Node.js has become an indispensable tool for developers worldwide, powering everything from frontend frameworks and build tools to backend servers and command-line utilities. Its versatility and efficiency have made it a cornerstone of modern web development and beyond. However, before you can leverage its capabilities, the fundamental question arises: is Node.js even installed on your computer? This article will guide you through the simple yet crucial process of verifying your Node.js installation, ensuring you’re ready to dive into the exciting world of JavaScript development.
The need to check for a Node.js installation is common for anyone embarking on a new development project, setting up a new machine, or troubleshooting existing setups. Whether you’re a seasoned developer or a budding enthusiast, confirming the presence and version of Node.js is often the very first step. This straightforward check can save you significant time and frustration by preventing errors that arise from attempting to run Node.js commands on a system where it’s not yet installed.

Why Checking Your Node.js Installation Matters
Before we delve into the “how,” let’s briefly touch upon the “why.” Knowing whether Node.js is installed and its current version offers several key advantages:
- Project Compatibility: Many development tools and frameworks are built with specific Node.js versions in mind. Checking your installation ensures you meet the prerequisites for your chosen technologies.
- Troubleshooting: If you encounter errors when running Node.js commands, the first troubleshooting step should always be to confirm its installation and version.
- Version Management: Understanding your Node.js version allows you to plan for updates or downgrades if required for specific projects.
- Onboarding: When setting up a new development environment or joining a team, verifying Node.js is a standard part of the initial setup process.
Essentially, this check is the gateway to unlocking the power of Node.js for your development endeavors.
Verifying Node.js Installation Across Different Operating Systems
The method for checking your Node.js installation is remarkably consistent across major operating systems: Windows, macOS, and Linux. This universality is one of the strengths of the command-line interface (CLI), which serves as our primary tool for this verification.
Using the Command Prompt or Terminal
The command-line interpreter is where you’ll execute the commands to interact with your system’s installed software.
On Windows:
-
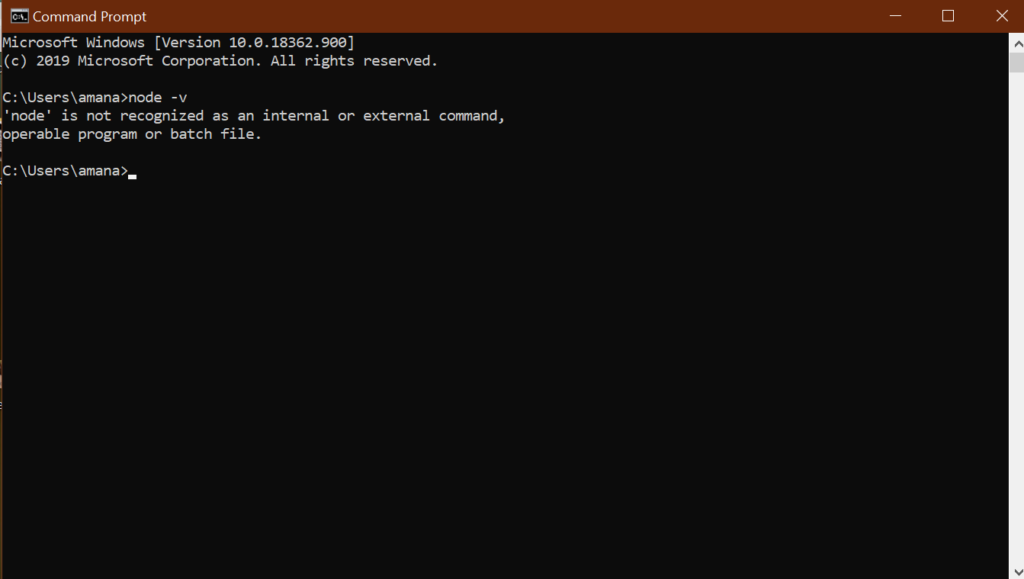
Open the Command Prompt: You can do this by searching for “cmd” in the Windows search bar and pressing Enter, or by typing
cmdinto the Run dialog box (Windows key + R). -
Execute the Node.js Version Command: Once the Command Prompt window is open, type the following command and press Enter:
node -vAlternatively, you can use:
node --versionIf Node.js is installed, you will see output displaying its version number, such as
v18.17.0. If Node.js is not installed, or if its executable is not in your system’s PATH, you will likely receive an error message like:'node' is not recognized as an internal or external command, operable program or batch file.
On macOS and Linux:
-
Open the Terminal: You can find the Terminal application in your Applications folder (usually within Utilities) or by searching for “Terminal” using Spotlight (Command + Space).
-
Execute the Node.js Version Command: In the Terminal window, type the following command and press Enter:
node -vOr, the equivalent:
node --versionSimilar to Windows, a successful installation will display the Node.js version number (e.g.,
v16.14.0). If Node.js is not found in your system’s PATH, you’ll typically see an error message such as:command not found: node
Important Note on PATH: The “PATH” is an environment variable that tells your operating system where to find executable files. If Node.js is installed but you’re still encountering “command not found” errors, it might indicate that the Node.js installation directory hasn’t been added to your system’s PATH. This is more common during manual installations or if Node.js was installed in a non-standard location.
Understanding the Output: What the Version Number Means
The output node -v or node --version provides crucial information beyond just confirmation. The version number, like v18.17.0, is broken down into major, minor, and patch versions:
- Major Version (e.g., 18): This number indicates significant changes, often including new features, breaking changes, and API updates. Major version changes are less frequent and signify substantial evolution.
- Minor Version (e.g., 17): This number represents new features that are generally backward-compatible.
- Patch Version (e.g., 0): This number signifies bug fixes and security updates that maintain backward compatibility.
For most development work, especially when starting out, the exact version might not be critical, but being aware of it helps in understanding compatibility requirements for various libraries and frameworks.
What to Do If Node.js is Not Installed
If your check reveals that Node.js is not installed on your system, don’t worry! Installing it is a straightforward process, and there are several recommended ways to do so. The choice of installation method often depends on your operating system and whether you anticipate needing to manage multiple Node.js versions for different projects.
Recommended Installation Methods
-
Using the Official Node.js Installer:
- Visit the Official Node.js Website: Go to nodejs.org.
- Download the Installer: You’ll typically see two download options:
- LTS (Long Term Support): This is the recommended version for most users, offering the most stable and reliable experience with extended support.
- Current: This version includes the latest features and is suitable for those who want to experiment with cutting-edge developments, but it may be less stable.
- Run the Installer: Download the appropriate installer for your operating system (Windows, macOS, or Linux) and follow the on-screen instructions. The installer typically handles setting up the Node.js runtime and adding it to your system’s PATH automatically.
- Verify Installation: After the installation is complete, reopen your Command Prompt or Terminal and run
node -vagain to confirm it’s installed.
-
Using a Version Manager (Recommended for Developers):
For developers who work on multiple projects that might require different Node.js versions, a Node Version Manager (NVM) is invaluable. NVM allows you to install, switch between, and manage multiple Node.js versions seamlessly.-
Node Version Manager (NVM) for macOS/Linux:
- Installation: Follow the installation instructions on the official NVM GitHub repository (https://github.com/nvm-sh/nvm). This usually involves running a script in your terminal.
- Installing Node.js with NVM: Once NVM is installed, you can install Node.js with commands like:
bash

nvm install --lts  # Installs the latest LTS version

nvm install 18     # Installs the latest Node.js v18.x.x
- Switching Versions: You can switch between installed versions using:
bash

nvm use 18
-
NVM for Windows: While the original NVM is for Unix-like systems, there’s a widely used alternative for Windows called
nvm-windows. You can find it on GitHub (https://github.com/coreybutler/nvm-windows). The commands are similar, allowing for easy installation and switching of Node.js versions.
Using a version manager is considered best practice for professional development environments as it provides flexibility and avoids version conflicts between projects.
-
Checking for npm and npx
When you install Node.js using the official installers or version managers, it typically comes bundled with npm (Node Package Manager) and often npx (Node Package Execute). These are essential tools for managing project dependencies and running packages without installing them globally.
Verifying npm Installation
npm is the default package manager for Node.js and is crucial for installing libraries and managing project dependencies.
-
Open your Command Prompt or Terminal.
-
Execute the npm Version Command: Type the following command and press Enter:
npm -vOr:
npm --versionIf npm is installed (which it should be with a standard Node.js installation), you’ll see its version number displayed (e.g.,
9.7.1). If you get an error, it might indicate an issue with your Node.js installation or PATH configuration.
Verifying npx Installation
npx is a tool that comes with npm 5.2+ and allows you to execute Node.js packages without having to install them globally. This is incredibly useful for running scaffolding tools or other one-off commands.
-
Open your Command Prompt or Terminal.
-
Execute the npx Version Command: Type the following command and press Enter:
npx -vOr:
npx --versionIf npx is available, you will see its version number. If not, ensure your npm version is up-to-date (using
npm install -g npm@latest) or that your Node.js installation is complete.
Conclusion
Confirming whether Node.js is installed on your system is a fundamental and straightforward process. By utilizing simple command-line commands like node -v, npm -v, and npx -v, you can quickly ascertain your Node.js environment’s status. Whether you’re a developer building the next big application, a system administrator managing server environments, or an enthusiast exploring new technologies, this initial check is a vital step.
If Node.js is not present, the official Node.js website offers robust installers, while version managers like NVM provide enhanced flexibility for developers working with multiple projects. Understanding how to check your Node.js installation and its associated tools ensures you’re well-equipped to harness the immense power and versatility that Node.js brings to the world of technology. With this knowledge, you can confidently move forward with your development journey, knowing your foundational tools are in place.
aViewFromTheCave is a participant in the Amazon Services LLC Associates Program, an affiliate advertising program designed to provide a means for sites to earn advertising fees by advertising and linking to Amazon.com. Amazon, the Amazon logo, AmazonSupply, and the AmazonSupply logo are trademarks of Amazon.com, Inc. or its affiliates. As an Amazon Associate we earn affiliate commissions from qualifying purchases.