In an increasingly digital world, the need for reliable, secure, and accessible data storage has never been more critical. From personal photo archives and media libraries to vital business documents and collaborative project files, our digital lives depend on robust infrastructure. While cloud services offer convenience, many users and organizations seek greater control, privacy, and performance for their critical data. This is where a Network Attached Storage (NAS) solution shines, and among the myriad options, TrueNAS stands out as a powerful, open-source platform offering enterprise-grade features without the prohibitive costs.
TrueNAS, developed by iXsystems, is a free and open-source operating system based on FreeBSD (TrueNAS CORE) or Linux (TrueNAS SCALE) that transforms commodity hardware into a sophisticated storage server. Leveraging the formidable ZFS file system, TrueNAS provides unparalleled data integrity, protection against data corruption, snapshotting capabilities, and flexible storage management. Whether you’re a tech enthusiast building a homelab, a small business seeking an affordable yet powerful file server, or simply someone looking to take control of their digital assets, installing TrueNAS is a strategic step. This guide will walk you through the entire process, from understanding the core concepts and gathering prerequisites to the hands-on installation and initial configuration, ensuring your data is not just stored, but truly safeguarded.
Understanding TrueNAS and Its Essential Prerequisites
Before embarking on the installation journey, it’s crucial to grasp what TrueNAS is, its various iterations, and the fundamental hardware and software requirements. Laying this groundwork will ensure a smooth installation and a stable, high-performing storage solution tailored to your needs.
What is TrueNAS? CORE vs. SCALE
TrueNAS is more than just a file server; it’s a comprehensive storage operating system built for data resilience and versatility. At its heart lies the ZFS file system, renowned for its transactional copy-on-write mechanism, data integrity checks, self-healing capabilities, and powerful snapshot features. This makes TrueNAS an ideal choice for protecting your most valuable digital assets, giving you peace of mind that your data is not only stored but also verified against corruption.
Historically, TrueNAS was known as FreeNAS, a FreeBSD-based system (now TrueNAS CORE) primarily focused on traditional NAS functions like file sharing (SMB/CIFS, NFS, AFP), iSCSI, and basic application plugins/jails. TrueNAS CORE is celebrated for its stability and maturity, making it an excellent choice for those seeking a rock-solid, dedicated storage server.
More recently, iXsystems introduced TrueNAS SCALE, which is based on Debian Linux. SCALE expands TrueNAS’s capabilities significantly by incorporating advanced features like Kubernetes for containerized applications, virtual machine orchestration via KVM, and improved hardware compatibility, especially with newer components. While CORE is perfect for a traditional, reliable NAS, SCALE offers a more versatile platform for those looking to integrate their storage with modern virtualization and container technologies. For this guide, we will primarily focus on the TrueNAS CORE installation process due to its simpler, more direct approach for beginners, while acknowledging that many steps are transferable to SCALE.
Hardware Requirements for Your TrueNAS Server
The performance and reliability of your TrueNAS system depend heavily on the underlying hardware. Investing in appropriate components upfront will prevent bottlenecks and ensure long-term stability.
- CPU: A 64-bit CPU (Intel or AMD) is essential. While TrueNAS itself isn’t incredibly CPU-intensive for basic file serving, a modern multi-core processor will provide better performance, especially if you plan to run plugins, jails, or virtual machines, or engage in heavy data transfers. For TrueNAS CORE, even a modest Intel Core i3 or AMD Ryzen 3 equivalent is often sufficient. For TrueNAS SCALE, a more powerful CPU is recommended due to its additional virtualization and containerization layers.
- RAM: This is arguably the most critical component for a TrueNAS system, especially with ZFS. ZFS utilizes RAM for its Adaptive Replacement Cache (ARC) to cache frequently accessed data, dramatically improving read performance. The general recommendation is a minimum of 8GB of RAM, but 16GB or more is highly recommended, especially if you have large storage pools or plan to run multiple services. ECC (Error-Correcting Code) RAM is strongly advised. ECC RAM detects and corrects data corruption on the fly, preventing “bit rot” and ensuring data integrity, which is paramount when dealing with ZFS. While not strictly mandatory for a small home setup, it’s a best practice for any system where data integrity is critical.
- Storage Drives:
- Boot Drive: TrueNAS needs a dedicated boot drive, separate from your data drives. This can be a small SSD (recommended for speed and reliability, e.g., 16GB or 32GB) or even a sturdy USB drive (though SSDs are far more reliable and performant for OS installation). Do NOT use the same drives you plan to use for your data pools.
- Data Drives: These are the drives that will hold your actual data. TrueNAS excels with multiple drives configured in a ZFS pool for redundancy (e.g., RAIDZ1, RAIDZ2, Mirror). For optimal performance and data protection, use drives of the same size and type. For critical data, enterprise-grade HDDs or high-end SSDs are recommended. Plan for at least two drives for mirroring (basic redundancy) or three for RAIDZ1.
- Network Interface Card (NIC): A Gigabit Ethernet port is a minimum requirement to ensure fast data transfer across your network. For higher performance or specific use cases like virtualization or multiple clients, consider a system with multiple Gigabit NICs or a 10 Gigabit Ethernet card.
- Motherboard and Case: Ensure your motherboard has enough SATA ports (or an HBA card) for all your planned data drives and the boot drive. Adequate cooling and power supply are also essential for a system that will likely run 24/7.
Software and Tools You’ll Need
Beyond the physical hardware, a few software tools are necessary to prepare your installation media.
- TrueNAS ISO File: The operating system image itself, downloaded from the official TrueNAS website.
- USB Drive (8GB or larger): This will be used to create your bootable TrueNAS installer.
- USB Creator Tool: Software like Rufus (for Windows) or BalenaEtcher (for Windows, macOS, Linux) will help you write the ISO image to the USB drive, making it bootable.
- Monitor, Keyboard, and Mouse: You’ll need these temporarily to navigate the BIOS/UEFI settings and the TrueNAS installer on the server machine.
Preparing Your TrueNAS Installation Media
With your hardware ready and a clear understanding of TrueNAS, the next step is to create a bootable USB drive that will initiate the installation process on your server. This involves downloading the correct TrueNAS image and then “burning” it onto a USB stick.
Downloading the TrueNAS ISO
The first step is to obtain the TrueNAS installation image. Always download TrueNAS from the official iXsystems website (www.truenas.com) to ensure you’re getting the legitimate, uncorrupted software.
- Navigate to the Downloads Page: On the TrueNAS website, look for the “Download” or “Products” section.
- Choose Your Version: You’ll typically be presented with options for TrueNAS CORE and TrueNAS SCALE.
- If you’re building a traditional, stable NAS for file sharing and basic services, choose TrueNAS CORE.
- If you’re interested in containerization, virtualization, or need broader hardware support, consider TrueNAS SCALE.
- For this guide, we’ll assume you’ve chosen TrueNAS CORE for its straightforward installation path.
- Initiate Download: Select the appropriate ISO file and begin the download. The file size can be several gigabytes, so ensure you have a stable internet connection.
Creating a Bootable USB Installer
Once the TrueNAS ISO file is downloaded, you need to write it to a USB drive, transforming it into a bootable installation medium. This process will erase all data on the USB drive, so ensure you have backed up any important files from it beforehand.
- Insert USB Drive: Plug an 8GB or larger USB drive into your computer.
- Launch USB Creator Tool:
- For Windows (using Rufus):
- Download and open Rufus (it’s a portable executable).
- Under “Device,” select your USB drive. Double-check that you’ve selected the correct drive to avoid accidentally formatting another storage device.
- Under “Boot selection,” click “SELECT” and browse to the TrueNAS ISO file you downloaded.
- Leave other options at their default settings (e.g., “Standard Windows installation” for partition scheme might change, but Rufus usually auto-detects what’s best for ISOs).
- Click “START.” You might be prompted to confirm data loss or for various download options; proceed as necessary.
- Wait for the process to complete.
- For Windows, macOS, or Linux (using BalenaEtcher):
- Download and install BalenaEtcher.
- Open BalenaEtcher.
- Click “Flash from file” and select your TrueNAS ISO.
- Click “Select target” and choose your USB drive. Again, verify you’ve selected the correct drive.
- Click “Flash!”
- Wait for the process to complete and verify.
- For Windows (using Rufus):
- Eject USB Drive: Once the tool reports success, safely eject the USB drive from your computer. Your TrueNAS installation media is now ready.
The TrueNAS Installation Process
With your bootable USB drive prepared, you’re ready to physically install TrueNAS onto your chosen server hardware. This stage involves booting from the USB drive, navigating the text-based installer, and performing the core operating system installation.
Booting from the Installation Media
This is the first interaction with your server hardware after preparing the USB.
- Connect Peripherals: Connect a monitor, keyboard, and mouse to your TrueNAS server.
- Insert USB Installer: Plug the TrueNAS bootable USB drive into an available USB port on your server.
- Power On and Access BIOS/UEFI: Power on your server. As it starts up, repeatedly press the key designated by your motherboard manufacturer to enter the BIOS or UEFI setup menu. Common keys include
Delete,F2,F10,F12, orEsc. - Set Boot Priority:
- Navigate to the “Boot” section or “Boot Order” in your BIOS/UEFI settings.
- Change the boot order to prioritize booting from your USB drive. It might be listed under “Removable Devices,” “USB HDD,” or the specific brand/model of your USB drive.
- Save changes and exit the BIOS/UEFI. The system should now reboot and attempt to boot from the TrueNAS USB installer.
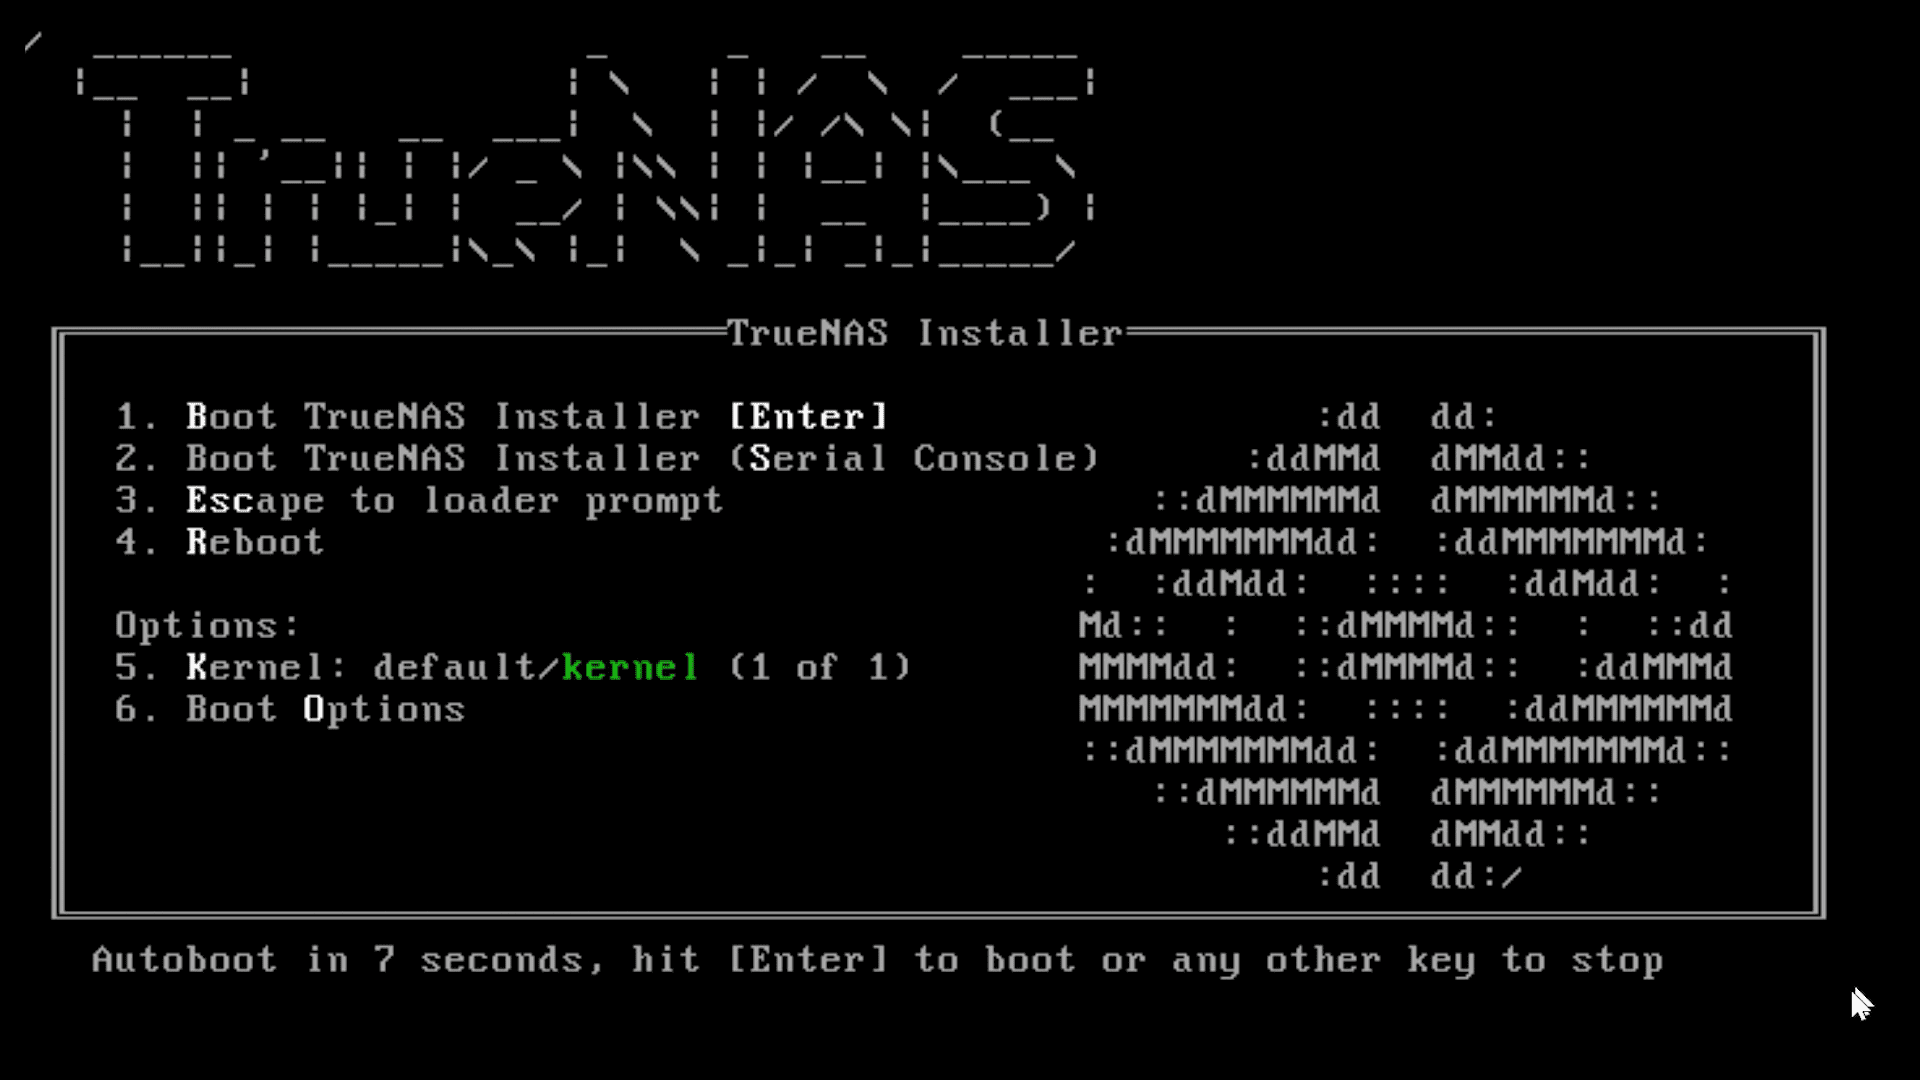
- TrueNAS Boot Menu: If successful, you will see a TrueNAS boot menu. Select the default option, which is usually “Boot TrueNAS Installer” or similar.
Navigating the TrueNAS Installer
The TrueNAS installer is a text-based interface. Use the arrow keys, Tab key, and Enter key to navigate and make selections.
- Welcome Screen: After the installer loads, you’ll see a welcome screen.
- Select “Install/Upgrade”: Choose the “1) Install/Upgrade” option and press Enter.
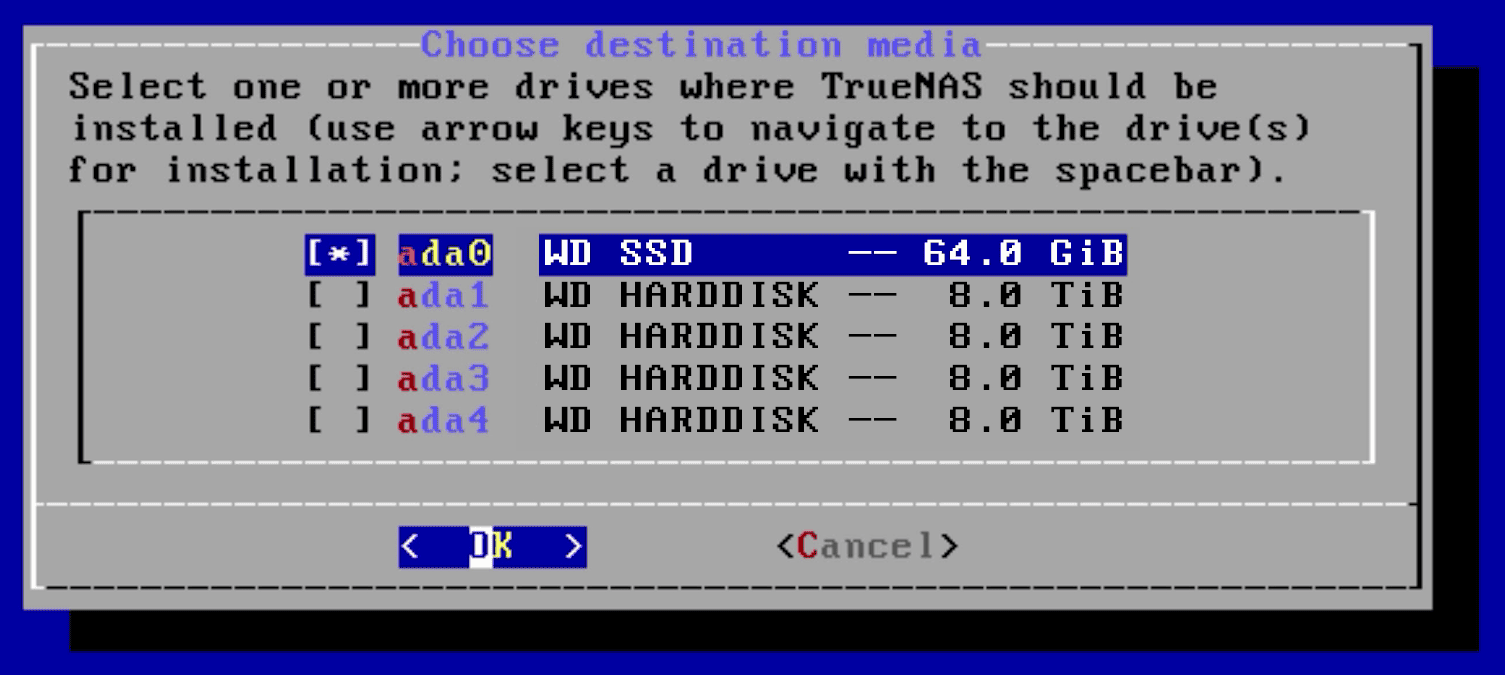
- Select Installation Drive: This is a crucial step. The installer will list all detected storage devices. Carefully select the dedicated boot drive you intend to install TrueNAS on (e.g., your small SSD or USB drive), NOT your large data drives. Using the spacebar to select and deselect drives. You can select multiple drives for a mirrored boot device, which is an excellent practice for redundancy of your OS. Once selected, press Enter.
- Confirm Installation: A warning message will appear, informing you that all data on the selected drive(s) will be erased. Read this carefully. If you are absolutely certain you’ve chosen the correct drive(s), select “Yes” and press Enter to proceed.
- Set Root Password: You’ll be prompted to set a strong
rootpassword. This is the administrative password for your TrueNAS system. Choose a complex password and remember it, as you’ll need it to log into the web interface later. Type it in twice to confirm. - Installation Progress: The installer will now proceed to copy files and set up TrueNAS on your boot drive. This process can take several minutes depending on the speed of your boot drive.
- Installation Complete: Once the installation is finished, you’ll see a message indicating success.
Post-Installation First Boot and Initial Configuration
The installation on the boot drive is complete, but there are a few more steps to get TrueNAS up and running for the first time.
- Remove USB Installer: When prompted, remove the TrueNAS installation USB drive from the server. This is critical to ensure the server boots from the newly installed TrueNAS OS.
- Reboot System: Choose the “3) Reboot System” option (or let it reboot automatically if configured) and press Enter.
- Boot into TrueNAS: The server will reboot. This time, it should boot directly into the newly installed TrueNAS operating system on your dedicated boot drive. You’ll see several boot messages scroll by.
- TrueNAS Console Menu: After booting, you’ll be presented with the TrueNAS console setup menu. This displays vital information, most importantly the IP address assigned to your TrueNAS server by your network’s DHCP server. Make a note of this IP address.
- Access Web UI: From another computer on the same network, open a web browser and enter the noted IP address into the address bar. This will take you to the TrueNAS web interface – your primary tool for managing your NAS.
Initial Configuration and Data Pool Setup
The TrueNAS operating system is now installed, but it’s essentially an empty shell. The next crucial steps involve accessing the powerful web interface and configuring your storage pools (where your data will actually live) and setting up network shares to make your files accessible.
Accessing the TrueNAS Web Interface
The web interface is your command center for TrueNAS. It provides a graphical way to manage every aspect of your system, from storage to users and network services.
- Open Browser and Enter IP: On a computer connected to the same local network as your TrueNAS server, open your preferred web browser (Chrome, Firefox, Edge, etc.). In the address bar, type the IP address you noted from the TrueNAS console screen (e.g.,
http://192.168.1.100). - Login: You’ll be presented with the TrueNAS login screen.
- Username:
root - Password: The strong password you set during the installation process.
- Username:
- Welcome Dashboard: After successfully logging in, you’ll be greeted by the TrueNAS dashboard, which provides an overview of your system’s status, resource utilization, and recent alerts. Take a moment to familiarize yourself with the layout.
Creating Your First Storage Pool (ZFS)
This is where you define how your data drives will be used and protected. TrueNAS leverages ZFS pools for this, offering incredible flexibility and data integrity.
- Navigate to Storage > Pools: In the left-hand navigation pane of the TrueNAS web interface, click on “Storage,” then “Pools.”
- Add a New Pool: Click the “Add” button (or “Create Pool” if it’s your first time).
- Choose “Create New Pool”: Select this option and click “CREATE POOL.”
- Name Your Pool: Provide a descriptive name for your storage pool (e.g.,
DataPool,MediaStorage). - Select Data Drives:
- In the “Data VDevs” section, you will see a list of your available physical drives.
- Drag and drop the drives you want to include in this pool from the “Available Disks” list to the “Data VDevs” section.
- Important: Only select your data drives here. Do NOT select your boot drive.
- Choose a VDev Layout (RAID Configuration): This is critical for data redundancy and performance. TrueNAS offers several ZFS VDev layouts:
- Stripe: Combines drives into one large volume without redundancy. Not recommended for valuable data.
- Mirror: Two or more drives are mirrored, meaning data is written identically to all drives in the mirror. Provides redundancy (if one drive fails, data is safe on the other). Excellent for performance. Requires at least 2 drives.
- RAIDZ1: Similar to RAID5, it can sustain a single drive failure without data loss. Requires at least 3 drives.
- RAIDZ2: Similar to RAID6, it can sustain two drive failures without data loss. Recommended for larger pools and more critical data. Requires at least 4 drives.
- RAIDZ3: Can sustain three drive failures. For extremely critical applications. Requires at least 5 drives.
- Recommendation for Beginners: For a basic home setup, a Mirror (with 2 drives) or RAIDZ1 (with 3-4 drives) offers a good balance of redundancy and usable capacity. For anything more critical, RAIDZ2 is often preferred.
- Review and Create: Once you’ve selected your drives and VDev layout, review the summary. Check the “Confirm Data Loss” box (as the drives will be formatted). Click “CREATE POOL.” The process will take some time, especially for larger drives.
Setting Up Shares and Access Permissions
Now that you have a storage pool, you need to create “shares” so that other devices on your network can access the data stored on TrueNAS. You’ll also set up users and permissions to control who can access what.
- Create a Dataset (Optional but Recommended):
- A dataset is a file system within a ZFS pool, offering granular control over properties like quotas, snapshots, and permissions. It’s good practice to create datasets for different types of data (e.g.,
Media,Documents,Backups). - Go to Storage > Pools. Click the three dots next to your newly created pool and select “Add Dataset.”
- Give it a name (e.g.,
Media), choose a desired share type (Generic, SMB, NFS, etc.), and configure other options as needed. Click “SUBMIT.”
- A dataset is a file system within a ZFS pool, offering granular control over properties like quotas, snapshots, and permissions. It’s good practice to create datasets for different types of data (e.g.,
- Create Users and Groups:
- Navigate to Accounts > Users. Click “ADD.”
- Create a user account for yourself and any other individuals who need access to the NAS. Set a username, full name, password, and optionally define a home directory.
- You can also create custom groups under Accounts > Groups to manage permissions more efficiently.
- Configure Network Shares:
- SMB (Windows Shares): This is the most common protocol for Windows and macOS clients.
- Go to Sharing > Windows Shares (SMB). Click “ADD.”
- Browse to the path of your dataset (e.g.,
/mnt/DataPool/Media). - Give it a descriptive name.
- Adjust permissions as needed (e.g., allow guest access, or restrict to specific users/groups).
- Click “SUBMIT.” Ensure the SMB service is running via Services > SMB and toggle it on if it’s not.
- NFS (Unix/Linux Shares): For Unix-like systems.
- Go to Sharing > Unix Shares (NFS). Click “ADD.”
- Browse to the path.
- Configure authorized networks/IPs and other options.
- Click “SUBMIT.” Ensure the NFS service is running.
- AFP (Apple Filing Protocol): For older macOS clients (SMB is generally preferred now).
- Go to Sharing > Apple Shares (AFP). Click “ADD.”
- Browse to the path.
- Click “SUBMIT.” Ensure the AFP service is running.
- SMB (Windows Shares): This is the most common protocol for Windows and macOS clients.
- Set File System Permissions (ACLs): For granular control, you may need to adjust the underlying file system permissions (ACLs).
- Go to Storage > Pools. Click the three dots next to your dataset and select “Edit Permissions.”
- You can set owner, group, and specific ACL entries for users/groups to define read, write, and execute access. This is crucial for securing your data.
Essential Post-Installation Steps and Best Practices
Your TrueNAS server is now operational and serving data. However, a robust storage solution requires ongoing care and attention. These post-installation steps and best practices are vital for maintaining system health, ensuring data integrity, and expanding functionality.
Updating TrueNAS
Regularly updating your TrueNAS system is paramount for security, stability, and access to new features.
- Check for Updates: In the TrueNAS web interface, navigate to “System” > “Update.” The system will check for available updates.
- Download and Apply Updates: If an update is available, click “Download Updates.” Once downloaded, click “Apply Pending Updates.”
- Reboot (If Required): Most major updates require a system reboot. Follow the prompts to restart your TrueNAS server after the update is applied.
- Review Release Notes: Before updating, it’s a good practice to review the release notes for the new version to be aware of any significant changes, new features, or potential issues.
Monitoring and Maintenance
Proactive monitoring and routine maintenance are key to preventing data loss and ensuring optimal performance.
- System Health Monitoring:
- Regularly check the TrueNAS dashboard for overall system health, CPU usage, RAM usage, and network activity.
- Configure email alerts (
System > Email) to receive notifications about critical events (e.g., drive failures, pool errors, high CPU usage).
- SMART Monitoring for Drives: ZFS inherently monitors drive health, but SMART (Self-Monitoring, Analysis, and Reporting Technology) tests provide early warnings of impending drive failures.
- Go to Storage > Disks.
- For each disk, you can schedule regular “SMART tests” (short and long tests). Configure these to run periodically, and ensure email alerts are set up to notify you of any issues.
- Pool Scrubs: ZFS “scrubs” are background operations that read all data and metadata in a pool to verify checksums and detect any silent data corruption (bit rot). If corruption is found, ZFS will attempt to repair it using redundant copies if available.
- Go to Storage > Pools. Click the three dots next to your pool and select “Scrub Task.”
- Schedule a scrub task to run monthly or quarterly, depending on your data criticality and hardware.
- Snapshots and Replication: These are powerful ZFS features for data recovery and disaster preparedness.
- Snapshots: Create point-in-time copies of your datasets. Snapshots are incredibly efficient (they only store changes) and allow you to quickly roll back to a previous state if files are accidentally deleted or corrupted. Configure automatic snapshot tasks (
Storage > Snapshots). - Replication: Replicate your snapshots to another TrueNAS system (or even another pool on the same system) for off-site backup or disaster recovery. This is a robust form of backup that protects against catastrophic hardware failure or environmental disasters.
- Snapshots: Create point-in-time copies of your datasets. Snapshots are incredibly efficient (they only store changes) and allow you to quickly roll back to a previous state if files are accidentally deleted or corrupted. Configure automatic snapshot tasks (
- Backups of Non-Redundant Data: While TrueNAS pools with redundancy protect against drive failures, they are NOT a substitute for a comprehensive backup strategy. Backups protect against accidental deletion, ransomware, or the complete loss of your TrueNAS server.
- Implement a 3-2-1 backup strategy: at least three copies of your data, stored on two different media types, with one copy off-site.
- Consider using tools like rsync or Cloud Sync tasks within TrueNAS to push critical data to external drives, another NAS, or cloud storage services.
Enhancing Your TrueNAS Setup
TrueNAS is highly extensible. Once your core storage is stable, you can explore ways to expand its capabilities.
- Plugins/Jails (TrueNAS CORE): TrueNAS CORE offers a robust plugin system for easily installing popular applications in isolated environments (jails). Examples include:
- Plex Media Server: Organize and stream your media library.
- Nextcloud: Create your private cloud storage and collaboration platform.
- Transmission/Deluge: BitTorrent clients.
- Home Assistant: For home automation enthusiasts.
- Virtual Machines (TrueNAS SCALE / Advanced CORE):
- TrueNAS SCALE, in particular, excels at running virtual machines directly on the server, consolidating your hardware.
- Even TrueNAS CORE has basic VM capabilities, though SCALE’s KVM integration is more advanced.
- Network Configuration:
- Link Aggregation (LAGG): Combine multiple network interfaces into a single logical interface for increased bandwidth or failover redundancy.
- VLANs: Segment your network for improved security and organization.
- UPS Configuration: Connect an Uninterruptible Power Supply (UPS) to your TrueNAS server. Configure TrueNAS to gracefully shut down in the event of a power outage, protecting your data from corruption due to sudden power loss. TrueNAS has built-in support for many UPS devices.
Conclusion
Installing TrueNAS is a transformative step towards gaining complete control over your digital infrastructure. By following this comprehensive guide, you’ve not only set up a powerful Network Attached Storage solution but also established a foundation for unparalleled data integrity and availability. From the meticulous selection of hardware to the nuanced configuration of ZFS pools and network shares, each stage plays a vital role in safeguarding your precious data.
The journey with TrueNAS doesn’t end with installation. Its open-source nature, coupled with the robust ZFS file system, provides a platform for continuous growth and customization. Embrace the ongoing maintenance, leverage the advanced features like snapshots and replication, and explore the vast ecosystem of plugins and virtualization options to tailor your TrueNAS server to your evolving needs.
In an era where digital security and data sovereignty are paramount, TrueNAS empowers you to build a personal or small business “data brand” – a reputation for reliability, accessibility, and uncompromised integrity. By investing your time in this setup, you’re not just storing data; you’re securing your digital future, gaining peace of mind, and making a smart “money” move by choosing a cost-effective, enterprise-grade solution over proprietary alternatives. Congratulations on taking this crucial step towards mastering your data storage with TrueNAS!
aViewFromTheCave is a participant in the Amazon Services LLC Associates Program, an affiliate advertising program designed to provide a means for sites to earn advertising fees by advertising and linking to Amazon.com. Amazon, the Amazon logo, AmazonSupply, and the AmazonSupply logo are trademarks of Amazon.com, Inc. or its affiliates. As an Amazon Associate we earn affiliate commissions from qualifying purchases.