
In the digital age, while paperless offices are an aspiration, the trusty laser printer remains a critical piece of technology for countless businesses and home users alike. From essential documents to vibrant reports, the ability to produce high-quality hard copies is indispensable. Central to this capability is the toner cartridge – the heart of any laser printer. Understanding how to correctly install and manage your toner isn’t just a basic maintenance task; it’s a fundamental skill for anyone operating this essential office gadget. This guide delves deep into the process, ensuring your printer operates at peak efficiency, consistently delivering crisp, professional output.

Understanding Toner Cartridges and Your Printer Ecosystem
Before diving into the mechanics of installation, it’s crucial to grasp the technology behind toner and how it integrates with your printer. Toner isn’t ink; it’s a fine, dry powder composed of plastic particles, carbon, and other agents. This powder is electrostatically charged, melted by a fuser unit, and bonded to paper, creating durable, high-resolution prints. Recognizing the nuances of your specific printer model and its corresponding toner is the first step towards seamless maintenance.
The Anatomy of a Toner Cartridge: OEM vs. Compatible
A toner cartridge is a self-contained unit comprising the toner powder, a developer unit, and often a drum unit, though some printers have separate drum and toner components. This distinction is vital for installation and troubleshooting.
-
OEM (Original Equipment Manufacturer) Cartridges: These are produced by the printer’s manufacturer (e.g., HP, Canon, Brother, Samsung). They are designed for optimal compatibility, reliability, and print quality, often offering advanced features or specific chemical compositions tailored to the printer. While typically more expensive, they guarantee performance and often come with manufacturer warranties.
-
Compatible/Remanufactured Cartridges: Compatible cartridges are new cartridges made by third-party manufacturers, designed to work with specific printer models. Remanufactured cartridges are original OEM cartridges that have been recycled, cleaned, refilled with new toner, and had worn parts replaced. Both options generally offer a lower cost per page. However, quality can vary significantly between brands, potentially leading to issues like lower page yield, print quality inconsistencies, or even printer damage in rare cases. For critical applications, OEM often remains the safer bet, but high-quality compatible options can offer excellent value for everyday use. Understanding the trade-offs helps in making an informed choice for your technological ecosystem.
Identifying Your Printer’s Needs: Laser and Toner Specifics
While the term “printer” is broad, “toner” specifically refers to laser printers. Inkjet printers use liquid ink cartridges. A common mistake is to confuse the two. Laser printers are known for their speed, efficiency, and cost-effectiveness for high-volume text printing, making them staples in offices and homes requiring frequent document production. Each laser printer model has a unique cartridge design and often specific toner formulations. Always consult your printer’s manual or the manufacturer’s website to identify the precise toner cartridge model number required. Using the incorrect cartridge, even if it physically fits, can lead to printer malfunction, poor print quality, or irreparable damage to the internal mechanisms. This due diligence is a critical aspect of responsible tech maintenance.
The Importance of Genuine Toner and Its Alternatives
The debate between genuine OEM toner and third-party alternatives extends beyond cost. OEM toners are engineered to work in harmony with your printer’s fuser, drum, and other components. This synergy ensures consistent print quality, proper page yields, and the longevity of your printer. Using non-OEM toner, especially low-quality options, can sometimes lead to:
-
Reduced Print Quality: Streaks, smudges, faded prints, or inconsistent color.
-
Lower Page Yield: The cartridge may run out of toner faster than advertised.
-
Printer Damage: Toner leaks, fuser unit issues, or damage to the drum unit due to incompatible toner properties.
-
Voided Warranty: Some printer manufacturers may void the warranty if non-OEM consumables are used and cause damage.
While cost savings are attractive, weigh them against potential risks and the value of consistent, high-quality output. For many tech users, a balance is found in well-reviewed, reputable third-party brands that offer warranties on their products and often match the performance of OEMs in specific scenarios.
Preparing for a Smooth Toner Installation
A successful toner installation isn’t just about snapping a new cartridge into place; it involves a brief but crucial preparation phase. Taking these preliminary steps ensures safety, cleanliness, and efficiency, minimizing potential headaches down the line.
Safety First: Precautions and Best Practices
Toner powder, while not inherently toxic in small exposures, can be an irritant. It’s also incredibly fine and can become airborne, making a mess and potentially affecting air quality.
-
Power Down: Always turn off your printer and unplug it from the power source before beginning. This prevents accidental electrocution and protects the printer’s delicate electronic components.
-
Ventilation: Work in a well-ventilated area to minimize inhalation of toner particles.
-
Protective Gear: Consider wearing disposable gloves to prevent toner from getting on your hands. Toner stains easily and can be difficult to remove from skin and clothing.
-
Surface Protection: Lay down old newspapers or a disposable mat to protect your workspace from potential spills. Toner is notoriously difficult to clean from surfaces like carpets or upholstery.
Gathering Your Tools (or Lack Thereof)
One of the beauties of modern printer design is the minimal need for specialized tools during toner installation. Most installations are tool-free. However, having a few simple items nearby can be beneficial:
-
A Damp Cloth: For wiping away any accidental toner spills on the printer’s exterior (avoid using on internal components).
-
A Small Brush or Canned Air (Optional): To gently clean dust or loose toner from accessible areas, being extremely careful not to damage internal components or blow toner deeper into the machine.
-
The New Toner Cartridge: Ensure it’s the correct model for your printer.
-
The Printer Manual: If you’re unsure about specific steps, the manual is your authoritative guide.
Locating the Toner Compartment
The location of the toner compartment varies by printer manufacturer and model.
-
Front Access: Many smaller laser printers have a front-loading tray that, once opened, reveals the toner and/or drum unit.
-
Top Access: Some larger office printers may require opening a top lid.
-
Side Access: Less common, but some specialized units might have side-panel access.
Always refer to your printer’s manual for the exact location and opening mechanism. Force should never be required. If a panel feels stuck, re-check the manual for latches or buttons that need to be pressed. Observing and understanding these design choices is part of comprehending your tech’s physical interface.
Step-by-Step Toner Installation Process
With preparations complete, the actual installation of the toner cartridge is a straightforward process. Following these steps carefully will ensure proper seating and functionality.
Removing the Old Cartridge
-
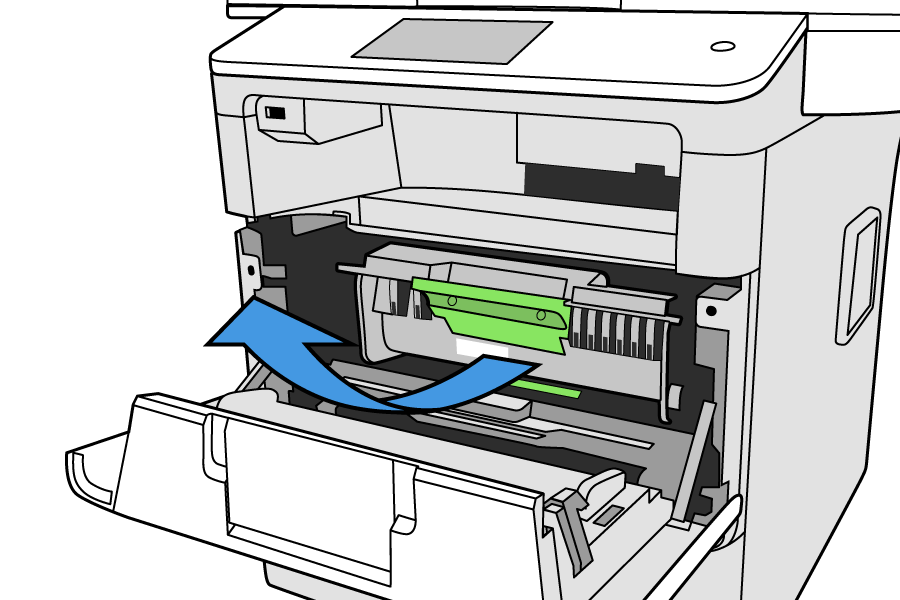
Open Access Panel: Gently open the appropriate access panel(s) on your printer as identified in the preparation phase.
-
Locate Old Cartridge: The old toner cartridge will typically be visible and may have a handle or grips.
-
Release Mechanism: Some printers have a release lever or button that needs to be pressed before the cartridge can be removed. Consult your manual.
-
Pull Out Gently: Grasp the old cartridge by its designated handle (if applicable) and pull it straight out of the printer. Avoid tilting it, as this can cause residual toner powder to spill.
-
Place Aside: Immediately place the old cartridge into a plastic bag or onto your protected surface to contain any potential leaks.
Preparing the New Cartridge
-
Unpack: Carefully remove the new toner cartridge from its packaging. Avoid touching the drum or optical components if they are exposed on the cartridge.
-
Remove Protective Seals: Most new cartridges come with protective strips, tabs, or covers. These must be removed before installation. There’s usually a brightly colored tab or loop that you pull to remove a sealing strip. Ensure all tape and plastic covers are removed according to the instructions provided with the cartridge. Failing to do so is a common cause of printer errors or poor print quality.
-
Gently Rock (If Instructed): Some manufacturers recommend gently rocking the cartridge horizontally a few times to distribute the toner powder evenly inside. This can prevent uneven print density. Do not shake vigorously.
Inserting the New Cartridge Securely
-
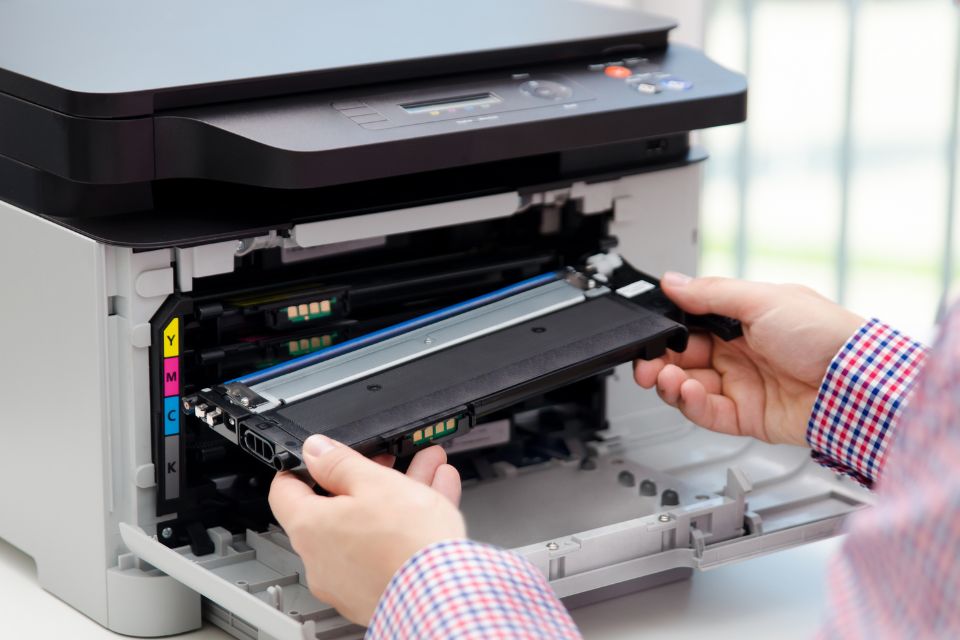
Align: Carefully align the new toner cartridge with the tracks or slots inside the printer’s compartment. Many cartridges have guides that ensure they are inserted in the correct orientation.
-
Slide In: Gently slide the cartridge into the printer until it clicks firmly into place or until you feel it seat securely. Do not force it. If it doesn’t slide easily, remove it and re-align. Forcing it can damage both the cartridge and the printer.
-
Close Access Panel: Once the cartridge is seated, close the access panel(s) until they latch securely.
Post-Installation Checks and Calibration
-
Power On: Plug in your printer and power it on.
-
Printer Self-Test: The printer will typically perform a self-initialization or calibration cycle, which may involve whirring sounds or status lights. Allow this process to complete.
-
Print a Test Page: Once the printer is ready, print a test page or a diagnostic page from your computer or directly from the printer’s control panel. This confirms that the toner is installed correctly and that print quality is satisfactory.
-
Driver Update (Rare): In very rare cases, especially with new or remanufactured cartridges, your computer’s printer driver might need a minor update to recognize the new consumable. This is more common with non-OEM cartridges and specific printer models.
Troubleshooting Common Toner-Related Issues
Even with careful installation, technology can occasionally present challenges. Knowing how to diagnose and resolve common toner-related issues can save time and prevent unnecessary service calls, empowering you as a tech user.
Print Quality Problems (Streaks, Faded Prints, Smudges)
-
Faded or Light Prints: The most common culprit is a low toner level. If it’s a new cartridge, ensure all sealing strips were removed and try gently rocking it again to redistribute toner. A dirty drum unit (if separate from the toner) or fuser unit could also be responsible.
-
Streaks or Lines: This often indicates an issue with the drum unit, a dirty fuser, or a defect in the toner cartridge itself. If the drum is integrated into the toner, replacing the cartridge should resolve it. If separate, the drum unit might need cleaning or replacement.
-
Smudges or Uneven Prints: Excess toner might be leaking, or the fuser unit isn’t heating correctly, preventing the toner from bonding properly to the paper. Check for toner spills within the printer.
Printer Not Recognizing New Cartridge
This is a frustrating, but often resolvable, issue.
-
Reseat the Cartridge: The most common fix is to simply remove the new cartridge and re-insert it, ensuring it clicks firmly into place.
-
Restart Printer and Computer: Sometimes a full power cycle of both the printer and the computer can resolve communication issues.
-
Check Chip Contact: Some cartridges have a microchip that communicates with the printer. Ensure this chip is clean and making proper contact with the printer’s sensors. If using a compatible/remanufactured cartridge, a faulty chip is a possibility.
-
Firmware/Driver Update: Occasionally, a printer firmware update or a new driver for your operating system might be necessary, especially if the printer manufacturer has updated its recognition protocols.
Toner Spills and Cleanup
Toner spills are messy but manageable.
-
DO NOT Use a Regular Vacuum Cleaner: The fine toner particles can become airborne, and the static charge can damage vacuum cleaner motors or even cause small explosions in rare, concentrated cases.
-
Use a Toner Vacuum or Damp Cloth: Invest in a specialized toner vacuum (designed to handle fine particles and static) if spills are frequent. For minor spills, a slightly damp, lint-free cloth can carefully wipe up the powder. Avoid rubbing, as this can embed the toner.
-
Patience and Prevention: The best strategy is prevention. Handle cartridges carefully, especially old ones, and work on a protected surface.
Maximizing Toner Lifespan and Printer Longevity
Beyond just installation, understanding best practices for toner and printer maintenance contributes significantly to the overall lifespan and efficiency of your technological investment.
Optimizing Print Settings
Adjusting your printer settings can significantly impact toner consumption:
-
Draft Mode: For internal documents or drafts, use “draft” or “toner-saver” mode. These settings use less toner per page while still producing readable text.
-
Print Preview: Always use print preview to avoid printing unnecessary pages.
-
Monochrome Printing: For documents that don’t require color, ensure you’re printing in black and white or grayscale.
-
Font Choice: Some fonts (e.g., Arial, Calibri) are more toner-efficient than others (e.g., Times New Roman, Comic Sans) due to their stroke thickness.
Proper Storage of Toner Cartridges
Toner cartridges are sensitive to environmental conditions.
-
Original Packaging: Store new, unopened cartridges in their original, sealed packaging to protect them from light and humidity.
-
Temperature and Humidity: Store in a cool, dry place, away from direct sunlight or extreme temperature fluctuations. High humidity can cause toner powder to clump, while excessive heat can degrade the toner’s properties.
-
Orientation: Store cartridges horizontally to keep the toner evenly distributed.
Regular Printer Maintenance
While toner installation is periodic, general printer upkeep extends its life:
-
Clean Exterior: Regularly wipe down the printer’s exterior to prevent dust buildup.
-
Internal Cleaning: Periodically run the printer’s internal cleaning cycles (often found in the printer’s menu or utility software). This can help clear residual toner or dust from the drum and fuser areas.
-
Check for Obstructions: Ensure no paper clips, staples, or other foreign objects have fallen into the paper path.
Environmental Considerations: Recycling Toner
As responsible tech users, disposing of old toner cartridges correctly is paramount. Toner contains plastics, metals, and fine chemical powders that are harmful to the environment if sent to landfills.
-
Manufacturer Programs: Many printer manufacturers (HP, Canon, Brother, Lexmark, etc.) offer free recycling programs for their empty toner cartridges. Visit their websites for details on how to return them.
-
Retailer Drop-Offs: Office supply stores (e.g., Staples, Office Depot) often have in-store recycling programs for used cartridges.
-
Specialized Recyclers: Several companies specialize in recycling printer consumables, some even offering monetary incentives for returning empty cartridges.
By integrating proper installation techniques with a broader understanding of printer maintenance, troubleshooting, and environmental responsibility, you not only ensure consistent, high-quality output but also extend the life of your valuable tech equipment. This holistic approach transforms a simple task like “how to install toner” into an act of informed and efficient technology management.
aViewFromTheCave is a participant in the Amazon Services LLC Associates Program, an affiliate advertising program designed to provide a means for sites to earn advertising fees by advertising and linking to Amazon.com. Amazon, the Amazon logo, AmazonSupply, and the AmazonSupply logo are trademarks of Amazon.com, Inc. or its affiliates. As an Amazon Associate we earn affiliate commissions from qualifying purchases.