
Java, a cornerstone of modern computing, powers a vast array of applications, from enterprise-level systems and mobile apps to web servers and scientific tools. Its “write once, run anywhere” philosophy has made it a perpetually relevant and widely adopted programming language. Whether you’re a budding developer eager to build your first application, a seasoned professional setting up a new development environment, or a tech enthusiast looking to understand the backbone of many digital tools, knowing how to install Java is a fundamental skill. This guide will walk you through the process, covering essential steps, considerations, and best practices, drawing from the breadth of topics our website explores – from the latest tech trends to the strategies behind successful brands and the financial implications of your tech choices.

Understanding Java: More Than Just a Programming Language
Before diving into the installation process, it’s crucial to understand what Java truly represents and why it remains so important in the ever-evolving tech landscape. Java is not just a programming language; it’s a platform. This means it comprises not only the language itself but also a set of tools, libraries, and runtime environments that enable developers to create and execute software.
The Java Ecosystem: JDK, JRE, and JVM
The Java ecosystem can seem complex at first, but understanding its core components will demystify the installation process.
Java Development Kit (JDK): For the Creators
If your goal is to develop Java applications, you’ll need the Java Development Kit (JDK). The JDK is a comprehensive package that includes everything a developer needs. This means it contains not just the tools to run Java programs but also tools to compile, debug, and package them. Think of it as the artist’s studio, complete with brushes, paints, canvases, and instructions.
The JDK includes:
- Java Runtime Environment (JRE): This is the part that actually runs Java programs.
- Compiler (javac): This translates your human-readable Java code into bytecode, which the Java Virtual Machine (JVM) can understand.
- Debugger (jdb): A tool to help you find and fix errors in your code.
- Archiver (jar): Used to package multiple Java classes and resources into a single file.
- Documentation Generator (javadoc): Creates API documentation from your source code comments.
Java Runtime Environment (JRE): For the Users
If you simply need to run Java applications but don’t plan on developing them, you might only need the Java Runtime Environment (JRE). The JRE provides the necessary components to execute Java programs. It includes the Java Virtual Machine (JVM) and the Java Class Libraries. This is akin to having a player ready to play a CD, without needing the tools to create the music itself. Many applications that rely on Java will prompt you to install the JRE if it’s missing.
Java Virtual Machine (JVM): The Engine of Execution
At the heart of both the JDK and JRE is the Java Virtual Machine (JVM). The JVM is an abstract computing machine that enables your computer to run Java programs. It’s responsible for interpreting and executing the compiled Java bytecode. This is the “magic” behind Java’s platform independence. The JVM translates the bytecode into machine-specific instructions, allowing your Java application to run on any operating system that has a compatible JVM.
Why is Java Still Relevant in Today’s Tech Landscape?
In an era dominated by rapid technological advancements and the rise of new programming languages, Java’s enduring relevance can be attributed to several factors:
- Robustness and Stability: Java is known for its reliability and ability to handle complex, large-scale applications. This makes it a preferred choice for enterprise software.
- Platform Independence: The JVM allows Java applications to run on virtually any operating system without modification, a significant advantage in diverse IT environments.
- Vast Ecosystem and Community: With decades of development, Java boasts an enormous ecosystem of libraries, frameworks, and tools. Its massive global community provides extensive support, resources, and readily available talent.
- Performance: Modern JVMs have become incredibly efficient, offering performance comparable to natively compiled languages for many applications.
- Security: Java has built-in security features and a mature security model, which are critical for applications handling sensitive data.
Installing Java: A Step-by-Step Guide
Installing Java is generally a straightforward process, but it requires paying attention to details such as choosing the correct version and understanding system requirements. We’ll cover the most common installation scenarios, focusing on the widely used Oracle JDK, which is the standard for many developers.
Step 1: Determine Your Needs – Which Java Version and Edition?
Before downloading, consider which version of Java you need.
Choosing a Java Development Kit (JDK) Edition
Oracle offers different editions of the JDK. The most common ones are:
- Oracle JDK: This is the commercial offering, providing the full development kit. While it has historically been free for development and testing, its licensing for production use changed with Oracle JDK 11. For many individual developers and small businesses, this remains a viable option.
- OpenJDK: This is the open-source reference implementation of the Java Platform, Standard Edition. Many vendors (like Adoptium/Eclipse Temurin, Amazon Corretto, Microsoft Build of OpenJDK) provide free, production-ready builds of OpenJDK. For most users, an OpenJDK distribution is the recommended choice due to its open-source nature and often simpler licensing.
Selecting the Right Java Version
Java versions are designated by numbers (e.g., Java 8, Java 11, Java 17, Java 21).
- Long-Term Support (LTS) Versions: These versions (like Java 8, 11, 17, 21) receive extensive support and updates for an extended period, making them ideal for stability and production environments.
- Feature Releases: These are released more frequently and introduce new features but have shorter support cycles.
For new projects or general development, it’s often recommended to start with the latest LTS version (currently Java 21). If you need to work with older applications, you might need to install an older LTS version like Java 8 or 11.
Step 2: Download the Appropriate JDK
Once you’ve decided on the version and edition, you’ll need to download the installer.
- For Oracle JDK: Visit the Oracle Java SE Downloads page. You’ll find installers for various operating systems. Be mindful of the licensing terms if you intend to use it in a production environment.
- For OpenJDK Distributions (Recommended for most):
- Eclipse Temurin (Adoptium): This is a popular, community-driven, LTS-focused distribution. Visit the Adoptium website (https://adoptium.net/) to download.
- Amazon Corretto: Amazon’s free, multiplatform, production-ready distribution of OpenJDK.
- Microsoft Build of OpenJDK: Microsoft’s free distribution.
Choose the installer that matches your operating system (Windows, macOS, Linux) and architecture (x64, ARM64, etc.).
Step 3: Install the JDK
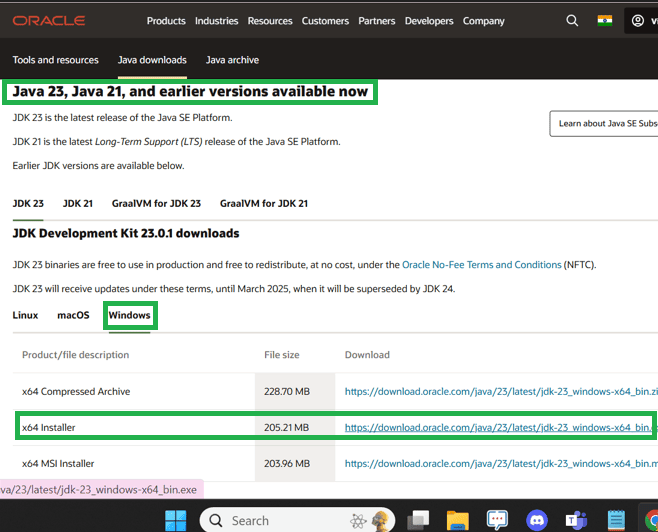
The installation process varies slightly depending on your operating system.
Windows Installation
- Run the Installer: Locate the downloaded
.exefile and double-click it to start the installation wizard. - Follow the Prompts: The installer is generally user-friendly. You’ll typically be asked to accept the license agreement and choose an installation directory. It’s recommended to install it in the default location unless you have a specific reason not to.
- Custom Setup (Optional): For most users, the default installation is sufficient. Developers might choose to customize which components are installed, but this is rarely necessary for a basic setup.
- Completion: Once the installation is complete, you’ll see a confirmation message.
macOS Installation
- Run the Installer: Locate the downloaded
.dmgfile and double-click it. A disk image will mount, and you’ll see a package installer (.pkgfile). Double-click this to begin the installation. - Follow the Prompts: Similar to Windows, you’ll agree to terms and proceed through the wizard. The installer will place the JDK in the appropriate system location.
- Completion: The installer will notify you when the process is finished.
Linux Installation
Linux installations can be done in several ways: using a package manager or installing from a compressed archive.
Using a Package Manager (Recommended for ease of use and updates):
- Debian/Ubuntu-based systems (e.g., Mint):
bash

sudo apt update

sudo apt install openjdk-<version>-jdk  # e.g., sudo apt install openjdk-17-jdk
If the specific version isn’t available, you might need to add a PPA. - Fedora/CentOS/RHEL-based systems:
bash

sudo dnf update

sudo dnf install java-<version>-openjdk-devel # e.g., sudo dnf install java-17-openjdk-devel
(For older systems, useyuminstead ofdnf.)
Installing from a Compressed Archive (.tar.gz):
- Extract the Archive: Download the
.tar.gzfile and extract it to a suitable location, often/usr/local/java/or a similar directory.
bash

tar -xvzf jdk-<version>_linux-x64_bin.tar.gz -C /usr/local/java/
- Set Environment Variables: This is a crucial step for Linux. You’ll need to configure
JAVA_HOMEand update yourPATH.- Edit your shell’s configuration file (e.g.,
~/.bashrc,~/.zshrc):
bash

export JAVA_HOME=/usr/local/java/jdk-<version>

export PATH=$PATH:$JAVA_HOME/bin
- Apply the changes:
bash

source ~/.bashrc  # or source ~/.zshrc
- Edit your shell’s configuration file (e.g.,
Step 4: Verify the Installation
After installation, it’s essential to confirm that Java has been installed correctly and that your system can find it.
-
Open a Terminal or Command Prompt:
- Windows: Search for “Command Prompt” or “PowerShell”.
- macOS: Open “Terminal” from Applications > Utilities.
- Linux: Open your preferred terminal emulator.
-
Check the Java Version: Type the following command and press Enter:
java -versionThis command should output information about the installed Java version, such as:
openjdk version "17.0.8" 2023-07-18
OpenJDK Runtime Environment Temurin-17.0.8+7 (build 17.0.8+7)
OpenJDK 64-Bit Server VM Temurin-17.0.8+7 (build 17.0.8+7, mixed mode, sharing)
If you see an error message like “command not found,” it means your system can’t locate the Java executable, and you likely need to configure your
PATHenvironment variable (especially on Linux and macOS if installed manually). -
Check the Java Compiler Version: If you installed the JDK, verify the compiler:
bash

javac -version
This should also output the Java compiler version.
Configuring Environment Variables: The Backbone of Java Development
Environment variables are a set of dynamic named values that can affect the way running processes will behave on a computer. For Java development, setting JAVA_HOME and ensuring the bin directory is in your PATH is critical. This allows the system and various development tools to locate your Java installation.
Setting JAVA_HOME
The JAVA_HOME environment variable points to the root directory of your Java installation. Many development tools and build systems (like Maven, Gradle, and application servers) rely on JAVA_HOME to find the JDK.
Windows
- Search for “Environment Variables”: In the Windows search bar, type “environment variables” and select “Edit the system environment variables.”
- System Properties: In the System Properties window, click the “Environment Variables…” button.
- New System Variable:
- Under “System variables,” click “New…”.
- Variable name:
JAVA_HOME - Variable value: The path to your JDK installation directory (e.g.,
C:Program FilesJavajdk-17.0.8).
- Add to PATH:
- Find the “Path” variable under “System variables,” select it, and click “Edit…”.
- Click “New” and add
%JAVA_HOME%bin. - Ensure this entry is near the top of the list.
- Apply Changes: Click “OK” on all open windows to save the changes. You might need to restart your command prompt or IDE for the changes to take effect.
macOS and Linux
As mentioned in the Linux installation section, you’ll typically edit your shell’s profile file.
- Identify Your Shell: Open a terminal and type
echo $SHELL. Common shells arebashandzsh. - Edit Configuration File:
- For Bash:
nano ~/.bashrc(or~/.bash_profile) - For Zsh:
nano ~/.zshrc
- For Bash:
- Add Export Statements: Add the following lines to the end of the file, replacing the path with your actual JDK installation path:
bash

export JAVA_HOME=/Library/Java/JavaVirtualMachines/jdk-17.jdk/Contents/Home  # Example for macOS

# export JAVA_HOME=/usr/lib/jvm/java-17-openjdk-amd64 # Example for Linux

export PATH=$PATH:$JAVA_HOME/bin
- Save and Exit: Press
Ctrl + X, thenY, thenEnterto save and exit nano. - Apply Changes:
- For Bash:
source ~/.bashrc(orsource ~/.bash_profile) - For Zsh:
source ~/.zshrc
- For Bash:
Verifying Environment Variables
After setting them, reopen your terminal and run:
echo $JAVA_HOME
java -version
javac -version
These commands should now correctly reflect your Java installation.
Troubleshooting Common Installation Issues
While Java installation is generally smooth, occasional hiccups can occur. Here are some common issues and their solutions:
- “java is not recognized as an internal or external command” (Windows) / “command not found” (macOS/Linux): This almost always indicates that the
PATHenvironment variable is not set correctly or the changes haven’t been applied to your current terminal session. Ensure%JAVA_HOME%bin(Windows) or$JAVA_HOME/bin(macOS/Linux) is added to your system’sPATH, and restart your terminal. - Multiple Java Versions Installed: If you have multiple versions of Java installed, your system might default to an older or incorrect one. You can manage default versions using
update-alternativeson Debian/Ubuntu systems or by carefully configuring yourJAVA_HOMEandPATH. For IDEs, they often have their own settings to specify which JDK to use. - Permissions Errors (Linux): When installing from archives, ensure you have the necessary read and execute permissions for the Java directories. Using
sudofor extraction orchmodcan resolve this. - Firewall or Antivirus Interference: In rare cases, security software might interfere with the installation process. Temporarily disabling them (with caution) can help diagnose if this is the issue.
- Incorrect Architecture: Downloading the 32-bit JDK for a 64-bit operating system (or vice versa) will lead to errors. Always ensure you match the architecture.

Conclusion: Your Java Journey Begins
Installing Java is a foundational step for anyone venturing into software development or needing to run Java-based applications. By understanding the core components – JDK, JRE, and JVM – and following the installation and environment variable configuration steps meticulously, you set yourself up for a seamless experience. As you delve deeper into the world of technology, you’ll find Java’s influence pervasive, powering critical systems and driving innovation across various sectors. Whether you’re optimizing your personal finance with budgeting apps built on Java or crafting a compelling corporate identity through sophisticated software solutions, a correctly installed Java Development Kit is your gateway. Embrace the power of Java, and happy coding!
aViewFromTheCave is a participant in the Amazon Services LLC Associates Program, an affiliate advertising program designed to provide a means for sites to earn advertising fees by advertising and linking to Amazon.com. Amazon, the Amazon logo, AmazonSupply, and the AmazonSupply logo are trademarks of Amazon.com, Inc. or its affiliates. As an Amazon Associate we earn affiliate commissions from qualifying purchases.