In the rapidly evolving landscape of technology, managing infrastructure efficiently and consistently is no longer a luxury but a necessity. From individual developers and small businesses to large enterprises, the demand for scalable, reliable, and automatable systems has never been higher. This is where Infrastructure as Code (IaC) tools like Terraform shine, transforming how we provision and manage cloud resources. HashiCorp Terraform stands out as a leading open-source IaC tool, enabling users to define and provide data center infrastructure using a high-level configuration language. For Windows users looking to harness the power of IaC and streamline their deployment workflows, installing Terraform is the crucial first step.
This comprehensive guide will walk you through the entire process of installing Terraform on your Windows machine, from understanding its core benefits to setting it up for your first project. By the end of this tutorial, you’ll not only have Terraform successfully installed but also a foundational understanding of how it can elevate your productivity, enhance digital security through consistent deployments, and optimize resource allocation – touching upon the very essence of modern tech, strategic brand building through reliability, and intelligent financial management in IT operations.
Understanding Terraform: Why It’s Indispensable for Modern Tech Workflows
Before diving into the installation, it’s essential to grasp what Terraform is and why it has become a cornerstone in the technology stack of countless organizations. Its ability to bridge the gap between development and operations teams, automate repetitive tasks, and ensure environmental consistency makes it an invaluable asset in today’s cloud-native world.
What is Terraform? A Foundation for Scalable Infrastructure
At its heart, Terraform is an Infrastructure as Code (IaC) tool that allows you to define and manage your infrastructure resources using human-readable configuration files. Instead of manually clicking through cloud provider consoles or writing complex scripts, you describe your desired infrastructure state in HashiCorp Configuration Language (HCL). Terraform then takes this declaration and provisions the resources across various cloud providers (like AWS, Azure, Google Cloud, Oracle Cloud Infrastructure, etc.) and on-premise solutions.
The power of Terraform lies in its provider model. HashiCorp and its community develop “providers” that serve as plugins for specific services, abstracting away the underlying API calls. This means whether you’re provisioning a virtual machine on Azure, a database on AWS, or a network configuration on Google Cloud, you use the same intuitive HCL syntax, making multi-cloud deployments significantly simpler and more manageable. By treating infrastructure as code, you can leverage best practices from software development, such as version control, automated testing, and code reviews, bringing unprecedented consistency and reliability to your IT operations.
The Core Advantages: Efficiency, Consistency, and Cost Savings
The adoption of Terraform brings a multitude of benefits that directly impact productivity, reliability, and ultimately, the financial health of any project or organization.
- Automation and Efficiency: One of the most significant advantages is the automation of infrastructure provisioning. Manual processes are prone to human error and can be incredibly time-consuming. Terraform automates the creation, modification, and destruction of infrastructure, drastically reducing deployment times and freeing up valuable engineering resources to focus on innovation rather than repetitive tasks. This boost in productivity is a direct contributor to faster development cycles and quicker time-to-market for new features or products.
- Consistency and Reliability: IaC ensures that your infrastructure is always in a desired, defined state. By codifying your environment, you eliminate configuration drift and inconsistencies that often plague manual setups. This consistency translates into more reliable applications and services, minimizing downtime and improving overall system stability. From a brand perspective, consistent and reliable services build trust and reinforce a strong corporate identity, assuring customers of a dependable experience.
- Multi-Cloud Agnosticism: Terraform’s provider model allows it to manage infrastructure across a wide array of cloud providers and on-premise solutions from a single workflow. This multi-cloud capability provides flexibility, reduces vendor lock-in, and enables organizations to select the best services for their needs across different platforms, potentially leading to optimized performance and cost structures.
- Version Control and Collaboration: Since infrastructure is defined in code, it can be version-controlled using systems like Git. This enables teams to track changes, revert to previous states if necessary, and collaborate effectively. Code reviews become possible for infrastructure changes, enhancing security and quality assurance, which is crucial for digital security and maintaining robust systems.
- Cost Management and Optimization: By defining infrastructure precisely, Terraform helps prevent resource sprawl and underutilized assets. You can easily spin up resources when needed and tear them down when not in use, which is especially beneficial in development and testing environments. Furthermore, the ability to plan changes (
terraform plan) allows you to see the impact of your infrastructure modifications before applying them, including potential cost implications. This foresight supports intelligent financial planning, helping businesses save money by only provisioning what’s necessary and optimizing resource usage. This aligns perfectly with the “Money” aspect of efficient business finance, turning a tech tool into a strategic financial asset.
The Step-by-Step Guide to Installing Terraform on Your Windows System
Installing Terraform on Windows is a straightforward process, but it requires careful attention to detail, particularly when configuring system environment variables. Follow these steps to get Terraform up and running on your machine.
Step 1: Preparing Your Environment
Before you begin the download and installation, ensure your Windows environment meets the basic requirements:
- Operating System: A modern version of Windows (Windows 10, Windows 11, Windows Server 2016/2019/2022).
- Administrative Privileges: You will need administrator rights to modify system environment variables.
- Internet Connection: Required to download the Terraform executable.
- Basic Command Line Knowledge: Familiarity with
cmd.exeor PowerShell will be helpful for verification.
Step 2: Downloading the Terraform Executable
The first official step is to obtain the Terraform executable. Always download Terraform from its official source to ensure authenticity and security.
- Navigate to the Official HashiCorp Website: Open your web browser and go to the official Terraform downloads page:
https://www.terraform.io/downloads. - Select the Windows Version: On the downloads page, you’ll see various operating systems listed. Locate the “Windows” section. You’ll typically find two options:
amd64(for 64-bit systems, which is most common) and386(for 32-bit systems). Choose the correct architecture for your Windows installation. If you’re unsure, most modern computers are 64-bit. - Download the ZIP File: Click on the appropriate link to download the
.ziparchive. This file contains the Terraform executable. Make a note of where you save this file, typically your “Downloads” folder.
Important Security Note: Always download software from official vendor websites. This practice safeguards your system against malware and ensures you’re getting the legitimate, untampered version of the software. This emphasis on digital security is paramount in today’s tech landscape.
Step 3: Extracting and Placing Terraform
Once downloaded, the Terraform executable needs to be placed in a location where your system can easily access it.
- Locate the Downloaded ZIP File: Go to the folder where you saved the
terraform_VERSION_windows_ARCH.zipfile. - Extract the Contents: Right-click on the
.zipfile and select “Extract All…” or use your preferred archiving software (like 7-Zip or WinRAR) to extract its contents. You’ll find a single executable file namedterraform.exeinside. - Create a Dedicated Directory: It’s best practice to create a dedicated, easily accessible folder for Terraform. For example, create a new folder named
terraformdirectly under yourC:drive (e.g.,C:terraform). Avoid placing it in system folders or temporary directories. - Move the Executable: Move the extracted
terraform.exefile into this newly createdC:terraformfolder.
This dedicated directory will make it easy to manage Terraform and ensures it’s isolated from other system files.
Step 4: Configuring Your System PATH for Seamless Access
This is the most critical step. Adding Terraform to your system’s PATH environment variable allows you to run terraform commands from any directory in your command prompt or PowerShell, without having to navigate to C:terraform first.
- Open System Properties:
- Press
Win + Rto open the Run dialog. - Type
sysdm.cpland press Enter. This will open the System Properties window. - Alternatively, right-click on “This PC” (or “My Computer”) > “Properties” > “Advanced system settings”.
- Press
- Access Environment Variables:
- In the System Properties window, navigate to the “Advanced” tab.
- Click on the “Environment Variables…” button at the bottom.
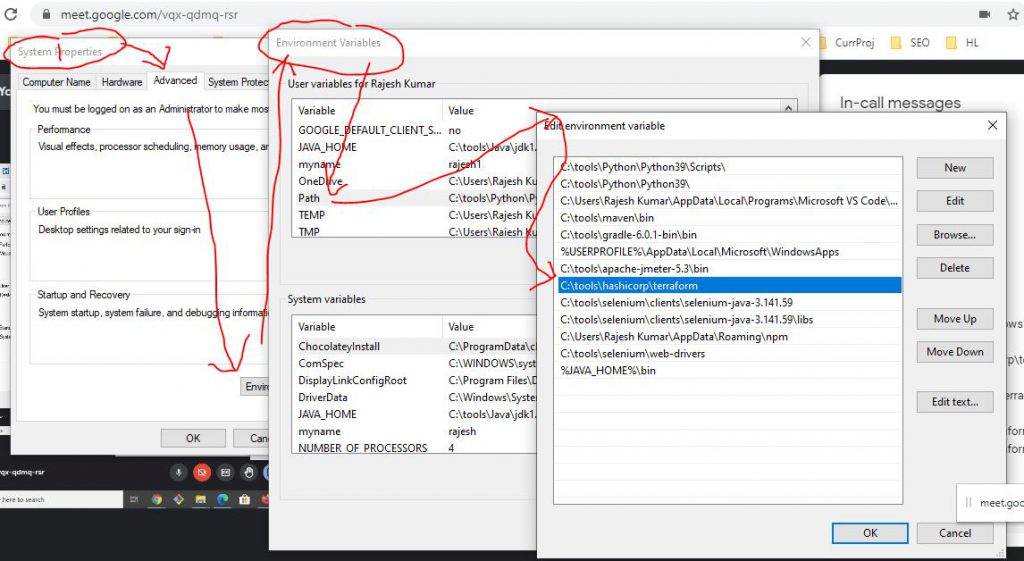
- Edit System PATH Variable:
- In the “Environment Variables” window, under the “System variables” section (the lower pane), scroll down and find the variable named
Path. - Select
Pathand click “Edit…”.
- In the “Environment Variables” window, under the “System variables” section (the lower pane), scroll down and find the variable named
- Add Terraform’s Directory to PATH:
- In the “Edit environment variable” window:
- Click “New”.
- Type the full path to your Terraform directory (e.g.,
C:terraform). - Click “OK” on all open windows (Edit Environment Variable, Environment Variables, and System Properties) to save the changes.
- Note for older Windows versions (e.g., Windows 7): If the “Edit environment variable” window is a single text field, you’ll need to append
;C:terraformto the existing value, ensuring you separate it with a semicolon from the previous entry.
- In the “Edit environment variable” window:
It’s crucial to ensure that the path is correctly entered and saved. An incorrect path is the most common reason for Terraform not being recognized later.
Step 5: Verifying Your Terraform Installation
After configuring the PATH variable, you must verify that Terraform is correctly installed and accessible from your command line.
- Open a NEW Command Prompt or PowerShell Window: It is essential to open a new command prompt or PowerShell window after modifying environment variables. Existing windows will not pick up the changes.
- Run the Version Command: In the new command prompt or PowerShell window, type the following command and press Enter:
bash

terraform --version
- Confirm Success: If the installation was successful, you should see output similar to this, indicating the installed Terraform version:
Terraform v1.x.x

on windows_amd64
If you receive an error message like “terraform' is not recognized as an internal or external command, operable program or batch file.“, it means there’s an issue with your PATH configuration. Revisit Step 4 carefully.

Congratulations! You have successfully installed Terraform on your Windows machine. You are now ready to begin defining and managing your infrastructure as code.
Your First Steps with Terraform: Beyond Installation
With Terraform installed, the next logical step is to understand how to interact with it and begin provisioning resources. This section will guide you through the fundamental commands and offer essential troubleshooting advice.
Initializing a Terraform Configuration
Before Terraform can interact with any cloud provider, it needs to be initialized within a project directory. This process downloads the necessary provider plugins.
-
Create a Project Directory: Create a new folder for your first Terraform project (e.g.,
C:terraform_projectsmy_first_infra). -
Create a Configuration File: Inside this folder, create a new file named
main.tf(the.tfextension is crucial). -
Add a Basic Provider Block: Open
main.tfwith a text editor and add a simple provider block. For instance, to configure the AWS provider:terraform { required_providers { aws = { source = "hashicorp/aws" version = "~> 5.0" # Specify your desired AWS provider version } } } provider "aws" { region = "us-east-1" # Or your desired AWS region }(Note: You would need to configure AWS credentials separately for this to work, usually via environment variables or the AWS CLI).
-
Initialize Terraform: Open a new command prompt or PowerShell window, navigate to your project directory (
cd C:terraform_projectsmy_first_infra), and run:
bash

terraform init
Terraform will download the AWS provider plugin and initialize the backend. You should see a “Terraform has been successfully initialized!” message.
Planning and Applying Your Infrastructure
Once initialized, you can plan and apply your infrastructure changes.
-
Define a Resource: Add a simple resource to your
main.tffile. For example, to create an AWS S3 bucket:resource "aws_s3_bucket" "my_first_bucket" { bucket = "my-unique-first-terraform-bucket-12345" # Must be globally unique acl = "private" tags = { Name = "MyFirstTerraformBucket" Environment = "Dev" } } -
Generate an Execution Plan: Run the
terraform plancommand. This command inspects your configuration, compares it to the current state of your infrastructure (if any), and proposes a set of changes it will make to reach your desired state. It’s a “what-if” scenario, showing you exactly what will happen without actually making any changes.
bash

terraform plan
You will see a detailed output showing resources to be added, changed, or destroyed. -
Apply the Changes: If you are satisfied with the plan, apply the changes to provision your infrastructure:
bash

terraform apply
Terraform will prompt you to typeyesto confirm the operation. After confirmation, it will create the S3 bucket in your AWS account.
This controlled deployment process is a testament to Terraform’s value in productivity and digital security. You preview changes, ensure they align with your intentions, and only then proceed, minimizing unexpected errors and maintaining system integrity.
Essential Troubleshooting Tips
Even with a detailed guide, issues can arise. Here are solutions to common problems:
- **”
terraform' is not recognized..."** This almost always indicates an incorrect or missing entry in your system's PATH environment variable. Revisit Step 4 of the installation guide, ensuring the pathC:terraform(or wherever you placedterraform.exe`) is correctly added and that you opened a *new* command prompt or PowerShell window after making changes. - Provider Plugin Download Issues: If
terraform initfails, check your internet connection. Proxy settings or strict firewalls might also interfere with downloading plugins. Ensure your network allows connections toreleases.hashicorp.com. - Version Mismatches: Sometimes a provider or module requires a specific Terraform version. Pay attention to error messages during
terraform initorterraform planthat might suggest upgrading or downgrading your Terraform binary. (This hints at whytfswitchis useful, discussed next). - Credential Issues: If Terraform can’t authenticate with your cloud provider (e.g., AWS, Azure), verify your credentials. Ensure environment variables (
AWS_ACCESS_KEY_ID,AWS_SECRET_ACCESS_KEY) are set correctly, or your cloud CLI is configured properly.
Maximizing Your Terraform Experience: Advanced Considerations and Best Practices
Installing Terraform is just the beginning. To truly leverage its power for enhanced productivity, robust digital security, and strategic advantage, consider these advanced tips and best practices.
Version Management with tfswitch (Optional but Recommended)
In a professional setting, you might work on multiple projects that require different versions of Terraform. Forcing all projects to upgrade or downgrade simultaneously can be impractical. Tools like tfswitch (a community-driven tool) allow you to easily switch between different Terraform versions on the fly.
- Why use
tfswitch? It prevents compatibility issues between different Terraform configurations and allows teams to adopt new Terraform versions at their own pace. This flexibility is crucial for maintaining productivity across diverse projects and ensuring specific infrastructure code bases remain stable with their tested Terraform versions. - Installation:
tfswitchcan often be installed via package managers like Chocolatey on Windows (choco install tfswitch). - Usage: Once installed, simply navigate to your project directory and run
tfswitch. It will read therequired_versionspecified in yourmain.tfand automatically download and switch to the correct Terraform binary.
Integrating a version manager like tfswitch is a prime example of adopting smart tools to manage complexity, directly contributing to more efficient tech operations and better resource management—elements that underpin both productivity and cost-effectiveness.
Integrating Terraform with Your Development Workflow
Terraform becomes even more powerful when integrated seamlessly into your broader development and operations workflows.
- IDE Extensions: For Windows users, Visual Studio Code (VS Code) is a popular choice. Install the “HashiCorp Terraform” extension to get syntax highlighting, auto-completion, and formatting for HCL files. This significantly enhances the developer experience, reducing errors and speeding up configuration writing.
- Source Control (Git): Always keep your Terraform configuration files in a version control system like Git. This enables collaborative development, tracks changes, provides an audit trail, and facilitates easy rollbacks if needed.
- CI/CD Pipelines: For enterprise environments, integrate Terraform into your Continuous Integration/Continuous Delivery (CI/CD) pipelines (e.g., Azure DevOps, GitLab CI, GitHub Actions, Jenkins). This automates the
terraform planandterraform applysteps, ensuring that infrastructure changes are consistently deployed after passing automated tests and approvals. This level of automation is critical for maintaining a strong corporate identity through reliable service delivery and leveraging technology trends for competitive advantage.
Security and Best Practices in IaC
As you manage infrastructure with code, security and best practices become paramount. These measures are vital for digital security and maintaining trust in your brand.
- Sensitive Data Handling: Never hardcode sensitive information (like API keys, database passwords) directly into your Terraform configuration files. Use secure methods like environment variables, secrets managers (e.g., AWS Secrets Manager, Azure Key Vault, HashiCorp Vault), or Terraform’s built-in
sensitiveattribute for variables. - State File Management: Terraform maintains a state file (
terraform.tfstate) that maps real-world resources to your configuration. This file often contains sensitive information and is crucial for Terraform’s operation. Store state files securely in remote backends (e.g., S3 with versioning and encryption, Azure Blob Storage) rather than locally, and ensure they are encrypted at rest and in transit. Implement access controls to limit who can modify or read the state file. - Least Privilege: Configure your cloud provider credentials with the principle of least privilege. Grant Terraform only the permissions it needs to create, modify, or destroy the resources defined in your configuration, and nothing more.
- Code Reviews: Just like application code, conduct peer reviews for your Terraform configurations. This helps catch errors, enforce coding standards, and share knowledge within the team, improving overall code quality and security.
- Modularization: Break down large Terraform configurations into smaller, reusable modules. This improves readability, reduces redundancy, and promotes consistency across different projects or environments.
Adhering to these best practices reinforces digital security, streamlines operations, and bolsters the reputation of your systems, contributing to a strong brand image built on reliability and trust.
Conclusion: Empowering Your Infrastructure Journey
Installing Terraform on Windows is a fundamental step toward embracing Infrastructure as Code, a paradigm shift that promises unparalleled efficiency, consistency, and control over your digital infrastructure. From a productivity standpoint, Terraform liberates developers and operations teams from manual, error-prone tasks, allowing them to focus on innovation. In terms of digital security, its emphasis on codified, reviewable infrastructure minimizes vulnerabilities and ensures robust deployments.
Beyond the technical advantages, Terraform subtly underpins strategic business objectives. By ensuring consistent and reliable IT environments, it strengthens your corporate identity and brand reputation, signaling a commitment to quality and stability. Financially, the tool promotes judicious resource allocation, helping to optimize cloud spending and reduce operational costs, thereby enhancing business finance practices.
As you embark on your Terraform journey, remember that the initial setup is merely the foundation. Continuous learning, adopting best practices, and integrating Terraform into a broader, automated workflow will unlock its full potential, empowering you to build, deploy, and manage scalable, resilient, and cost-effective cloud infrastructure with confidence. Your Windows machine is now a powerful launchpad for your Infrastructure as Code ambitions, ready to tackle the complexities of modern cloud environments with precision and agility.
aViewFromTheCave is a participant in the Amazon Services LLC Associates Program, an affiliate advertising program designed to provide a means for sites to earn advertising fees by advertising and linking to Amazon.com. Amazon, the Amazon logo, AmazonSupply, and the AmazonSupply logo are trademarks of Amazon.com, Inc. or its affiliates. As an Amazon Associate we earn affiliate commissions from qualifying purchases.