Welcome, Mac users! If you’re eager to dive into the vast world of PC gaming but find yourself on the Apple ecosystem, you’re in the right place. Steam, the ubiquitous digital distribution platform for video games, is fully compatible with macOS, and installing it is a straightforward process. This guide will walk you through every step, from downloading the client to launching your first game, ensuring a smooth and enjoyable experience. Whether you’re a seasoned gamer looking to expand your library or a newcomer curious about what all the fuss is about, this tutorial is for you.
Understanding Steam and Its Importance in the Gaming Landscape
Before we get our hands dirty with the installation process, it’s crucial to understand what Steam is and why it has become such a dominant force in the gaming industry. Developed by Valve Corporation, Steam is more than just a game store; it’s a comprehensive digital platform that offers a gateway to thousands of titles, from indie gems to AAA blockbusters.
The Evolution of Digital Distribution
In the early days of PC gaming, acquiring games often meant trips to brick-and-mortar stores, purchasing physical discs, and dealing with installation manuals. While nostalgic for some, this process was often cumbersome and prone to issues. Steam revolutionized this by introducing a digital-first approach. It allowed users to purchase, download, and install games directly onto their computers without the need for physical media. This shift brought unparalleled convenience, accessibility, and a wealth of features that have reshaped how we play and interact with games.
Beyond Just Games: The Steam Ecosystem
Steam’s appeal extends far beyond its extensive game catalog. The platform boasts a robust set of features designed to enhance the gaming experience:
- Automatic Updates: Say goodbye to manual patch downloads. Steam automatically updates your games, ensuring you’re always playing the latest version with bug fixes and new content.
- Cloud Saves: Never lose your progress again. Steam Cloud allows you to store your game saves online, accessible from any Mac (or PC) where you log in.
- Community Features: Connect with other players through forums, discussions, user-created content, and the ability to share screenshots and videos of your gameplay.
- Steam Workshop: For many games, the Workshop provides access to a treasure trove of user-generated content, including mods, custom maps, and items that can significantly extend the life and variety of your favorite titles.
- Sales and Discounts: Steam is renowned for its frequent and generous sales, offering significant discounts on a vast array of games. This makes it an incredibly cost-effective way to build your game library.
- Streaming and Broadcasting: Share your gameplay live with friends or the broader Steam community through integrated streaming features.
The sheer breadth of its offerings and its commitment to user experience have cemented Steam as the go-to platform for PC gamers worldwide. For Mac users, it’s the primary conduit to this expansive universe.
Downloading and Installing the Steam Client on macOS
The process of getting Steam onto your Mac is remarkably simple and follows a familiar software installation pattern.
Step 1: Acquiring the Steam Installer
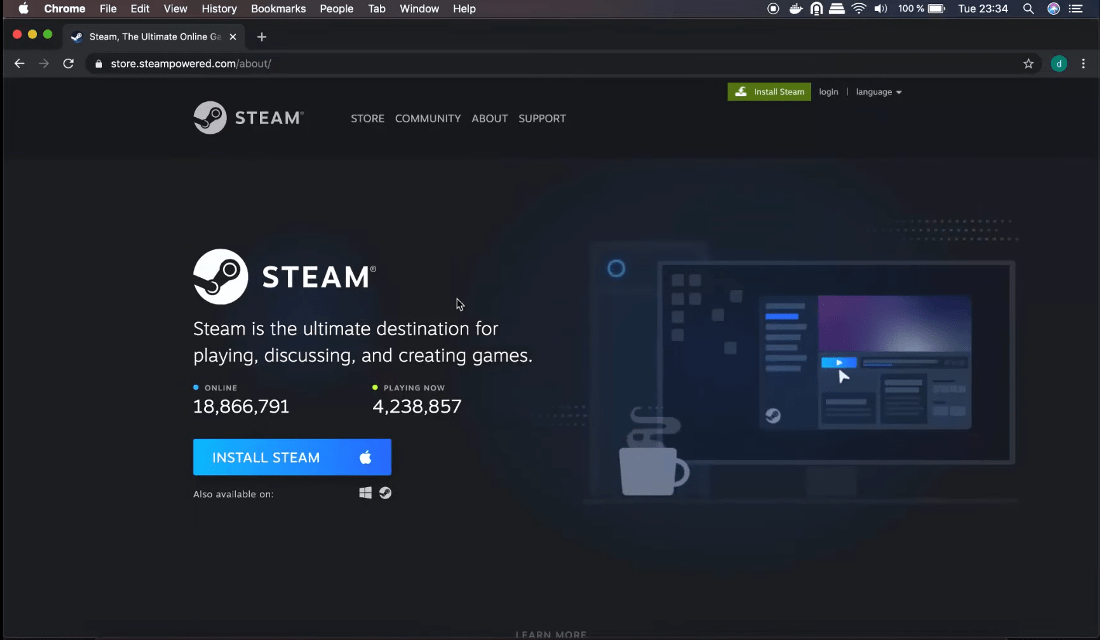
Your journey begins by visiting the official Steam website. Open your preferred web browser and navigate to https://store.steampowered.com/.
Once on the homepage, look for the “Install Steam” button, usually prominently displayed in the top-right corner of the page. Click this button.
You will then be directed to a page detailing the benefits of Steam. On this page, you’ll see download options for different operating systems. Locate the macOS icon or button and click it. This will initiate the download of the Steam installer file, which typically has a .dmg extension.
- Tip: Always download software from official sources to ensure you’re getting a legitimate and safe version. Avoid third-party download sites that might bundle unwanted software or malware.
Step 2: Running the Installer and Granting Permissions
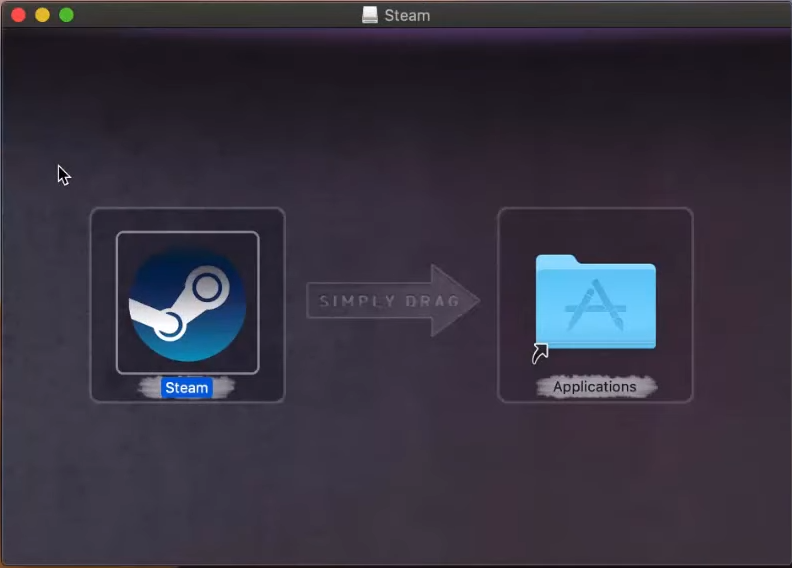
Once the .dmg file has finished downloading, locate it in your Downloads folder (or wherever your browser is set to save files). Double-click the .dmg file to open it. This will mount a virtual disk image containing the Steam application.
Inside the mounted disk image, you’ll typically see the Steam application icon and often a shortcut to your Applications folder. To install Steam, you need to drag the Steam application icon into your Applications folder. Simply click and drag the Steam icon over to the “Applications” folder icon.
- Security and Privacy: macOS is known for its robust security features. The first time you launch Steam after dragging it to your Applications folder, you might receive a security prompt asking if you’re sure you want to open an application downloaded from the internet. Click “Open” to proceed. You may also need to enter your administrator password to authorize the installation.
Step 3: First Launch and Account Creation/Login
With Steam installed in your Applications folder, it’s time to launch it for the first time.
- Open Applications Folder: Navigate to your Applications folder (you can usually access this from the Finder sidebar or by going to
Go > Applicationsin the Finder menu bar). - Launch Steam: Double-click the Steam icon to open the application.
- Initial Setup: Steam will likely perform a brief update upon its first launch, downloading any necessary components. This usually takes only a minute or two, depending on your internet speed.
- Login or Create Account: You will then be presented with the Steam login screen.
- Existing Users: If you already have a Steam account, enter your username and password and click “Login.”
- New Users: If you’re new to Steam, click on the “Create a New Account” link. This will take you to a web page where you can register for a free Steam account. You’ll need to choose a username, password, provide an email address, and agree to the Steam Subscriber Agreement.
Once you’ve successfully logged in or created your account, you’ll be greeted by the main Steam client interface, ready for you to explore!
Navigating the Steam Client and Acquiring Your First Game
The Steam client, while packed with features, is designed to be intuitive. Here’s a quick tour and how to get your hands on some games.
Understanding the Steam Interface
Upon launching Steam, you’ll be presented with the main client window. Here’s a breakdown of the key areas:
- Top Menu Bar: This is where you’ll find standard application menus like File, View, Friends, Games, Help, and your profile name.
- Navigation Bar: Located below the menu bar, this bar provides quick access to major sections of Steam:
- Store: This is where you browse, search for, and purchase games. You’ll find new releases, popular titles, ongoing sales, and personalized recommendations.
- Library: This is your personal collection of all the games you own. From here, you can install, launch, and manage your games.
- Community: Access Steam’s social features, forums, user-generated content, and more.
- Profile: View and manage your Steam profile, friends list, achievements, and inventory.
- Content Area: The largest part of the window, which dynamically displays the content of the section you’ve selected in the navigation bar.
- Friends List: Usually a separate, smaller window (or accessible via a tab), this displays your online friends and allows you to chat with them.
Browsing and Purchasing Games
The Store section is your primary destination for discovering new games.
- Search: Use the search bar at the top of the Store page to look for specific titles.
- Browse: Explore categories, genres, tags, and featured sections to find games that pique your interest.
- Wishlist: If you find a game you’re interested in but aren’t ready to buy, add it to your Wishlist. This is a great way to keep track of games you want and get notified when they go on sale.
- Product Pages: Click on any game to view its dedicated product page. Here you’ll find detailed descriptions, screenshots, videos, system requirements, user reviews, and pricing information.
- Purchase: If you decide to buy a game, click the “Add to Cart” button. You’ll then proceed through a checkout process, where you can select your payment method (credit card, PayPal, Steam Wallet, etc.) and complete the purchase.

Installing and Launching Your Games
Once you’ve purchased a game, it will appear in your Library.
- Access Your Library: Click on the “Library” tab in the navigation bar.
- Select Your Game: Find the game you wish to install in the list on the left.
- Install: Click the “Install” button that appears on the right-hand side of the Library view. Steam will prompt you to choose an installation location and may display any required disk space.
- Download and Install: Steam will then begin downloading and installing the game. You can monitor the download progress at the bottom of the Steam client window.
- Launch: Once the installation is complete, the “Install” button will change to a “Play” button. Click it to launch your game!
Congratulations! You’ve successfully installed Steam on your Mac and are ready to explore a universe of gaming possibilities. Enjoy your adventures!
aViewFromTheCave is a participant in the Amazon Services LLC Associates Program, an affiliate advertising program designed to provide a means for sites to earn advertising fees by advertising and linking to Amazon.com. Amazon, the Amazon logo, AmazonSupply, and the AmazonSupply logo are trademarks of Amazon.com, Inc. or its affiliates. As an Amazon Associate we earn affiliate commissions from qualifying purchases.