
In today’s interconnected digital landscape, the ability to securely manage and interact with remote servers is not just a convenience—it’s a fundamental necessity. Whether you’re a developer deploying applications, a system administrator maintaining infrastructure, a small business owner managing your website, or an individual simply wanting to access your home server from afar, Secure Shell (SSH) is the bedrock upon which secure remote operations are built. For users of Ubuntu, one of the most popular and versatile Linux distributions, mastering SSH installation and configuration is an essential skill that dramatically enhances productivity and bolsters digital security.
This comprehensive guide will walk you through everything you need to know about installing, configuring, and securing SSH on your Ubuntu system. We’ll delve into the ‘what’ and ‘why’ of SSH, provide step-by-step instructions for a seamless setup, and share crucial security best practices to protect your valuable data and systems. By the end of this article, you’ll be equipped with the knowledge to establish robust, encrypted connections, enabling efficient remote management and safeguarding your digital assets, aligning perfectly with the core tenets of Tech, Brand, and Money on our platform.
Understanding SSH: The Gateway to Secure Remote Management
Before we dive into the technicalities, let’s establish a clear understanding of what SSH is and why it has become an indispensable tool for anyone working with remote servers.
What is SSH?
SSH, or Secure Shell, is a cryptographic network protocol that enables secure data communication between two networked devices. It provides a secure channel over an unsecured network by using strong encryption. SSH is primarily used to log into a remote computer, execute commands, and transfer files. Unlike older, insecure protocols like Telnet or FTP, SSH encrypts all traffic, including passwords, commands, and data transfers, protecting them from eavesdropping, connection hijacking, and other network attacks.
The magic of SSH lies in its client-server architecture. An SSH client (like the ssh command on Linux/macOS or PuTTY on Windows) connects to an SSH server (often openssh-server on Linux). Once a connection is established and authenticated, the client can securely interact with the server’s command-line interface as if they were sitting directly in front of it.
Why is SSH Indispensable for Ubuntu Users?
For Ubuntu users, SSH is more than just a tool; it’s a cornerstone of efficient and secure system administration. Its importance spans several critical areas:
- Enhanced Digital Security: In an era rife with cyber threats, securing your remote connections is paramount. SSH encrypts all communications, preventing sensitive information like login credentials, confidential files, and proprietary commands from being intercepted by malicious actors. This directly contributes to robust digital security, a key focus for any tech-savvy individual or business.
- Remote Server Management: Imagine managing a fleet of servers in a data center or even just a single cloud instance without ever leaving your desk. SSH makes this possible. You can install software, update packages, troubleshoot issues, manage users, and perform virtually any administrative task remotely, saving time and resources. This boosts productivity immensely, whether for personal projects or large-scale business operations.
- File Transfer: Beyond command execution, SSH facilitates secure file transfers through protocols like SCP (Secure Copy Protocol) and SFTP (SSH File Transfer Protocol). This means you can upload website files, download log data, or move critical backups with the assurance that your data is encrypted and protected during transit.
- Tunneling and Port Forwarding: SSH can create secure tunnels for other network services that might otherwise be insecure. This is particularly useful for accessing internal services securely over a public network or for bypassing network restrictions.
- Automation and Scripting: SSH plays a vital role in automating server management tasks. Scripts can use SSH to connect to multiple servers, execute commands, and gather data, enabling efficient scaling and maintenance—a boon for any Tech professional looking to streamline operations.
- Protecting Your Brand and Money: For businesses and individuals with an online presence, server security directly impacts brand reputation and financial stability. A compromised server due to insecure remote access can lead to data breaches, website defacement, or service outages, all of which incur significant financial losses and irreparable damage to brand trust. Implementing strong SSH practices is a proactive step in protecting your investments and your good name.
Preparing Your Ubuntu System for SSH Installation
Before we initiate the installation of the SSH server, it’s crucial to ensure your Ubuntu system is in optimal condition. This involves checking basic requirements and performing essential updates.
System Requirements and Prerequisites
The beauty of SSH is its lightweight nature. You don’t need a powerful machine to run an SSH server. However, a few basic prerequisites are necessary:
- An Ubuntu System: This guide specifically targets Ubuntu (desktop or server editions). The commands might vary slightly for other Linux distributions.
- Internet Connection: To download the
openssh-serverpackage from Ubuntu’s repositories, your system needs an active internet connection. - Sudo Privileges: You’ll need a user account with
sudoprivileges to install software and make system-level changes. Most initial user setups on Ubuntu grant this by default. - Basic Command Line Familiarity: While we’ll guide you step-by-step, a basic understanding of using the terminal will be helpful.
Updating Your Package Repository
It’s always a best practice to update your system’s package lists and upgrade existing packages before installing new software. This ensures you’re working with the latest security patches and stable versions, minimizing potential conflicts and vulnerabilities.
Open your terminal (Ctrl+Alt+T on Ubuntu Desktop) and run the following commands:
sudo apt update
sudo apt upgrade -y
sudo apt update: This command fetches the latest list of available packages and their versions from the repositories. It doesn’t install new software but refreshes the local package index.sudo apt upgrade -y: This command upgrades all your currently installed packages to their latest versions based on the updated package list. The-yflag automatically confirms any prompts, allowing the upgrade process to run non-interactively.
Allow these commands to complete. Depending on how long it’s been since your last update, this process might take a few minutes.
Step-by-Step SSH Installation and Configuration
With your system prepared, we can now proceed with installing and configuring the OpenSSH server on Ubuntu.
Installing OpenSSH Server
The openssh-server package contains the necessary components to run an SSH server on your Ubuntu machine. Installation is straightforward using the apt package manager.
In your terminal, execute the following command:
sudo apt install openssh-server -y
This command will download and install the openssh-server package, along with any necessary dependencies. Once the installation is complete, the SSH service usually starts automatically.
Verifying SSH Service Status
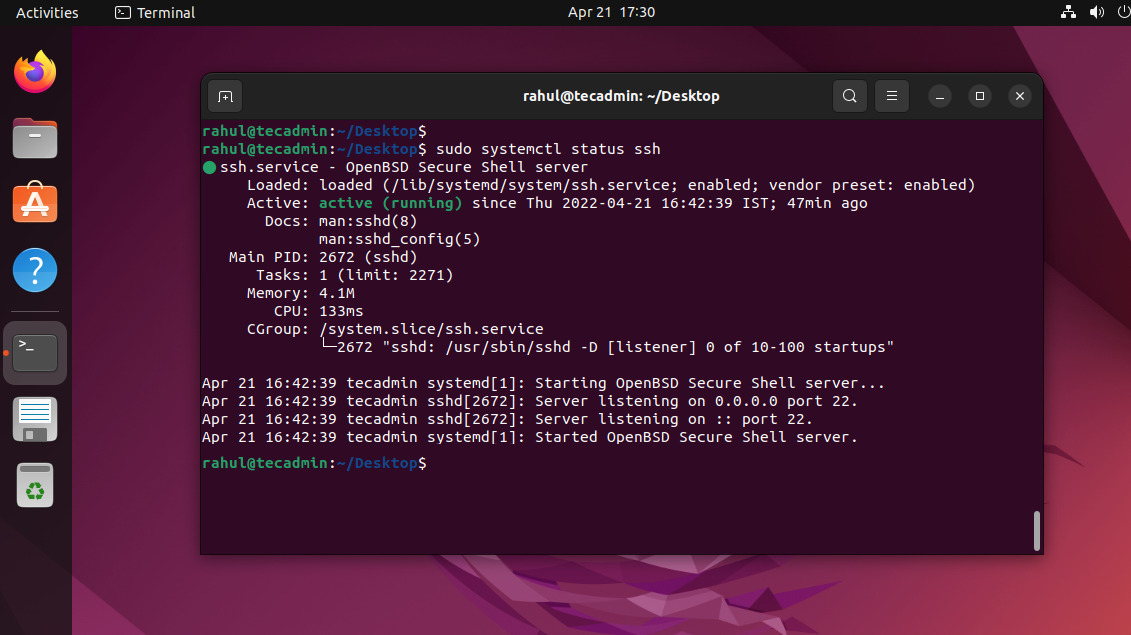
After installation, it’s good practice to verify that the SSH service is running correctly. You can do this using the systemctl command.
sudo systemctl status ssh
You should see output indicating that the ssh.service is “active (running)”. If it’s not active, you can start it with sudo systemctl start ssh. To ensure it starts automatically on boot, you can enable it: sudo systemctl enable ssh. However, apt typically handles these for openssh-server by default.
Configuring the Firewall (UFW) for SSH
Ubuntu uses UFW (Uncomplicated Firewall) by default, which is a user-friendly frontend for iptables. For security reasons, a firewall should always be enabled, and you must explicitly allow SSH traffic to pass through. If UFW is active and SSH is not allowed, you won’t be able to connect remotely.
First, check the status of your UFW firewall:
sudo ufw status
If UFW is inactive, you can enable it (be cautious if you’re connected remotely and haven’t allowed SSH yet!):
sudo ufw enable
Next, allow SSH connections. UFW has a pre-defined profile for SSH, which typically uses port 22.
sudo ufw allow ssh
This command automatically adds a rule to allow incoming traffic on port 22 (the default SSH port). If you plan to change your SSH port later (which is a recommended security practice), you would need to allow the new port instead of ssh (e.g., sudo ufw allow 2222/tcp).
Verify the new rule:
sudo ufw status
You should now see an entry allowing SSH (or port 22) connections.
Customizing Your SSH Configuration for Enhanced Security
While SSH is secure by default, customizing its configuration can significantly harden your server against attacks. The main SSH configuration file is /etc/ssh/sshd_config. Always make a backup before editing it!
sudo cp /etc/ssh/sshd_config /etc/ssh/sshd_config.backup
Now, open the file with a text editor (e.g., nano):
sudo nano /etc/ssh/sshd_config
Let’s look at some critical changes you should consider. After making any changes, remember to restart the SSH service: sudo systemctl restart ssh.
Changing the Default SSH Port
Running SSH on the default port 22 makes your server an easy target for automated scanning tools and brute-force attacks. While changing the port doesn’t stop a determined attacker, it significantly reduces the noise from automated bots. Choose a port number between 1024 and 65535 that isn’t commonly used by other services.
Find the line #Port 22 (or Port 22 if uncommented). Uncomment it (remove the #) and change 22 to your desired port, for example, 2222:
Port 2222
Important: If you change the port, you must update your firewall rule to allow the new port. For example, if you chose port 2222:
sudo ufw delete allow ssh # Remove the old rule for port 22
sudo ufw allow 2222/tcp # Add the new rule for port 2222
sudo ufw reload
Disabling Root Login
Logging in as the root user directly via SSH is a major security risk. The root user has absolute power over the system, and any compromise of its credentials could be catastrophic. It’s much safer to log in as a regular user and then use sudo to perform administrative tasks.
Find the line #PermitRootLogin prohibit-password (or PermitRootLogin yes) and change it to:
PermitRootLogin no
Disabling Password Authentication (Transitioning to Key-Based)
While password authentication is convenient, it’s susceptible to brute-force attacks and dictionary attacks, especially if users choose weak passwords. SSH key-based authentication offers a far more secure alternative. Once you have set up key-based authentication and confirmed it works, you should disable password authentication.
Find the line #PasswordAuthentication yes and change it to:
PasswordAuthentication no
Implementing Key-Based Authentication

SSH key-based authentication uses a pair of cryptographic keys: a public key and a private key. The public key is placed on the server, and the private key remains securely on your local machine. When you attempt to connect, the server challenges your client, which then proves its identity using the private key without ever sending the key itself over the network. This is far more secure than passwords.
1. Generate SSH Key Pair (on your local machine/client):
If you don’t already have an SSH key pair, generate one on your local machine (your laptop or desktop from which you will connect to the Ubuntu server).
ssh-keygen -t rsa -b 4096
-t rsa: Specifies the type of key to create (RSA is a common and secure choice).-b 4096: Specifies the number of bits in the key (4096 is a strong size).
You’ll be prompted to save the key to a file (default ~/.ssh/id_rsa is usually fine) and to enter a passphrase. Always use a strong passphrase for your private key. This acts as an additional layer of security, encrypting your private key on your local machine.
This command will create two files in your ~/.ssh directory:
id_rsa: Your private key (KEEP THIS SECRET AND SECURE!)id_rsa.pub: Your public key (This is what you put on the server)
2. Copy the Public Key to Your Ubuntu Server:
There are several ways to do this. The easiest is using ssh-copy-id:
ssh-copy-id username@your_server_ip
Replace username with your actual username on the Ubuntu server and your_server_ip with the server’s IP address or hostname. If you changed the SSH port, you’d specify it:
ssh-copy-id -p 2222 username@your_server_ip
You’ll be prompted for your user’s password on the Ubuntu server. After entering it, ssh-copy-id will add your public key to the ~/.ssh/authorized_keys file on the server.
If ssh-copy-id is not available or you prefer to do it manually:
# On your local machine:
cat ~/.ssh/id_rsa.pub

# Copy the output (the long string starting with 'ssh-rsa AAAA...')

# On your Ubuntu server (connect via password temporarily, or use console):
mkdir -p ~/.ssh
chmod 700 ~/.ssh
echo "PASTE_YOUR_PUBLIC_KEY_HERE" >> ~/.ssh/authorized_keys
chmod 600 ~/.ssh/authorized_keys
Ensure you paste the entire public key string.
After setting up key-based authentication, test it by trying to log in using your key. If successful, you can then proceed to disable password authentication as described above. Remember to restart SSH service after changing sshd_config.
Connecting to Your Ubuntu Server via SSH
Once SSH is installed and configured, connecting to your server is straightforward. The method varies slightly depending on your client operating system.
From Linux/macOS
If you’re connecting from another Linux machine or a macOS computer, the ssh command-line client is pre-installed.
Open your terminal and use the following command:
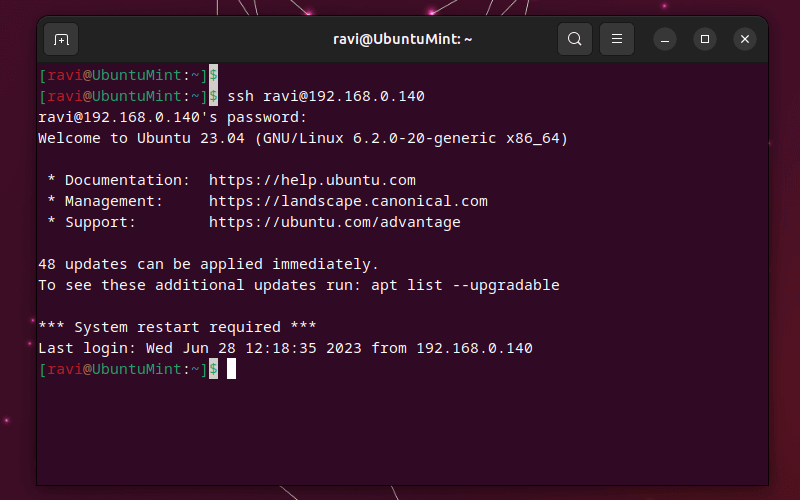
ssh username@your_server_ip
username: Replace with your actual username on the Ubuntu server.your_server_ip: Replace with the IP address or hostname of your Ubuntu server.
If you changed the SSH port (e.g., to 2222):
ssh -p 2222 username@your_server_ip
The first time you connect, you might see a warning about the host’s authenticity and be asked to confirm. Type yes to add the server’s fingerprint to your ~/.ssh/known_hosts file.
If you set up key-based authentication, SSH will automatically try to use your private key. If your private key is protected by a passphrase, you’ll be prompted to enter it.
From Windows (Using PuTTY or WSL)
Windows users have a couple of primary options for connecting via SSH:
-
PuTTY: A popular, free, and open-source SSH client for Windows. Download it from the official PuTTY website.
- Launch PuTTY.
- In the “Host Name (or IP address)” field, enter your server’s IP address or hostname.
- If you changed the SSH port, enter it in the “Port” field.
- For key-based authentication, navigate to
Connection > SSH > Auth, click “Browse,” and select your private key file (PuTTY requires its own.ppkformat; use PuTTYgen to convert yourid_rsakey to.ppk). - You can save your session for future use under the “Session” category.
- Click “Open” to establish the connection.
-
Windows Subsystem for Linux (WSL): If you have WSL enabled on Windows 10/11, you can use the native Linux
sshclient just as you would on a regular Linux machine.- Open your WSL terminal (e.g., Ubuntu app).
- Use the
sshcommand as described for Linux/macOS:
bash

ssh -p 2222 username@your_server_ip
This method is often preferred by developers for its consistency with Linux environments and its robust terminal experience.
Essential Security Best Practices for SSH
Beyond the initial setup and configuration, maintaining a secure SSH environment requires ongoing vigilance and adherence to best practices. These steps are crucial for protecting your digital assets, ensuring business continuity, and upholding your brand’s reputation for security.
Regular Updates and Patching
This cannot be overstated. Software vulnerabilities are constantly discovered, and developers release patches to address them. Regularly updating your Ubuntu system ensures that your OpenSSH server and all other system components have the latest security fixes. Make it a routine to run:
sudo apt update && sudo apt upgrade -y
Consider setting up automated updates for non-critical systems, but always review changes before applying to production environments.
Using Strong Passphrases for SSH Keys
While SSH keys are more secure than passwords, your private key is only as secure as its passphrase. A weak passphrase can be brute-forced, compromising your key. Always use a long, complex passphrase that includes a mix of uppercase and lowercase letters, numbers, and symbols. Treat your private key like a physical key to your house – keep it safe and never share it.
Limiting User Access
Only grant SSH access to users who absolutely need it. For each user, ensure they have the minimum necessary privileges (least privilege principle). You can further restrict SSH access by editing the sshd_config file:
AllowUsers: Specify a list of users who are permitted to log in via SSH.
AllowUsers user1 user2
DenyUsers: Explicitly deny specific users (less common thanAllowUsersfor security hardening, but useful).AllowGroups/DenyGroups: Control access based on user groups.
Remember to restart the SSH service after any changes to sshd_config.
Monitoring SSH Logs
SSH logs record connection attempts, authentication failures, and other important events. Regularly reviewing these logs (/var/log/auth.log or /var/log/syslog) can help you detect unauthorized access attempts or suspicious activity.
You can view recent logs with:
sudo tail -f /var/log/auth.log
For more advanced monitoring, consider implementing a log management solution or an intrusion detection system like Fail2Ban.
Implementing Fail2Ban
Fail2Ban is a popular intrusion prevention framework that scans log files (e.g., auth.log) for malicious IP addresses attempting to brute-force passwords or exploit vulnerabilities. It automatically bans these IPs for a configurable amount of time using firewall rules. Installing Fail2Ban adds a significant layer of automated defense:
sudo apt install fail2ban -y
sudo systemctl enable fail2ban
sudo systemctl start fail2ban
You can configure Fail2Ban by copying its default configuration file and editing the copy (/etc/fail2ban/jail.local).
Implementing Two-Factor Authentication (2FA)
For the highest level of security, consider implementing two-factor authentication (2FA) for SSH logins. This requires users to provide something they know (their password or passphrase) and something they have (a code from a mobile authenticator app or a hardware token). Tools like Google Authenticator can be integrated with SSH to provide this extra layer of protection. This is an excellent addition for critical systems and directly enhances digital security for business and personal branding.
Troubleshooting Common SSH Issues
Even with careful setup, you might encounter issues. Here are some common problems and their solutions:
Connection Refused
This typically means the SSH server is not running, the firewall is blocking the connection, or the client is trying to connect to the wrong port.
- Check SSH service status:
sudo systemctl status ssh - Check UFW status:
sudo ufw status. Ensure the correct port (default 22, or your custom port) is allowed. - Verify IP address: Make sure you’re using the correct IP address or hostname.
- Check
sshd_config: Ensure thePortdirective is correct and that the service restarted after changes.
Permission Denied (Public Key)
This indicates an issue with key-based authentication.
- Permissions on server: Ensure
~/.sshis700and~/.ssh/authorized_keysis600. - Key contents: Verify your public key is correctly copied into
authorized_keyson the server, without extra spaces or line breaks. - Private key on client: Ensure your private key file (
id_rsa) on your local machine has600permissions. ~/.ssh/config(client-side): If you use a custom key location or have multiple keys, ensure your client-side SSH config (~/.ssh/config) is correctly set up.- Agent forwarding: Ensure
ssh-agentis running and your key is added:eval "$(ssh-agent -s)"; ssh-add ~/.ssh/id_rsa. - Passphrase: Make sure you are entering the correct passphrase for your private key.
SSH Timeout
A timeout often suggests network connectivity problems or a firewall blocking the connection between your client and the server before SSH even has a chance to respond.
- Network connectivity: Can you ping the server’s IP address? Is the server online?
- Intermediate firewalls: Are there any other firewalls (router, cloud provider security groups) between your client and the server that might be blocking the SSH port?
- Incorrect port: Double-check you are using the correct port number.
By understanding these common issues and their troubleshooting steps, you can quickly diagnose and resolve problems, minimizing downtime and maintaining productivity.
Conclusion
Installing and configuring SSH on Ubuntu is an indispensable skill in today’s digital landscape. It provides the secure foundation for remote server management, vital for developers, system administrators, and anyone keen on maintaining a robust and protected online presence. By following the steps outlined in this comprehensive guide, you’ve not only set up a crucial piece of technology but also significantly bolstered your digital security posture.
Remember, the journey doesn’t end with installation. Adhering to security best practices—such as regular updates, strong passphrases, disabling root login, implementing key-based authentication, enabling Fail2Ban, and potentially 2FA—is paramount for long-term security. These practices are not just technical requirements; they are fundamental to protecting your data, upholding your professional brand, and safeguarding your financial interests in an increasingly interconnected world.
Embrace SSH, leverage its power responsibly, and enjoy the unparalleled convenience and security it brings to your Ubuntu systems, ensuring that your digital operations are always productive, secure, and resilient.
aViewFromTheCave is a participant in the Amazon Services LLC Associates Program, an affiliate advertising program designed to provide a means for sites to earn advertising fees by advertising and linking to Amazon.com. Amazon, the Amazon logo, AmazonSupply, and the AmazonSupply logo are trademarks of Amazon.com, Inc. or its affiliates. As an Amazon Associate we earn affiliate commissions from qualifying purchases.