In the ever-evolving landscape of digital customization and personalizing your online experience, few applications offer the depth of control and aesthetic refinement that Spicetify provides for Spotify. For dedicated music lovers who spend significant time with their digital audio library, the default Spotify interface can sometimes feel… well, a little bland. This is where Spicetify steps in, transforming your listening sessions from routine to remarkable.
This comprehensive guide will walk you through the process of installing Spicetify, unlocking its potential to tailor the Spotify desktop client to your exact preferences. Whether you’re a tech enthusiast looking to dive deep into system modifications, a brand-conscious individual seeking a unique visual identity, or simply someone who appreciates a more streamlined and personalized workflow, Spicetify offers a powerful avenue to achieve just that. We’ll explore what Spicetify is, why you might want to install it, the prerequisites, and then delve into the step-by-step installation process for various operating systems. By the end of this article, you’ll be well on your way to a Spotify experience that is as unique as your music taste.
Understanding Spicetify: More Than Just a Theme
Before we embark on the installation journey, it’s crucial to understand what Spicetify truly is and the benefits it brings. Spicetify is essentially a command-line tool that allows users to extensively customize the Spotify desktop client. This isn’t about superficial changes; Spicetify enables you to alter themes, apply custom CSS, modify the user interface elements, and even introduce new features through extensions.
The core functionalities and appeal of Spicetify lie in:
- Deep Theming Capabilities: Go beyond Spotify’s limited color palettes. Spicetify allows you to import and create intricate themes, transforming the entire look and feel of the application. This includes fonts, colors, spacing, and more. For those who value aesthetics and personal branding, this is a game-changer. Imagine your Spotify client reflecting your personal brand identity or fitting seamlessly with your operating system’s overall theme.
- UI Customization: Want to rearrange elements, hide certain sections, or tweak the behavior of specific UI components? Spicetify offers granular control over the Spotify desktop client’s interface, allowing for a more efficient and visually pleasing user experience. This appeals to productivity-focused users who want to streamline their workflow and eliminate visual clutter.
- Extension Support: This is where Spicetify truly shines for the tech-savvy. Spicetify supports a robust ecosystem of community-developed extensions that can add entirely new functionalities to Spotify. These can range from advanced playlist management tools, better queue visualization, integration with other services, or even subtle animations. This aspect taps directly into the “Tech” pillar of our website, offering users powerful AI-driven features or advanced software integrations.
- Cross-Platform Compatibility: Spicetify is designed to work seamlessly across Windows, macOS, and Linux, making it accessible to a broad range of users.
In essence, Spicetify empowers you to treat your Spotify desktop client not just as a music player, but as a canvas for personalization, productivity, and even a reflection of your unique digital identity.
Prerequisites for Installation
Before you begin the installation process, it’s essential to ensure you have the necessary components in place. Spicetify relies on a few key pieces of software and configurations to function correctly.
1. Spotify Desktop Client
This might seem obvious, but you absolutely need the official Spotify desktop client installed and running on your system. Spicetify modifies the existing Spotify client; it does not replace it.
- Download: If you don’t have it already, download the latest version of the Spotify desktop client from the official Spotify website.
- Installation: Follow the standard installation procedure for your operating system.
- First Launch: Ensure you have launched Spotify at least once and logged into your account. This helps create the necessary configuration files that Spicetify will interact with.
2. Package Manager (Recommended)
While Spicetify can be installed manually, using a package manager significantly simplifies the process, especially for managing updates and dependencies. The most common and recommended package manager for Spicetify is Homebrew on macOS and Linux, and winget or Chocolatey on Windows.
For Windows Users:
- winget: This is Microsoft’s built-in package manager. It’s available on modern Windows 10 and Windows 11 systems. You can typically use it directly from the Command Prompt or PowerShell.
- Chocolatey: If you’re on an older version of Windows or prefer Chocolatey, you’ll need to install it first. Visit the official Chocolatey website (https://chocolatey.org/) for installation instructions.
For macOS Users:
- Homebrew: This is the de facto package manager for macOS. If you don’t have it installed, open your Terminal and run the command provided on the official Homebrew website (https://brew.sh/).
For Linux Users:
- Snap/Flatpak/Apt/Yum/DNF: Depending on your Linux distribution, you will use its native package manager. For Spicetify, Homebrew (via
brew install spicetify-cli) is often the most straightforward approach, even on Linux, as it handles dependencies efficiently. However, you can also explore native package manager options if preferred.
3. Command Line Interface (CLI) Access
Spicetify is a command-line tool. This means you’ll be interacting with it through your system’s terminal or command prompt. Familiarity with basic command-line operations will be beneficial.
- Windows: Command Prompt (cmd.exe) or PowerShell.
- macOS: Terminal.app.
- Linux: Your distribution’s default terminal emulator.
Ensure you know how to open and navigate these interfaces.
Installing Spicetify: Step-by-Step Guide
With the prerequisites in place, we can now proceed with the installation of Spicetify. We will cover the most common installation methods for each major operating system.
Installing Spicetify on Windows
For Windows users, we’ll primarily focus on using winget for its ease of use and widespread availability.
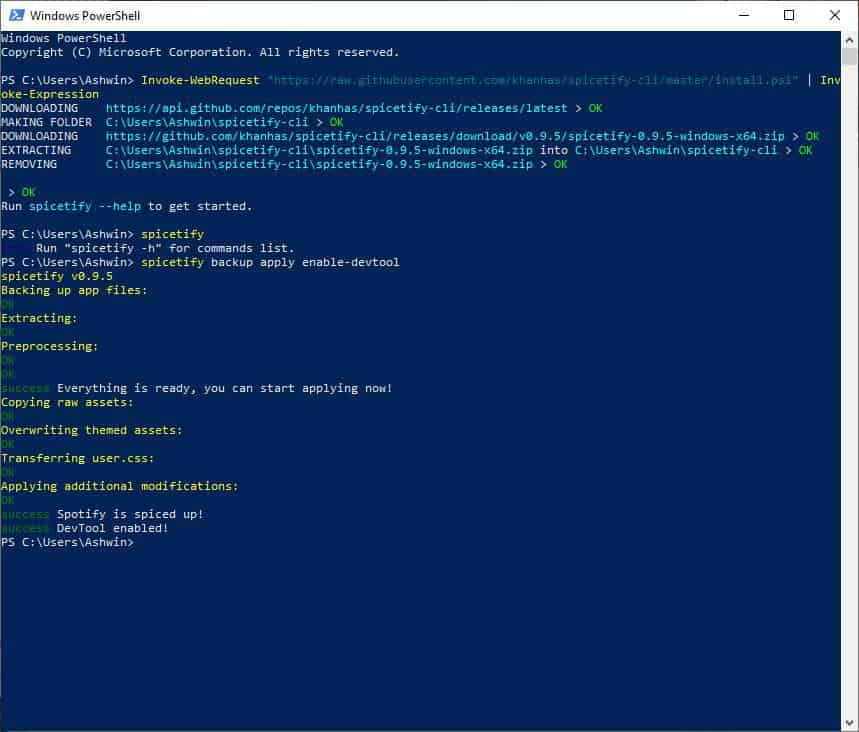
Using winget (Recommended for Windows)
-
Open Command Prompt or PowerShell as Administrator:
- Search for “Command Prompt” or “PowerShell” in the Windows search bar.
- Right-click on the application and select “Run as administrator.” This is crucial for package installation.
-
Install Spicetify CLI:
- Type the following command and press Enter:
bash

winget install spicetify-cli
wingetwill search its repository for Spicetify and prompt you to confirm the installation. Follow the on-screen instructions.
- Type the following command and press Enter:
-
Verify Installation:
- Once the installation is complete, you can verify it by typing:
bash

spicetify -h
- If Spicetify is installed correctly, you should see a help message with available commands.
- Once the installation is complete, you can verify it by typing:
Using Chocolatey (Alternative for Windows)
If you have Chocolatey installed:
- Open Command Prompt or PowerShell as Administrator: (Same as step 1 above).
- Install Spicetify:
- Type the following command and press Enter:
bash

choco install spicetify-cli
- Follow any prompts during the installation.
- Type the following command and press Enter:
- Verify Installation: (Same as step 3 above).
Installing Spicetify on macOS
Homebrew is the standard and most efficient way to install Spicetify on macOS.
Using Homebrew
-
Install Homebrew (if you haven’t already):
- Open your Terminal (Applications > Utilities > Terminal).
- Paste the following command and press Enter:
bash

/bin/bash -c "$(curl -fsSL https://raw.githubusercontent.com/Homebrew/install/HEAD/install.sh)"
- Follow the on-screen instructions, which may include entering your password.
-
Install Spicetify CLI:
- Once Homebrew is installed, run the following command in your Terminal:
bash

brew install spicetify-cli
- Homebrew will download and install Spicetify and its dependencies.
- Once Homebrew is installed, run the following command in your Terminal:
-
Verify Installation:
- After the installation, type:
bash

spicetify -h
- You should see the Spicetify help message.
- After the installation, type:
Installing Spicetify on Linux
While native package managers exist, using Homebrew on Linux (via brew install spicetify-cli) often provides a consistent and straightforward experience, especially when it comes to managing dependencies.
Using Homebrew on Linux
-
Install Homebrew on Linux (if you haven’t already):
- Open your Terminal.
- Run the following command:
bash

/bin/bash -c "$(curl -fsSL https://raw.githubusercontent.com/Homebrew/install/HEAD/install.sh)"
- Follow the on-screen instructions. You might need to run a couple of commands after the installation to add Homebrew to your PATH.
-
Install Spicetify CLI:
- Once Homebrew is set up, run in your Terminal:
bash

brew install spicetify-cli
- Once Homebrew is set up, run in your Terminal:
-
Verify Installation:
- Type:
bash

spicetify -h
- The help message confirms a successful installation.
- Type:
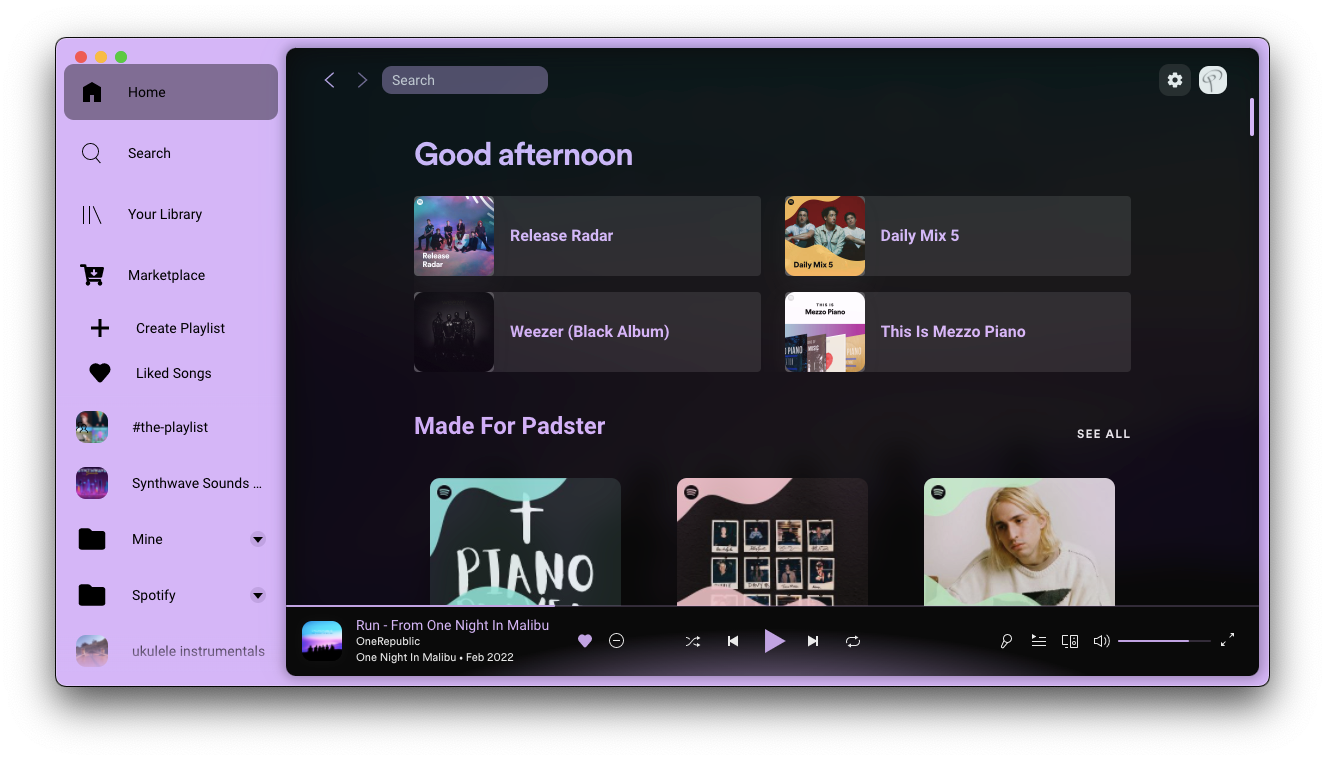
Applying Themes and Customizations
Once Spicetify is installed, the real fun begins: customizing your Spotify client. The process generally involves applying pre-made themes or creating your own.
Applying a Built-in Theme
Spicetify comes with several built-in themes. To see what’s available and apply one:
-
Open your Terminal/Command Prompt.
-
List available themes:
spicetify config --list-themesThis command will show you a list of themes that Spicetify knows about.
-
Apply a theme:
Let’s say you want to apply the “Dribbblish” theme (a popular choice). The command would be:spicetify config current_theme dribbblishReplace
dribbblishwith the name of any theme you find in the list. -
Apply Color Scheme:
Many themes also have different color schemes. To see available color schemes for the current theme:spicetify config --list-color-schemes dribbblishThen apply one:
spicetify config color_scheme nordReplace
nordwith your desired color scheme. -
Backup and Apply:
Spicetify typically prompts you to back up your Spotify theme files before applying changes. This is a good practice. You might need to restart Spotify for the changes to take effect. -
Backup Spotify Configuration:
Before making any significant changes, it’s wise to back up your Spotify’s original configuration:
bash

spicetify backup apply
This command backs up your current Spotify configuration and then applies the Spicetify settings.
Customizing with Your Own Themes
For users who are more adventurous or have a specific brand identity in mind, Spicetify allows for complete customization through CSS.
-
Locate Theme Directory: Spicetify themes are stored in a specific directory. You can find this by running:
spicetify config --show-pathThis will output the path to Spicetify’s configuration directory. Within this directory, you’ll usually find a
Themesfolder. -
Create or Download a Theme: You can create your own
jsonandcssfiles within theThemesfolder or download themes from the Spicetify community (e.g., GitHub repositories). -
Edit Theme Files: The
jsonfile typically defines variables (like colors, fonts, etc.), and thecssfile contains the actual styling rules. You can edit these files using any text editor. This is where you can truly integrate your personal branding, aligning Spotify’s visual elements with your brand’s color palette and typography. -
Apply Your Custom Theme:
Once your theme files are in place, you can apply it using thespicetify config current_theme your_theme_namecommand, similar to applying built-in themes.
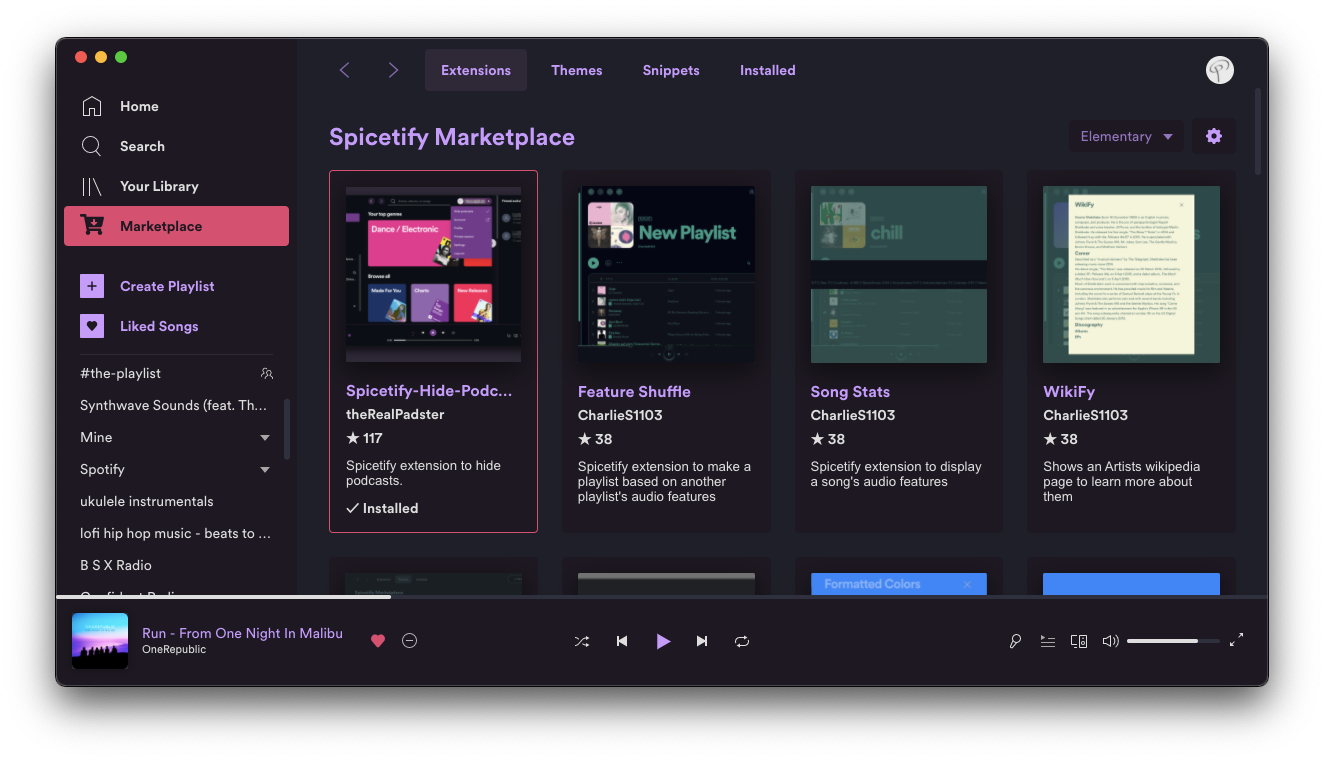
Spicetify Extensions
Extensions add new functionality. To manage extensions:
- View Available Extensions: You can often find community extensions on GitHub.
- Install Extensions: Spicetify has a command for installing extensions, but it often involves downloading the extension files and placing them in the correct Spicetify directory. Refer to the specific extension’s documentation for installation instructions.
- Enable/Disable Extensions: Use
spicetify config extensions --enable <extension_name>andspicetify config extensions --disable <extension_name>.
By leveraging themes, custom CSS, and extensions, Spicetify transforms Spotify into a highly personalized and functional application that aligns with your technological, branding, and even financial goals by improving your workflow and reducing distractions.
In conclusion, installing Spicetify is a rewarding endeavor for anyone looking to inject a dose of personality and advanced customization into their Spotify desktop client. It bridges the gap between a standard application and a tool that truly reflects your digital identity and preferences. Whether you’re aiming for a sleek, minimalist look, a vibrant, energetic interface, or integrating unique functionalities, Spicetify provides the power and flexibility to make it happen. Happy customizing!
aViewFromTheCave is a participant in the Amazon Services LLC Associates Program, an affiliate advertising program designed to provide a means for sites to earn advertising fees by advertising and linking to Amazon.com. Amazon, the Amazon logo, AmazonSupply, and the AmazonSupply logo are trademarks of Amazon.com, Inc. or its affiliates. As an Amazon Associate we earn affiliate commissions from qualifying purchases.