In an era defined by rapid technological advancements and a growing consciousness towards sustainable living, the concept of generating your own electricity has moved from niche aspiration to mainstream practicality. Installing solar power isn’t just an environmentally sound decision; it’s a strategic financial move and a fascinating dive into cutting-edge technology. This comprehensive guide will walk you through the entire process, from initial planning and component selection to the hands-on installation and post-setup optimization, all while connecting the dots to the broader themes of Tech, Brand, and Money that underpin modern sustainability efforts.
I. Why Embrace Solar Power? The Tech, Money, and Brand Case
Before delving into the nuts and bolts of installation, understanding the compelling reasons behind the solar shift can solidify your commitment. It’s a trifecta of benefits that resonate deeply with today’s homeowners and businesses.
A. The Technological Edge: Smart Energy for a Smarter Future
Solar power systems are at the forefront of renewable energy technology, constantly evolving with innovations that make them more efficient, reliable, and integrated into our digital lives. Modern solar panels are more powerful and durable than ever, thanks to advancements in photovoltaic cell design and materials science. Inverters, the brains of the system, are now “smart” devices, often connected to the internet, allowing for real-time performance monitoring via apps and cloud platforms.
Beyond the hardware, AI tools are beginning to play a significant role, optimizing panel placement for maximum sun exposure, predicting energy output based on weather patterns, and even managing energy storage and consumption within a smart home ecosystem. This technological sophistication means that installing solar isn’t just about reducing your carbon footprint; it’s about upgrading your home or business to a state-of-the-art energy management system, enhancing productivity by reducing energy anxiety, and embracing the future of digital energy. The digital security of these connected systems is also paramount, with manufacturers investing heavily in protecting user data and ensuring system integrity against cyber threats.
B. The Financial Payoff: Investing in Energy Independence
The financial benefits of installing solar power are arguably one of its most attractive features, aligning perfectly with the “Money” theme. The initial investment, while significant, yields substantial returns over the system’s lifespan, often 25-30 years or more.
- Reduced or Eliminated Electricity Bills: This is the most immediate and tangible saving. By generating your own power, you drastically cut down on utility expenses, providing predictable energy costs shielding you from rising grid prices.
- Increased Home Value: Studies consistently show that homes equipped with solar panels sell faster and at a premium. It’s an upgrade that pays dividends, signaling a modern, efficient, and low-operating-cost property to potential buyers.
- Government Incentives and Rebates: Many regions offer federal tax credits, state-level rebates, and local programs that significantly offset installation costs. These incentives are designed to accelerate renewable energy adoption and can make solar power remarkably affordable. Understanding these financial tools is crucial for maximizing your investment.
- Potential for Online Income/Side Hustle: In many areas, “net metering” policies allow you to sell excess electricity generated by your panels back to the grid. This can result in credits on your bill or even cash payments, turning your roof into a micro-power plant and a source of passive income.
- Long-Term ROI: When properly planned and installed, a solar power system offers an impressive return on investment, often paying for itself within 5-10 years, after which you enjoy decades of free electricity.
C. The Brand Statement: Personal and Corporate Identity
Choosing to go solar makes a powerful statement about your values, influencing both personal and corporate identity – the “Brand” aspect.
- Personal Branding: For homeowners, installing solar is a declaration of environmental responsibility, technological savviness, and financial foresight. It enhances your personal brand as a conscientious, forward-thinking individual, contributing to a sustainable future. It’s a visible commitment that inspires others and differentiates your property.
- Corporate Identity and Marketing: For businesses, adopting solar power is an exceptional brand strategy. It demonstrates a commitment to corporate social responsibility (CSR), appeals to environmentally conscious consumers, and can significantly enhance public perception. Marketing materials can highlight your sustainable practices, attracting talent and customers who value ethical and green businesses. Case studies of companies reducing their carbon footprint through solar are powerful testimonials to this commitment.
II. Planning Your Solar Project: A Strategic Blueprint
The success of your solar installation hinges on meticulous planning. This phase integrates elements of Tech (system design, component selection), Money (budgeting, ROI calculation), and even Brand (choosing reputable suppliers/installers).
A. Site Assessment and Energy Audit: Foundation of Efficiency
The first step is to understand your energy needs and the solar potential of your property.
- Energy Audit: Begin by analyzing your electricity bills from the past 12-24 months to determine your average daily and monthly energy consumption (kWh). This data is vital for sizing your system accurately. Consider energy efficiency upgrades before going solar to reduce your overall demand, which means you’ll need a smaller, less expensive solar system.
- Site Assessment: This involves evaluating your roof or property for suitability.
- Sun Exposure: Identify areas with maximum direct sunlight throughout the year. Shading from trees, chimneys, or neighboring buildings can significantly reduce efficiency. Advanced AI tools can simulate sun paths and optimize panel placement for maximum energy harvesting.
- Roof Condition: Ensure your roof is in good repair and has at least 10-15 years of life left. Replacing a roof after solar installation is complex and costly.
- Roof Angle and Orientation: South-facing roofs (in the Northern Hemisphere) with a pitch between 30-45 degrees are ideal. However, modern systems can be effective on east/west-facing roofs as well, sometimes even generating more evenly distributed power throughout the day.
- Structural Integrity: A qualified professional must assess if your roof can support the additional weight of the solar panels and racking.
B. Choosing the Right System Type and Components: Tech Decisions
This is where the “Tech” aspect truly shines. The choices you make here will define your system’s performance, longevity, and cost-effectiveness.
- System Type:
- Grid-Tied (On-Grid): The most common type, connected to the utility grid. Excess power is sent to the grid, and you draw power from the grid when your panels aren’t producing enough. Relies on the grid for backup.
- Off-Grid: Completely independent of the utility grid. Requires a robust battery bank for energy storage to provide power at night or during cloudy days. More complex and expensive, often used in remote locations.
- Hybrid: Combines grid-tied benefits with battery storage. Offers energy independence during outages while still leveraging the grid for backup and net metering.
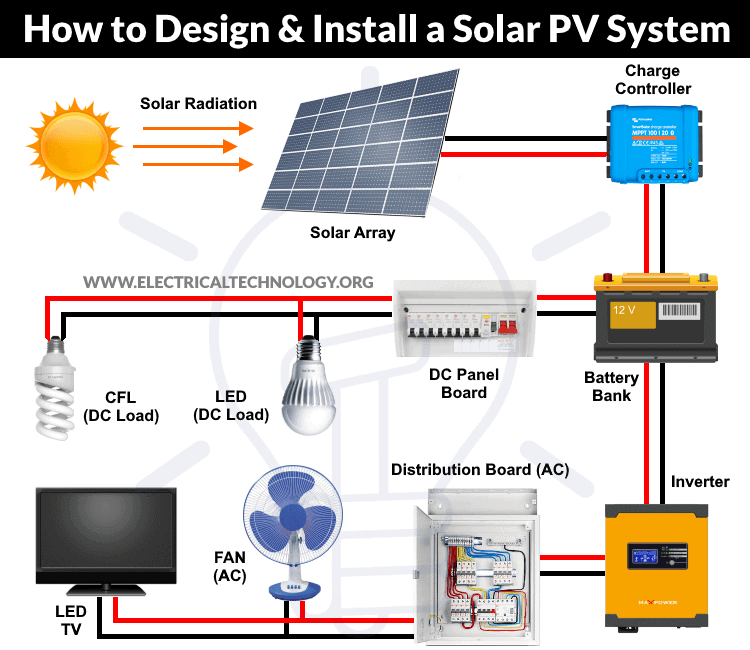
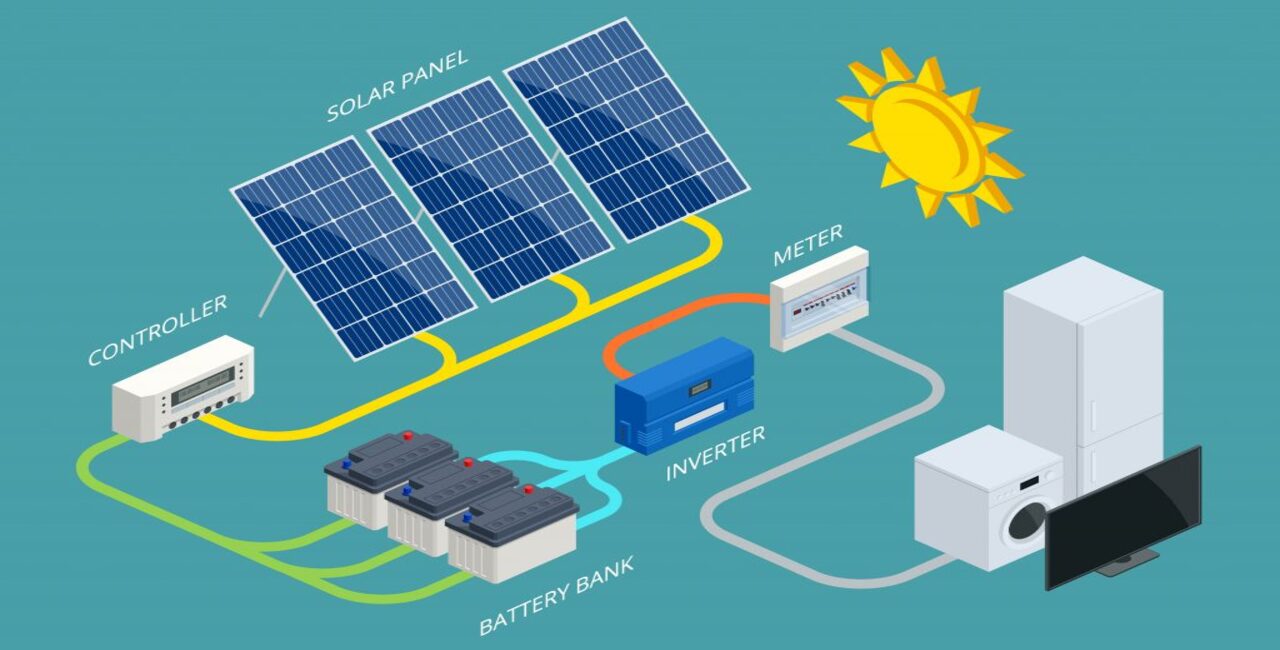
- Key Components:
- Solar Panels (PV Modules): The primary energy collectors. Monocrystalline panels (higher efficiency, sleek look) and Polycrystalline panels (slightly lower efficiency, more cost-effective) are common. Thin-film panels are less common for residential roofs but offer flexibility. Consider reputable brands with strong warranties (often 25+ years for performance).
- Inverters: Convert the DC electricity from panels into usable AC electricity for your home.
- String Inverters: Cost-effective, but if one panel is shaded or underperforms, it affects the entire string.
- Microinverters: One per panel, maximizing individual panel output. Better for shaded roofs or complex roof layouts, and allow for panel-level monitoring.
- Hybrid Inverters: Combine grid-tie functions with battery management.
- Mounting System (Racking): Secures panels to the roof or ground. Must be durable, weather-resistant, and compatible with your roof type. High-quality mounting systems prevent leaks and withstand extreme weather.
- Batteries (Optional, but recommended for Hybrid/Off-Grid): Crucial for storing excess energy. Lithium-ion batteries (e.g., Tesla Powerwall, LG Chem) are popular due to their efficiency, lifespan, and energy density.
- Monitoring System: Essential for tracking your system’s performance, identifying issues, and ensuring optimal output. Most modern inverters come with integrated monitoring accessible via web portals or smartphone apps.
C. Permitting and Regulations: Navigating the Bureaucracy
This is often the most time-consuming part of the planning phase. Navigating local building codes, electrical regulations, and utility company requirements can be complex.
- Building Permits: You’ll need permits from your local municipality to ensure the installation meets structural and safety standards.
- Electrical Permits: Ensures all wiring and electrical connections comply with the National Electrical Code (NEC) and local amendments.
- Utility Interconnection Agreement: If you’re connecting to the grid (grid-tied or hybrid), you must obtain approval from your utility company. They will want to ensure your system meets their technical standards and will often require a special meter for net metering.
- HOA Approvals: If you live in a homeowner’s association (HOA) community, you may need their approval as well.
This process often involves submitting detailed drawings, equipment specifications, and safety plans. A reputable installer will typically handle all permitting for you, leveraging their “Brand” and experience to streamline the process. If DIY, allocate significant time and effort here.
III. The Solar Installation Process: A Step-by-Step Guide
With careful planning, the installation itself becomes a systematic execution of your design. While professional installation is highly recommended due to the electrical and structural complexities, understanding the steps is crucial for DIY enthusiasts or for overseeing a hired team. Safety is paramount throughout this “Tech” driven process.
A. Safety First: Essential Precautions
Working on roofs and with high-voltage electricity is inherently dangerous. Prioritizing safety is non-negotiable.
- Personal Protective Equipment (PPE): Always wear safety glasses, work gloves, a hard hat, and fall protection (harness, ropes) when working on a roof.
- Electrical Safety: Turn off the main electrical breaker before working on any part of the electrical system. Use insulated tools. Verify circuits are dead with a multimeter. Solar panels generate electricity even in cloudy conditions, so treat them as live circuits once installed.
- Ladder Safety: Use sturdy ladders placed on stable ground and properly secured.
- Weather Conditions: Never work in wet, windy, or icy conditions.
B. Mounting the Racking System: The Foundation
This step involves securely attaching the mounting rails to your roof.
- Locate Rafters: Use a stud finder to locate the roof rafters where the mounting feet will be attached. This ensures structural integrity.
- Attach Mounts: Drill pilot holes and secure the mounting feet (often L-feet or standoffs) to the rafters, ensuring they are properly sealed with flashing to prevent leaks.
- Install Rails: Attach the aluminum rails to the mounting feet. These rails will hold the solar panels. Ensure they are level and properly spaced according to your panel dimensions.
C. Installing Solar Panels: Harnessing the Sun
Once the racking is in place, the panels can be mounted.
- Lift and Place Panels: Carefully lift each panel onto the rails. This often requires two people due to the size and weight.
- Secure Panels: Use mid-clamps and end-clamps to firmly attach the panels to the rails. Ensure they are tightly secured to withstand wind loads.
- Wiring the Panels (DC Wiring): Connect the panels in series or parallel using MC4 connectors, following your system design. This creates strings of panels. Ensure all connections are watertight and secure. Bundle and neatly route the DC wiring using UV-resistant cable ties.
D. Inverter Installation and Grid Connection: The Heart of the System
This phase connects the panels to your home’s electrical system.
- Mount the Inverter(s): Install the inverter in a cool, dry, and easily accessible location, often in a garage or utility room. Microinverters are mounted directly under each panel.
- Connect DC Wires: Route the DC wires from the solar panels to the DC input terminals of the string inverter. For microinverters, the AC output cables from each microinverter are connected together and then routed to the main service panel.
- Connect AC Wires: Connect the AC output of the inverter to a dedicated breaker in your main service panel. This requires a qualified electrician for safe and compliant connection to your home’s grid.
- Grounding: Properly ground all components (panels, rails, inverter) according to electrical codes to protect against lightning strikes and electrical faults.
- Monitoring System Setup: Connect the inverter to your home’s Wi-Fi network (if applicable) to enable online monitoring. This “Tech” integration allows you to track performance, diagnose issues, and optimize energy usage from anywhere.
E. Final Inspections and Activation: The Green Light
After the physical installation and wiring are complete, several critical checks and inspections are required before activation.
- System Testing: Before professional inspections, perform your own checks to ensure all connections are tight, wiring is correct, and voltages/currents are as expected.
- Local Authority Inspection: The local building and electrical inspectors will verify that the installation complies with all applicable codes and permits.
- Utility Interconnection: Once approved by inspectors, the utility company will perform a final check, potentially install a net meter, and give you permission to operate (PTO).
- Flip the Switch! With PTO granted, you can finally turn on your system and start generating clean, renewable energy. This is a moment of significant “Money” saving and “Brand” fulfillment.
IV. Maximizing Your Solar Investment: Post-Installation Management
Installing solar is a long-term investment, and proper management ensures you get the most out of your system for decades to come. This involves continuous monitoring, smart maintenance, and staying informed about financial incentives and warranty coverages, reinforcing the Tech and Money themes.
A. Monitoring Your System’s Performance: Digital Oversight
One of the greatest “Tech” advantages of modern solar systems is the sophisticated monitoring capabilities.
- Real-time Data: Your inverter’s monitoring system (via an app or web portal) provides real-time data on energy production, consumption, and even individual panel performance (with microinverters).
- Performance Tracking: Regularly review your system’s output against expected production. Factors like heavy shading, dirty panels, or component malfunctions can reduce efficiency. Early detection of issues through monitoring can prevent significant energy losses and costly repairs.
- Energy Management: Use the data to adjust your energy consumption habits. For example, run heavy appliances during peak solar production hours to maximize self-consumption and minimize grid reliance.
B. Maintenance Tips: Protecting Your Investment
Solar power systems are relatively low-maintenance, but some routine care can extend their lifespan and efficiency.
- Panel Cleaning: Dust, pollen, bird droppings, and leaves can accumulate on panels, reducing their efficiency. Clean them 1-2 times a year with water and a soft brush or squeegee. Avoid harsh chemicals or abrasive materials.
- Shading Management: Periodically trim trees or foliage that might grow to shade your panels.
- Inverter Checks: Ensure the inverter area is clear of debris and has adequate ventilation. Listen for unusual noises.
- Wiring Inspection: Periodically check visible wiring for signs of damage from pests or weather.
- Professional Check-ups: Consider a professional inspection every few years to ensure all electrical connections are secure and components are functioning optimally.
C. Understanding Warranties and Guarantees: Financial Security
A key “Money” aspect of your solar investment is understanding the warranties that protect it.
- Performance Warranty: Most solar panels come with a 25-year (or longer) performance warranty, guaranteeing that the panels will produce at least a certain percentage of their rated power (e.g., 80% after 25 years).
- Product Warranty: Covers manufacturing defects for panels (10-12 years) and inverters (5-12 years, extendable).
- Workmanship Warranty: If you used an installer, they typically provide a warranty on their installation work, covering issues like roof leaks or faulty wiring for 5-10 years.
Keep all warranty documentation organized and know who to contact if an issue arises.

D. Financial Incentives and Rebates: Continuous Savings
Stay informed about ongoing or new financial incentives. Tax credits can change, and new local programs might emerge.
- Federal Tax Credits: Keep abreast of federal solar tax credits (like the ITC in the US), which can significantly reduce the net cost of your system.
- State and Local Programs: Research state rebates, property tax exemptions for solar, and special financing programs (e.g., PACE loans).
- Net Metering Policies: Understand how your utility’s net metering policies evolve, as this can affect your electricity bill savings and potential for selling excess power.
By proactively managing these aspects, you ensure your solar power system remains a high-performing, financially rewarding, and environmentally responsible asset for decades to come, embodying the perfect synergy of Tech, Brand, and Money.
aViewFromTheCave is a participant in the Amazon Services LLC Associates Program, an affiliate advertising program designed to provide a means for sites to earn advertising fees by advertising and linking to Amazon.com. Amazon, the Amazon logo, AmazonSupply, and the AmazonSupply logo are trademarks of Amazon.com, Inc. or its affiliates. As an Amazon Associate we earn affiliate commissions from qualifying purchases.