In an era increasingly defined by technological innovation, financial savviness, and a growing consciousness for sustainability, harnessing the sun’s power for your home is more appealing than ever. Installing solar panels is not merely an eco-conscious decision; it’s a strategic move that integrates cutting-edge technology into your home, significantly impacts your long-term financial health, and can even enhance your property’s brand appeal. This comprehensive guide will walk you through the journey of installing solar panels, transforming your residence into a beacon of energy independence.
The allure of solar power extends beyond environmental stewardship. For tech enthusiasts, it offers a fascinating glimpse into renewable energy systems, often managed through smart apps and sophisticated inverters. From a financial perspective, solar panels promise substantial savings on electricity bills, protection against rising energy costs, and potentially lucrative incentives. Furthermore, a solar-equipped home subtly signals a commitment to modernity and sustainability, bolstering its appeal in the competitive real estate market. While the prospect of installing solar panels may seem daunting, with careful planning, the right knowledge, and adherence to safety protocols, it is an achievable and rewarding DIY project for many homeowners, or at least a journey you can confidently oversee.
Understanding Your Solar Journey: Planning and Preparation
The foundation of any successful solar panel installation lies in meticulous planning and thorough preparation. This initial phase is crucial for ensuring efficiency, safety, and compliance with local regulations, ultimately maximizing your investment.
Assessing Your Home’s Solar Potential
Before even considering equipment, you must evaluate your home’s suitability for solar power. This involves a multi-faceted assessment:
- Roof Evaluation: The primary consideration is your roof. Is it in good condition? Does it have sufficient surface area and structural integrity to support the panels? A south-facing roof is ideal in the Northern Hemisphere for maximum sun exposure, but east or west-facing roofs can also be viable, especially with modern panel technology. The slope of your roof also plays a role in energy capture.
- Sunlight Exposure: Conduct a shade analysis. Trees, neighboring buildings, or other obstructions can significantly reduce a panel’s efficiency. Track the sun’s path throughout the day and across seasons to identify any potential shading issues. Tools like solar pathfinders or even simple observation can help.
- Energy Consumption: Understand your household’s energy needs. Review past electricity bills to determine your average monthly kWh usage. This data is vital for sizing your solar system correctly – you want enough panels to offset a significant portion, if not all, of your consumption, but not an oversized system that leads to unnecessary expense.
- Future Needs: Consider any planned additions or changes that might alter your energy usage, such as electric vehicle charging, a new hot tub, or an expansion. Planning for these now can save future upgrades.
Navigating Permits and Regulations
The bureaucratic aspect of solar installation is often the most overlooked yet critical step. Failing to secure the necessary permits can lead to fines, project delays, or even the forced removal of your system.
- Local Building Codes: Each municipality has specific building codes that govern structural requirements, electrical standards, and aesthetic considerations for solar installations. Consult your local planning or building department early in the process.
- Electrical Codes: Adherence to national and local electrical codes (like the National Electrical Code in the US) is paramount for safety. This often requires professional electrical work and inspections.
- Utility Interconnection: Connecting your solar system to the grid allows you to sell excess electricity back to the utility (net metering) and draw power when your panels aren’t producing enough. This process involves specific applications, agreements, and sometimes utility-mandated equipment. Start this process early, as it can be time-consuming.
- Homeowners Association (HOA) Rules: If you live in an HOA-governed community, check their regulations regarding solar panel installation. Some HOAs have restrictions on panel visibility or placement, though many states have “solar access rights” laws that prevent HOAs from outright prohibiting solar.
Selecting the Right Equipment
The technology behind solar power has advanced significantly, offering a range of options tailored to different needs and budgets. Making informed choices here directly impacts your system’s efficiency and longevity.
- Solar Panels (Photovoltaic Modules):
- Monocrystalline: High efficiency, sleek black appearance, better performance in low light/hot conditions. More expensive.
- Polycrystalline: Slightly lower efficiency than mono, typically blue in color, more cost-effective.
- Thin-Film: Flexible, lighter, less efficient, often used for niche applications rather than residential rooftops.
- Power Output: Panels are rated by wattage (e.g., 300W, 400W). Higher wattage means fewer panels are needed for the same total system size.
- Brand Reputation: Research reputable brands known for durability, warranty, and performance.
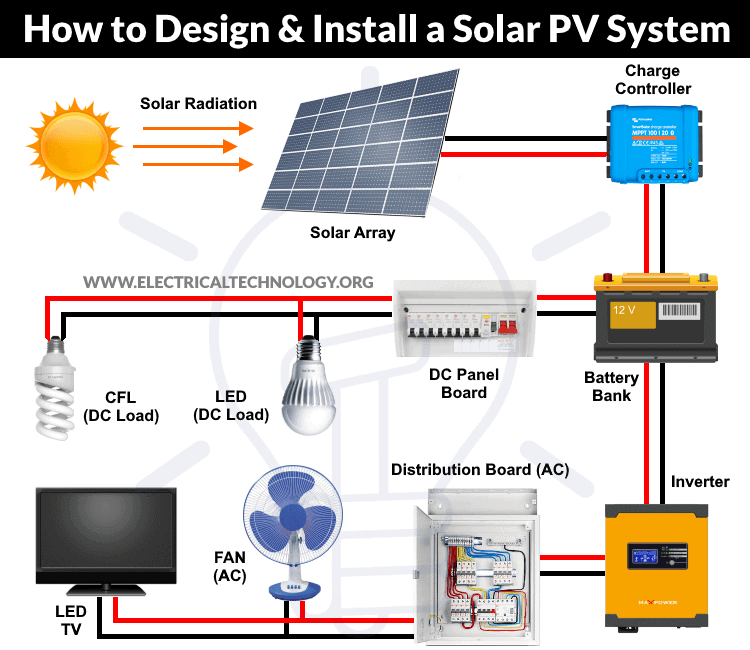
- Inverters: These devices convert the DC electricity from your panels into usable AC electricity for your home.
- String Inverters: Traditional, cost-effective, but if one panel is shaded or underperforms, it affects the entire string.
- Microinverters: Installed on each panel, optimizing individual panel performance. If one panel fails, others are unaffected. Excellent for complex roofs or shaded areas, often offering panel-level monitoring (a significant Tech advantage).
- Power Optimizers: A hybrid approach, pairing optimizers on each panel with a central string inverter, combining some benefits of both.
- Racking Systems: Securely mount the panels to your roof, designed to withstand wind, snow, and seismic activity. Different systems exist for various roof types (shingle, tile, metal) and angles.
- Batteries (Optional but Increasingly Popular): For energy independence and backup power during outages, battery storage systems (like Tesla Powerwall or Enphase Encharge) are gaining traction. These represent a significant Tech integration, often managed via smart home apps and offering insights into energy usage and storage.
- Monitoring Systems: Many modern inverters and microinverters come with integrated monitoring systems, often accessible via a smartphone app. This Tech feature allows you to track your system’s real-time performance, detect issues, and visualize your energy production and consumption.
Budgeting and Financial Incentives
The “Money” aspect is central to solar investment. Understanding the costs and available financial aids can dramatically improve your return on investment (ROI).
- Upfront Costs: Solar panel installation involves significant upfront costs, including equipment, labor, permits, and interconnection fees. Get multiple quotes from different installers, even if planning a DIY, to understand material costs and potential professional assistance fees.
- Federal Tax Credit (ITC): The Investment Tax Credit (ITC) allows homeowners to deduct a percentage of the cost of installing a solar energy system from their federal taxes. This is a massive financial incentive.
- State and Local Incentives: Many states and municipalities offer additional rebates, tax exemptions, or performance-based incentives (like Solar Renewable Energy Credits – SRECs) that can further reduce your costs and increase your savings.
- Net Metering: This policy allows you to receive credits for the excess electricity your solar panels generate and send back to the grid. It effectively allows your utility meter to spin backward, reducing your monthly bill.
- Property Value Increase: Installing solar panels can significantly increase your home’s resale value, often offsetting the initial investment. This also contributes to the “Brand” of your home as a modern, sustainable property.
- Financing Options: Explore various financing models: cash purchase (highest ROI), solar loans (allow immediate ownership), or Power Purchase Agreements (PPAs) and leases (zero upfront cost, but you don’t own the system).
Essential Tools and Safety Measures
Whether you’re undertaking the installation yourself or simply overseeing a team, understanding the necessary tools and, more importantly, prioritizing safety is non-negotiable.
Gathering Your Toolkit
A well-equipped toolkit ensures efficiency and prevents delays. Beyond standard hand tools, specific items are crucial for solar installation:
- Basic Hand Tools: Wrenches (ratcheting and open-end), socket sets, screwdrivers (various types), measuring tape, level.
- Power Tools: Cordless drill/driver (for mounting hardware), angle grinder (for cutting rails if needed), reciprocating saw.
- Electrical Tools: Multimeter (for testing voltage and current – Tech tool), wire strippers, crimpers, conduit bending tools, continuity tester.
- Safety Gear: Crucial for working at heights and with electricity.
Prioritizing Safety
Solar installation involves working at heights, handling heavy equipment, and dealing with live electrical components – all of which pose significant risks.
- Working at Heights: Always use a sturdy, properly secured ladder. If working on the roof, wear a safety harness securely tethered to an anchor point. Fall protection equipment is paramount. Never work alone on a roof.
- Electrical Safety: This is perhaps the most critical safety aspect.
- De-energize: Always turn off the main circuit breaker to your home before working on any electrical connections. Verify circuits are dead with a multimeter.
- Proper Grounding: Ensure all metallic components of the solar system are properly grounded according to code.
- Insulated Tools: Use tools with insulated handles when working with electrical components.
- Wear PPE: Always wear insulated gloves, safety glasses, and hard hats.
- Read Manuals: Thoroughly read and understand the electrical wiring diagrams and safety instructions for all equipment (panels, inverters, disconnects).
- Heavy Lifting: Solar panels can be heavy and awkward. Use proper lifting techniques or get assistance to prevent back injuries.
- Weather Conditions: Never work on a wet roof or during high winds. Extreme temperatures can also be hazardous.
Step-by-Step Solar Panel Installation
With planning complete and safety measures in place, you’re ready for the physical installation. This section outlines the typical sequence of events.
Installing the Mounting System
This is the structural backbone of your solar array, securely attaching panels to your roof.
- Locating Rafters: Use a stud finder to locate roof rafters, as racking systems must be securely bolted into these structural members. Mark their positions precisely.
- Attaching Flashing and Standoffs: Flashing is installed under shingles to create a watertight seal around penetrations. Standoffs or L-feet are then attached through the flashing and into the rafters. These provide the elevated base for the rails.
- Installing Rails: Aluminum rails are mounted to the standoffs, running parallel to the roof ridge. These rails form the framework to which the solar panels will be clamped. Ensure they are perfectly level and properly spaced according to your panel dimensions.
Securing the Solar Panels
Once the racking is stable, the panels can be carefully lifted and secured.
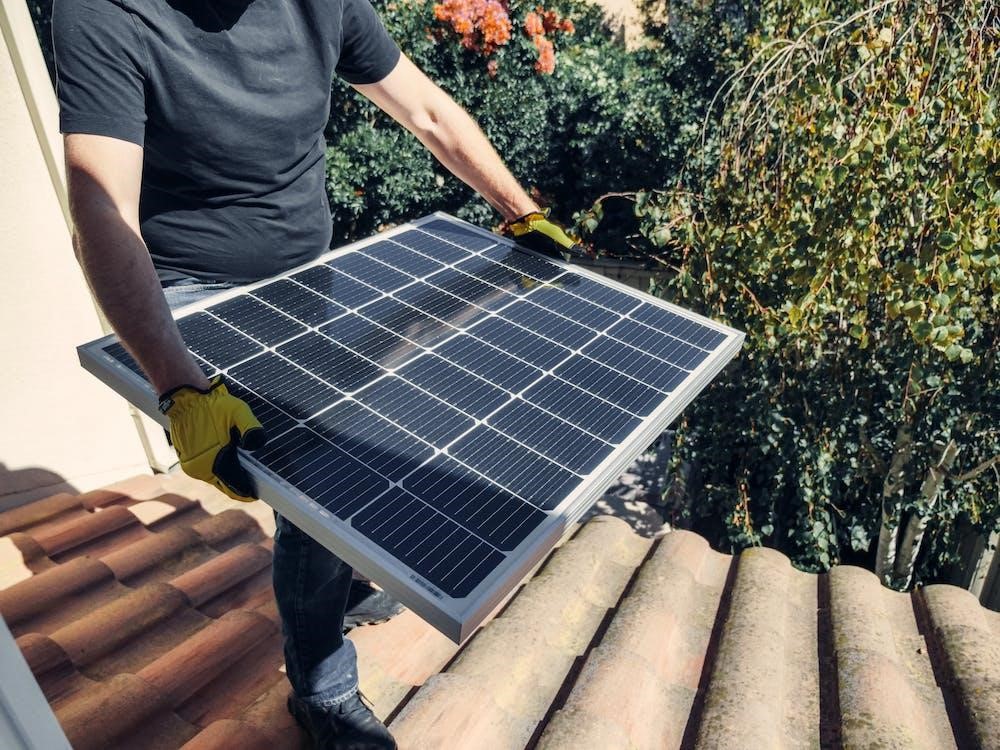
- Lifting Panels: Carefully lift panels onto the roof, ideally with a second person or a panel lift for safety and ease.
- Clamping Panels: Place the first panel onto the rails and secure it with mid-clamps that hold the panel edges. For subsequent panels, use common mid-clamps between them, and end-clamps for the outermost panels. Tighten all clamps to the manufacturer’s specified torque.
- Orientation: Ensure all panels are oriented correctly and aligned perfectly for a neat, professional appearance that also optimizes sunlight capture.
Wiring and Electrical Connections
This is where the Tech truly comes alive, connecting the individual panels into a functional electrical system.
- Panel Wiring (DC Side):
- Connecting Strings: Panels are connected in “strings” using their built-in MC4 connectors (positive to negative). The number of panels per string depends on the inverter’s voltage requirements.
- Microinverters/Optimizers: If using microinverters or power optimizers, these are attached directly to the back of each panel and then wired together or to a central string inverter. This simplifies string wiring.
- Inverter Installation: Mount the inverter (or inverters for multiple string systems) in a cool, dry, and easily accessible location, typically near your main electrical panel.
- DC Disconnect: Install a DC disconnect switch between the solar array and the inverter, allowing the DC power to be safely shut off.
- AC Wiring (From Inverter to Main Panel):
- Conduit Runs: Run conduit from the inverter to your main electrical service panel to protect the AC wiring.
- Breaker Installation: Install a new circuit breaker in your main panel to connect the solar system. The size of this breaker depends on your inverter’s output.
- Grounding: Ensure all components, including panels, racking, and inverter, are properly grounded to prevent electrical hazards and comply with codes.
- External Disconnects: Install an external AC disconnect switch for utility and emergency personnel, typically located near the main service meter.
Connecting to the Grid and Testing
The final electrical steps bring your system to life and integrate it with your home and utility grid.
- Utility Meter Connection: The final connection to the utility grid typically requires inspection and approval from both your local electrical inspector and the utility company. They will often install a special bi-directional meter for net metering.
- System Activation: Once all inspections are passed and utility interconnection is approved, you can safely flip the breakers to activate your system.
- Monitoring Setup: Connect your inverter to your home’s Wi-Fi (if applicable) and set up the manufacturer’s monitoring app. This Tech feature allows you to observe your system’s performance, energy production, and detect any potential issues in real-time, providing invaluable data for optimizing your savings.
Post-Installation: Maximizing Your Solar Investment
Installation is just the beginning. Ongoing monitoring and minimal maintenance ensure your system performs optimally and delivers maximum returns.
Monitoring Your System’s Performance
Modern solar systems are technological marvels that provide rich data.
- Real-time Data: Use your monitoring app or online portal to track daily, weekly, monthly, and annual energy production. This Tech allows you to see exactly how much electricity you’re generating and converting.
- Issue Detection: A sudden drop in production can indicate a problem (e.g., a shaded panel, a faulty optimizer, or an inverter issue). Early detection can prevent prolonged energy loss.
- Energy Management: By understanding your production and consumption patterns, you can adjust your habits (e.g., running high-energy appliances during peak solar production) to further maximize savings and minimize reliance on grid power, enhancing the “Money” aspect of your investment.
- Gamification: Some apps even gamify energy usage, turning energy efficiency into an engaging challenge.
Maintenance and Longevity
Solar panels are remarkably durable and require minimal maintenance, contributing to their long-term Money value.
- Cleaning: Periodically clean your panels, especially if you live in a dusty area or one with frequent bird activity. Rain often suffices, but a gentle rinse with a hose and a soft brush can remove stubborn grime, ensuring optimal sunlight absorption. Avoid abrasive cleaners or high-pressure washers.
- Inspections: Annually inspect your system for any loose wiring, damaged panels, or signs of wear on the racking. Pay attention to the inverter’s status lights.
- Shade Management: If trees grow and begin to shade your panels, consider trimming them to maintain optimal performance.
- Warranty Awareness: Keep track of your equipment warranties (panels often have 25+ year performance warranties, inverters typically 10-12 years).

The Financial and Environmental Payback
The true reward of installing solar panels manifests over time, solidifying the “Money” and “Brand” benefits.
- Long-Term Savings: Over their lifespan, solar panels can save tens of thousands of dollars on electricity bills, protecting you from future utility rate hikes.
- Return on Investment (ROI): Factoring in incentives and energy savings, solar systems often have a payback period of 5-10 years, after which the electricity generated is essentially free.
- Increased Property Value: Homes with solar panels often sell faster and at a premium. This enhances your home’s “Brand” as a desirable, forward-thinking property.
- Environmental Impact: By generating clean, renewable energy, you significantly reduce your carbon footprint, contributing to a healthier planet. This aspect resonates with a growing number of environmentally conscious buyers and aligns with broader societal “Brand” values of sustainability.
- Energy Independence: Reducing reliance on the grid provides a sense of security and resilience, particularly during power outages (especially with battery storage).
The journey to installing solar panels is a blend of practical application, technological integration, and strategic financial planning. It’s an investment that pays dividends for decades, not just in monetary terms, but in environmental stewardship and the satisfaction of contributing to a more sustainable future. By following these steps and understanding the underlying principles, you can confidently embark on your solar adventure, empowering your home with the limitless energy of the sun.
aViewFromTheCave is a participant in the Amazon Services LLC Associates Program, an affiliate advertising program designed to provide a means for sites to earn advertising fees by advertising and linking to Amazon.com. Amazon, the Amazon logo, AmazonSupply, and the AmazonSupply logo are trademarks of Amazon.com, Inc. or its affiliates. As an Amazon Associate we earn affiliate commissions from qualifying purchases.