
In the ever-evolving landscape of technology, the demand for powerful computational capabilities is consistently on the rise. From scientific research and big data analysis to machine learning model training, High-Performance Computing (HPC) clusters are indispensable tools. However, accessing or setting up a full-fledged HPC cluster can be a daunting and expensive endeavor for individual developers, researchers, or students. This is where the combination of Windows Subsystem for Linux (WSL) and SLURM Workload Manager shines, offering a remarkably accessible pathway to simulate and develop HPC workflows directly on your Windows desktop.
This comprehensive guide will walk you through the process of installing SLURM on a WSL Ubuntu environment. We’ll delve into the necessary prerequisites, step-by-step configurations for the database and SLURM components, and finally, how to verify your setup. By the end of this tutorial, you’ll have a fully functional SLURM environment, transforming your local machine into a powerful sandbox for learning, testing, and developing HPC applications without the complexities of a dedicated cluster. This aligns perfectly with the “Tech” focus of our website, providing practical tutorials and insights into powerful software tools.
Introduction: Harnessing HPC Power on Your Desktop
The world of high-performance computing can seem exclusive, reserved for large institutions with specialized hardware and vast budgets. However, with the right tools and a bit of know-how, you can bring a significant portion of that power to your personal computer.
What is SLURM? The Orchestrator of Computational Tasks
SLURM, which stands for Simple Linux Utility for Resource Management, is an open-source workload manager that is widely used in HPC clusters worldwide. It provides a framework for allocating exclusive or non-exclusive access to resources (compute nodes) to users for a specified amount of time, managing a queue of jobs, and executing those jobs on the allocated nodes. Think of SLURM as the air traffic controller for your computational tasks, ensuring that every job gets the resources it needs at the right time, minimizing conflicts and maximizing efficiency.
Key functions of SLURM include:
- Resource Management: Allocating compute nodes to users based on requests.
- Job Scheduling: Managing a queue of pending jobs and deciding when and where to run them.
- Job Execution: Launching and monitoring jobs on assigned nodes.
- Accounting: Tracking resource usage for billing or reporting purposes.
Its robust features and flexibility make it a cornerstone of modern scientific computing and data processing.
Why SLURM on WSL Ubuntu? The Best of Both Worlds
The decision to install SLURM on WSL Ubuntu rather than a native Linux installation or a virtual machine is driven by several compelling advantages, particularly for developers and researchers working primarily on Windows:
- Seamless Integration with Windows: WSL allows you to run a full Linux environment directly within Windows, offering native file system access and clipboard sharing. This means you can use your favorite Windows-based IDEs, text editors, and productivity tools while seamlessly compiling and running HPC applications within your Linux subsystem. There’s no need to dual-boot or manage separate physical drives, streamlining your workflow considerably.
- Simplified Development and Testing: For those developing applications destined for large-scale HPC clusters, having a local SLURM environment is invaluable. It provides a perfect sandbox for testing job scripts, debugging code, and understanding SLURM’s behavior without consuming valuable resources on a shared production cluster. This significantly accelerates the development cycle and reduces the risk of errors when deploying to a live system.
- Educational and Learning Opportunities: WSL makes SLURM accessible to students and enthusiasts eager to learn about HPC. It lowers the barrier to entry by removing the need for specialized hardware or complex server setups. You can experiment with different SLURM configurations, practice submitting jobs, and gain hands-on experience that is highly sought after in academic and industrial settings.
- Resource Efficiency: Compared to a traditional virtual machine, WSL generally offers better performance and lower resource overhead. It integrates more closely with the host operating system, making it a lightweight yet powerful solution for running Linux applications.
- Cost-Effectiveness: No dedicated server hardware or cloud instances are required for basic development and testing. You leverage your existing Windows machine, making it an extremely cost-effective way to get started with HPC.
By combining Windows’ user-friendliness with Linux’s computational power and SLURM’s scheduling capabilities, WSL Ubuntu creates an ideal environment for local HPC development. This setup empowers users to explore complex computational problems and optimize their workflows right from their desktop.
Setting the Stage: Prerequisites and Initial Setup
Before we dive into the core SLURM installation, we need to ensure your WSL environment is properly configured and equipped with the necessary foundational services. Think of this as preparing the ground before planting your seeds; a solid foundation ensures a robust and trouble-free growth.
Ensuring WSL2 and Ubuntu are Ready
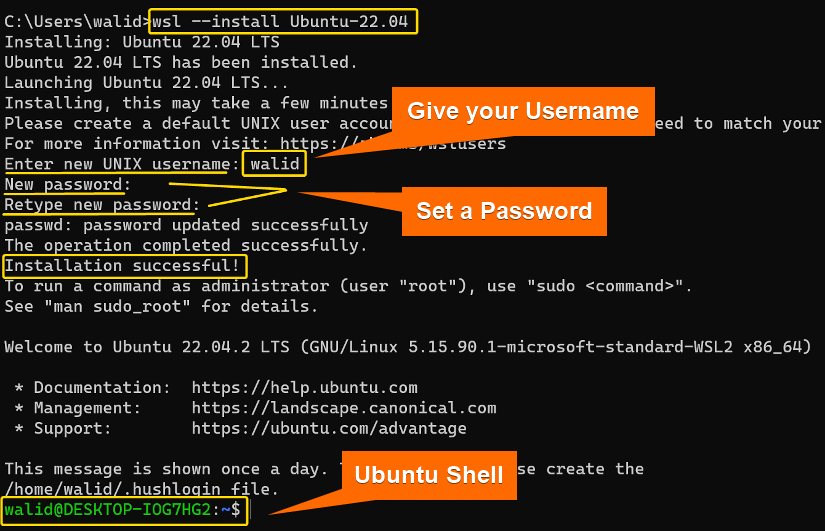
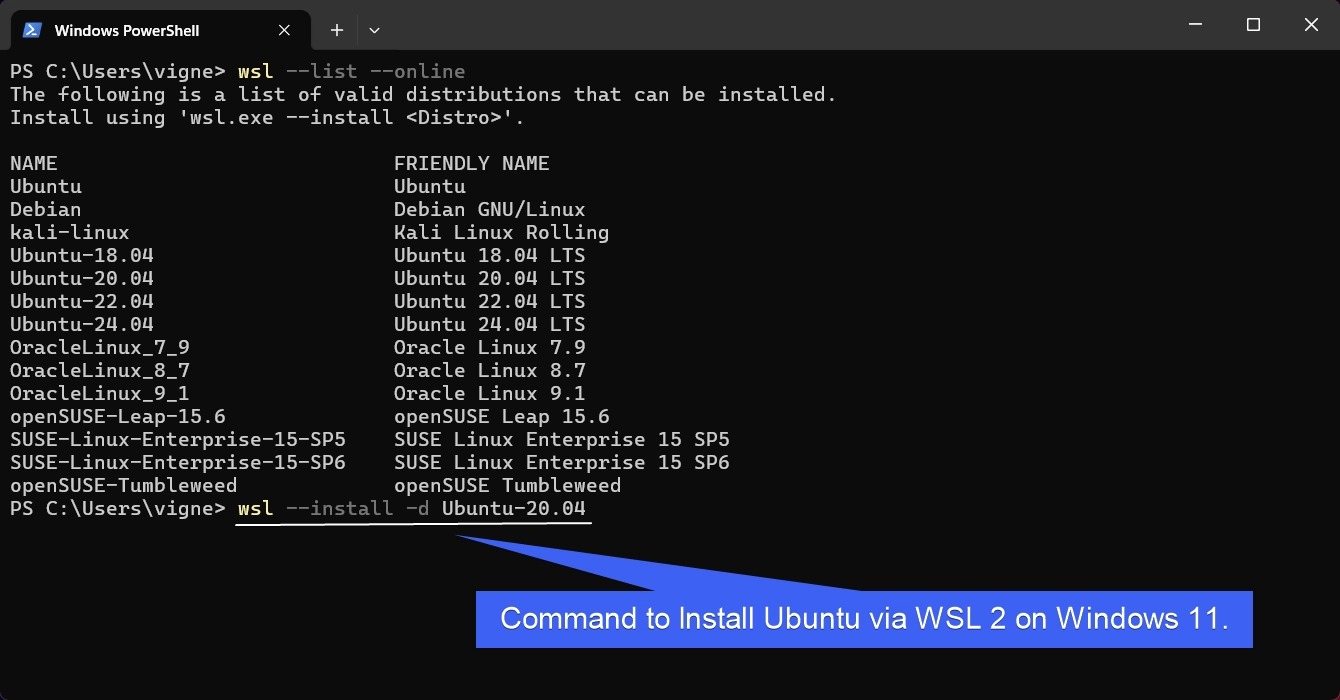
First and foremost, you need to have WSL2 installed and an Ubuntu distribution ready within it. If you haven’t set up WSL2 yet, a quick search for “install WSL2” on Microsoft’s documentation will guide you through the process. Ensure you are running Ubuntu (preferably the latest LTS version) as your WSL distribution.
Once your Ubuntu instance is running, the first step in any Linux environment is to update its package lists and upgrade any installed packages to their latest versions. This ensures you have access to the newest software, security patches, and dependencies, preventing potential conflicts during later installations.
sudo apt update
sudo apt upgrade -y
The sudo apt update command fetches the latest package information from the repositories, while sudo apt upgrade -y installs all available upgrades without asking for confirmation. This is a crucial first step for system stability and security.
Essential Dependencies: Munge and MariaDB
SLURM relies on a few key components to function correctly. Two of the most critical are munge for authentication and a database system (like MariaDB or MySQL) for accounting and state preservation.
Munge: The Authentication Glimmer
Munge is an authentication service that is crucial for secure communication within a SLURM cluster. It provides a cryptographic authentication service for creating and validating credentials, ensuring that only authorized users and processes can interact with the SLURM daemons. Without munge, your SLURM components won’t be able to communicate securely.
To install munge, execute the following command:
sudo apt install munge -y
After installation, munge needs to be properly configured and started. We will cover this in more detail later, but for now, the installation is sufficient.
MariaDB Server: The Data Keeper
SLURM uses a database to store critical information such as job accounting data, cluster state, and historical records. While SLURM can operate in a simpler mode without a database for very basic usage, setting up a database is highly recommended for any practical application, especially if you intend to use advanced features like job accounting (slurmdbd). MariaDB is a popular open-source relational database that is fully compatible with MySQL and widely used in Linux environments.
To install MariaDB server, use the following command:
sudo apt install mariadb-server -y
This command will download and install the MariaDB server and its necessary dependencies. Once installed, the MariaDB service will typically start automatically. With these foundational components in place, your WSL Ubuntu environment is now ready for the more intricate steps of configuring the database for SLURM and installing the SLURM components themselves.
Building the SLURM Environment: Database and SLURM Configuration
With the preliminary installations complete, we can now move on to configuring MariaDB for SLURM’s accounting needs and then installing and setting up the SLURM components. This phase involves creating a dedicated database, user, and crafting the crucial SLURM configuration files that dictate how your mini-cluster will operate.
Configuring MariaDB for SLURM
The MariaDB installation from the previous step provides the database server, but we need to secure it and create a dedicated database and user for SLURM. This ensures that SLURM has its own segregated space for storing data and operates with the principle of least privilege.
-
Secure MariaDB Installation:
It’s good practice to run themysql_secure_installationscript immediately after installing MariaDB. This script helps improve the security of your MariaDB installation by setting a root password, removing anonymous users, disallowing root login remotely, and removing the test database.sudo mysql_secure_installationFollow the prompts. You’ll likely be asked to set a root password, remove anonymous users, disallow remote root login, and remove the test database. For a local WSL setup, some of these might seem less critical, but it’s a good habit for security.
-
Create SLURM Database and User:
Now, log into the MariaDB shell as the root user and create a database and a user specifically for SLURM. Remember to replace'your_password'with a strong, secure password of your choice.sudo mysql -u root -pEnter the root password you set during the secure installation. Once inside the MariaDB prompt (
MariaDB [(none)]>), execute the following commands:CREATE DATABASE slurm_db; CREATE USER 'slurm'@'localhost' IDENTIFIED BY 'your_password'; GRANT ALL PRIVILEGES ON slurm_db.* TO 'slurm'@'localhost'; FLUSH PRIVILEGES; EXIT;CREATE DATABASE slurm_db;creates a new database namedslurm_db.CREATE USER 'slurm'@'localhost' IDENTIFIED BY 'your_password';creates a new user namedslurmthat can only connect fromlocalhost(your WSL instance) and sets their password.GRANT ALL PRIVILEGES ON slurm_db.* TO 'slurm'@'localhost';grants all permissions on theslurm_dbdatabase to theslurmuser. For production environments, you might restrict these privileges further, but for a local development setup, this is sufficient.FLUSH PRIVILEGES;reloads the grant tables, ensuring the new permissions take effect immediately.EXIT;exits the MariaDB shell.
Installing SLURM Components
Unlike some complex software, SLURM is generally available directly from the Ubuntu repositories, simplifying the installation process. We will install the core SLURM components using apt.
sudo apt install slurm-llnl slurm-client slurmd slurmctld slurm-wlm-doc libpam-slurm libmariadb-dev -y
Let’s break down these packages:
slurm-llnl: This is the main SLURM meta-package, often pulling in core components.slurm-client: Provides client utilities likesbatch,srun,sinfo,squeue, etc.slurmd: The SLURM daemon that runs on compute nodes (in our case,localhost).slurmctld: The SLURM controller daemon, the brain of the cluster.slurm-wlm-doc: SLURM workload manager documentation.libpam-slurm: Pluggable Authentication Module (PAM) for SLURM, used for authentication.libmariadb-dev: Development files for MariaDB, needed for SLURM to communicate with the database.
Crafting the SLURM Configuration File (slurm.conf)
The slurm.conf file is the heart of your SLURM cluster. It defines the cluster’s topology, nodes, partitions, users, and various operational parameters. For our WSL setup, we’ll create a minimal but functional configuration that treats localhost as both the control machine and the sole compute node.
Open the configuration file using your preferred text editor (e.g., nano):
sudo nano /etc/slurm-llnl/slurm.conf
Now, populate the file with the following content. Pay close attention to the explanations for each parameter.
# slurm.conf - SLURM configuration file for WSL Ubuntu
#
# ClusterName: A name for your SLURM cluster.
ClusterName=wsl_cluster

# ControlMachine: The hostname of the machine where slurmctld will run.
# In our WSL setup, this is localhost.
ControlMachine=localhost

# NodeName: Defines the compute nodes in your cluster.
# For WSL, we treat localhost as our single node.
NodeName=localhost Sockets=1 CoresPerSocket=4 ThreadsPerCore=2 RealMemory=8000 # Adjust memory/cores as per your system or desired simulation

# PartitionName: Defines partitions (groups of nodes) where jobs can run.
# We create a 'debug' partition for development.
PartitionName=debug Nodes=localhost Default=YES MaxTime=INFINITE State=UP

# ProctrackType: Specifies the method SLURM uses to track processes.
# cgroup is recommended for modern Linux systems.
ProctrackType=proctrack/cgroup

# SlurmUser: The user SLURM daemons run as. This user is usually created during package installation.
SlurmUser=slurm

# LogFile locations for slurmctld and slurmd.
SlurmctldLogFile=/var/log/slurm-llnl/slurmctld.log
SlurmdLogFile=/var/log/slurm-llnl/slurmd.log

# PidFile locations for the daemon process IDs.
SlurmctldPidFile=/var/run/slurmctld.pid
SlurmdPidFile=/var/run/slurmd.pid


<p style="text-align:center;"><img class="center-image" src="https://www.ubuntumint.com/wp-content/uploads/2023/07/Install-Ubuntu-on-Windows-via-Store.webp" alt=""></p>


# SchedulerType: Defines the scheduling algorithm. backfill is common.
SchedulerType=sched/backfill

# SelectType: Specifies how resources are allocated to jobs.
# cons_res (consumable resources) allows more flexible allocation.
SelectType=select/cons_res
SelectTypeParameters=CR_Core_Memory

# AuthType: Specifies the authentication method. Munge is standard for SLURM.
AuthType=auth/munge

# MessageTimeout: How long SLURM waits for a message response.
MessageTimeout=10

# CommunicationPort: The port slurmctld listens on.
CommunicationPort=6817

# Epilog/Prolog: Scripts executed before/after job execution (optional).
# We'll omit for simplicity, but know they exist for advanced setups.

# SLURM Accounting Storage Configuration (Crucial for slurmdbd)
# These parameters connect SLURM to the MariaDB database for accounting.
JobAcctGatherType=jobacct_gather/linux
JobAcctGatherFrequency=30
AccountingStorageType=accounting_storage/slurmdbd
AccountingStorageHost=localhost
AccountingStoragePort=6819 # Default port for slurmdbd
AccountingStorageUser=slurm
AccountingStoragePass=your_password # Use the password you set for the 'slurm' MariaDB user
AccountingStorageLoc=slurm_db
Important:
NodeNameparameters: AdjustSockets,CoresPerSocket,ThreadsPerCore, andRealMemoryto reflect your WSL system’s resources or to simulate a desired node configuration.RealMemoryshould be in MB. WSL usually reports total system RAM; you might want to specify a portion of it for simulation.your_password: Replace this placeholder with the actual password you set for theslurmuser in MariaDB.- Log directories: Ensure the log directories
/var/log/slurm-llnl/exist. If not, create them:sudo mkdir -p /var/log/slurm-llnl/andsudo chown slurm:slurm /var/log/slurm-llnl/.
Save and close the file (Ctrl+O, Enter, Ctrl+X in nano).
Configuring Munge for Secure Communication
Now that munge is installed, we need to ensure it’s properly configured and running for SLURM’s secure communication.
-
Generate Munge Key:
Ifmungedidn’t generate a key automatically or if you want to ensure a fresh one, you can do so. Usually, themungepackage installation handles this. The key is located at/etc/munge/munge.key. You might just need to check permissions. -
Set Permissions and Ownership:
Themungekey and related directories must have strict permissions for security. They should only be readable by themungeuser.sudo chown -R munge:munge /etc/munge /var/log/munge /var/run/munge sudo chmod 0700 /etc/munge /var/log/munge /var/run/munge -
Start and Enable Munge Service:
Ensure themungeservice is running and configured to start automatically on boot.sudo systemctl enable munge sudo systemctl start munge sudo systemctl status mungeThe
statuscommand should showactive (running).
Configuring SLURM Database Daemon (slurmdbd.conf)
For SLURM accounting to work (which records job details in the database), you need to configure and run slurmdbd (SLURM Database Daemon). This daemon acts as an intermediary between slurmctld and the MariaDB database.
-
Install
slurmdbd(if not already pulled byslurm-llnl):sudo apt install slurmdbd -y -
Create
slurmdbd.conf:
Open the configuration file forslurmdbd:sudo nano /etc/slurm-llnl/slurmdbd.confAdd the following content:
# slurmdbd.conf - SLURM Database Daemon configuration file
#
AuthType=auth/munge
DbdHost=localhost
DbdPort=6819
SlurmUser=slurm
LogFile=/var/log/slurm-llnl/slurmdbd.log
PidFile=/var/run/slurmdbd.pid
StorageType=accounting_storage/mariadb
StorageHost=localhost
StoragePort=3306
StorageUser=slurm
StoragePass=your_password # Use the same password as for slurm.conf
StorageLoc=slurm_db
Again, replace
your_passwordwith the actual password for theslurmMariaDB user. -
Set Permissions for
slurmdbd.conf:
Theslurmdbd.conffile contains sensitive information (the database password), so its permissions must be restricted.sudo chown slurm:slurm /etc/slurm-llnl/slurmdbd.conf sudo chmod 600 /etc/slurm-llnl/slurmdbd.confThis makes the file readable only by the
slurmuser. -
Create SLURM Spool Directory:
SLURM needs a spool directory for various internal operations. Ensure it exists and has the correct ownership.sudo mkdir -p /var/spool/slurmctld sudo chown slurm:slurm /var/spool/slurmctld
With these configuration files meticulously set up, your SLURM environment is almost ready to spring into action. The next and final phase involves starting the SLURM services and verifying that everything is running as expected.
Bringing SLURM to Life: Service Management and Verification
After all the configuration files are in place, the final step is to start the various SLURM daemons and verify that your local SLURM cluster is operational. This is the moment where all your hard work comes together, allowing you to interact with SLURM and submit your first jobs.
Starting and Enabling SLURM Services
SLURM consists of several core services that work in concert. We need to start and enable each of them to ensure they run correctly and automatically restart with your WSL instance.
-
Start and Enable
slurmdbd:
This daemon should be started first, asslurmctldrelies on it for accounting if configured.sudo systemctl enable slurmdbd sudo systemctl start slurmdbd sudo systemctl status slurmdbdVerify that the status is
active (running). -
Start and Enable
slurmctld:
The SLURM controller daemon is the central manager of your cluster.sudo systemctl enable slurmctld sudo systemctl start slurmctld sudo systemctl status slurmctldEnsure it shows
active (running). -
Start and Enable
slurmd:
The SLURM node daemon runs on each compute node. In our case, it runs onlocalhost.sudo systemctl enable slurmd sudo systemctl start slurmd sudo systemctl status slurmdConfirm
active (running).
If any of these services fail to start, immediately check the log files specified in slurm.conf and slurmdbd.conf (e.g., /var/log/slurm-llnl/slurmctld.log, /var/log/slurm-llnl/slurmd.log, /var/log/slurm-llnl/slurmdbd.log) for error messages. Common issues include incorrect paths, permission problems, or errors in the configuration files.
Verifying the Installation
Once all services are running, it’s time to use SLURM’s client commands to verify that your mini-cluster is functioning correctly.
-
Check Node Information with
sinfo:
Thesinfocommand provides information about SLURM nodes and partitions. You should seelocalhostlisted as a node in thedebugpartition, with its state asidleorallocated.sinfoExpected output might look something like:
PARTITION AVAIL  TIMELIMIT  NODES  STATE NODELIST
debug*       up   INFINITE      1   idle localhost
If
localhostshows asdownordrain, check theslurmdlog file. -
Check Job Queue with
squeue:
Initially, your job queue should be empty, indicating no jobs are currently running or pending.squeueExpected output:
JOBID PARTITION NAME USER ST TIME NODES NODELIST(REASON) -
Run a Test Job with
srun:
srunis used to run a job interactively. Let’s run a simple command likehostnameto confirm job execution.srun hostnameYou should see
localhostprinted, confirming that SLURM successfully allocated a node (your WSL instance) and ran the command on it.Now, let’s try a job that takes a few seconds, and simultaneously check the queue:
srun sleep 10 &
squeue
You’ll see a job ID listed by
squeue, with its state asR(Running). After 10 seconds, if you runsqueueagain, it should be empty, and thesinfocommand should show the node back toidle. -
Verify Accounting (Optional but Recommended):
Ifslurmdbdis correctly configured, you can check if accounting records are being stored.
bash

sacct
This command will show information about completed jobs, including thesleep 10job you just ran. If you see your job listed, accounting is working.
Troubleshooting Common Issues
- Services Not Starting: Always check the
systemctl status <service_name>and the corresponding log files (/var/log/slurm-llnl/*.log). Error messages often pinpoint the exact problem, such as incorrect configuration parameters or missing dependencies. - Munge Errors (e.g., “Munge decode failed: Invalid credential”): This usually indicates a problem with the
mungeservice or its key. Ensuremungeis running, its permissions are correct (chmod 0700 /etc/munge), and themunge.keyfile exists and is owned bymunge:munge. A common fix is to regenerate the key and restartmunge:
bash

sudo rm /etc/munge/munge.key

sudo /usr/sbin/create-munge-key

sudo chown munge:munge /etc/munge/munge.key

sudo systemctl restart munge

sudo systemctl restart slurmctld slurmd
- Database Connection Issues: Check your
slurmdbd.conffor correctStorageUser,StoragePass,StorageHost, andStoragePort. Ensure MariaDB is running (sudo systemctl status mariadb). You can also try to log into MariaDB with theslurmuser:mysql -u slurm -p(enteryour_password). If this fails, review your MariaDB user creation steps. - Node in
downState: This often points to issues withslurmd. Check theslurmdlog file (/var/log/slurm-llnl/slurmd.log). It might indicate problems communicating withslurmctldor issues withmunge.
Remember, persistence is key in troubleshooting. Each error message provides a clue, and a systematic approach will help you resolve most issues.
Conclusion: Empowering Your Local HPC Development
Congratulations! You have successfully installed and configured SLURM on your WSL Ubuntu environment. This journey, from setting up the prerequisites to verifying the core services, equips you with a powerful local HPC sandbox. You now have a mini-cluster at your fingertips, capable of scheduling and executing computational jobs, mirroring the functionality of much larger, production-grade HPC systems.
The ability to run SLURM locally on WSL Ubuntu offers immense benefits for a wide array of users. For students, it democratizes access to HPC concepts, allowing hands-on learning without the need for specialized infrastructure. Researchers and developers can leverage this setup for rapid prototyping, debugging, and testing their code and job scripts before deploying them to larger, shared clusters, thus saving valuable cluster resources and accelerating their development cycles. For anyone interested in the intricacies of parallel computing and resource management, this local SLURM instance provides an invaluable experimental playground.
Next Steps for Your HPC Journey:
- Experiment with
sbatch: Explore submitting jobs using batch scripts (.shfiles) instead of interactivesruncommands. Learn how to specify resources, dependencies, and output files. - Explore SLURM’s Features: Dive deeper into SLURM documentation to understand advanced concepts like job arrays, quality of service (QoS), reservations, and more complex resource allocation strategies.
- Integrate with Development Tools: Consider how you might integrate your WSL SLURM environment with your favorite development tools, perhaps by mapping network drives or using SSH for more streamlined workflows.
- Monitor Resources: Learn to use tools like
htop,top, or SLURM’s ownsstatcommand to monitor resource utilization of your jobs on thelocalhostnode. - Simulate Multi-Node Behavior: While technically still on one physical machine, you can expand your
slurm.confto define multiple virtualNodeNameentries, simulating a larger cluster and experimenting with multi-node job distribution.
The realm of HPC is vast and constantly evolving, and your newly configured SLURM on WSL Ubuntu is an excellent starting point for your exploration. Embrace the power of local development, iterate quickly, and empower your computational endeavors with the flexibility and convenience this setup provides. This practical application of technology directly impacts productivity and knowledge acquisition, strongly resonating with our website’s mission to demystify complex “Tech” and make it accessible to everyone.
aViewFromTheCave is a participant in the Amazon Services LLC Associates Program, an affiliate advertising program designed to provide a means for sites to earn advertising fees by advertising and linking to Amazon.com. Amazon, the Amazon logo, AmazonSupply, and the AmazonSupply logo are trademarks of Amazon.com, Inc. or its affiliates. As an Amazon Associate we earn affiliate commissions from qualifying purchases.