In the vast landscape of digital entertainment, particularly within the realm of PC gaming, the pursuit of visual perfection is an endless quest. From cutting-edge graphics cards to high-resolution monitors, enthusiasts are constantly seeking ways to push the boundaries of realism and immersion. Among the most impactful and accessible methods for achieving this graphical renaissance is the installation of shaders. These ingenious pieces of software act as a powerful brush, painting over the default textures and lighting of your favorite games with breathtaking effects, transforming mundane scenes into vibrant, dynamic, and often hyper-realistic environments.
On a tech-focused platform like ours, dedicated to exploring software, AI tools, and insightful tutorials, diving into the practical application of shaders perfectly aligns with our mission to empower users with the knowledge to enhance their digital experiences. This comprehensive guide will demystify the process of installing shaders, explaining not just the “how” but also the “why,” ensuring you’re equipped to embark on a journey towards unparalleled visual fidelity in your gaming adventures.
Understanding Shaders and Their Impact
Before we delve into the hands-on installation, it’s crucial to grasp what shaders are, what they accomplish, and why they’ve become such a beloved tool for gamers and modders alike. Understanding the underlying principles will help you appreciate the transformation they bring and navigate the various options available.
What Exactly Are Shaders?
At their core, shaders are small programs designed to run on a graphics processing unit (GPU). They are executed during the rendering pipeline, influencing how light, shadow, color, and various visual effects are calculated and displayed on your screen. Unlike static textures or models, shaders introduce dynamic changes, recalculating visual properties in real-time based on factors like light sources, camera position, and material properties.
Think of a game’s default graphics as a beautifully drawn pencil sketch. Shaders are the equivalent of adding vibrant watercolors, intricate shading, realistic reflections, and subtle atmospheric effects, bringing that sketch to life with incredible depth and detail. They can simulate:
- Realistic Lighting: Global illumination, volumetric lighting, dynamic shadows, god rays.
- Water Effects: Refractions, reflections, waves, murky depths.
- Atmospheric Effects: Fog, haze, dust particles, realistic clouds.
- Surface Properties: Parallax occlusion mapping (simulating depth on flat textures), specular highlights, physically based rendering (PBR) effects.
- Post-Processing Effects: Color grading, bloom, depth of field, motion blur, anti-aliasing.
These effects dramatically enhance the visual fidelity, often making games look vastly superior to their original, unmodded versions.
Why Bother Installing Shaders? The Aesthetic and Experiential Benefits
The primary motivation for installing shaders is, without a doubt, visual enhancement. However, the benefits extend far beyond mere aesthetics, impacting the overall gaming experience in several profound ways:
- Immersive Realism: Shaders inject a dose of realism that stock game engines often lack. Realistic lighting and shadow interactions, coupled with advanced atmospheric effects, create environments that feel more tangible and believable. This heightened realism can pull you deeper into the game world, blurring the line between the virtual and the real.
- Atmospheric Depth: Beyond realism, shaders are masters of atmosphere. A well-chosen shader pack can transform a sunny plain into a brooding, misty landscape, or turn a dark cave into an eerily lit chamber with flickering torchlight. This control over mood and ambiance significantly enriches the storytelling and emotional impact of a game.
- Extended Game Lifespan: For older, beloved titles, shaders offer a new lease on life. Games from a decade or two ago, despite their timeless gameplay, can often look dated. Shaders can dramatically upgrade their visual presentation, making them feel fresh and modern, allowing you to re-experience classics with a contemporary graphical sheen.
- Personalized Visuals: With a multitude of shader packs available, you have the power to customize your game’s look to your exact preferences. Prefer a vibrant, saturated fantasy look? Or perhaps a gritty, realistic, cinematic aesthetic? There’s a shader pack for virtually every taste, allowing for unparalleled personalization.
- Showcase Your Hardware: For those with powerful gaming rigs, shaders are an excellent way to push your GPU to its limits and witness the raw graphical prowess of your hardware. They demand significant processing power, and the resulting visuals often justify the investment in high-end components.
Essential Prerequisites Before You Begin
Before you dive into the installation process, it’s vital to ensure your system and game are ready. Skipping these preliminary checks can lead to frustration or sub-optimal results.
- Adequate Hardware: Shaders are graphically intensive. A modern, dedicated graphics card (NVIDIA GeForce RTX series or AMD Radeon RX series, or equivalent older high-end models) is highly recommended. Your CPU and RAM also play a role, but the GPU is the primary workhorse. If your PC struggles with the unmodded game, adding shaders will only exacerbate performance issues.
- Compatible Game/Game Version: Shaders are game-specific or require a compatible mod loader. For instance, Minecraft typically uses OptiFine, while a broader range of games can be enhanced with tools like ReShade. Ensure your game version is compatible with the chosen shader method and packs.
- Up-to-Date Graphics Drivers: Always keep your graphics drivers updated to the latest stable version. Outdated drivers are a common cause of performance issues, visual glitches, and crashes when using shaders. Visit NVIDIA, AMD, or Intel’s official websites to download the newest drivers.
- Reliable Internet Connection: You’ll need to download shader packs and any necessary mod loaders, which can range from a few megabytes to several hundred.
- Trusted Sources: Always download shader packs and modding tools from reputable websites (e.g., CurseForge, official mod developer sites, trusted forums). Downloading from unknown sources can expose your system to malware.
- Backup Your Game Files: While shader installation is generally safe, it’s good practice to back up your game’s save files or even the entire game directory, especially if you’re experimenting with extensive modding.
Step-by-Step Installation Guides
The method for installing shaders varies significantly depending on the game. We’ll cover two of the most popular scenarios: Minecraft, which has a dedicated modding ecosystem, and a more generalized approach for a wide array of other PC games using ReShade.
Installing Shaders for Minecraft (Using OptiFine)
Minecraft is arguably the most popular game for shader enthusiasts, largely thanks to OptiFine, a performance optimization and HD texture/shader support mod.
Step 1: Preparing Your Minecraft Environment
First, ensure you have the correct version of Minecraft Java Edition installed. Shaders are not typically compatible with Minecraft Bedrock Edition.
- Install Java: OptiFine runs as a Java executable. If you don’t have Java installed or it’s outdated, download and install the latest version from the official Java website.
- Run Minecraft Once: Launch Minecraft Java Edition at least once with the desired game version (e.g., 1.20.1) that you plan to install OptiFine for. This creates the necessary game files and profiles.
- Download OptiFine: Go to the official OptiFine website (optifine.net). Navigate to the “Downloads” section and find the version corresponding to your Minecraft game version. Download the installer (.jar file). Be wary of ad links; look for the “Download” or “Mirror” link directly related to the OptiFine file.
Step 2: Acquiring Your Desired Shader Pack
There are hundreds of shader packs available, each with its unique aesthetic and performance demands. Some popular choices include:
-
SEUS (Sonic Ether’s Unbelievable Shaders): Known for its realistic lighting and atmospheric effects.
-
BSL Shaders: A highly customizable and beautiful pack offering a balance of performance and visuals.
-
Complementary Shaders: A modern, feature-rich pack built upon BSL.
-
Sildur’s Shaders: Offers various versions for different PC performance levels.
-
Download Shader Pack(s): Visit reputable Minecraft modding sites (e.g., CurseForge, Planet Minecraft, or the shader creator’s official page) and download your chosen shader packs. They will typically come as
.zipfiles. Do not extract these files. They need to remain in their zipped format for Minecraft to recognize them.
Step 3: Integrating the Shader Pack into Minecraft
With OptiFine installed and your shader packs downloaded, it’s time to bring them together.
- Locate the
shaderpacksFolder:- Open the Minecraft Launcher.
- Click on “Installations.”
- Hover over the OptiFine profile you just created and click the folder icon that appears (this opens the Minecraft game directory).
- Inside this directory, you should see a folder named
shaderpacks. If it doesn’t exist, simply create a new folder and name itshaderpacks(all lowercase).
- Move Shader Packs: Drag and drop the downloaded
.zipshader pack files (e.g.,BSL_Shaders_v8.zip) directly into theshaderpacksfolder. Remember, do not unzip them.
Step 4: Activating and Customizing Your Shaders
The final step is to tell Minecraft to use your new shaders and tweak their settings to your liking.
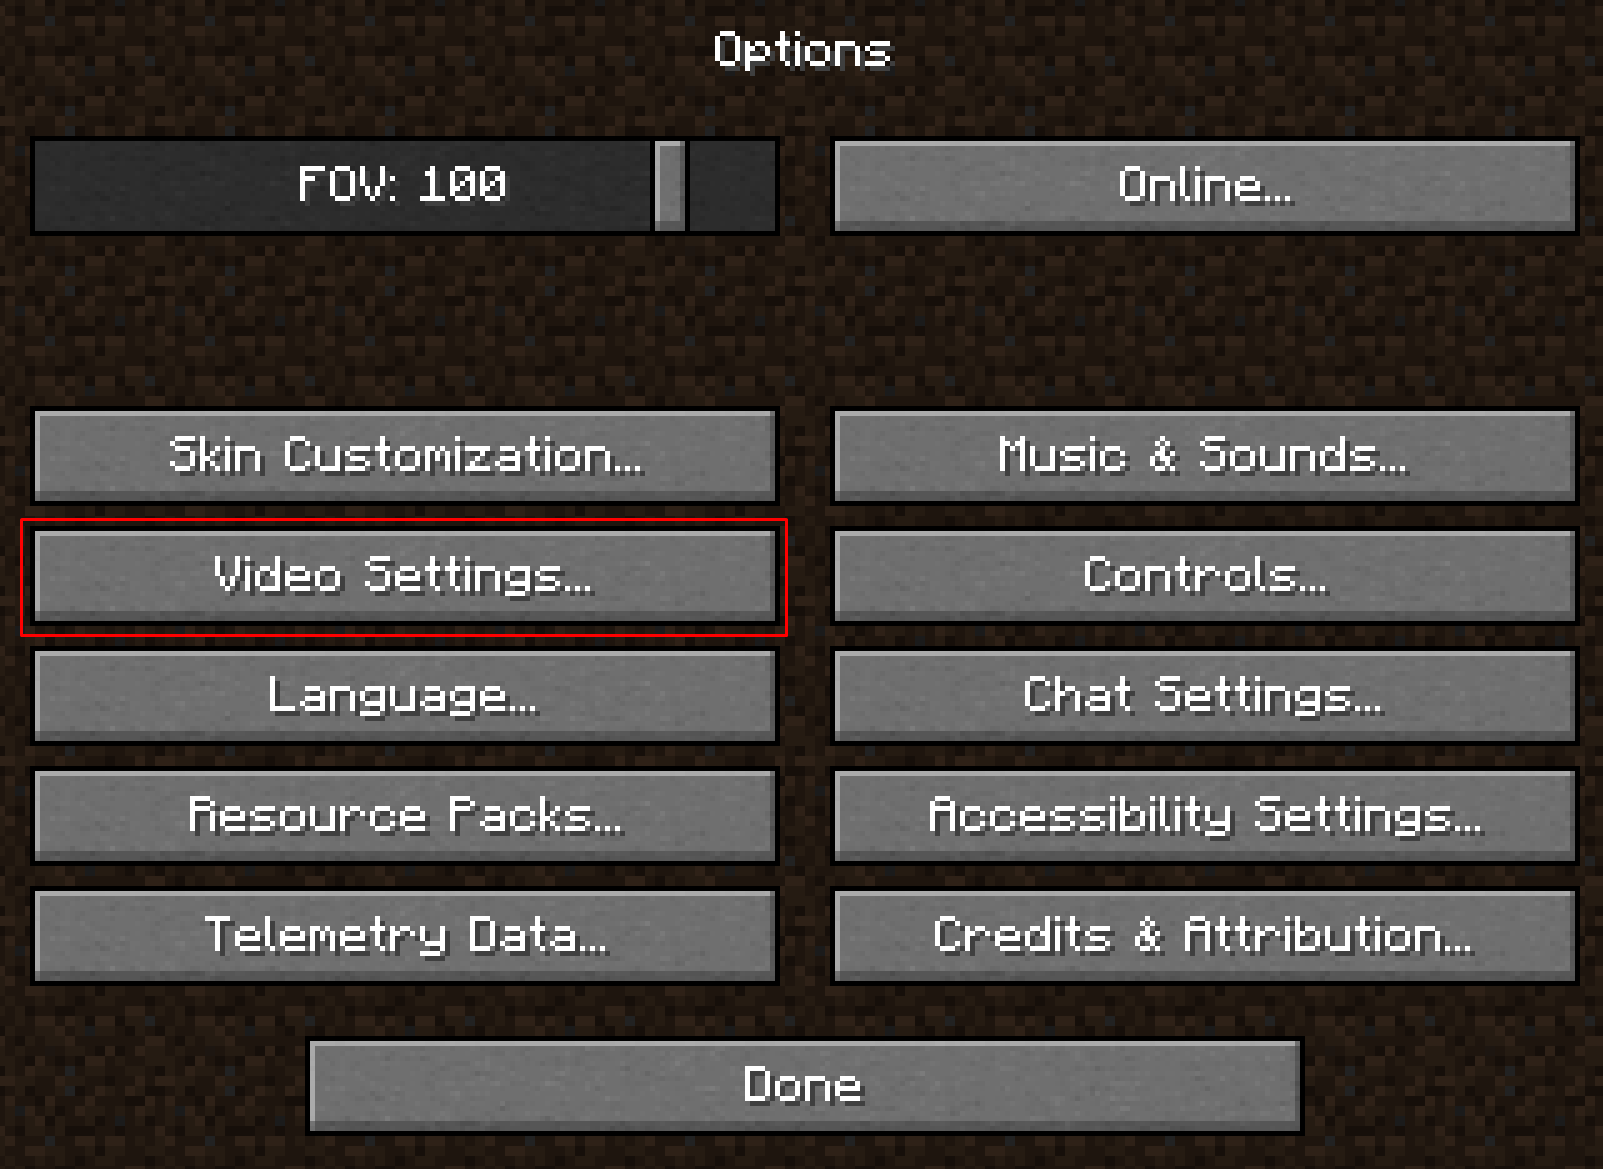
- Launch Minecraft: Open the Minecraft Launcher and ensure the “OptiFine” profile is selected. Click “Play.”
- Access Video Settings: Once in the game, go to “Options” -> “Video Settings” -> “Shaders.”
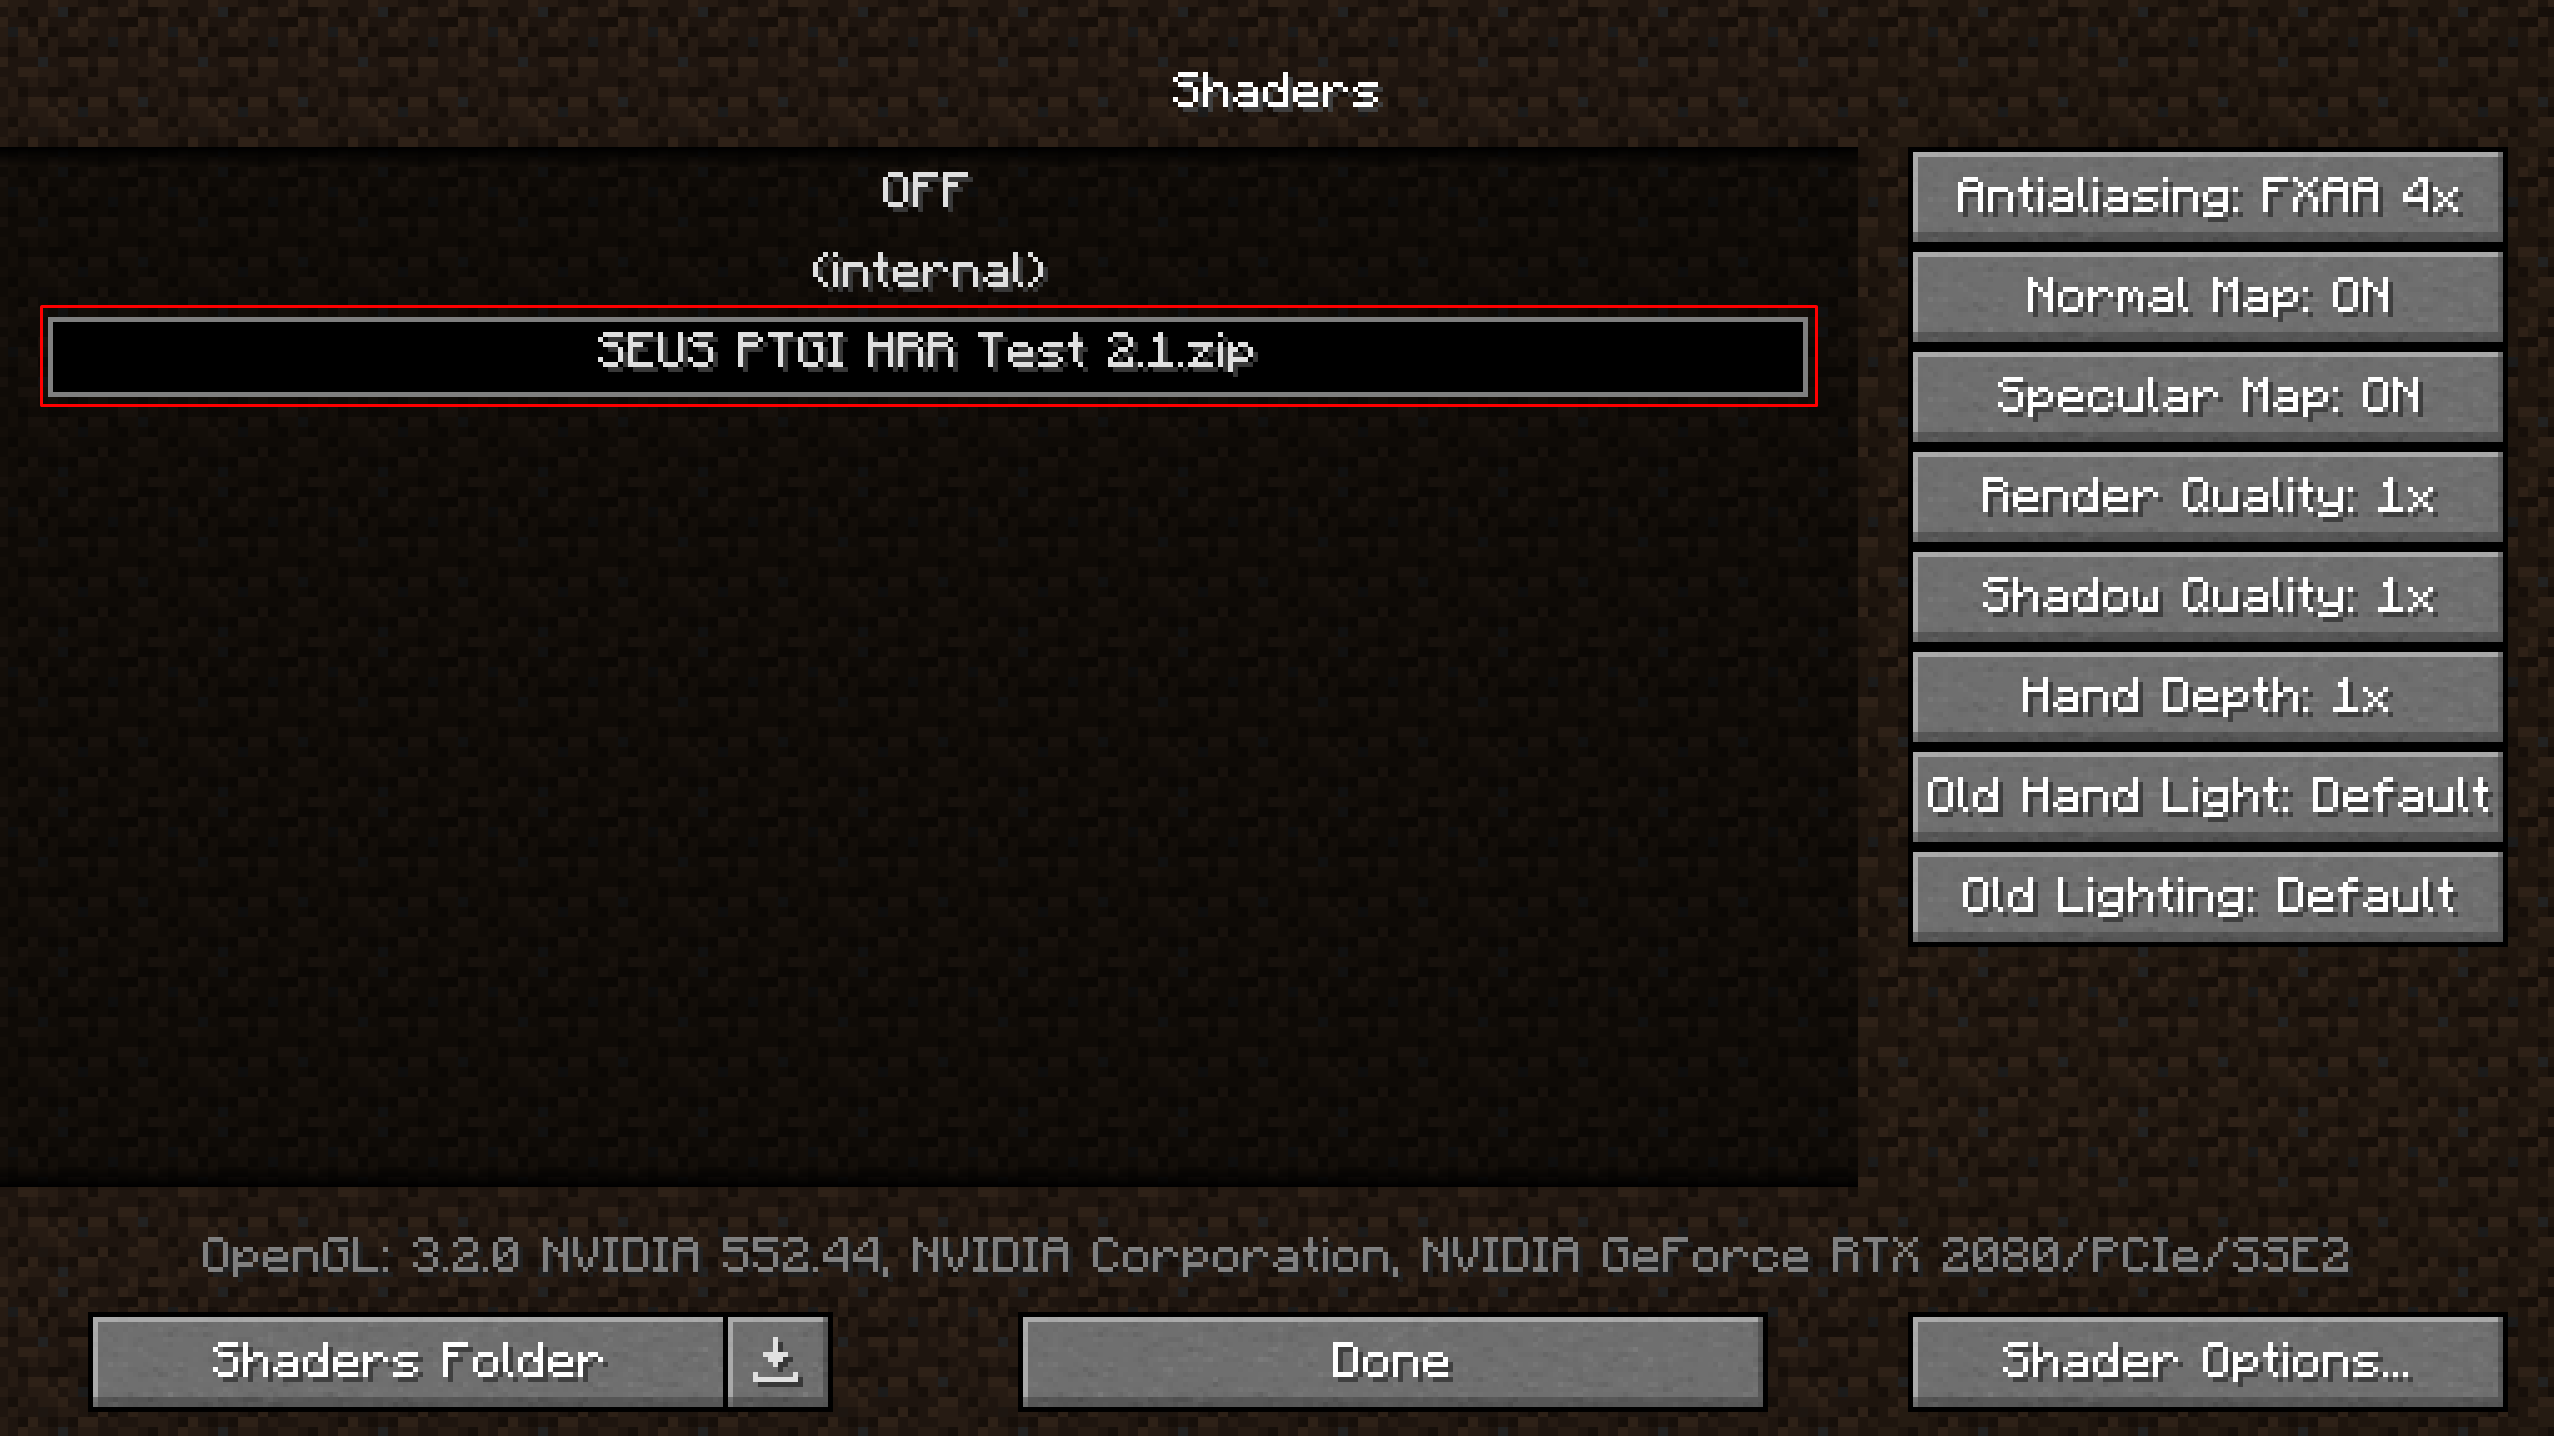
- Select Your Shader Pack: You will see a list of all the shader packs you placed in the
shaderpacksfolder. Click on the one you wish to activate. Minecraft will reload the textures, and your shaders will be applied. - Customize Shader Options: Most shader packs offer extensive customization. Click on “Shader Options…” to adjust parameters like shadow quality, water effects, atmospheric density, and more. Experiment with these settings to find the perfect balance between aesthetics and performance for your system.
Enhancing Other Games with ReShade
For games beyond Minecraft, especially those without a dedicated modding community for shaders, ReShade is a phenomenal and versatile tool. ReShade is a generic post-processing injector that works with a vast array of DirectX, OpenGL, and Vulkan games. It adds a suite of configurable post-processing effects, essentially allowing you to create your own “shaders” on top of the game’s existing rendering.
Step 1: Downloading and Running the ReShade Installer
- Download ReShade: Go to the official ReShade website (reshade.me) and download the latest version of the installer.
Step 2: Selecting Your Game and API
- Run Installer: Launch the downloaded ReShade setup file.
- Select Game Executable: The installer will ask you to select a game. Click “Click here to select a game and manage its ReShade installation.” Browse to the installation directory of the game you want to enhance and select its main executable file (e.g.,
game.exe). - Choose Rendering API: ReShade will then ask you to select the rendering API the game uses. This is crucial for ReShade to inject correctly. Common APIs include:
- Direct3D 9 (for older games)
- Direct3D 10/11/12 (for most modern Windows games)
- OpenGL (for some older games and cross-platform titles)
- Vulkan (for newer titles like Doom Eternal, Wolfenstein)
If you’re unsure, try Direct3D 10/11/12 first, or search online for what API your specific game uses.
Step 3: Choosing Your Shader Effects
- Select Effect Packages: ReShade will present a list of shader effect packages. By default, it will recommend a few essential ones. You can select individual effects or entire packages (e.g., “Standard effects,” “SweetFX,” “Legacy Standard Effects”). For a good starting point, select all recommended standard effects. You can always add or remove them later.
- Complete Installation: Click “OK” or “Finish.” ReShade will download the necessary files and integrate itself into your game.
Step 4: Configuring ReShade In-Game
- Launch Game: Start the game you just configured ReShade for. You should see a small banner at the top of the screen indicating ReShade is loading.
- Open ReShade Overlay: Once in the game, press the
Homekey (by default) to open the ReShade overlay. - Follow Tutorial/Select Preset: If it’s your first time, ReShade will guide you through a brief tutorial. You can then choose from existing presets (if you’ve downloaded any) or start configuring effects manually.
- Enable/Disable Effects: In the ReShade overlay, you’ll see a list of all installed effects. Check the boxes next to the effects you want to activate. As you enable them, you’ll see the changes in real-time.
- Adjust Effect Settings: Below the list of effects, you can click on each enabled effect to reveal its specific parameters (e.g., strength of ambient occlusion, depth of field blur amount, color saturation). Experiment with these sliders to achieve your desired look.
- Save Preset: Once you’re happy with your settings, click the “Home” key again to close the overlay. You can save your custom configuration as a preset file to easily load it later or share with others.
Optimizing Your Shader Experience
Installing shaders is just the first step. To truly enjoy them, you’ll need to understand how to manage performance and troubleshoot common issues.
Navigating Performance Considerations
Shaders, by their very nature, are performance-intensive. They require your GPU to perform complex calculations in real-time, which can significantly impact your frame rate.
- Monitor FPS: Always monitor your frames per second (FPS) after installing shaders. Most game launchers or third-party tools (like MSI Afterburner or NVIDIA GeForce Experience) have an FPS overlay.
- Adjust Shader Settings: This is your primary tool for balancing visuals and performance. Most shader packs offer extensive options:
- Shadow Quality: Reducing shadow resolution or distance can yield significant FPS gains.
- Render Quality/Internal Resolution: Lowering this can improve performance at the cost of some sharpness.
- Volumetric Lighting/Clouds: These are often very demanding. Experiment with turning them down or off.
- Anti-Aliasing: While improving edge smoothness, high levels of AA can be taxing.
- Water Reflections/Refractions: Simplifying water effects can help.
- Resolution Scaling: If your monitor is very high resolution (e.g., 4K), consider lowering the game’s internal render resolution while keeping the display resolution native. Many games have a “resolution scale” slider.
- Hardware Upgrade: Ultimately, if you desire ultra-realistic shaders at high frame rates, a powerful GPU is indispensable.
Troubleshooting Common Shader Issues
Even with careful installation, you might encounter issues. Here’s how to address the most frequent problems:
Game Crashes and Instability
- Incompatible Shader Pack: Not all shader packs are compatible with all game versions or mod loaders. Try a different, simpler shader pack.
- Outdated Drivers: Ensure your graphics drivers are up to date.
- Conflicting Mods: If you have other mods installed, one might be conflicting with the shaders or mod loader. Try disabling other mods temporarily.
- Incorrect Installation: Double-check all installation steps, especially for OptiFine (correct version, moved
.zipfile without extracting). - ReShade API Mismatch: For ReShade, ensure you selected the correct rendering API for your game. If not, uninstall ReShade and reinstall with the correct API.
Visual Glitches and Artifacts
- Shader Pack Bugs: Some shader packs might have bugs. Check the shader pack’s forum or download page for known issues or updates.
- Driver Issues: Again, ensure drivers are updated.
- Game Settings Conflict: Certain in-game video settings (e.g., specific anti-aliasing modes) might conflict with shader effects. Try adjusting them.
- Outdated OptiFine/ReShade: Ensure your shader loader is the latest stable version.
Performance Drops
- Hardware Limitations: Your hardware might simply not be powerful enough for the chosen shader pack’s settings. Refer to the “Navigating Performance Considerations” section above and dial down settings.
- Background Processes: Close unnecessary background applications that consume CPU or GPU resources.
- Game-Specific Optimizations: Some games have specific optimization tips. Consult community forums for your particular game.
Finding the Perfect Shader Pack for You
The “best” shader pack is subjective, depending on your aesthetic preference and hardware capabilities.
- Watch Videos: YouTube is an invaluable resource. Search for “best Minecraft shaders” or “ReShade presets for [Game Name]” to see various packs in action. Pay attention to performance comparisons.
- Read Reviews: Check modding forums and download sites for user reviews and recommendations.
- Consider Performance: Many shader packs offer “Lite,” “Medium,” or “High” versions. Start with a less demanding version if you’re unsure about your PC’s capability.
- Experiment: Don’t be afraid to download a few different packs and try them out. It’s easy to switch between them or remove them if they don’t suit you.
The Future of Graphics and Shaders
As technology continues its relentless march forward, the capabilities of graphics hardware and software evolve at an astounding pace. Modern graphics cards with dedicated RT (Ray Tracing) cores are bringing real-time ray tracing, a form of path tracing that simulates light physics more accurately than traditional rasterization, directly into games. While ray tracing is an evolution in rendering techniques, shaders remain fundamentally important. Many ray-traced games still use shaders for post-processing, material properties, and other effects, working in conjunction with RT cores to produce even more realistic and dynamic scenes.
Beyond Simple Aesthetics: Deeper Immersion
The role of shaders will likely expand beyond just making things look pretty. As game worlds become more complex and interactive, shaders can contribute to environmental storytelling, adaptive atmospheres, and even dynamic gameplay elements that react to player actions or in-game events. They are a core component in the ongoing quest to create truly immersive, believable, and responsive digital environments.
Conclusion: Transform Your Digital Worlds
Installing shaders is a relatively straightforward process that offers an incredibly rewarding payoff. Whether you’re breathing new life into a blocky Minecraft world or adding a cinematic flair to your favorite RPG, shaders provide an unparalleled level of visual customization and immersion. By following this guide, understanding the technical underpinnings, and dedicating a little time to experimentation, you can unlock a stunning new dimension of graphical fidelity in your PC games.
Embrace the power of shaders, experiment with different packs, and fine-tune your settings to create a gaming experience that is uniquely yours. Your digital worlds are waiting to be transformed – go forth and illuminate them!
aViewFromTheCave is a participant in the Amazon Services LLC Associates Program, an affiliate advertising program designed to provide a means for sites to earn advertising fees by advertising and linking to Amazon.com. Amazon, the Amazon logo, AmazonSupply, and the AmazonSupply logo are trademarks of Amazon.com, Inc. or its affiliates. As an Amazon Associate we earn affiliate commissions from qualifying purchases.