
Modern home appliances, particularly those from leading brands like Samsung, are marvels of engineering designed to simplify our daily lives. Yet, even the most sophisticated gadgets require occasional maintenance or repair. Among the more common issues faced by dryer owners is a worn or broken drive belt – a critical component responsible for turning the drum. While the prospect of disassembling an appliance might seem daunting, understanding the underlying mechanics and following a clear, step-by-step guide can empower any tech-savvy individual to tackle this repair with confidence. This tutorial will demystify the process of installing a new Samsung dryer belt, ensuring your appliance returns to peak performance and extending its valuable lifespan.

Understanding Your Samsung Dryer’s Drive System
Before diving into the repair, it’s insightful to grasp the function of the dryer belt and why it’s so vital to the appliance’s operation. This foundational knowledge not only aids in troubleshooting but also reinforces the interconnectedness of components within complex mechanical systems.
The Role of the Drive Belt in Appliance Mechanics
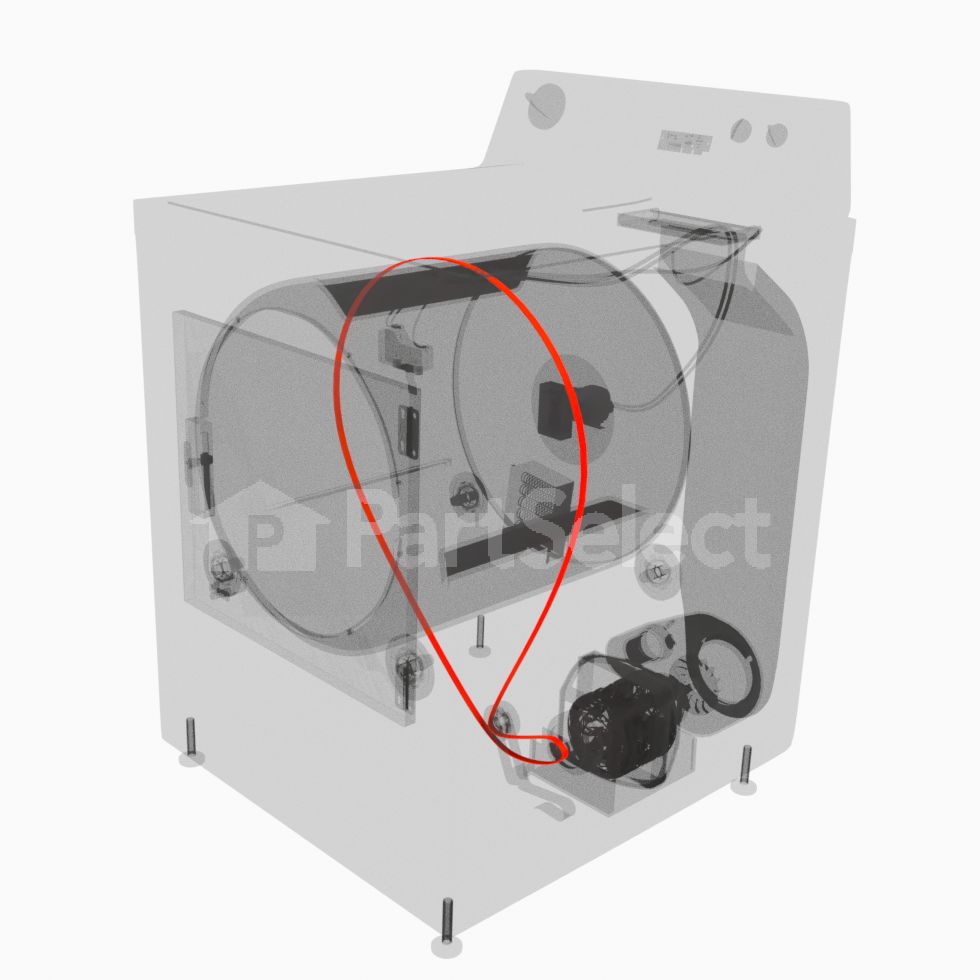
At its core, a dryer operates by tumbling clothes in a heated drum. This tumbling action is crucial for even drying and preventing wrinkles. The drive belt is the unsung hero of this process. It’s a long, continuous loop, often made of rubber or a durable synthetic material, that wraps around the dryer drum, a motor pulley, and an idler pulley. When the motor spins, it transmits power to the drive belt via the motor pulley. The belt, in turn, rotates the drum, creating the necessary motion. Without a functioning belt, the motor might hum, but the drum remains static, rendering the dryer useless for its primary purpose.
Identifying a Worn or Broken Belt: Digital Diagnostics and Physical Cues
While a completely snapped belt is an obvious culprit, a worn belt can manifest in more subtle ways. Common indicators include:
-
No Drum Movement: The most straightforward sign. You hear the motor, the fan might blow, but the drum doesn’t spin.
-
Squealing or Grinding Noises: A frayed or misaligned belt can rub against other components, creating distinct sounds that indicate a problem.
-
Excessive Vibrations: An imbalanced or damaged belt can cause the drum to wobble or vibrate unusually.
-
Burning Smell: Friction from a severely worn or slipping belt can generate heat and a distinctive burning rubber smell.
While Samsung dryers feature advanced diagnostics, these physical cues are often the first line of detection, alerting users to a mechanical issue that requires immediate attention. Early identification can prevent further damage to other components.
Common Samsung Dryer Models and Variations
Samsung manufactures a wide array of dryer models, from front-loading electric to gas-powered variants. While the fundamental belt installation process remains similar across many models, slight variations in panel removal, component placement, and belt routing can exist. It is always advisable to consult your specific dryer’s service manual or a parts diagram, often accessible online through Samsung’s support portal, by entering your model number. This digital resource provides precise schematics that can be invaluable, much like debugging code for a software engineer. Knowing your model number (usually found on a sticker inside the dryer door or on the back panel) is the first step in ensuring you have the correct replacement belt and understand any model-specific nuances.
Essential Tools and Safety Precautions for DIY Appliance Repair
Engaging in DIY appliance repair is a testament to technical self-sufficiency, but it demands respect for the inherent risks involved. Prioritizing safety and having the right tools are paramount, much like secure coding practices are essential in software development.
Tools You’ll Need for a Seamless Installation
Gathering your tools beforehand ensures a smooth and uninterrupted repair process. For a typical Samsung dryer belt installation, you will likely need:
-
Screwdrivers: Phillips head and flathead, for various screws securing panels and internal components.
-
Nut Drivers or Socket Set: For hex-head screws, common in appliance construction. Sizes typically range from 1/4 inch to 1/2 inch.
-
Pliers: Especially needle-nose pliers, useful for gripping small parts or maneuvering the belt.
-
Work Gloves: To protect your hands from sharp edges and grease.
-
Flashlight or Headlamp: Internal spaces can be dark, and good visibility is crucial.
-
Towel or Blanket: To protect your floor and the dryer itself if you lay it down.
-
New Drive Belt: Ensure it’s the correct part number for your specific Samsung dryer model.
-
Camera (Smartphone): To take pictures at various stages of disassembly. This is an invaluable troubleshooting tool for reassembly, acting as visual documentation.
Prioritizing Safety: Electrical and Mechanical Hazards
Safety is non-negotiable when working with electrical appliances. Dryers operate on high voltage and contain moving parts that can cause injury.
-
Disconnect Power: Always, without exception, unplug the dryer from the wall outlet or trip the circuit breaker before beginning any work. For gas dryers, also turn off the gas supply valve. This is the equivalent of “sudo shutdown -h now” before physically manipulating server hardware.
-
Beware of Sharp Edges: Internal metal panels can have sharp edges. Wear work gloves to prevent cuts.
-
Heavy Lifting: Dryers are heavy. If you need to tilt or move the dryer, enlist assistance to prevent back injury.
-
Capacitor Discharge (if applicable): While less common in modern dryer motors, some older models or specific motor types might have capacitors that retain a charge even after power is disconnected. If unsure, research your model or avoid touching internal motor components unnecessarily.
Preparing Your Workspace for Optimal Efficiency
A well-prepared workspace enhances both safety and efficiency.
-
Clear the Area: Move the dryer away from the wall, ensuring ample space to work around it and to lay down panels.
-
Good Lighting: Ensure sufficient lighting in your workspace.
-
Organize Fasteners: As you remove screws and bolts, keep them organized. Using magnetic trays or labeled containers for different components (e.g., “front panel screws,” “top panel screws”) prevents confusion during reassembly, much like maintaining version control in a coding project.
-
Protect Surfaces: Lay down a blanket or old towels to protect your flooring and the dryer’s exterior panels from scratches.
Step-by-Step Guide to Samsung Dryer Belt Installation
With safety measures in place and tools at the ready, you can now proceed with the technical steps of replacing the dryer belt. This section details the disassembly, replacement, and reassembly processes, providing a clear roadmap for a successful repair.
Disassembly: Accessing the Drum and Motor
The first major hurdle is gaining access to the dryer’s internal components, specifically the drum and the motor assembly.
-
Remove the Top Panel: Most Samsung dryers have screws at the rear of the top panel. Remove these, then slide the top panel back slightly and lift it off.
-
Disconnect Control Panel Wires (if necessary): For some models, the control panel may need to be unscrewed or unclipped and gently lifted to access screws beneath it. Carefully disconnect any wire harnesses by pressing their release tabs.
-
Remove the Front Panel: This is often the most involved step.
-
Door and Door Switch: The dryer door might need to be removed (usually by unscrewing hinges) to access inner screws. Disconnect the door switch wires.
-
Lint Filter Housing Screws: Remove screws around the lint filter housing.
-
Bottom Access Panel (if present): Some models have a kick panel at the bottom that needs to be removed first.
-
Main Front Panel Screws: Locate and remove all screws securing the front panel. These are often along the top edge (once the top panel is off) and along the sides/bottom.
-
Carefully Detach: Once all screws are removed, gently pull the front panel away. Be mindful of any remaining wires (like for the moisture sensor) that may need to be disconnected. Lay the panel aside carefully.
-
-
Access the Drum: With the front panel off, the dryer drum will be exposed. It will likely be resting on two rollers at the front and two at the back.

Removing the Old Belt and Preparing for the New One
Once the drum is accessible, removing the old belt is straightforward.
-
Locate the Idler Pulley and Motor Pulley: These are usually at the bottom rear of the drum area. The idler pulley is spring-loaded and maintains tension on the belt.
-
Relieve Tension: Push the idler pulley to release tension on the belt.
-
Slide Off the Old Belt: Carefully slide the old belt off the motor pulley and idler pulley, then lift it off the drum. Inspect it for wear patterns – this can offer clues to potential issues with pulleys or rollers.
Positioning the New Belt: A Critical Step
This is where understanding the belt’s path is crucial.
-
Place Belt Around Drum: Position the new belt around the dryer drum. Ensure the ribbed side of the belt will face inward (towards the drum), making contact with the motor and idler pulleys. The smooth side generally faces the drum itself.
-
Routing the Belt: Now, gently lower the drum into place if you lifted it fully. The challenging part is routing the belt around the motor and idler pulleys while keeping it centered on the drum.
-
Reach underneath the drum from the front or side access point.
-
Loop the belt first around the motor pulley.
-
Then, pull the idler pulley towards you (compressing its spring) and loop the belt around the idler pulley. The belt should form a distinct “S” shape around the motor and idler pulleys, ensuring proper tension and direction of rotation.
-
Ensure the belt is perfectly centered on the drum and all pulleys. Wiggle the drum to make sure the belt settles correctly.
-
Reassembly: Putting It All Back Together
With the new belt in place, reverse the disassembly process.
-
Reattach the Front Panel: Carefully align the front panel, reattach any moisture sensor wires or other connections, and secure all screws.
-
Reconnect Control Panel Wires: If you disconnected them, reattach the wire harnesses to the control panel.
-
Replace the Top Panel: Slide the top panel back into place and secure its screws at the rear.
-
Reinstall Door (if removed): Attach the door hinges and reconnect the door switch wires.
-
Final Check: Before plugging in the dryer, manually rotate the drum a few times to ensure it spins freely and the belt appears to be tracking correctly without rubbing against anything.
Troubleshooting Common Issues and Post-Installation Tips
Even with careful execution, minor hiccups can occur. Understanding how to troubleshoot and maintain your appliance will solidify your mastery of this tech repair.
Common Installation Pitfalls and How to Address Them
-
Belt Slipping Off: This usually indicates improper routing around the pulleys or insufficient tension. Double-check the “S” pattern around the motor and idler pulleys and ensure the belt is centered.
-
Drum Not Spinning/Squealing: Recheck the belt routing and ensure the idler pulley spring is properly engaged to provide tension. Also, inspect the drum rollers for wear, as worn rollers can prevent smooth drum rotation.
-
Loose Screws: It’s easy to miss a screw during reassembly. If you notice rattling or panels don’t fit snugly, retrace your steps and ensure all fasteners are in place.
Testing Your Dryer After Installation
After reassembly, plug the dryer back in and restore power (gas, if applicable).
-
Run a No-Heat Cycle: Start a short cycle with no heat (e.g., “Air Fluff”) with a small load or no load. Listen for unusual noises and observe the drum’s rotation. It should spin smoothly and quietly.
-
Run a Heated Cycle: If the no-heat cycle is successful, run a short heated cycle to confirm all functions are working correctly. Check for proper heating and continued smooth drum operation.
Maintenance for Longevity and Digital Security Analogy
While the belt is designed for durability, proactive maintenance can extend its life and the dryer’s overall health.
-
Avoid Overloading: Overloading the dryer puts excessive strain on the motor, belt, and drum rollers, significantly accelerating wear.
-
Clean Lint Filter: Regularly cleaning the lint filter improves airflow and reduces strain on the heating element and motor.
-
Inspect Rollers and Pulleys: Periodically (perhaps every few years or during another repair) inspect the drum rollers and idler pulley for wear. Worn rollers can cause the belt to wear prematurely.
In the world of technology, “digital security” isn’t just about protecting data; it’s also about ensuring the reliable, long-term operation of your devices. Just as regular software updates and antivirus scans protect your computer, proactive physical maintenance of your appliances protects their operational integrity and extends their lifespan, preventing catastrophic failures and costly replacements.
The Value of DIY Appliance Repair in a Tech-Driven World
Successfully installing a Samsung dryer belt is more than just a repair; it’s an empowering act that underscores the value of technical literacy and practical skills in an increasingly complex world. It transforms a perceived obstacle into an opportunity for learning and self-reliance.
Empowerment Through Technical Skill Acquisition
In an era often dominated by disposable consumerism and reliance on professional services, mastering a technical skill like appliance repair is profoundly empowering. It fosters confidence, problem-solving abilities, and a deeper understanding of the mechanical systems that underpin our daily lives. This practical knowledge complements digital literacy, bridging the gap between virtual and tangible technologies. For the technically inclined, it’s a satisfying challenge, akin to debugging a complex program or building a custom PC.
Extending Appliance Lifespan and Reducing Waste
One of the most significant benefits of DIY repair is its contribution to sustainability. Replacing a major component like a drive belt, rather than the entire appliance, significantly extends the dryer’s useful life. This reduces the demand for new manufacturing, conserves resources, and lessens the burden on landfills. It’s a tangible step towards a more circular economy, where devices are repaired and reused, aligning with growing global initiatives for environmental responsibility and resource management.
The Economic and Environmental Impact of Repair vs. Replace
The decision to repair versus replace has substantial economic and environmental ramifications. Economically, a replacement belt is a fraction of the cost of a new dryer, saving hundreds, if not thousands, of dollars. Environmentally, manufacturing a new dryer consumes raw materials, energy, and generates emissions. Disposing of an old dryer adds to electronic waste. By opting for repair, individuals directly contribute to reducing their carbon footprint and promoting a more sustainable consumption model. This approach is gaining traction as consumers become more aware of the broader impact of their purchasing and disposal habits, making the ability to perform such repairs an increasingly valuable skill for the modern household.
In conclusion, installing a Samsung dryer belt is a manageable and rewarding DIY project that offers both immediate financial savings and long-term environmental benefits. By following this comprehensive guide, anyone with a modicum of technical aptitude can successfully restore their appliance, reinforcing the timeless value of repair in our technologically advanced homes.
aViewFromTheCave is a participant in the Amazon Services LLC Associates Program, an affiliate advertising program designed to provide a means for sites to earn advertising fees by advertising and linking to Amazon.com. Amazon, the Amazon logo, AmazonSupply, and the AmazonSupply logo are trademarks of Amazon.com, Inc. or its affiliates. As an Amazon Associate we earn affiliate commissions from qualifying purchases.