
In an increasingly connected world, home security has evolved beyond traditional alarms and locks. Smart home security devices, like the Ring Spotlight Cam, offer a proactive and integrated approach to safeguarding your property. Combining motion-activated lights, a 1080p HD camera, two-way talk, and a built-in siren, the Spotlight Cam is a formidable deterrent and a valuable surveillance tool. Whether you’re enhancing an existing Ring ecosystem or taking your first step into smart home security, proper installation is paramount to leveraging its full potential.
This comprehensive guide will walk you through every step of installing your Ring Spotlight Cam, from initial preparation and optimal placement to physical mounting, power connection, and post-installation configuration. We’ll delve into the nuances of both wired and battery-powered versions, provide practical tips for troubleshooting, and ensure your device is perfectly positioned to deliver unparalleled peace of mind. By the end of this tutorial, you’ll have the confidence and knowledge to expertly secure your home with your new Ring Spotlight Cam.
Pre-Installation Checklist: Ensuring a Smooth Setup
Before you even think about drilling holes or climbing ladders, a thorough preparation phase will save you time, effort, and potential frustration. A well-planned installation ensures not only optimal performance of your Ring Spotlight Cam but also a safe and secure setup process.
Gathering Your Tools and Components
Having all the necessary items at hand before you begin is crucial. You don’t want to be halfway up a ladder only to realize you’re missing a screwdriver. Here’s a list of what you’ll likely need:
-
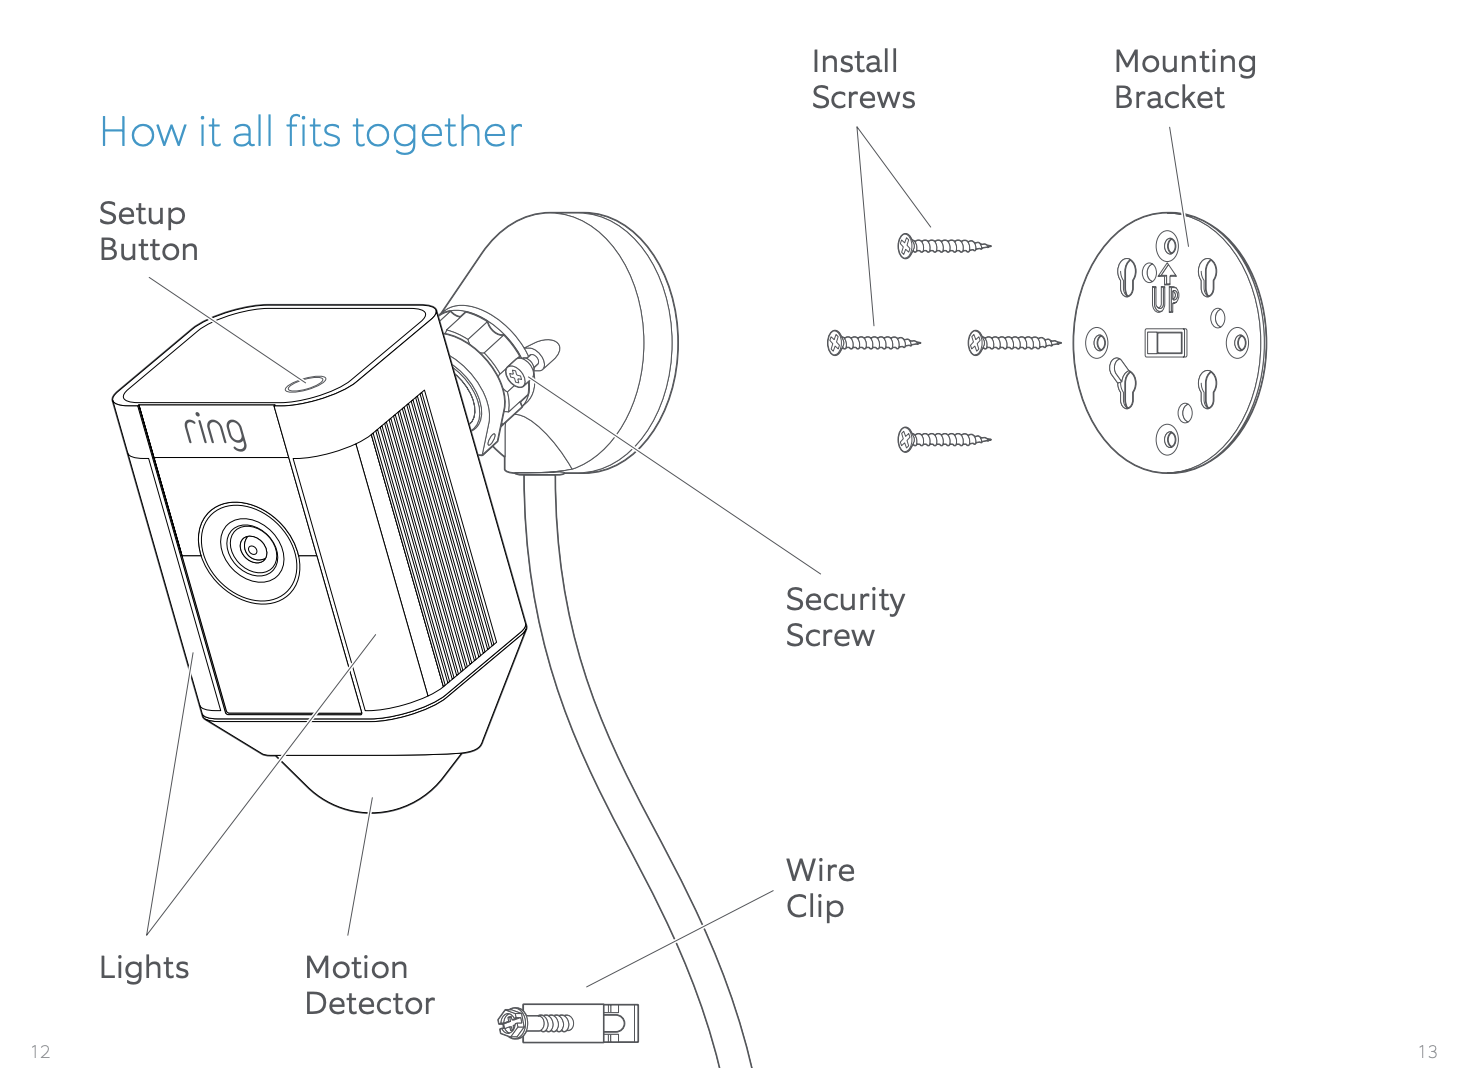
Your Ring Spotlight Cam: Ensure all components are present, including the camera unit, mounting bracket, screws, and wall anchors.
-
Power Source (Specific to Model):
-
For Battery Models: The rechargeable battery pack(s). Make sure they are fully charged.
-
For Wired/Plug-In Models: The power adapter with its cable.
-
For Solar Panel Models: The solar panel and its mounting hardware.
-
-
Drill: A power drill with appropriate drill bits for pilot holes (usually 1/4-inch for wall anchors).
-
Screwdriver: A Phillips-head screwdriver is typically sufficient.
-
Ladder or Step Stool: To safely reach your chosen mounting location.
-
Pencil: For marking drill holes.
-
Level: To ensure your camera is mounted straight.
-
Safety Glasses: Protect your eyes, especially when drilling.
-
Optional: Caulk (for weatherproofing wired installations), cable clips (for neat cable management), Wi-Fi extender (if signal is weak at desired location).
Optimal Placement Considerations
The placement of your Spotlight Cam is perhaps the most critical decision, directly impacting its effectiveness and your overall satisfaction. Consider these factors carefully:
-
Wi-Fi Signal Strength: Ring devices rely heavily on a stable Wi-Fi connection. Use your smartphone to check the Wi-Fi signal strength at potential mounting locations. A weak signal will lead to delayed notifications, poor video quality, and unreliable performance. If necessary, consider a Wi-Fi extender or mesh network system to boost coverage.
-
Viewing Angle and Coverage: Position the camera to cover the most important areas, such as entry points, driveways, or vulnerable windows. Aim for a wide, unobstructed view. Test the field of view by holding the camera in different spots and checking the live view on your Ring app. Avoid pointing it directly at reflective surfaces or busy streets to minimize false alerts.
-
Height and Security: A mounting height of 8-10 feet (2.5-3 meters) is often recommended. This height is generally high enough to prevent tampering while still providing a clear view of faces and activities. Too low, and it’s easily accessible; too high, and details might be lost.
-
Power Source Proximity (for Wired Models): If you have a wired Spotlight Cam, its placement will be dictated by the availability of an outdoor power outlet or an electrical junction box. Plan your cable routing to be as discreet and weatherproof as possible.
-
Motion Detection Zones: Envision the areas where you want motion to be detected. Ensure your placement allows you to draw effective motion zones within the app, avoiding public sidewalks or neighbor’s yards if not desired.
Account Setup and Initial Device Pairing (App-Based)
Before any physical installation, it’s highly recommended to set up your Ring account and pair your Spotlight Cam with the Ring app. This allows you to confirm the device is functioning correctly and connected to your Wi-Fi network before it’s permanently mounted.
-
Download the Ring App: If you haven’t already, download the Ring app from your smartphone’s app store (iOS or Android).
-
Create or Log In to Your Account: Follow the prompts to create a new Ring account or log in with existing credentials.
-
Add a Device: Tap “Set Up a Device” or the ‘+’ icon in the top right corner. Select “Security Cameras.”
-
Scan the QR Code: Locate the QR code on your Spotlight Cam (usually on the side or back) or on its packaging. Use your phone’s camera to scan it. This automatically identifies your device model.
-
Follow In-App Instructions: The app will guide you through connecting your Spotlight Cam to your home Wi-Fi network. This typically involves connecting your phone to a temporary Ring Wi-Fi network (e.g., “Ring-xxxxxx”) and then selecting your home Wi-Fi network and entering its password.
-
Name Your Device: Assign a descriptive name to your camera (e.g., “Front Door,” “Driveway,” “Backyard”).
-
Test Live View: Once paired, the app will perform a quick setup. Test the live view function to ensure the camera is sending video and audio correctly. This is your crucial “test run” before mounting.
-
Charge Batteries (if applicable): For battery models, fully charge the battery packs indoors before inserting them into the camera.
The Physical Installation Process: Step-by-Step Guide
With your preparation complete and your device pre-configured, it’s time for the hands-on part of the installation. This section details the physical mounting and power connection, ensuring your Spotlight Cam is securely in place and operational.
Mounting the Bracket
The mounting bracket is the foundation for your Spotlight Cam, so ensure it’s securely attached to your chosen surface.
-
Position the Bracket: Hold the mounting bracket against the wall at your desired height and location. Use a level to ensure it’s perfectly straight.
-
Mark Drill Holes: With the bracket level, use a pencil to mark the exact spots where you’ll drill the screw holes. The Ring bracket usually has distinct holes for this purpose.
-
Drill Pilot Holes: Using your power drill and the appropriate drill bit (typically 1/4-inch for the provided anchors), drill holes at the marked locations. Drill deep enough to accommodate the anchors fully.
-
Insert Wall Anchors (if applicable): If you’re drilling into stucco, brick, or concrete, gently tap the provided wall anchors into the pilot holes until they are flush with the surface. These anchors provide a secure grip for the screws. For wood surfaces, anchors are generally not needed.
-
Secure the Mounting Bracket: Align the mounting bracket with the drilled holes (and anchors, if used). Insert the mounting screws and use your screwdriver or drill to tighten them firmly. Ensure the bracket is stable and doesn’t wobble.
Attaching the Spotlight Cam
Once the bracket is securely in place, attaching the camera unit itself is relatively straightforward.
-
Connect to the Bracket: The Ring Spotlight Cam typically slides or screws onto the mounting bracket. Follow the specific instructions for your model. For many, there’s a ball joint mechanism that allows for flexible positioning. Secure the camera to the bracket using the provided locking screw or mechanism. Do not fully tighten the adjustment screw yet, as you’ll want to fine-tune the angle after power is connected.
-
Adjust Initial Angle: Loosely position the camera so it generally points in the desired direction. You’ll make precise adjustments later using the live view in the app.
Powering Your Device (Wired vs. Battery)
The method of powering your Spotlight Cam depends on the model you’ve chosen. Each has distinct steps and considerations.
For Battery-Powered Models
-
Insert Charged Battery: If you followed the pre-installation steps, your battery pack(s) should be fully charged. Open the battery compartment on the underside of the Spotlight Cam (often covered by a weather-resistant cap).
-
Slide In Battery: Insert the fully charged battery pack(s) until it clicks securely into place. Ensure it’s oriented correctly according to the arrows or markings.
-
Close Compartment: Replace the battery compartment cap, making sure it’s sealed tightly to protect against weather.
-
Test Functionality: The camera should power on. Confirm its connection to your Wi-Fi via the Ring app’s live view.
For Wired/Plug-In Models
-
Connect Power Adapter: Locate the power port on the back or underside of your Spotlight Cam. Plug the power adapter cable firmly into this port.
-
Route Cable Neatly: Carefully route the power cable along the wall, ensuring it’s not a tripping hazard and is protected from damage. Use cable clips if desired for a cleaner look. Avoid crimping the cable.
-
Weatherproofing (Crucial): If the connection point to the camera is exposed to elements, ensure any rubber seals are correctly seated. If routing cable through a drilled hole in the wall, apply outdoor-grade caulk around the cable entry point to prevent water infiltration.
-
Plug into Outlet: Finally, plug the power adapter into a weather-resistant outdoor electrical outlet. If the outlet isn’t already weather-rated, consider installing a weatherproof cover.
-
Test Functionality: The camera should power on. Confirm its connection and functionality through the Ring app.

Post-Installation Configuration and Optimization
Once your Spotlight Cam is physically installed and powered, the real magic happens in the Ring app. This stage involves fine-tuning settings to ensure your camera is working optimally and providing the security features you need without overwhelming you with unnecessary alerts.
Fine-Tuning Motion Zones and Sensitivity
This is perhaps the most important configuration step to prevent constant, irrelevant notifications.
-
Access Motion Settings: In the Ring app, navigate to your Spotlight Cam, then go to “Motion Settings.”
-
Create Custom Motion Zones: Tap “Edit Motion Zones.” You’ll see a live view or a still image from your camera. Use your finger to draw specific areas within the camera’s field of view where you want motion to be detected. Deselecting areas like public sidewalks, busy roads, or swaying trees will dramatically reduce false alerts.
-
Adjust Motion Sensitivity: Experiment with the sensitivity slider. Higher sensitivity will detect smaller movements further away, while lower sensitivity will focus on more significant motion closer to the camera. Start with a medium setting and adjust as needed. Consider “People Only Mode” if available and desired.
-
Test and Refine: Walk through the motion zones yourself, triggering alerts, and observe the results. Adjust the zones and sensitivity until you’re satisfied with the balance of detection and minimal false alarms.
Optimizing Light Settings and Siren
The “Spotlight” in Spotlight Cam isn’t just for show; it’s a powerful security feature.
-
Light Schedules: In the Ring app, under “Light Settings,” you can set schedules for when the floodlights automatically turn on. You can also adjust the brightness level. Consider having them activate only during specific night hours or based on motion.
-
Motion-Activated Lights: Ensure the “Motion-Activated Lights” setting is enabled if you want the lights to turn on when motion is detected. You can also set how long the lights stay on after activation.
-
Siren Functionality: Familiarize yourself with how to activate the siren in the app. While not for everyday use, knowing how to quickly trigger it in an emergency is crucial. You can also set it to automatically activate on motion, though this is often too aggressive for residential use without careful configuration.
Live View and Two-Way Talk Testing
Verify that all interactive features are working as expected.
-
Initiate Live View: From the Ring app dashboard, tap on your Spotlight Cam to enter live view.
-
Test Two-Way Talk: Tap the microphone icon in live view. Speak into your phone and listen for your voice through the camera’s speaker. Ask someone to speak near the camera and ensure you can hear them through your phone. Adjust volume settings if necessary.
-
Image Quality Check: While in live view, assess the video quality. Is it clear? Is there any lag? If quality is poor, re-evaluate your Wi-Fi signal strength at the camera’s location.
Integrating with Other Smart Home Devices
Maximize your security and convenience by integrating your Spotlight Cam with other smart home devices.
-
Ring Ecosystem: If you have other Ring devices (Doorbell, Alarm, other cameras), ensure they are all linked within the Ring app. This allows for unified monitoring and event history.
-
Alexa Integration: Link your Ring account with your Amazon Alexa account. This enables voice commands like “Alexa, show me the front door camera” on Echo Show devices or “Alexa, turn on the porch lights” for your Spotlight Cam.
-
Other Smart Home Platforms: Explore integrations with other platforms you use, though Ring’s primary strength lies within its own ecosystem and Amazon Alexa.
Troubleshooting Common Installation Issues
Even with careful planning, sometimes issues arise. Here are some common problems and their solutions to ensure your Ring Spotlight Cam operates flawlessly.
Wi-Fi Connectivity Problems
-
Weak Signal: If your Wi-Fi signal is consistently weak or drops, consider moving your router closer, using a Wi-Fi extender, or upgrading to a mesh Wi-Fi system. Ring offers its own Chime Pro, which doubles as a Wi-Fi extender for Ring devices.
-
Incorrect Password: Double-check your Wi-Fi password in the Ring app during setup. Passwords are case-sensitive.
-
Too Many Devices: Ensure your router isn’t overloaded with too many connected devices, which can slow down network performance for all.
-
Router Settings: Check your router’s settings. Some older routers or specific security settings (e.g., firewall, port restrictions) might interfere with Ring device communication. Consult your router’s manual or ISP.
Power-Related Glitches
-
Battery Not Charging: Ensure the battery is correctly inserted and the charging cable/adapter is fully connected. Try charging the battery with a different USB charger to rule out a faulty Ring charger. If using a solar panel, ensure it gets adequate direct sunlight.
-
Wired Camera Not Powering On: Verify that the outlet has power (test with another device). Check circuit breakers. Ensure all cable connections are secure and there are no cuts or damage to the power cable.
Motion Detection Inconsistencies
-
Too Many Alerts: Re-evaluate your motion zones and sensitivity settings. Focus on drawing zones that exclude public areas or moving objects like trees and flags. Utilize “People Only Mode” if available.
-
Not Detecting Motion: Increase motion sensitivity. Ensure the camera is positioned to have a clear view of the area you want to monitor, without obstructions. Sometimes, glare from the sun can interfere; try adjusting the camera angle slightly.
-
Environmental Factors: Strong winds, heavy rain, or sudden changes in light (e.g., car headlights at night) can sometimes trigger false alerts. Fine-tuning is key.
Firmware Updates and App Issues
-
Keep Firmware Updated: Ring regularly releases firmware updates to improve performance and security. Ensure your device’s firmware is always up-to-date (this usually happens automatically when connected to Wi-Fi).
-
App Not Responding: If the Ring app is acting up, try force-closing and reopening it. If the problem persists, uninstall and reinstall the app. Ensure your phone’s operating system is also up-to-date.
-
Factory Reset (Last Resort): If all else fails, a factory reset of the Spotlight Cam might be necessary. This will erase all settings and require you to set up the device from scratch through the app. Refer to Ring’s support documentation for the exact reset procedure for your model.
By systematically addressing these common issues, you can quickly diagnose and resolve most problems, ensuring your Ring Spotlight Cam provides reliable security and peace of mind.

Conclusion
Installing your Ring Spotlight Cam is a proactive step towards enhancing your home’s security and your personal peace of mind. While the process involves several steps, from careful planning and physical mounting to detailed app configuration, each stage contributes to the optimal performance of this sophisticated gadget. By following this guide, you’ve equipped yourself with the knowledge to not only successfully install your device but also to troubleshoot potential issues and fine-tune its settings for maximum effectiveness.
Remember that the Ring Spotlight Cam is more than just a camera; it’s an integral part of a comprehensive security ecosystem. Its motion-activated lights, siren, and two-way talk features work in concert to deter intruders and connect you to your property from anywhere in the world. With your Spotlight Cam now expertly installed and configured, you can rest assured that your home is under vigilant watch, providing you with an invaluable layer of protection in today’s smart world.
aViewFromTheCave is a participant in the Amazon Services LLC Associates Program, an affiliate advertising program designed to provide a means for sites to earn advertising fees by advertising and linking to Amazon.com. Amazon, the Amazon logo, AmazonSupply, and the AmazonSupply logo are trademarks of Amazon.com, Inc. or its affiliates. As an Amazon Associate we earn affiliate commissions from qualifying purchases.