In the fast-evolving world of technology, keeping your computer running at peak efficiency is paramount, whether you’re a casual user, a hardcore gamer, a creative professional, or someone managing a side hustle that demands robust digital tools. One of the most impactful and straightforward upgrades you can make to breathe new life into an aging system or enhance a modern one is installing additional Random Access Memory (RAM). Often referred to as your computer’s short-term memory, RAM is crucial for multitasking, running demanding applications, and ensuring overall system responsiveness.
This tutorial, designed to be accessible even for beginners, will walk you through the entire process of installing RAM sticks, transforming what might seem like a daunting task into a confidence-boosting DIY project. We’ll cover everything from understanding why an upgrade is beneficial, to meticulous preparation, the step-by-step installation, and crucial post-installation checks. By the end of this guide, you’ll not only have successfully upgraded your system but also gained a deeper understanding of your computer’s internal workings, empowering you with valuable tech knowledge.
Understanding the “Why”: The Power of a RAM Upgrade
Before we delve into the mechanics, let’s explore the compelling reasons behind upgrading your RAM. It’s more than just adding another component; it’s about unlocking your PC’s true potential and adapting it to your current digital lifestyle and workload.
Why More RAM Matters for Your System
RAM acts as a super-fast scratchpad for your CPU, holding data that your processor needs to access quickly. Unlike your hard drive (HDD) or solid-state drive (SSD), which store data long-term, RAM stores data only while your computer is on and actively using it. Think of it like this: your hard drive is a massive library, while RAM is the desk space where you’re actively working. The more desk space you have, the more books you can open and refer to simultaneously without constantly having to put one back and pull out another.
Here’s how sufficient RAM profoundly impacts your daily computing experience:
- Seamless Multitasking: Running multiple applications simultaneously – a web browser with dozens of tabs, a word processor, a video editor, and a communication app – consumes significant RAM. More RAM means less slowdown, fewer crashes, and a smoother transition between tasks.
- Enhanced Application Performance: Demanding software, such as video editing suites (Adobe Premiere Pro, DaVinci Resolve), 3D modeling programs (Blender, AutoCAD), large databases, or modern games, can quickly exhaust available RAM. Upgrading ensures these applications have the resources they need to run efficiently, reducing lag and rendering times.
- Improved Gaming Experience: Modern games are incredibly resource-intensive. Sufficient RAM allows for faster loading times, smoother frame rates, and the ability to run games at higher settings without stuttering, providing a more immersive and enjoyable gaming session.
- Faster System Responsiveness: When your computer runs out of physical RAM, it starts using a portion of your storage drive as “virtual memory.” While this prevents crashes, it’s significantly slower than actual RAM, leading to noticeable slowdowns, often referred to as “paging” or “swapping.” More RAM minimizes this reliance on slower virtual memory.
- Future-Proofing (to an extent): While technology constantly evolves, having ample RAM gives your system a longer relevant lifespan, allowing it to handle future software updates and increasingly demanding applications without immediate need for a full system overhaul.
For those running online businesses, managing multiple financial applications, or developing AI tools, the impact of insufficient RAM can directly translate to lost productivity and frustration. A RAM upgrade is often the most cost-effective way to get a noticeable performance boost without replacing your entire machine.
Identifying Your RAM Needs: When is it Time for an Upgrade?
Recognizing the signs that your PC needs a RAM upgrade is crucial. Don’t wait until your system grinds to a halt.
- Frequent Stuttering and Freezing: If your computer frequently lags, freezes, or becomes unresponsive, especially when opening several programs or browser tabs, it’s a strong indicator of RAM exhaustion.
- Slow Application Loading Times: Applications taking an unusually long time to launch or switch between could be struggling due to insufficient RAM.
- “Out of Memory” Errors: This is the most direct sign. If you see messages like “Your system is low on memory” or applications crashing unexpectedly with memory-related errors, an upgrade is essential.
- Checking Task Manager (Windows) or Activity Monitor (macOS): These tools provide real-time insights into your RAM usage. Open them (Ctrl+Shift+Esc on Windows, Cmd+Space then type “Activity Monitor” on macOS), navigate to the “Performance” or “Memory” tab, and observe your RAM usage during your typical workflow. If it’s consistently near 80-90% or higher, it’s a clear signal.
- New Software or Games: If you’re planning to install a new, demanding game or professional software, check its minimum and recommended RAM requirements. If your current setup falls short, an upgrade is highly recommended.
Understanding these indicators empowers you to make an informed decision, ensuring your valuable time isn’t wasted waiting for your computer to catch up.
Essential Preparations: Before You Open Your PC
Installing RAM is generally straightforward, but proper preparation is key to a smooth and safe process. Rushing into it without checking compatibility or taking precautions can lead to frustration or even damage.
Checking Compatibility: The Crucial First Step
This is perhaps the most critical preparation step. Not all RAM is created equal, and installing incompatible modules will either prevent your system from booting or cause instability.
-
Determine Your Current RAM Type:
- DDR Generation: RAM comes in different generations: DDR2, DDR3, DDR4, and the latest DDR5. These generations are physically incompatible (they have different pin counts and notch placements). You must match the DDR generation of your motherboard.
- Form Factor: Desktop RAM uses DIMMs (Dual In-line Memory Modules), while laptops use SO-DIMMs (Small Outline DIMMs). This guide focuses on DIMMs for desktops.
- Speed (MHz): RAM speed is measured in MHz (e.g., 2400MHz, 3200MHz, 3600MHz). While mixing speeds is technically possible, your RAM will only run at the slowest module’s speed. For optimal performance, aim to match the speed of your existing RAM or purchase a new matched kit.
- Capacity (GB): Your current stick’s capacity (e.g., 8GB, 16GB).
You can find this information using various methods:
- System Information Tools: On Windows, type “dxdiag” in the Run dialog (Win+R) or search for “System Information.” On macOS, click the Apple menu > “About This Mac” > “System Report.”
- Third-Party Software: Tools like CPU-Z provide incredibly detailed information about your RAM and motherboard.
- Physically Inspecting Your Current RAM: If you’re comfortable, open your PC case and look at the stickers on your RAM modules. They will usually list the DDR generation, speed, and capacity.
- Motherboard Manual/Manufacturer Website: The most reliable source for knowing what your motherboard supports is its manual or the manufacturer’s official website. Look for “RAM Support” or “Memory Specifications.” This will tell you the supported DDR generation, maximum capacity, and recommended speeds.
-
Check Motherboard Slots: Determine how many RAM slots your motherboard has and how many are currently occupied. Most motherboards have 2 or 4 DIMM slots.
-
Maximum Supported RAM: Your motherboard and CPU both have a maximum RAM capacity they can support. Ensure your planned upgrade doesn’t exceed this.
-
Purchase Matched Kits: For the best performance and stability, especially when using dual-channel or quad-channel memory configurations, it’s highly recommended to buy RAM in matched kits (e.g., 2x8GB instead of two individual 8GB sticks).
Gathering Your Tools and Ensuring Safety Precautions
A little preparation here goes a long way in preventing damage or injury.
- Phillips Head Screwdriver: You’ll need this to open your PC case.
- Anti-Static Wrist Strap (Recommended): This is crucial for preventing electrostatic discharge (ESD), which can permanently damage sensitive computer components. If you don’t have one, regularly touch a grounded metal object (like an unpainted metal part of your PC case) before and during the installation process.
- Clean, Well-Lit Work Area: Ensure you have enough space and good lighting to see what you’re doing. Avoid carpeted areas, as they can generate static electricity.
- Small Container: To hold screws so they don’t get lost.
Safety Precautions:
- Power Off and Unplug: Always, always completely power down your computer and unplug it from the wall outlet.
- Press Power Button (Optional but Recommended): After unplugging, press and hold the power button for a few seconds. This helps drain any residual power from the system’s capacitors.
- Ground Yourself: Wear an anti-static wrist strap or consistently touch a grounded metal object before touching any internal components.
- Handle with Care: Always hold RAM modules by their edges, avoiding contact with the gold pins or the chips themselves.
- Patience: Don’t force anything. If a component isn’t fitting, double-check your alignment and ensure there are no obstructions.
Backing Up Data and Disconnecting Peripherals
While upgrading RAM is generally low-risk, it’s always good practice to ensure your data is safe.
- Backup Important Data: Before any internal hardware modification, consider backing up critical files to an external drive or cloud service. This is a general best practice, even if the risk here is minimal.
- Disconnect Peripherals: Unplug all external devices – monitor, keyboard, mouse, USB drives, etc. – from your PC. This clears your workspace and prevents any accidental tugs or disconnections during the case opening process.
The Step-by-Step Guide to RAM Installation
With preparations complete, you’re ready to dive into the physical installation. Take your time, follow each step carefully, and remember the safety precautions.
Opening Your PC Case and Locating RAM Slots
- Move Your PC: Place your computer tower on your clean, well-lit workspace. Lay it on its side, usually with the motherboard facing upwards once the side panel is removed.
- Remove Side Panel: Use your Phillips head screwdriver to unscrew the thumbscrews or standard screws holding the side panel in place (usually the left panel when looking at the front of the PC). Carefully slide or lift the panel off and set it aside.
- Ground Yourself: If you haven’t already, touch a grounded metal part of your PC case to discharge any static electricity.
- Locate RAM Slots: Look for long, narrow slots on your motherboard, typically near the CPU (which is usually covered by a large fan or heatsink). These slots will have small plastic clips on either end. Desktop motherboards commonly have two or four RAM slots.
Removing Existing RAM (If Applicable)
If you’re replacing existing RAM or moving it to different slots:
- Open Latches: Gently push down on the plastic clips (latches) at both ends of the RAM slot. They should spring outwards, releasing the RAM stick.
- Remove Module: Once the latches are open, the RAM stick should slightly pop up. Carefully grasp the RAM stick by its edges and pull it straight up out of the slot.
- Store Safely: Place the removed RAM in an anti-static bag or a safe, non-conductive place if you plan to reuse or sell it.
Installing the New RAM Modules: The Click of Confidence
This is where your new RAM finds its home.
-
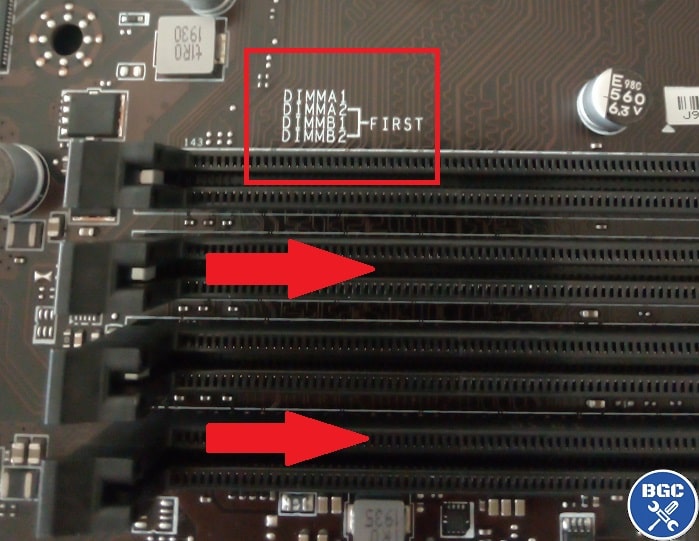
Check Slot Configuration (for multiple sticks): If installing two or four RAM sticks, consult your motherboard manual for the recommended slot configuration. Motherboards often recommend specific slots (e.g., A2 and B2 for two sticks) to enable dual-channel memory, which significantly boosts performance. The slots are usually color-coded or labeled.
-
Open Latches: Ensure the plastic latches at both ends of the chosen RAM slot(s) are fully open.
-
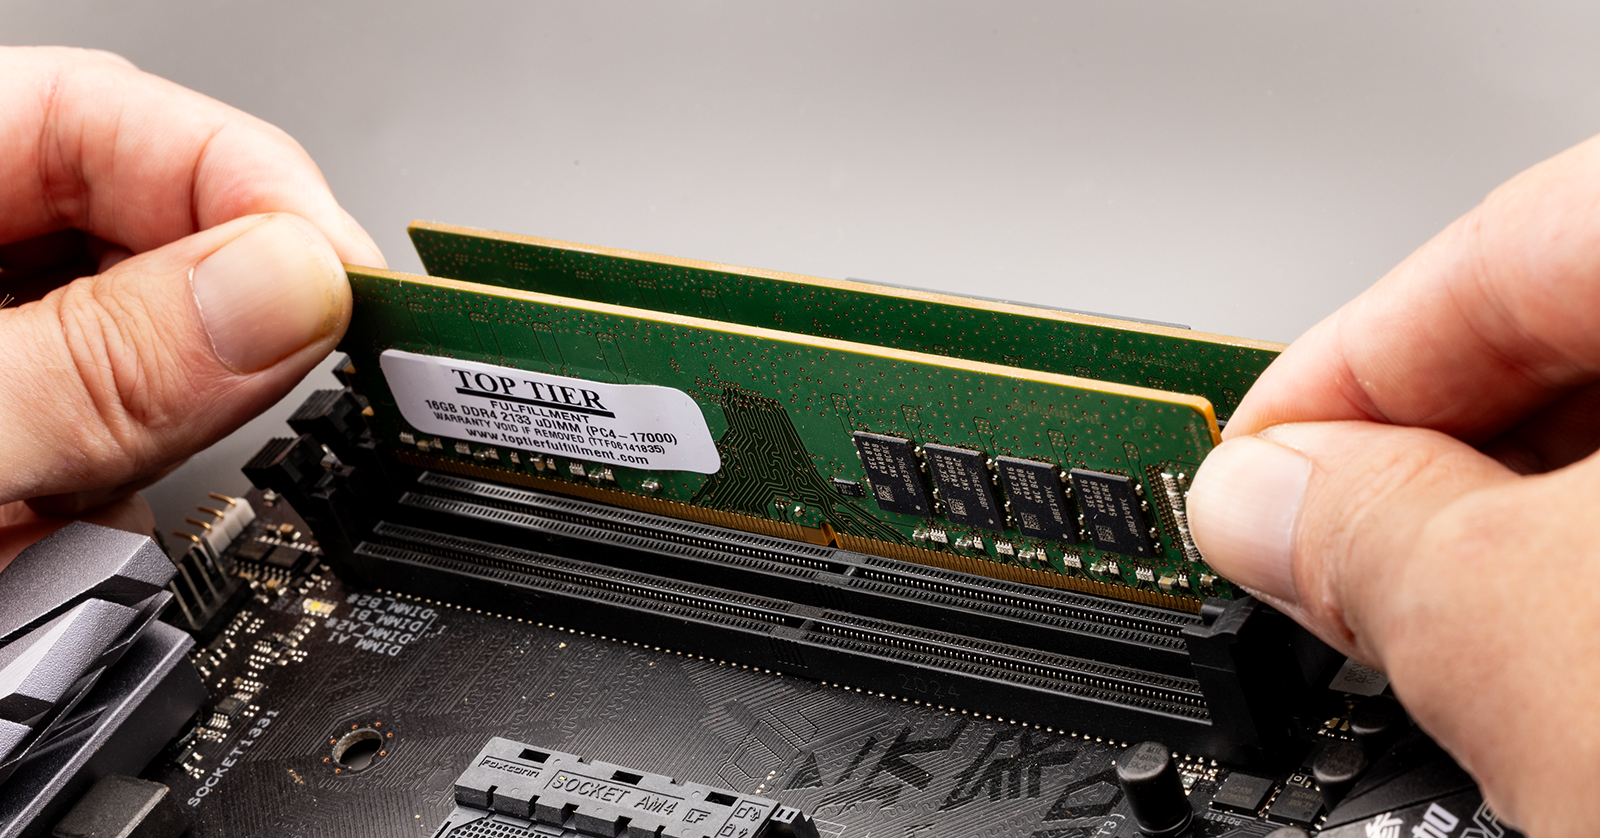
Align RAM: Hold the new RAM stick by its edges. Notice the notch (or two notches on older DDR generations) on the bottom edge of the RAM stick. This notch must align perfectly with the corresponding key in the RAM slot on the motherboard. Do not force it. If it doesn’t align, you might have it oriented incorrectly. Flip it around.
-
Insert and Press: Once aligned, place the RAM stick evenly into the slot. Apply firm, even pressure to both ends of the RAM stick simultaneously with your thumbs. You should feel it slide into place. Continue pressing until you hear an audible “click” from both plastic latches snapping back into their closed, upright position, securing the RAM.
- Important: Ensure the latches are fully closed and the RAM stick is seated flush and level in the slot. If a latch doesn’t click, press down on that side of the RAM again until it does.
-
Repeat: If you’re installing multiple sticks, repeat the process for each module in the recommended slots.
Securing Your System: Closing the Case
Once all RAM modules are securely installed:
- Inspect: Take a moment to visually inspect all newly installed RAM sticks. Ensure they are fully seated, level, and that both latches on each stick are closed.
- Replace Side Panel: Carefully reattach the side panel to your PC case. Slide or place it back into position and secure it with the screws you removed earlier.
- Reconnect Peripherals: Plug all your external devices (monitor, keyboard, mouse, power cable, etc.) back into your computer.
Post-Installation & Troubleshooting
The installation is complete, but a few final steps are necessary to ensure everything is working as expected.
Verifying Your New RAM: Checking System Information
After you’ve powered everything back on, the first thing to do is confirm that your system recognizes the new RAM.
- Boot Up: Power on your computer. It might take a moment longer to boot the first time after a hardware change as it initializes the new components. Don’t be alarmed if it cycles power a few times before booting normally.
- Check System Information:
- Windows: Right-click on the Start button, then click “System.” Alternatively, search for “About your PC.” You should see the “Installed RAM” (or “Installed physical memory”) reflecting the new total capacity. You can also open Task Manager (Ctrl+Shift+Esc), go to the “Performance” tab, and click on “Memory” to see details like speed and number of slots used.
- macOS (for supported Mac Pro/Mini models): Click the Apple menu > “About This Mac.” Under the “Memory” section, you’ll see the total installed RAM.
- BIOS/UEFI: For the most detailed information, you can enter your system’s BIOS/UEFI settings during boot-up (usually by pressing Del, F2, F10, or F12 repeatedly as the computer starts). Look for a “Memory” or “Main” section, which should display the detected RAM capacity and speed.
If the displayed RAM matches what you installed, congratulations! Your upgrade was successful.
Common Issues and Quick Fixes
Sometimes, things don’t go perfectly. Here are some common issues and their solutions:
- PC Doesn’t Boot (Black Screen): This is the most common and alarming issue.
- Solution: Power off and unplug the PC. Re-open the case and carefully reseat all RAM sticks. Ensure they are fully clicked into place with latches secured. Double-check that you’ve installed them in the correct slots if using a specific configuration (e.g., dual-channel). Ensure no other cables were accidentally dislodged. If you removed existing RAM, try putting the old RAM back in to confirm it’s not a motherboard issue. If you installed multiple new sticks, try booting with just one stick at a time to identify a potentially faulty module.
- System Recognizes Less RAM Than Installed:
- Solution: This often points to one or more RAM sticks not being properly seated or being faulty. Follow the troubleshooting steps for a black screen (reseating, checking individual sticks). Also, verify that your operating system (especially older 32-bit versions) supports the total amount of RAM you’ve installed; 32-bit Windows, for example, can only address about 3.5GB of RAM. Modern systems are almost universally 64-bit and don’t have this limitation.
- System Crashes or Bluescreens After Booting:
- Solution: This can indicate unstable RAM, possibly due to incorrect speed settings or a faulty module.
- Check BIOS/UEFI: Ensure your RAM is running at its advertised speed (XMP/DOCP profile might need to be enabled in BIOS for speeds above default JEDEC profiles).
- Test RAM: Use a memory diagnostic tool like MemTest86 (you’ll need to create a bootable USB drive) to thoroughly check your RAM for errors. This can help pinpoint a faulty stick.
- Reseat: Again, reseating can often resolve subtle connection issues.
- Solution: This can indicate unstable RAM, possibly due to incorrect speed settings or a faulty module.
- No Display Output / Beep Codes:
- Solution: Beep codes (a series of short and long beeps from your motherboard speaker) are diagnostic signals. Refer to your motherboard manual to decode the specific beep pattern, as it often indicates a specific hardware problem, frequently related to RAM. A single long beep followed by two or three short beeps often signifies a memory error.
Remember, patience and systematic troubleshooting are your best allies.
Maximizing Your RAM: Tips for Optimal Performance
Beyond just installing more RAM, here are a few tips to ensure you’re getting the most out of your memory:
- Enable XMP/DOCP Profile (if applicable): High-speed RAM (e.g., 3200MHz, 3600MHz) often defaults to a lower JEDEC standard speed (like 2133MHz or 2400MHz) in your BIOS. To unlock its full advertised speed, you need to enable the Extreme Memory Profile (XMP on Intel platforms) or D.O.C.P. (Direct Overclock Profile on AMD platforms) in your motherboard’s BIOS/UEFI settings. This sets the correct timings and voltage for optimal performance.
- Utilize Dual-Channel (or Quad-Channel) Memory: For a significant performance boost, ensure your RAM sticks are installed in the correct slots to enable dual-channel (or quad-channel for HEDT platforms) mode. This allows your CPU to access data from two (or four) memory modules simultaneously, effectively doubling (or quadrupling) the memory bandwidth. Consult your motherboard manual for the specific slot configuration.
- Keep Drivers Updated: While not directly related to RAM, ensuring your motherboard chipsets and other system drivers are up to date can improve overall system stability and performance.
- Mind Your Background Processes: Even with ample RAM, too many unnecessary background applications can consume resources. Regularly check your Task Manager/Activity Monitor and close programs you don’t need.

Conclusion: Empowering Your Tech Journey
Upgrading your RAM is a powerful and rewarding way to enhance your computer’s performance, making your digital life smoother, faster, and more productive. Whether you’re navigating complex software for work, immersing yourself in the latest games, or simply multitasking with ease, sufficient RAM is the bedrock of a responsive system.
This tutorial has aimed to demystify the process, breaking down each step from understanding the “why” to the final verification. By following these guidelines, you’ve not only saved money on professional installation but also gained invaluable hands-on experience with your hardware. This kind of practical knowledge is a cornerstone of digital literacy, empowering you to troubleshoot, maintain, and truly understand the technology that drives your personal and professional endeavors.
As technology continues its rapid advancement, the ability to perform basic hardware upgrades like installing RAM ensures you remain agile and adaptable. So, enjoy your newly optimized PC, and keep exploring the fascinating world of tech with confidence!
aViewFromTheCave is a participant in the Amazon Services LLC Associates Program, an affiliate advertising program designed to provide a means for sites to earn advertising fees by advertising and linking to Amazon.com. Amazon, the Amazon logo, AmazonSupply, and the AmazonSupply logo are trademarks of Amazon.com, Inc. or its affiliates. As an Amazon Associate we earn affiliate commissions from qualifying purchases.