
In an increasingly digital world, the need for physical documents remains a constant for many – from printing crucial reports and financial statements to cherished photos and event tickets. For Mac users, the promise of intuitive technology often extends to peripherals like printers. However, the path to seamless printing isn’t always as straightforward as “plug and play.” Whether you’ve just unboxed a brand-new printer or are trying to revive an older model with your latest macOS update, understanding the nuances of printer installation on a Mac is key to unlocking productivity and avoiding frustrating technical glitches.
This comprehensive guide is designed to demystify the process, offering clear, step-by-step instructions for installing various types of printers on your Apple computer. We’ll delve into everything from initial setup and driver management to troubleshooting common issues and optimizing your printing workflow for efficiency and even cost savings. By the end of this article, you’ll not only have your printer up and running but also possess the knowledge to maintain a reliable printing ecosystem, allowing you to focus on what truly matters – your work and your creativity.
The Essential First Steps: Preparing for Printer Installation
Before diving into the specifics of connecting your printer to your Mac, a little preparation goes a long way. Think of this as laying a solid foundation for a smooth and stress-free installation process. Skipping these initial checks can often lead to unnecessary troubleshooting later on.
Understanding Printer Types and Connection Methods (USB, Wi-Fi, Ethernet)
The first step is to identify your printer’s capabilities and how it’s designed to connect. Modern printers offer a variety of connection options, each with its own advantages:
- USB (Universal Serial Bus): This is the simplest and most direct method. A USB cable connects your printer directly to a USB port on your Mac. It’s often the most reliable for initial setup and troubleshooting, as it bypasses network complexities. Most basic home printers support this.
- Wi-Fi (Wireless Fidelity): The most popular choice for convenience, Wi-Fi connectivity allows you to place your printer anywhere within range of your wireless network without being tethered to your computer. This is ideal for multi-device households or office environments where multiple users need to access the same printer. Printers often have a small display screen or buttons for connecting to your Wi-Fi network.
- Ethernet (Network Cable): Common in office settings or for robust home networks, an Ethernet connection involves plugging your printer directly into your router or a network switch via an Ethernet cable. This provides a highly stable and fast connection, often preferred for high-volume printing and shared access across larger networks.
- Bluetooth: Less common for primary printing, some portable or specialized printers may offer Bluetooth connectivity for short-range, direct wireless printing from your Mac or other devices.
Knowing your printer’s connection options will dictate the subsequent steps you need to take.
Gathering Your Essentials: Drivers, Cables, and Network Details
Once you know your connection method, it’s time to gather the necessary components. This proactive step prevents last-minute scrambling and ensures you have everything at hand when you begin the installation.
- Printer Drivers: While macOS boasts excellent built-in driver support for a vast array of printers (often referred to as “driverless” printing or AirPrint compatibility), some manufacturers’ printers, especially older models or specialized ones, may require specific drivers. Always check the printer manufacturer’s website for the latest macOS-compatible drivers. Downloading these beforehand ensures your printer operates with full functionality and access to all its features.
- Cables: If you’re using a USB connection, make sure you have the correct USB cable (usually USB-A to USB-B, though modern Macs may require a USB-C adapter or hub). For Ethernet, ensure you have a standard network cable.
- Network Details: For Wi-Fi printers, you’ll need your Wi-Fi network name (SSID) and password. Keep these handy. If your network uses a WPS (Wi-Fi Protected Setup) button on your router, this can also simplify the wireless connection process.
- Printer Manual: While often overlooked, your printer’s manual contains vital information, especially for initial setup, connecting to Wi-Fi, and understanding specific error codes.
Why Pre-Installation Checks Matter for a Smooth Setup
Taking the time for these preliminary steps isn’t just about convenience; it’s about establishing a reliable printing workflow right from the start. A properly prepared installation minimizes the chances of encountering common issues like “printer not found,” “driver not installed,” or “network error.” It contributes directly to your productivity by reducing downtime and frustration, and indirectly supports the “tech” pillar of efficiency and seamless integration. By ensuring you have the right tools and information, you set yourself up for printing success, enhancing your overall user experience with your Mac.
Step-by-Step Guide: Adding Your Printer to macOS
With your preparations complete, it’s time to connect your printer to your Mac. macOS provides an intuitive interface for this, but the exact steps vary slightly depending on your connection type. We’ll walk through each method, ensuring you’re ready to print in no time.
Connecting via USB: The Plug-and-Play Approach
The simplest method for many, connecting a printer via USB is often a matter of “plug and play.”
- Power On: Ensure your printer is powered on and, if applicable, has paper loaded and ink cartridges installed.
- Connect the Cable: Plug one end of the USB cable into your printer and the other end into an available USB port on your Mac. If your Mac only has USB-C ports, you may need a USB-C to USB-A adapter or a hub.
- Automatic Detection: Your Mac should often detect the new printer automatically. A notification might appear asking if you want to set up the new device.
- Add Manually (if not detected): If nothing happens, navigate to
System Settings(orSystem Preferenceson older macOS versions) >Printers & Scanners. Click the+(Add Printer, Scanner, or Fax) button. Your USB printer should appear in the list under the “Default” tab. Select it. - Install Software: macOS will often suggest installing necessary drivers. Allow it to do so. If you’ve downloaded drivers manually, you might need to run the installer first.
Wireless Wonders: Setting Up a Wi-Fi or Bluetooth Printer
Wireless printing offers unparalleled flexibility. The initial setup often involves connecting the printer to your Wi-Fi network first, independent of your Mac.
- Printer to Network Connection:
- Via Printer Display: Most Wi-Fi printers have a small screen. Navigate through its menu to find “Network Setup,” “Wi-Fi Setup,” or similar. Select your Wi-Fi network name (SSID) from the list and enter your Wi-Fi password.
- WPS Button: If your router has a WPS button, you might find a WPS option on your printer’s network setup menu. Select it, then press the WPS button on your router within two minutes. The printer and router will connect automatically.
- Setup Software (from manufacturer): Some printers come with software you install on a computer (Windows or Mac) via USB initially, which then helps configure the printer’s Wi-Fi settings.
- Mac Detection: Once your printer is connected to your Wi-Fi network, ensure your Mac is on the same network.
- Add Printer on Mac: Go to
System Settings>Printers & Scanners. Click the+button. Your wireless printer should appear in the list under the “Default” tab. Select it. - Bluetooth: For Bluetooth printers, ensure Bluetooth is enabled on both your Mac (
System Settings>Bluetooth) and the printer. Follow the printer’s instructions to put it into pairing mode, then select it from your Mac’s Bluetooth device list. Once paired, it should appear inPrinters & Scanners.
Network Printers: For the Office and Advanced Home Setup
Ethernet-connected printers are typically found in shared environments or for users desiring a highly stable connection.
- Physical Connection: Plug one end of an Ethernet cable into your printer’s Ethernet port and the other end into an available port on your router or network switch.
- Power On: Ensure the printer is powered on.
- Mac Detection: Ensure your Mac is connected to the same network.
- Add Printer on Mac: Go to
System Settings>Printers & Scanners. Click the+button.- Default Tab: Your network printer might appear automatically if it’s broadcasting its presence.
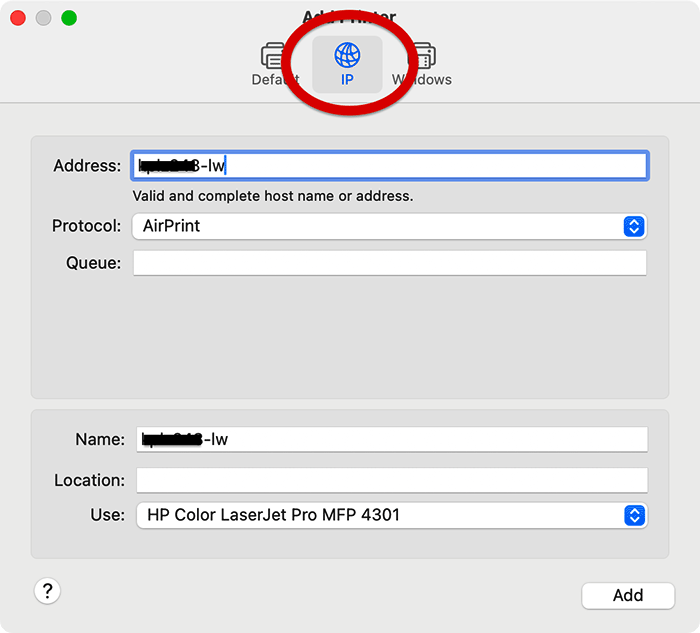
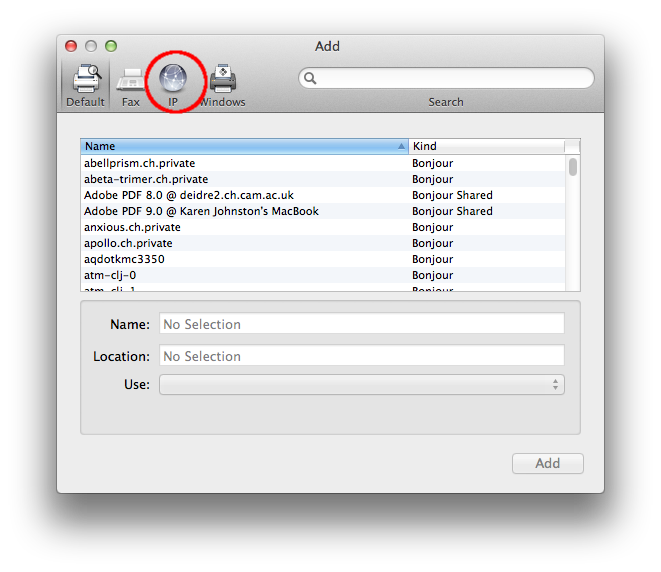
- IP Tab: If not, click the
IPtab.- Protocol: Choose
HP Jetdirect - Socket(most common). - Address: Enter the printer’s IP address. You can often find this by printing a network configuration page from the printer’s menu, or by checking your router’s connected devices list.
- Name & Location: Give it a descriptive name (e.g., “Office Laser”) and location if desired.
- Use: Ensure the correct printer driver is selected. If “Generic PCL Laser Printer” or “Generic PostScript Printer” is chosen, ensure you download the specific driver from the manufacturer’s website for full features.
- Protocol: Choose
Navigating System Settings: The ‘Printers & Scanners’ Hub
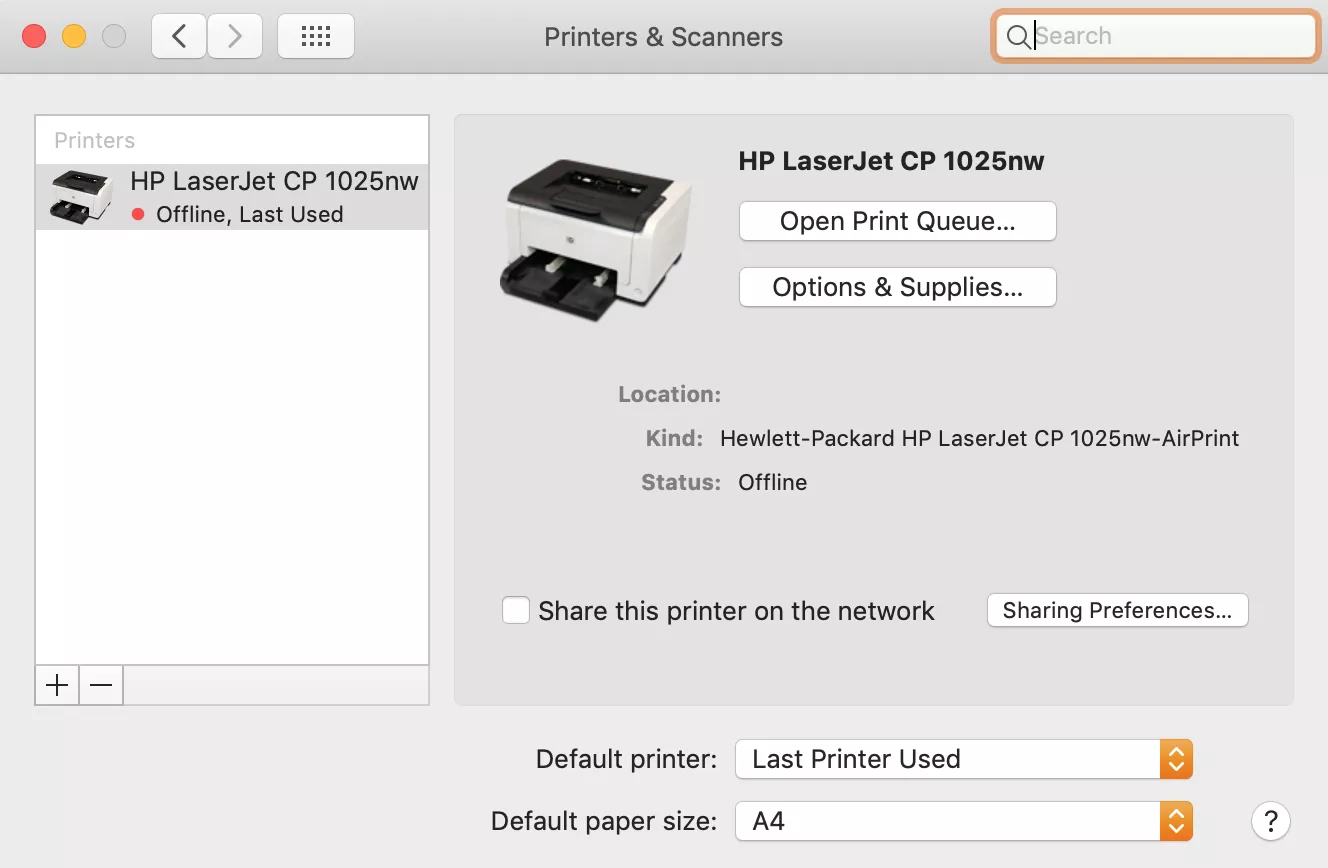
Regardless of your connection method, the Printers & Scanners pane in System Settings (or System Preferences) is your central command center for managing all printers connected to your Mac. This hub not only allows you to add printers but also to remove them, set default printers, and access various print queues and options. Familiarizing yourself with this area is crucial for maintaining an efficient printing workflow, aligning perfectly with the “Tech” aspect of productivity and seamless software interaction within the Apple ecosystem.
Optimizing Your Printing Experience: Beyond Basic Setup
Installing your printer is just the beginning. To truly leverage its capabilities and integrate it smoothly into your daily workflow, there are several additional steps and considerations. These optimizations ensure not just functionality, but also efficiency and access to advanced features.
Installing or Updating Printer Drivers: Ensuring Full Functionality
While macOS does an admirable job with generic drivers and AirPrint, specific manufacturer drivers often unlock a printer’s full potential. These custom drivers provide access to advanced features like:
- Specific paper types and sizes: Enabling precise handling for photo paper, envelopes, labels, and custom media.
- Ink/toner level monitoring: Giving you accurate readings and alerts, which can save money by preventing wasted ink or unexpected outages.
- Duplex printing options: Automatic two-sided printing, a major paper and cost saver.
- Color management profiles: Crucial for designers and photographers to ensure accurate color reproduction.
- Scanning functionalities: For multifunction printers, the driver often integrates scanning utilities directly into macOS.
How to Install/Update Drivers:
- Check Manufacturer’s Website: Always visit the support section of your printer manufacturer’s official website. Look for drivers specifically for your printer model and macOS version.
- Download and Install: Download the latest driver package. It will usually be a
.pkgor.dmgfile. Double-click to run the installer and follow the on-screen instructions. - Restart (Optional but Recommended): Sometimes, a system restart after driver installation can help ensure the new drivers are fully recognized.
- Verify: After installation, go to
System Settings>Printers & Scanners, select your printer, and clickOptions & Supplies. Check theDriverorUtilitytabs to confirm the correct driver is selected and that additional features are available.
Keeping your drivers up-to-date is a key aspect of tech maintenance, ensuring compatibility with new macOS versions and protecting against potential vulnerabilities or bugs.
Setting a Default Printer: Streamlining Your Workflow
If you have multiple printers connected to your Mac (e.g., a home inkjet and an office laser printer), setting a default printer significantly streamlines your workflow. Instead of selecting the printer every time you print, your Mac will automatically choose the designated default.
How to Set a Default Printer:
- Go to
System Settings>Printers & Scanners. - At the bottom of the list of printers, there’s a dropdown menu labeled
Default printer. - Click this dropdown and select your preferred printer from the list.
You can also set the default to “Last Printer Used,” which can be convenient if you frequently switch between printers. This small adjustment can save valuable seconds on every print job, contributing directly to your “Productivity” goals.
Managing Print Queues and Advanced Settings
Each printer on your Mac has its own print queue, which holds documents waiting to be printed. Managing this queue is essential for controlling print jobs, especially when dealing with large documents or multiple users.
Accessing the Print Queue:
- Go to
System Settings>Printers & Scanners. - Select your printer.
- Click
Printer Queue...orOpen Print Queue....
From the print queue window, you can:
- Pause/Resume: Pause individual print jobs or the entire queue.
- Delete: Remove print jobs from the queue.
- Rearrange: Reorder jobs (though this functionality is less common for individual users).
Advanced Printing Options:
When you initiate a print job (e.g., from Safari, Pages, or Word), click Show Details in the print dialog box. Here, you’ll find a wealth of advanced settings specific to your printer, often under dropdown menus like Layout, Paper Handling, Cover Page, Printer Features, etc. These include:
- Duplex settings: For two-sided printing.
- Color/grayscale options: Saving ink by printing in black and white.
- Print quality settings: Adjusting resolution for photos versus text.
- Watermarks or custom headers/footers.
- Paper tray selection.
Exploring these options empowers you to take full control of your printing, customizing output to your exact needs and potentially saving resources.
Printing a Test Page: Verifying Your Success
After all the setup, the final step in ensuring everything is working correctly is to print a test page. This simple action confirms that your printer is connected, communicating with your Mac, and able to produce physical output.
How to Print a Test Page (Mac-specific):
While some printers have an internal test page option, a good way to verify the Mac connection is to print a simple document from an application.
- Open an application like TextEdit, Pages, or even Safari.
- Type a few words or open a simple document.
- Go to
File>Print. - Ensure your newly installed printer is selected.
- Click
Print.
If the page prints successfully, congratulations! Your printer is now fully operational and ready for use. If not, don’t worry – the next section on troubleshooting will help you diagnose and resolve common issues.
Troubleshooting Common Printer Installation Issues on Mac
Even with the most careful preparation, you might encounter bumps in the road. Printer issues are common, but many can be resolved with a systematic approach. Understanding how to diagnose and fix these problems is a valuable tech skill, minimizing downtime and maintaining your productivity.
When Your Mac Can’t Find the Printer
This is perhaps the most common issue. Here’s a checklist of things to investigate:
- Power and Cables: Is the printer powered on? Are all cables (USB, Ethernet) securely connected at both ends? For Wi-Fi, is the printer showing signs of being connected to the network (e.g., a steady Wi-Fi indicator light)?
- Network Connectivity (Wi-Fi/Ethernet):
- Is your Mac on the same Wi-Fi network as the printer? (Crucial for discovery).
- Can other devices on your network “see” the printer?
- Try restarting your Wi-Fi router.
- Temporarily disable your Mac’s firewall (
System Settings>Network>Firewall) to see if it’s blocking discovery. Remember to re-enable it afterward.
- USB Port Issues: Try plugging the USB cable into a different USB port on your Mac or a different hub if you’re using one.
- Printer’s IP Address (Network Printers): For Ethernet printers, verify the printer’s IP address. Has it changed? You might need to re-add the printer in
System Settingsusing the new IP. Consider assigning a static IP address to your printer on your router to prevent future changes. - AirPrint/Bonjour: Ensure your router supports Bonjour (Apple’s network discovery protocol) and that it’s enabled. Most modern routers do by default.
Driver Woes and Software Conflicts
Outdated or incorrect drivers are a frequent source of printing problems, leading to “printer offline” messages, partial prints, or missing features.
- Install Latest Drivers: Re-download and install the latest macOS drivers directly from the printer manufacturer’s website for your specific printer model.
- Generic Driver Test: If specific drivers aren’t working, try selecting a more generic driver in
System Settings>Printers & Scanners>Options & Supplies>Driver. For example, “Generic PCL Laser Printer” or “Generic PostScript Printer.” While this might limit features, it can confirm basic communication. - Software Updates: Ensure your macOS is up to date (
System Settings>General>Software Update). Apple often includes printer driver updates with macOS updates. - Third-Party Software Conflicts: Rarely, security software or VPNs might interfere with printer communication. Try temporarily disabling them to rule them out.
Network Connectivity Challenges
Beyond simply not being found, network printers can have intermittent connectivity issues.
- Signal Strength: For Wi-Fi printers, ensure the printer is not too far from your router or in an area with poor signal.
- IP Address Conflicts: Two devices on your network having the same IP address can cause chaos. Restarting your router usually resolves this by re-assigning IPs.
- Firmware Update: Check the printer manufacturer’s website for firmware updates for your printer. Firmware updates often improve network stability and compatibility.
- Router Settings: Ensure your router isn’t blocking specific ports or services that your printer needs. Refer to your router’s manual or support for advanced network settings.
Resetting the Printing System: A Last Resort Solution
If all else fails, macOS provides a powerful troubleshooting step: resetting the printing system. This action removes all printers and scanners from your Mac, clears their queues, and resets all printer settings. It’s often effective for resolving persistent software-related issues.
How to Reset the Printing System:
- Go to
System Settings>Printers & Scanners. - Control-click (or right-click) on an empty area in the list of printers.
- Select
Reset Printing System.... - Confirm your decision by clicking
Reset. - You will need to re-add all your printers after this, but it often resolves deep-seated configuration problems.
This troubleshooting guide is a testament to the fact that while technology is designed for ease, a methodical approach to problem-solving is an invaluable skill, particularly in maintaining digital security and productivity.
Maximizing Your Printer’s Potential: Tips for Productivity and Efficiency
Once your printer is flawlessly integrated with your Mac, the journey doesn’t end. By adopting smart practices and leveraging advanced features, you can transform your printing setup from a mere necessity into a powerful tool that enhances productivity and even contributes to financial savings and environmental responsibility. This aligns with the “Tech” focus on productivity, the “Money” aspect of smart financial management, and the underlying brand promise of efficient tools.
Leveraging AirPrint and Cloud Printing Services
Apple’s AirPrint technology is a game-changer for Mac, iPhone, and iPad users. It allows for driverless printing to compatible printers on the same Wi-Fi network. If your printer is AirPrint-enabled, you simply connect it to your Wi-Fi, and your Mac (and other Apple devices) will automatically discover it without needing to install any software. This reduces setup time and streamlines mobile printing.
Cloud Printing Services (like Google Cloud Print, though deprecated, or manufacturer-specific cloud apps) offer even greater flexibility, allowing you to print from anywhere with an internet connection. By sending documents to your cloud-connected printer, you can initiate print jobs from your Mac while away from home or the office, ensuring documents are ready when you arrive. This modern approach to printing leverages “Technology Trends” to boost flexibility and convenience.
Smart Printing Habits for Cost Savings and Sustainability
Printing, especially in color, can be a significant recurring expense. Adopting mindful printing habits can lead to substantial “Money” savings and contribute to a more sustainable footprint:
- Print in Black and White: Whenever color isn’t essential, default to grayscale printing. Black ink/toner is generally cheaper than color, and using less color helps prolong the life of expensive color cartridges.
- Duplex Printing (Two-Sided): Always use duplex printing if your printer supports it. Halving your paper consumption not only saves money on paper but also reduces environmental impact.
- Print Preview: Always use the print preview function before sending a job. This allows you to catch errors, unnecessary pages, or formatting issues, preventing wasted paper and ink.
- Draft Mode: For internal documents or drafts, use your printer’s “draft” or “economy” print quality setting. This uses less ink and prints faster.
- Refill/Remanufactured Cartridges: Explore reliable, high-quality third-party refill or remanufactured ink/toner cartridges. These can be significantly cheaper than OEM (Original Equipment Manufacturer) cartridges. Always research reputable brands to avoid quality issues.
- Digital Alternatives: Before printing, ask yourself if a physical copy is truly necessary. Can the document be stored digitally, annotated electronically, or shared via email?
- Energy Saving: Turn off your printer when not in use, especially overnight. Most printers have an energy-saving sleep mode, but a full power-off further reduces electricity consumption.
Keeping Your Printer and macOS Up-to-Date
The digital landscape is constantly evolving, and so should your tech. Regularly updating your printer’s firmware and your macOS ensures optimal performance, security, and compatibility.
- Printer Firmware: Periodically check your printer manufacturer’s website for firmware updates. These updates often improve performance, fix bugs, enhance security, and add support for new features or operating systems.
- macOS Updates: Apple frequently releases macOS updates that include new printer drivers and improved printing system components. Keeping your operating system current is vital for maintaining compatibility with your printer.
The Long-Term Benefits of a Well-Maintained Printing Ecosystem
A smoothly functioning printer, integrated seamlessly with your Mac, offers more than just the ability to put ink on paper. It represents a well-managed aspect of your digital life, contributing to overall “Productivity.” Reliable tech infrastructure reduces stress, saves time (which indirectly saves money), and ensures that when you need to print that urgent document, it happens without a hitch. This attention to detail and proactive maintenance reflects a robust approach to personal and business finance by safeguarding investments in technology and ensuring tools contribute positively to your daily operations. A well-maintained printing ecosystem is an investment in your peace of mind and operational efficiency.
Conclusion
Installing a printer on your Mac, while sometimes perceived as a daunting task, is a straightforward process when approached systematically. By understanding the different connection methods, preparing adequately, and following the clear steps outlined in this guide, you can establish a reliable and efficient printing setup.
From the simplicity of USB and the freedom of Wi-Fi to the robustness of Ethernet, macOS provides intuitive tools within System Settings to get your printer up and running. More importantly, extending beyond the basic setup, embracing driver updates, mastering print queues, and adopting smart printing habits can significantly enhance your productivity, reduce costs, and ensure your printing experience is consistently smooth.
A well-installed and optimized printer is more than just a peripheral; it’s an essential extension of your digital workflow, bridging the gap between your on-screen creations and their physical manifestations. By applying the knowledge shared here, Mac users can confidently navigate the world of printer installation and maintenance, ensuring their technology serves them effectively and efficiently, contributing to both their tech prowess and their financial well-being.
aViewFromTheCave is a participant in the Amazon Services LLC Associates Program, an affiliate advertising program designed to provide a means for sites to earn advertising fees by advertising and linking to Amazon.com. Amazon, the Amazon logo, AmazonSupply, and the AmazonSupply logo are trademarks of Amazon.com, Inc. or its affiliates. As an Amazon Associate we earn affiliate commissions from qualifying purchases.