The Power Supply Unit (PSU) is often described as the heart of a computer system. While the CPU and GPU garner the most headlines for their processing prowess, neither can function without the steady, regulated flow of direct current (DC) provided by the PSU. For tech enthusiasts and PC builders, mastering the installation of this component is more than just a mechanical task; it is an essential skill that ensures system stability, longevity, and peak performance. Whether you are upgrading an existing rig to support a high-end RTX graphics card or embarking on your first custom build, understanding the nuances of power delivery is critical.
In this guide, we will explore the technical intricacies of installing a power supply, from initial selection and safety protocols to cable management and final performance verification.
Pre-Installation: Understanding the Technical Requirements
Before touching any hardware, it is vital to understand the specifications of your components. The power supply must not only fit physically within your chassis but also provide enough wattage and the correct voltage rails to support your internal hardware.
Choosing the Right PSU for Your Tech Stack
The first step in any installation is ensuring compatibility. Power supplies come in various form factors, with ATX being the standard for mid-to-full towers, while SFX (Small Form Factor) is required for compact Mini-ITX builds. Beyond size, consider the efficiency rating. The “80 Plus” certification (Bronze, Silver, Gold, Platinum, and Titanium) indicates how efficiently the unit converts AC power from your wall into DC power for your components. In high-performance tech environments, a Gold-rated or higher PSU is recommended to reduce heat waste and electricity costs.
Essential Tools and Workspace Preparation
To install a PSU, you generally only need a Phillips #2 screwdriver. However, a professional tech setup should also include cable ties (Velcro or plastic), a steady light source, and an anti-static mat or wrist strap. Static electricity is the silent killer of sensitive silicon; by grounding yourself, you prevent Electrostatic Discharge (ESD) from damaging the delicate circuits on your motherboard or the PSU’s internal capacitors.
Modular vs. Non-Modular Units
Modern technology has shifted toward modular and semi-modular designs. A non-modular PSU has all cables permanently attached, which can lead to “cable spaghetti” inside your case, obstructing airflow. A modular PSU allows you to plug in only the cables you need. Before installation, identify which cables your build requires: typically the 24-pin motherboard cable, the 8-pin CPU (EPS) cable, and various PCIe and SATA power connectors.
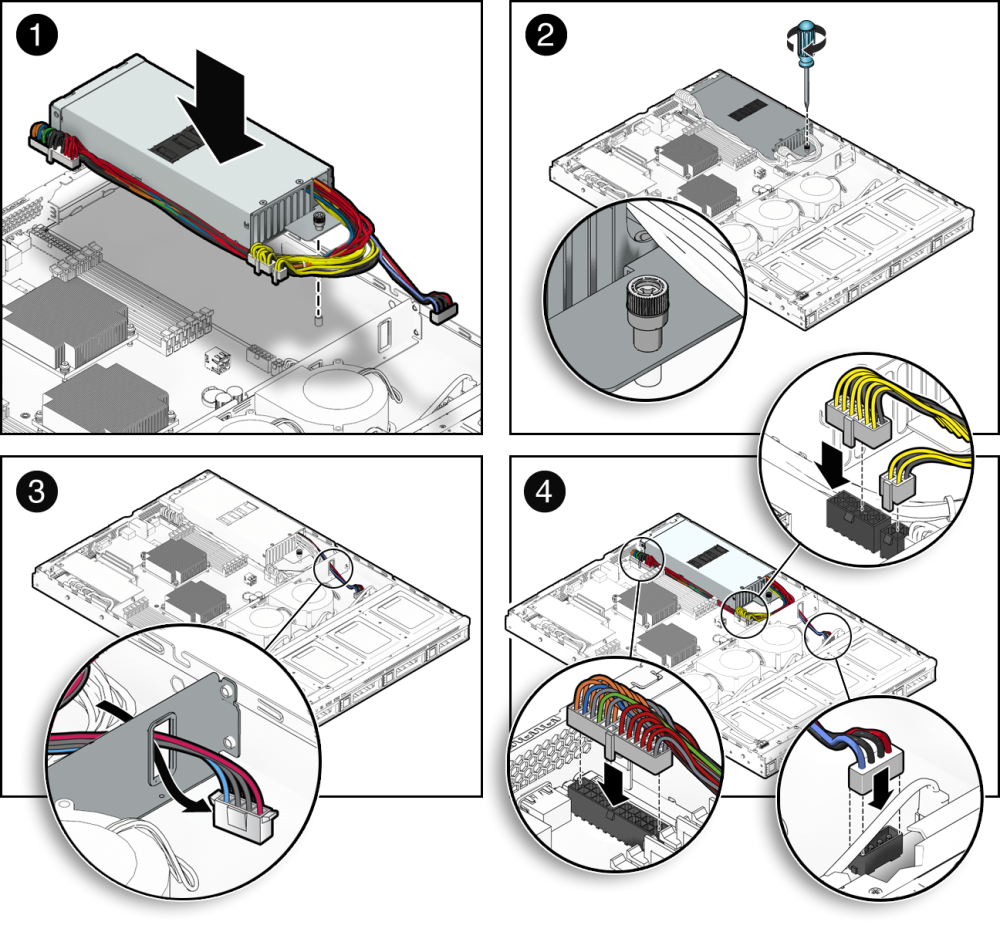
The Physical Installation: Seating the Unit
Once your workspace is ready and your components are unboxed, the physical installation begins. This stage focuses on the structural integrity of the build and optimizing thermal performance.
Orienting the PSU Fan
One of the most debated topics in PC building is whether the PSU fan should face up or down. In a modern chassis with a bottom-mounted PSU shroud and a filtered intake at the bottom, the fan should face downward. This allows the PSU to draw in cool air from outside the case, operate as an independent thermal loop, and exhaust heat out the back. If you are building in a case that sits on a thick carpet or lacks bottom ventilation, orient the fan upward so it can draw air from inside the cabin.
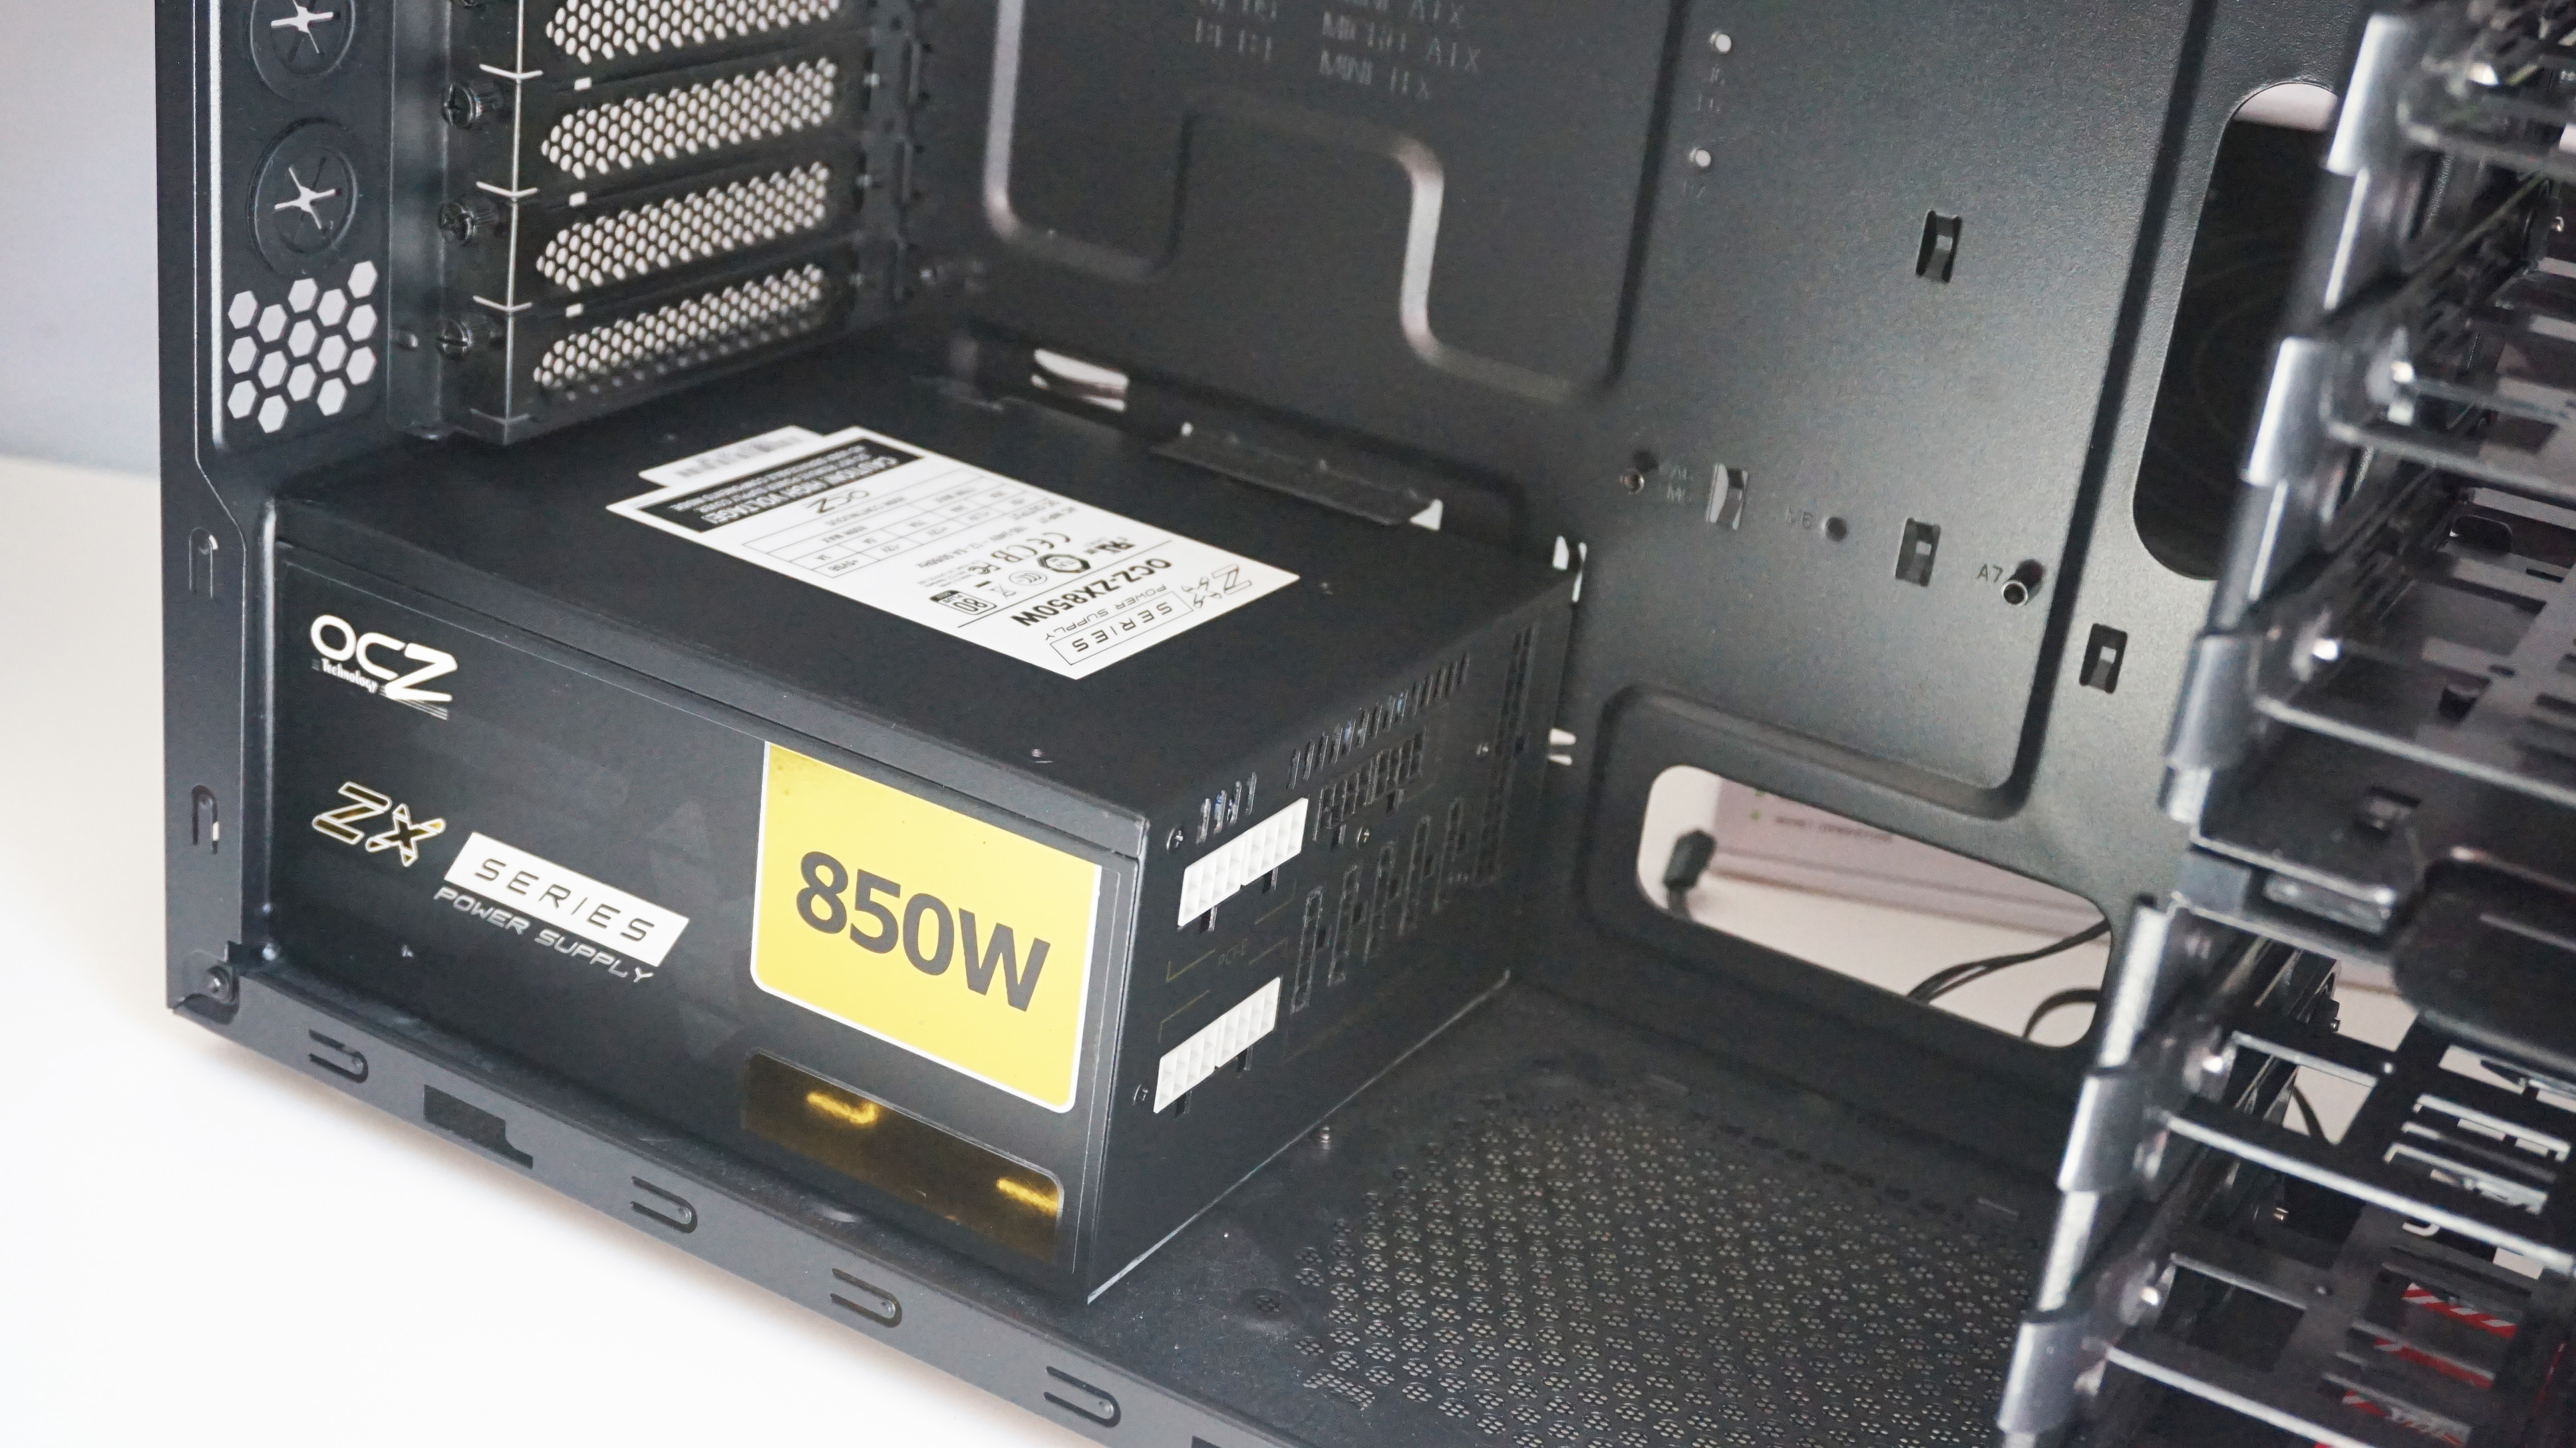
Mounting and Securing the Chassis
Carefully slide the PSU into its designated bay at the rear of the case. Ensure that the mounting holes on the back of the PSU align with the screw holes in the case frame. Use the four screws usually provided with the PSU to secure the unit. It is best practice to start all four screws by hand to ensure they are not cross-threaded before tightening them with your screwdriver. The unit should be firm and show no signs of rattling, as mechanical vibrations can lead to premature component failure over time.
Integrating with Case Airflow
In the context of modern tech design, airflow is paramount. Ensure that the PSU does not obstruct any case fans or intake paths. If your case includes a PSU shroud, use this to your advantage to hide excess cabling, which we will discuss in the following section. A clean installation isn’t just about aesthetics; it’s about maintaining the low temperatures required for high-clock-speed stability.
Navigating the Cable Labyrinth: Connections and Power Delivery
This is the most technical phase of the installation. Connecting the wrong cable or failing to seat a connector fully can result in a system that fails to POST (Power-On Self-Test) or, in worse cases, electrical arcing.
The Motherboard and CPU Power
The primary connection is the 24-pin ATX power cable. This provides the foundational power for the motherboard’s various sub-systems. It is keyed, meaning it can only fit in one direction, but it requires a firm press until the plastic clip snaps into place. Following this, locate the EPS (CPU) power header, usually found at the top left of the motherboard. Modern high-end CPUs may require two 8-pin connectors to provide stable voltage during heavy workloads or overclocking. Ensure these are labeled “CPU” or “EPS,” as they look remarkably similar to PCIe cables but have a different pinout.
Powering the Graphics Engine (PCIe)
For gamers and workstation users, the GPU is the most power-hungry component. High-end cards require 6-pin, 8-pin, or the newer 12VHPWR (16-pin) connectors. When using high-wattage cards, avoid “daisy-chaining” cables (using two connectors on a single cable). Instead, run individual cables from the PSU for each slot on the GPU. This prevents any single cable from exceeding its thermal limit, ensuring a stable current during intensive rendering or gaming sessions.
Storage and Peripheral Power
While NVMe SSDs draw power directly from the motherboard, traditional SATA SSDs, HDDs, and RGB hubs require SATA power cables. These are “L-shaped” and should be handled with care, as the plastic tabs on some drives can be brittle. Once all components are plugged in, take a moment to “tuck” the cables. Use the routing holes in your case to move the bulk of the wiring behind the motherboard tray. This improves the internal aesthetics and, more importantly, allows unobstructed airflow to reach your CPU and GPU.
Post-Installation: Verification and Optimization
With the hardware installed and cables connected, the final stage involves testing the integrity of the power delivery system and ensuring the software environment recognizes the hardware correctly.
The First Boot and BIOS Check
Before closing the side panel, connect the power cord to the wall and flip the switch on the back of the PSU to the “I” (On) position. Press the case power button. If the fans spin and the motherboard displays a logo, you have successfully completed the primary installation. Enter the BIOS (usually by tapping Del or F2) and navigate to the “Hardware Monitor” or “Power” section. Here, you can verify that the +12V, +5V, and +3.3V rails are within the acceptable 5% tolerance range.
Stress Testing and Stability
Once you are in your operating system, it is professional practice to run a stability test. Software tools like OCCT or AIDA64 allow you to put a synthetic load on the PSU. Monitor for any sudden shutdowns or “coil whine”—a high-pitched noise caused by vibrating inductors. While some coil whine is normal under heavy load, excessive noise or system crashes under load may indicate a faulty unit or insufficient wattage for your tech configuration.

Long-Term Maintenance for Tech Longevity
To keep your power supply running at peak efficiency, perform periodic maintenance. Every six months, use compressed air to blow out any dust that has accumulated in the PSU’s intake filter and internal fan. Dust buildup increases heat and forces the fan to run at higher RPMs, which can lead to bearing wear. Additionally, if you live in an area with inconsistent power, consider pairing your high-end PSU with a Uninterruptible Power Supply (UPS) to protect your hardware from surges and brownouts.
By following these professional steps, you ensure that your computer’s power delivery system is robust, efficient, and ready to handle the demands of modern computing. The PSU is the foundation of your entire tech ecosystem; installing it with precision and technical oversight is the best way to safeguard your investment.
aViewFromTheCave is a participant in the Amazon Services LLC Associates Program, an affiliate advertising program designed to provide a means for sites to earn advertising fees by advertising and linking to Amazon.com. Amazon, the Amazon logo, AmazonSupply, and the AmazonSupply logo are trademarks of Amazon.com, Inc. or its affiliates. As an Amazon Associate we earn affiliate commissions from qualifying purchases.