
In the dynamic world of technology, staying updated and proficient with essential tools is paramount. For anyone working with Python, a fundamental requirement is the ability to manage and install packages efficiently. This is where pip, the Python package installer, comes into play. On Ubuntu, a popular Linux distribution, installing and using pip is a straightforward process that unlocks a vast ecosystem of libraries and frameworks, empowering developers to build more sophisticated applications, analyze data with cutting-edge tools, and explore the frontiers of AI.
This guide is designed for anyone navigating the Ubuntu environment, from seasoned developers to individuals just beginning their tech journey. We’ll cover the nuances of installing pip for both Python 3 and, if necessary, Python 2, ensuring you have the right tools for your projects. We’ll also delve into best practices for managing packages, virtual environments, and troubleshooting common issues, equipping you with the knowledge to confidently leverage pip in your Ubuntu workflow. Beyond the immediate technical steps, understanding how to effectively manage Python dependencies can also have ripple effects on your personal productivity and the efficiency of your development projects.
Understanding Pip and Its Significance in the Python Ecosystem
Before we dive into the installation process, it’s crucial to grasp what pip is and why it’s indispensable. pip stands for “Pip Installs Packages” or “Preferred Installer Program.” At its core, pip is the de facto standard package manager for Python. It allows you to easily install, upgrade, and uninstall Python packages from the Python Package Index (PyPI) and other repositories.
The Python ecosystem is incredibly rich, with thousands of libraries available for everything from web development (Django, Flask) and data science (NumPy, Pandas, Scikit-learn) to machine learning and artificial intelligence (TensorFlow, PyTorch). Without pip, manually downloading, compiling, and installing each of these dependencies would be an arduous and error-prone task. pip automates this process, simplifying dependency management and making it seamless to incorporate powerful functionalities into your projects.
For individuals venturing into the realm of tech, particularly those interested in software development, data analysis, or AI, mastering pip is a foundational skill. It directly impacts your ability to:
- Accelerate Development: Quickly integrate pre-built libraries, saving significant development time.
- Access Cutting-Edge Tools: Easily experiment with and utilize the latest advancements in AI, data science, and other tech fields.
- Ensure Project Reproducibility: Define project dependencies precisely, allowing for consistent and reproducible environments across different machines or for team collaboration.
- Maintain Code Quality: Leverage mature and well-tested libraries, reducing the likelihood of introducing bugs.
The significance of pip extends beyond mere installation. It’s an integral part of the developer workflow, enabling efficient management of project requirements. This efficiency can translate into better personal productivity, allowing you to focus more on problem-solving and innovation rather than wrestling with dependency conflicts.
Installing Pip on Ubuntu: A Step-by-Step Approach
Ubuntu, being a Linux-based operating system, often comes with Python pre-installed. However, pip might not always be included by default, or you might need to install a specific version for Python 3 or Python 2. We will focus on Python 3 as it is the current standard and recommended version.
Installing Pip for Python 3
Python 3 is the modern and actively developed version of Python. Most Ubuntu installations will have Python 3 available. To install pip for Python 3, you’ll primarily use your system’s package manager, apt.
-
Update Package Lists:
Before installing any new software, it’s good practice to update your system’s package lists. This ensures you’re getting the latest available versions and that your system knows about all available packages. Open your terminal (you can usually find it by searching for “Terminal” in your applications menu or by pressingCtrl+Alt+T) and run:sudo apt updateYou will be prompted to enter your user password. This command fetches information about available packages from the repositories.
-
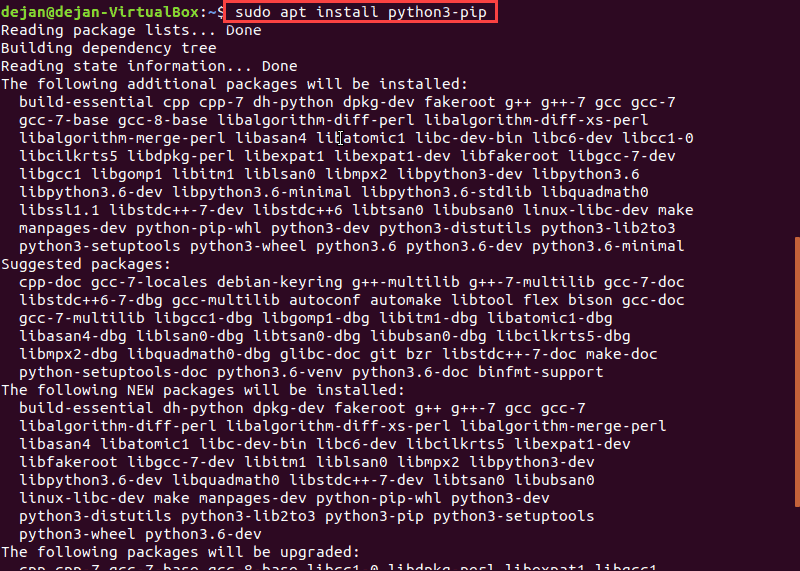
Install the Pip Package:
Once your package lists are updated, you can installpipfor Python 3. The package is typically namedpython3-pip.sudo apt install python3-pipThis command will download and install
python3-pipand any necessary dependencies.aptwill show you a summary of what will be installed and ask for confirmation. TypeYand press Enter to proceed. -
Verify the Installation:
After the installation is complete, you can verify thatpiphas been installed correctly and check its version.pip3 --versionYou should see output similar to:
pip <version_number> from <path_to_pip> (python <python_version>)For example:
pip 22.0.2 from /usr/lib/python3/dist-packages/pip (python 3.10)The
pip3command specifically targets thepipassociated with your Python 3 installation.
Installing Pip for Python 2 (Legacy Systems)
While Python 3 is the recommended version, you might encounter older systems or specific legacy projects that still require Python 2. If this is the case, you can install pip for Python 2 using a similar approach. However, be aware that Python 2 has reached its end-of-life and is no longer supported, so it’s strongly advised to migrate to Python 3 whenever possible.
-
Update Package Lists:
Ensure your package lists are up-to-date:sudo apt update -
Install the Pip Package for Python 2:
The package for Python 2 is typically namedpython-pip.sudo apt install python-pipAgain, confirm the installation by typing
Yand pressing Enter. -
Verify the Installation:
To verify the installation for Python 2, use thepipcommand:pip --versionYou should see output similar to:
pip <version_number> from <path_to_pip> (python <python_version>)For example:
pip 20.0.2 from /usr/lib/python2.7/dist-packages/pip (python 2.7)Important Note: On systems where both Python 2 and Python 3 are installed, using
pipmight default to Python 2’spip, whilepip3will point to Python 3’spip. It’s crucial to use the correct command (pipvs.pip3) to ensure you are managing packages for the intended Python version.
Managing Python Packages with Pip: Best Practices and Essential Commands
Once pip is installed, its true power lies in its ability to manage your Python project’s dependencies. This is where the concepts of personal productivity and efficient project management intertwine. Using pip effectively means not just installing packages but also organizing them, ensuring reproducibility, and avoiding conflicts.
Creating and Managing Virtual Environments
A critical best practice when working with Python projects is the use of virtual environments. A virtual environment is an isolated Python environment that allows you to install packages for a specific project without affecting your system’s global Python installation or other projects. This prevents version conflicts and keeps your projects clean and self-contained.
Installing venv (Python 3)
Python 3 comes with the venv module built-in, which is the recommended way to create virtual environments. If for some reason it’s not available, you might need to install the python3-venv package:
sudo apt install python3-venv
Creating a Virtual Environment
Navigate to your project directory in the terminal and run the following command to create a virtual environment. We’ll name it .venv (the dot makes it a hidden directory, a common convention):

python3 -m venv .venv
This command will create a .venv directory within your project.
Activating and Deactivating the Virtual Environment
To start using the virtual environment, you need to activate it:
-
On Ubuntu/Linux/macOS:
source .venv/bin/activateOnce activated, your terminal prompt will change, typically showing the name of your virtual environment in parentheses (e.g.,
(.venv) your_username@your_machine:~/your_project$). Now, anypipcommands will operate within this isolated environment. -
To deactivate the virtual environment when you’re done working on the project, simply type:
deactivate
Installing Packages within a Virtual Environment
With the virtual environment activated, you can now install packages using pip. For example, to install the popular data analysis library pandas:
pip install pandas
This will install pandas and its dependencies only within your .venv environment.
Essential Pip Commands
Here are some of the most frequently used pip commands:
-
Installing a Package:
pip install package_nameExample:
pip install requests -
Installing a Specific Version:
pip install package_name==version_numberExample:
pip install numpy==1.21.0 -
Upgrading a Package:
pip install --upgrade package_nameExample:
pip install --upgrade django -
Uninstalling a Package:
pip uninstall package_nameExample:
pip uninstall beautifulsoup4 -
Listing Installed Packages:
pip listThis will show all packages installed in the current environment.
-
Saving Project Dependencies:
To ensure your project can be reproduced, you should save a list of its dependencies.pip freeze > requirements.txtThis command creates a
requirements.txtfile that lists all installed packages and their exact versions. -
Installing Dependencies from a File:
When you get a project or want to set up a new environment, you can install all its dependencies from arequirements.txtfile:pip install -r requirements.txt
This disciplined approach to package management not only enhances your personal productivity by preventing common issues but also demonstrates professionalism in your development endeavors. It contributes to a more robust and maintainable codebase, which is crucial for any tech project, whether it’s a personal learning experiment or a corporate initiative.
Troubleshooting Common Pip Installation and Usage Issues
Even with straightforward processes, users can sometimes encounter hiccups when installing or using pip. Understanding common problems and their solutions can save you a significant amount of time and frustration.
“command not found: pip” or “command not found: pip3”
This is the most common issue after attempting an installation. It usually means that either the installation didn’t complete successfully, or the system’s PATH environment variable hasn’t been updated to include the directory where pip is installed.
-
Solution:
-
Re-run the installation: Double-check that you used
sudo apt install python3-pip(orpython-pipfor Python 2) and that there were no errors during the process. -
Check PATH: On some systems, especially after manual installations, the
pipexecutable might not be in the default PATH. However,aptinstallations usually handle this correctly. If you suspect a PATH issue, you might need to find thepipexecutable (e.g., usingsudo find / -name pip3) and then add its directory to your PATH. This is less common withaptinstallations. -
Use
python3 -m pip: A robust way to runpipregardless of PATH issues is to invoke it as a module:python3 -m pip install package_nameThis explicitly tells Python 3 to run the
pipmodule. This is a good habit to adopt.
-
Permission Errors During Installation (e.g., “EnvironmentError: [Errno 13] Permission denied”)
This error typically occurs when you try to install packages globally (without a virtual environment) and your user doesn’t have write permissions to the Python site-packages directory.
-
Solution:
-
Use a Virtual Environment (Highly Recommended): This is the best and most recommended solution. By creating and activating a virtual environment, you install packages into a directory that your user owns, thus avoiding permission issues.
-
Install for the current user only: If you absolutely must install a package globally and are facing permission issues, you can try installing it for your user only. This doesn’t require
sudo.pip install --user package_nameHowever, this can still lead to conflicts if different projects need different versions of the same package.
-
Use
sudo(with caution): Installing withsudo pip install package_namewill install the package globally with root privileges. This is generally discouraged as it can mess up system-managed Python packages and lead to conflicts. Only use this if you understand the implications and have a very specific reason.
-
Network/Proxy Issues (e.g., “Could not fetch URL…”)
If your Ubuntu machine is behind a proxy or firewall, pip might fail to connect to PyPI.
-
Solution:
Configurepipto use your proxy settings. You can do this temporarily for a single command or persistently by creating apip.conffile.-
Temporary:
pip install --proxy http://username:password@proxy.server.com:port package_name -
Persistent (create
~/.config/pip/pip.conf):
ini

[global]

proxy = http://username:password@proxy.server.com:port
Replaceusername,password,proxy.server.com, andportwith your actual proxy details.
-
Package Not Found on PyPI
Sometimes, a package you’re trying to install might not be found on the Python Package Index.
-
Solution:
-
Check the package name: Ensure you have spelled the package name correctly. PyPI is case-sensitive.
-
Alternative repositories: The package might be hosted on a different repository. You can specify an alternative index URL:
pip install --index-url https://your.alternative.repo.com/simple/ package_name -
Package availability: The package might not be published on PyPI at all, or it might have been removed. You may need to find an alternative library or build it from source if the source is available.
-
By understanding and proactively addressing these common issues, you can ensure a smoother and more productive experience with pip on your Ubuntu system. This problem-solving capability is a valuable asset in the tech landscape, saving time and fostering a deeper understanding of the tools you use.
Conclusion: Empowering Your Ubuntu Development Workflow with Pip
Installing and effectively managing pip on Ubuntu is a fundamental step for anyone serious about Python development, data science, AI, or any field leveraging Python’s extensive library ecosystem. From ensuring you have the correct version installed for Python 3 to mastering the use of virtual environments and understanding essential commands, this guide has provided a comprehensive roadmap.
The benefits extend beyond mere technical proficiency. By adopting best practices like using pip with virtual environments and maintaining requirements.txt files, you significantly enhance your personal productivity, reduce project management overhead, and contribute to the creation of more robust, reproducible, and maintainable software. This disciplined approach is a hallmark of professional development and a key enabler of innovation in the ever-evolving tech landscape.
As you continue your journey in technology, remember that pip is not just an installation tool; it’s a gateway to a universe of possibilities. It allows you to harness the collective power of the Python community, integrating powerful libraries and frameworks that drive progress in areas like artificial intelligence, machine learning, and complex data analysis. So, embrace the power of pip, keep your environments clean, your dependencies managed, and continue building, exploring, and innovating on your Ubuntu platform.