
In the dynamic landscape of modern software development, Python has emerged as a cornerstone language, powering everything from web applications and data science projects to artificial intelligence and automation scripts. A significant part of Python’s versatility and widespread adoption comes from its vast ecosystem of third-party libraries and packages. To effectively manage these indispensable components, every Python developer relies on a crucial tool: Pip.
Pip, which stands for “Pip Installs Packages,” is the default package installer for Python. It simplifies the process of installing, managing, and upgrading Python packages, pulling them directly from the Python Package Index (PyPI) – a colossal repository of open-source Python projects. For anyone working with Python on a Linux system, understanding how to install and utilize Pip is not just a best practice; it’s a fundamental skill that unlocks a world of development possibilities and significantly enhances productivity. This guide will walk you through the essential steps to get Pip up and running on your Linux machine, ensuring you’re well-equipped to navigate the expansive Python ecosystem.
Understanding Pip and Its Indispensable Role in Python Development
Before diving into the installation process, it’s vital to grasp what Pip is and why it holds such a pivotal position in the Python development workflow. This understanding will not only clarify its utility but also highlight how it integrates with broader technology trends and contributes to efficient software practices.
What Exactly is Pip?
At its core, Pip is a command-line utility that allows you to install and manage Python packages. Think of it as an app store for Python, but instead of apps, you’re downloading and installing libraries and modules that extend Python’s capabilities. These packages can range from tools for web development (like Django or Flask), data analysis (NumPy, Pandas), machine learning (Scikit-learn, TensorFlow), to utilities for file manipulation or network communication. Without Pip, managing these dependencies manually would be an incredibly tedious and error-prone task, severely hindering development velocity.
Pip streamlines this process by connecting directly to PyPI, where thousands of community-contributed packages are hosted. When you issue a pip install command, Pip automatically fetches the specified package and its dependencies, resolves any conflicts, and installs them into your Python environment. This seamless operation ensures that developers can focus on writing code ratherabilities rather than wrestling with package management.
Why Pip is Essential for Every Python Project
The essence of modern software development often lies in leveraging existing tools and libraries to build complex applications faster and more reliably. Pip is the gateway to this efficiency in the Python world. Here’s why it’s indispensable:
- Dependency Management: Almost every non-trivial Python project relies on multiple external packages. Pip allows developers to declare these dependencies in a
requirements.txtfile, making it easy for other developers or deployment systems to install all necessary components with a single command. This ensures consistent development environments across teams and deployment stages, a critical aspect of robust software engineering. - Access to PyPI: PyPI is the central repository for Python packages, hosting over 400,000 projects. Pip is the primary client for interacting with PyPI, giving developers immediate access to this vast collection of open-source tools. This dramatically accelerates development cycles, as most common functionalities or complex algorithms are likely already implemented and available as a package.
- Version Control: Pip allows you to specify exact package versions, ranges of versions, or minimum versions, preventing compatibility issues that might arise from unintended package updates. This granular control is vital for maintaining the stability of long-term projects and reproducing environments accurately.
- Ecosystem Integration: Pip is deeply integrated into the Python ecosystem, making it the de facto standard for package management. Its familiarity and widespread use mean that almost all Python projects and tutorials assume its presence, making it a foundational tool for anyone entering or working within the Python community.
The ability to quickly integrate and manage these external components through Pip directly impacts a developer’s productivity, allowing for faster prototyping, development, and deployment. It’s a prime example of how well-designed software tools facilitate efficiency and innovation within the tech landscape.
A Glimpse into the Python Ecosystem and Open Source
Pip’s significance extends beyond mere package installation; it embodies the spirit of collaboration and open source that drives much of modern technology. The Python Package Index, powered by Pip, is a testament to the global community of developers who contribute their work for the benefit of all. This collaborative model fosters rapid innovation, as solutions to common problems are shared and improved upon collectively.
From a broader tech perspective, Pip reflects a key trend in software development: the reliance on modular, reusable components. Instead of “reinventing the wheel,” developers are encouraged to build upon the work of others, leading to more robust, secure, and efficient applications. This approach not only boosts individual productivity but also contributes to the collective advancement of technology, aligning perfectly with the ethos of accessible software and tools.
Preparing Your Linux Environment for Pip Installation
Installing Pip on Linux is generally straightforward, but a few preliminary steps can ensure a smooth process. Proper preparation helps in avoiding common pitfalls and ensures that Pip integrates correctly with your existing Python setup.
Prerequisites: Python Installation and System Updates
The absolute prerequisite for Pip is, naturally, Python itself. Most modern Linux distributions come with Python pre-installed. However, it’s crucial to confirm its presence and version, as Pip is tightly coupled with a specific Python installation.
-
Check for Python: Open your terminal and type:
python3 --versionor simply
python --versionIf Python is installed, you’ll see an output like
Python 3.x.x. If you see a message indicating the command is not found, you’ll need to install Python first. On most Debian/Ubuntu systems, this can be done withsudo apt update && sudo apt install python3. For Fedora/CentOS, usesudo dnf install python3. -
System Updates: Before installing any new software, it’s always good practice to update your system’s package list and upgrade existing packages. This ensures you have the latest security patches and library dependencies, which can prevent conflicts during installation.
- For Debian/Ubuntu-based systems (e.g., Ubuntu, Mint):
bash

sudo apt update

sudo apt upgrade
- For RHEL/CentOS/Fedora-based systems:
bash

sudo dnf update

# Or for older CentOS/RHEL: sudo yum update
- For Arch Linux:
bash

sudo pacman -Syu
- For Debian/Ubuntu-based systems (e.g., Ubuntu, Mint):
Choosing Your Linux Distribution and Package Manager
Linux comes in many flavors, known as distributions (distros), each with its own package management system. The method you use to install Pip will largely depend on your specific distribution. The most common package managers include apt (for Debian/Ubuntu), dnf or yum (for Fedora/RHEL/CentOS), and pacman (for Arch Linux). Understanding which one your system uses is key to selecting the correct installation commands. This guide will focus on the most popular distributions, providing commands for each where applicable.
Step-by-Step Installation Methods for Pip on Linux
There are primarily two robust methods to install Pip on a Linux system: using your distribution’s native package manager or utilizing the get-pip.py script. The former is generally recommended for its simplicity and system-level integration, while the latter offers a more universal approach.
Method 1: Installing Pip via Your System’s Package Manager (Recommended)
This is the most straightforward and recommended method as it integrates Pip into your system’s existing package management framework, making it easy to keep updated alongside other system software.
For Debian/Ubuntu-based Systems (apt)
If you’re running Ubuntu, Linux Mint, Debian, or other Debian derivatives, apt (Advanced Package Tool) is your go-to.
Pip for Python 3 is typically packaged as python3-pip.
- Update your package list:
bash

sudo apt update
- Install
python3-pip:
bash

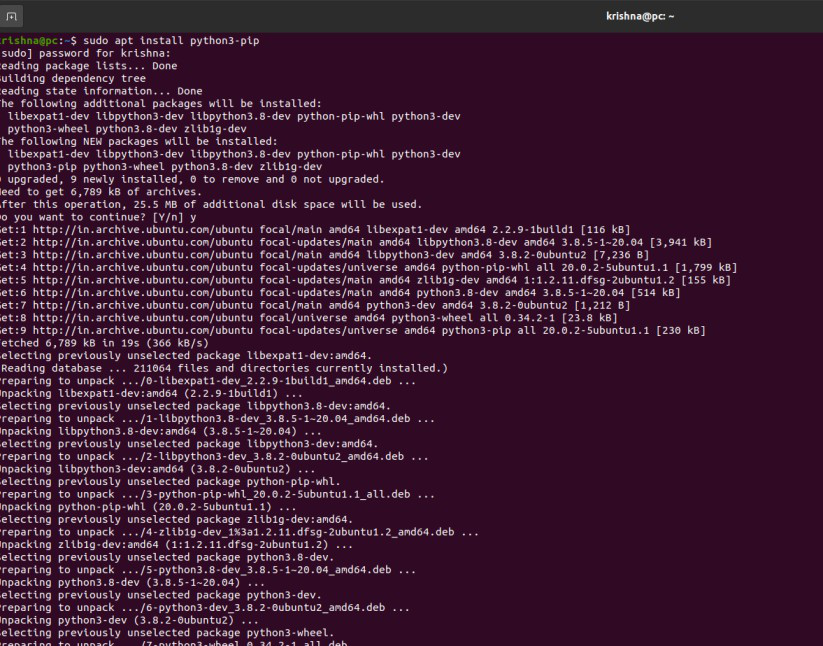
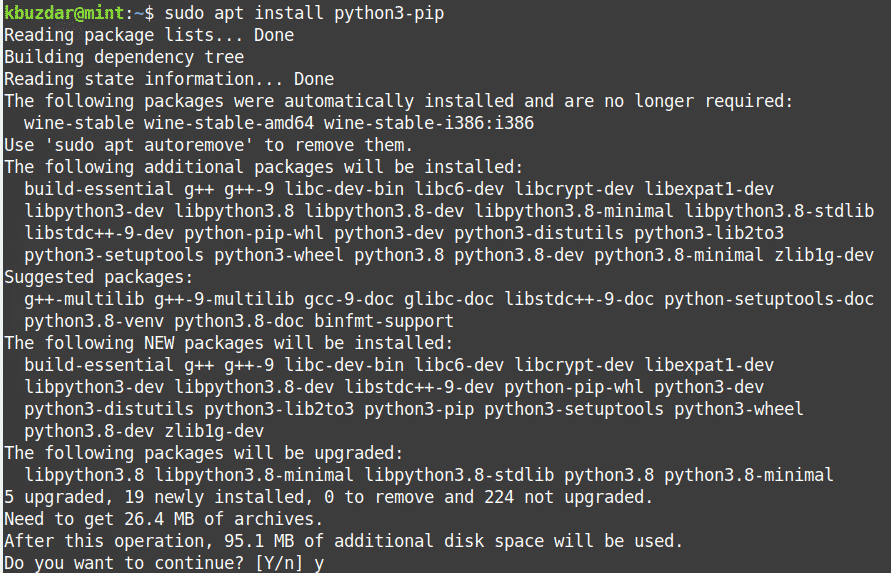
sudo apt install python3-pip
This command will download and install Pip along with its necessary dependencies.
For RHEL/CentOS/Fedora-based Systems (dnf/yum)
For Red Hat Enterprise Linux (RHEL), CentOS, or Fedora, dnf (Dandified YUM) is the modern package manager, replacing yum in newer versions.
- Update your package list:
bash

sudo dnf update

# For older CentOS/RHEL versions using yum: sudo yum update
- Install
python3-pip:
bash

sudo dnf install python3-pip

# For older CentOS/RHEL versions using yum: sudo yum install python3-pip
This will install Pip for Python 3.
Method 2: Installing Pip Using the get-pip.py Script (Universal Approach)
This method involves downloading a special script, get-pip.py, directly from the Python Packaging Authority (PyPA) and running it with your Python interpreter. This approach is highly universal and works across most Linux distributions, especially if Pip isn’t available in your system’s repositories or you need a specific version.
-
Download the
get-pip.pyscript:
You can usecurlorwgetto download the script. It’s recommended to download it into a temporary directory.curl https://bootstrap.pypa.io/get-pip.py -o get-pip.py # Alternatively, using wget: # wget https://bootstrap.pypa.io/get-pip.pyThis command fetches the script and saves it as
get-pip.pyin your current directory. -
Execute the installation script:
Now, run the script using your Python 3 interpreter.
bash

python3 get-pip.py
If you encounter permission issues (e.g.,Permission deniederrors when trying to install globally), you might need to usesudo. However, it’s generally advised to avoidsudowhen installing Python packages globally, as it can interfere with system packages. If you must usesudo, proceed with caution:
bash

sudo python3 get-pip.py
After successful installation, it’s a good practice to delete the script:
bash

rm get-pip.py
Addressing Potential PATH Configuration Issues
After installation, especially with the get-pip.py method, you might find that the pip command isn’t immediately recognized by your shell. This usually means that the directory where Pip was installed is not included in your system’s PATH environment variable. The PATH variable tells your shell where to look for executable programs.
To fix this:
- Locate Pip’s installation directory: Pip is typically installed in
/usr/local/binor~/.local/bin(for user-specific installations). You can often find its location by runningfind / -name pip -type f 2>/dev/null(this might take a while) orwhich pip3. - Add the directory to your PATH: If Pip is in
~/.local/binand it’s not in yourPATH, you can add it by editing your shell’s configuration file (e.g.,~/.bashrcfor Bash or~/.zshrcfor Zsh).
Add the following line to the end of the file:
bash

export PATH="$HOME/.local/bin:$PATH"
Then, apply the changes:
bash

source ~/.bashrc

# Or: source ~/.zshrc
After this,piporpip3commands should be recognized.
Verifying Your Pip Installation and Basic Usage
Once you’ve completed the installation, the next crucial step is to verify that Pip is correctly installed and then learn its fundamental commands. This section will guide you through confirming its presence and beginning your journey of package management.
Confirming Pip’s Presence and Version
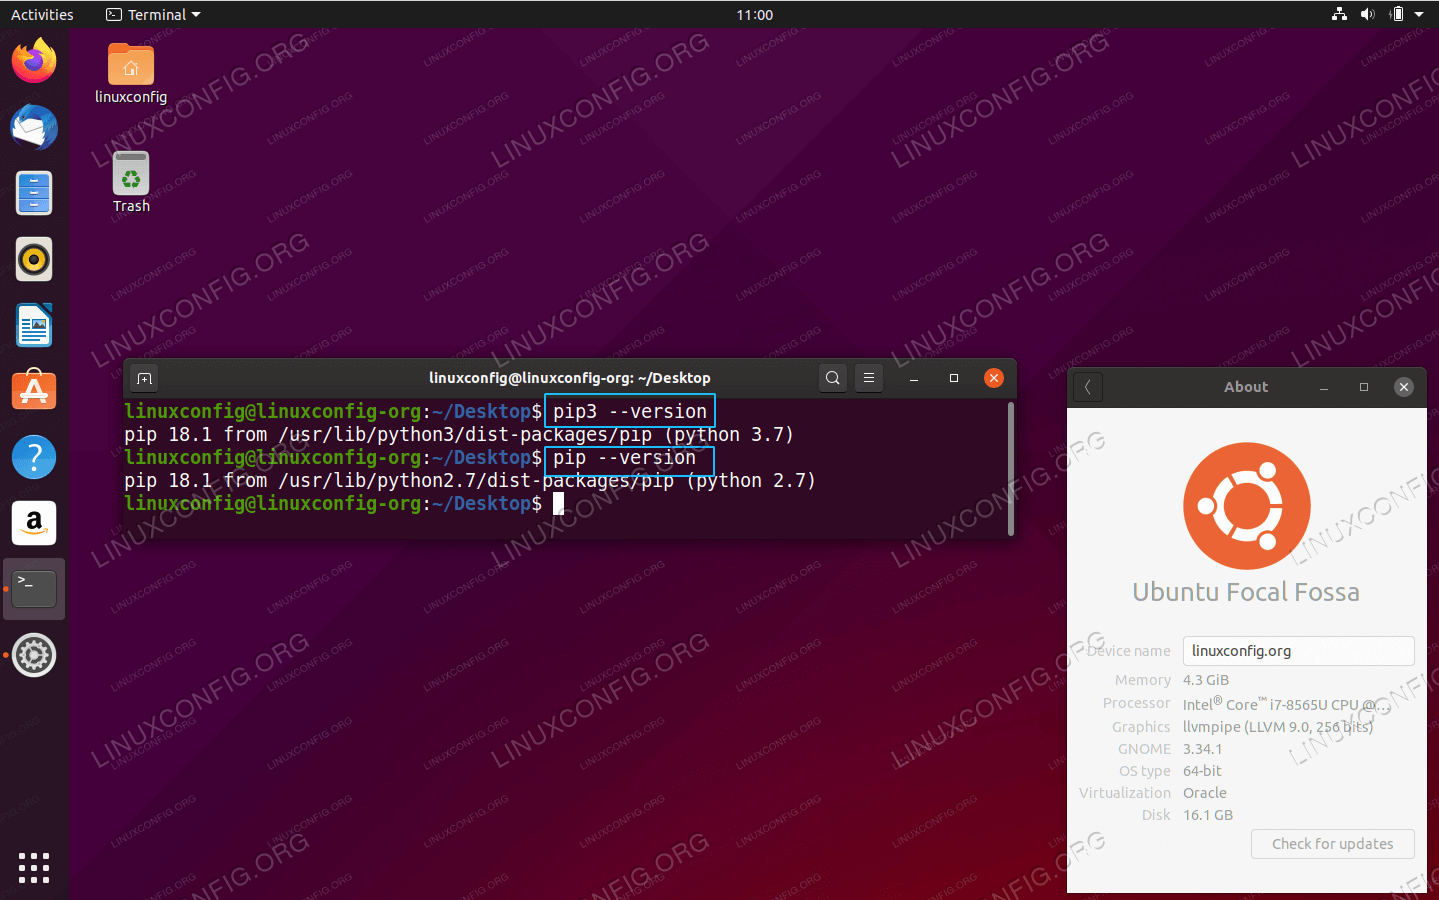
To ensure Pip is ready for action, open your terminal and run the following commands:
pip3 --version
or
pip --version
You should see output similar to this:
pip 23.x.x from /usr/lib/python3/dist-packages/pip (python 3.x)
This output confirms that Pip is installed, tells you its version number, and indicates which Python version it’s associated with. If you get a “command not found” error, revisit the installation steps, paying close attention to the PATH configuration.
Your First Steps with Pip: Installing Python Packages
With Pip installed, you can now tap into the vast PyPI ecosystem. Let’s try installing a common package, for example, requests, a popular library for making HTTP requests.
pip install requests
You’ll see output indicating that Pip is downloading and installing requests and any of its dependencies. Once complete, you can verify the installation by attempting to import requests in a Python interpreter:
python3
>>> import requests
>>> requests.__version__
'2.31.0' # (or whatever the current version is)
>>> exit()
If no errors occur, requests has been successfully installed and is ready for use in your Python projects.
Managing Dependencies: Upgrading and Uninstalling Packages
Pip is not just for installation; it’s a full-fledged package manager.
-
Upgrading a package: To get the latest version of an already installed package, use the
--upgradeflag:pip install --upgrade requestsThis command will check PyPI for a newer version of
requestsand upgrade it if available. -
Uninstalling a package: If you no longer need a package, you can easily remove it:
bash

pip uninstall requests
Pip will ask for confirmation before removing the package and its related files.
Listing Installed Packages
To get an overview of all Python packages installed in your current environment, use the list command:
pip list
This command will output a table showing the name and version of every installed package, which is invaluable for documenting project dependencies or troubleshooting conflicts.
Advanced Practices, Troubleshooting, and Maximizing Productivity with Pip
Beyond basic installation and usage, there are several advanced practices and troubleshooting tips that can further enhance your Python development workflow, streamline productivity, and even contribute to digital security.
The Power of Virtual Environments: Isolating Project Dependencies
One of the most critical best practices in Python development is the use of virtual environments. A virtual environment is an isolated Python environment that allows you to install packages for specific projects without interfering with your global Python installation or other projects. This prevents “dependency hell,” where different projects require conflicting versions of the same package.
-
Why use them?
- Isolation: Each project gets its own set of dependencies.
- Cleanliness: Your global Python installation remains pristine.
- Reproducibility: Easily share project requirements via
requirements.txt. - Digital Security: Limits potential conflicts and vulnerabilities to specific project environments.
-
How to create and activate a virtual environment (using
venvmodule, built into Python 3):- Navigate to your project directory:
bash

cd my_python_project
- Create a virtual environment (e.g., named
venv):
bash

python3 -m venv venv
- Activate the virtual environment:
bash

source venv/bin/activate
Your terminal prompt will change, indicating you are inside the virtual environment (e.g.,(venv) user@host:~/my_python_project$). Now, anypip installcommand will install packages only within this isolated environment. - To deactivate, simply type:
bash

deactivate
- Navigate to your project directory:
Embracing virtual environments is a significant step towards a professional and productive Python development workflow.
Keeping Pip Itself Updated
Just like any other software, Pip itself receives updates that bring new features, bug fixes, and security enhancements. It’s good practice to keep your Pip installation up to date.
python3 -m pip install --upgrade pip
Using python3 -m pip ensures you’re upgrading the Pip associated with your python3 interpreter, even if your PATH isn’t perfectly configured or if you have multiple Python versions.
Common Installation Issues and Their Solutions
Even with careful preparation, you might encounter issues. Here are some common ones and how to address them:
pip: command not found:- Solution: This is typically a
PATHissue. Review the “Ensuring YourPATHConfiguration is Correct” section above. Also, ensure you usedpython3for installation if you intend to usepip3.
- Solution: This is typically a
Permission deniederrors:- Cause: Trying to install packages globally without sufficient permissions.
- Solution:
- Recommended: Use virtual environments. This avoids global installations entirely.
- Alternative (less recommended for packages, but sometimes needed for Pip itself): Use
sudocautiously with package manager installations (e.g.,sudo apt install python3-pip). Forpip installof Python packages, if you absolutely must install globally and face permissions issues withoutsudo, use the--userflag:pip install --user package_name. This installs the package in your user’s home directory (~/.local/bin).
- Old Python Versions:
- Cause: Your system might default to an older Python 2 installation, leading to confusion.
- Solution: Always explicitly use
python3andpip3to ensure you’re working with Python 3 and its associated Pip. For instance,python3 get-pip.pyorpip3 install package_name.
- SSL Certificate Errors:
- Cause: Issues with system certificates preventing secure connections to PyPI.
- Solution: Ensure your system’s root certificates are up to date (
sudo apt install ca-certificateson Debian/Ubuntu, or equivalent for other distros). If you’re behind a corporate proxy, you might need to configure Pip to use it (refer to Pip’s documentation for proxy settings).
Integrating Pip into Your Developer Workflow
Integrating Pip effectively into your daily workflow can significantly boost productivity. Beyond basic install commands, consider these practices:
requirements.txt: Usepip freeze > requirements.txtto save a list of all installed packages and their exact versions for a project. This file is crucial for reproducible builds and sharing projects. Later,pip install -r requirements.txtwill install all listed dependencies.- Testing and CI/CD: Pip commands are fundamental in automated testing and Continuous Integration/Continuous Deployment (CI/CD) pipelines, ensuring that all necessary dependencies are installed before tests run or applications are deployed. This is a critical aspect of modern software engineering and digital security, as it helps guarantee that deployed software uses known, tested dependencies.
- Security Scanning: While Pip manages packages, developers are responsible for the security of their dependencies. Tools like
pip-auditor integrating with security scanners like Snyk or OWASP Dependency-Check can scan yourrequirements.txtfor known vulnerabilities, adding another layer of digital security to your projects.
Conclusion
Installing Pip on your Linux system is a foundational step into the vast and vibrant world of Python development. Whether you choose the convenience of your distribution’s package manager or the universal flexibility of the get-pip.py script, mastering this essential tool empowers you to efficiently manage Python packages, leverage the colossal PyPI ecosystem, and accelerate your development workflow.
By understanding Pip’s role, preparing your environment, and adopting best practices like virtual environments and dependency management, you’re not just installing a piece of software; you’re equipping yourself with a critical component for building robust, scalable, and secure applications. Pip is more than just a utility; it’s a gateway to enhanced productivity and a testament to the collaborative power of open-source technology that continually shapes the tech landscape. With Pip at your command, your Linux machine transforms into a potent development workstation, ready to tackle any Python challenge you throw at it.
aViewFromTheCave is a participant in the Amazon Services LLC Associates Program, an affiliate advertising program designed to provide a means for sites to earn advertising fees by advertising and linking to Amazon.com. Amazon, the Amazon logo, AmazonSupply, and the AmazonSupply logo are trademarks of Amazon.com, Inc. or its affiliates. As an Amazon Associate we earn affiliate commissions from qualifying purchases.