In today’s fast-paced digital landscape, the ability to build and deploy robust web applications is an indispensable skill. At the heart of countless dynamic websites and powerful web services lies PHP, a versatile, open-source scripting language renowned for its simplicity, flexibility, and extensive community support. Whether you’re an aspiring web developer, a seasoned professional looking to set up a local development environment, or a business owner aiming to understand the technical foundations of your online presence, installing PHP on a Windows machine is a foundational step.
This comprehensive guide will walk you through the process of installing PHP on Windows, demystifying the technical jargon and providing clear, actionable steps. We’ll explore the rationale behind choosing Windows for your PHP development, delve into the necessary prerequisites, detail the installation process, and touch upon how a well-configured PHP environment can empower your tech projects, enhance your brand’s digital strategy, and even open avenues for online income.
Unlocking Web Development: Why PHP on Windows Matters
For many developers and businesses, Windows offers a familiar and accessible operating system, making it a natural choice for setting up a local development environment. While Linux-based servers dominate the production landscape, developing on Windows provides a comfortable bridge, allowing you to build, test, and iterate on applications before deploying them to a live server. Understanding this local setup is crucial for productivity and efficient project management, aligning perfectly with the “Tech” and “Productivity” facets of our website’s focus.
The Power of PHP: A Foundation for Digital Innovation
PHP’s enduring popularity is no accident. It powers an astounding percentage of the internet, driving behemoths like WordPress, Facebook (in its early days), and countless e-commerce platforms. For those tracking “Technology Trends,” PHP’s continuous evolution with new versions (PHP 7.x, 8.x) brings significant performance improvements and modern language features, keeping it highly relevant in the competitive world of “Software” development.
Beyond conventional web applications, PHP can also serve as a backend for “AI Tools” or data processing scripts, especially when integrated with other services. Its extensive library support allows developers to tackle a wide array of problems, making it a versatile asset in any developer’s toolkit. Learning how to install and configure PHP is not just about getting a program running; it’s about gaining control over a powerful engine that can bring your digital ideas to life, contributing directly to your “Tech” prowess.
Crafting Your Digital Presence: PHP’s Role in Branding and Business
For “Brand Strategy” and “Corporate Identity,” a robust and secure website is non-negotiable. Many content management systems (CMS) and e-commerce platforms, critical for establishing an online presence and driving “Marketing” efforts, are built on PHP. Think of WordPress for blogs and business sites, or Magento and OpenCart for online stores – all PHP-driven.
By understanding how to manage your PHP environment, you gain a deeper insight into the technical underpinnings of your “Brand.” This knowledge can be invaluable when communicating with developers, making informed decisions about website performance, or even customizing solutions to better reflect your “Corporate Identity.” A well-optimized PHP backend ensures faster loading times and a smoother user experience, directly enhancing your brand’s online “Reputation.”
From a “Money” perspective, especially regarding “Online Income” and “Side Hustles,” mastering PHP opens up a world of opportunities. You can build websites for clients, develop custom applications, or even contribute to open-source projects, all of which can generate revenue. The cost-effectiveness of PHP (being open-source) means lower overheads for businesses, making it an attractive option for startups and small to medium-sized enterprises (SMEs) looking to manage their “Business Finance” efficiently. Investing time in learning PHP is, in essence, an investment in a highly marketable skill.
Preparing Your Windows Environment for PHP
Before diving into the actual installation, it’s crucial to prepare your Windows system. This involves understanding the components that PHP interacts with and deciding on the most suitable installation method for your needs. This preparatory phase is vital for “Digital Security” and “Productivity,” ensuring a smooth development workflow.
Essential Components: Web Servers, Databases, and Runtimes
PHP doesn’t run in isolation; it typically interacts with other software to form a complete web development stack.
- Web Server: A web server like Apache HTTP Server or Nginx is essential to serve your PHP files over HTTP. When a user requests a PHP page, the web server passes the request to the PHP interpreter, receives the processed output, and sends it back to the user’s browser.
- Database: Most dynamic web applications require a database to store and retrieve information. MySQL and MariaDB are popular choices that integrate seamlessly with PHP. PostgreSQL is another robust alternative.
- Visual C++ Redistributable: PHP binaries for Windows are compiled with Visual C++ compilers. Therefore, you’ll need the appropriate Visual C++ Redistributable packages installed on your system. The specific version depends on the PHP version you’re installing (e.g., PHP 7.4 might require VC15, PHP 8.x might require VC16/VC17). Always check the PHP download page for the exact requirement. Missing this can lead to runtime errors or prevent PHP from running at all.
Ensuring these components are properly installed and configured is a matter of “Digital Security.” Outdated or misconfigured software can create vulnerabilities. Regularly updating these components is a basic but critical security practice.
Choosing Your Path: Manual Installation vs. Integrated Stacks
There are two primary approaches to installing PHP on Windows:
- Manual Installation: This method involves downloading PHP, a web server (like Apache), and a database (like MySQL) as separate components and configuring them to work together. While more involved, it offers maximum control and a deeper understanding of each component’s interaction. It’s ideal for those who want a tailored environment or need to integrate PHP with an existing server setup.
- Integrated Development Environments (IDEs) / WAMP/XAMPP/Laragon Stacks: These are all-in-one packages that bundle Apache, MySQL/MariaDB, PHP, and sometimes Perl (XAMPP) or Nginx (Laragon) into a single, easy-to-install application.
- XAMPP (X-platform Apache MySQL PHP Perl): A very popular choice for cross-platform development.
- WAMP (Windows Apache MySQL PHP): Specifically designed for Windows.
- Laragon: A modern, lightweight, and incredibly fast development environment specifically for Windows, supporting Apache, Nginx, MySQL, PostgreSQL, PHP, Node.js, and more. It emphasizes speed and ease of use for “Productivity.”
For beginners, integrated stacks like Laragon or XAMPP are often recommended due to their ease of setup, allowing you to quickly get a development environment up and running. However, for a truly nuanced understanding and advanced customization, the manual approach is invaluable. This guide will focus on the manual installation process, giving you the granular control necessary to deeply understand your “Software” stack.
Step-by-Step Manual PHP Installation on Windows
This section will guide you through the detailed process of manually installing and configuring PHP to work with a web server like Apache on your Windows machine. This “Tutorials” section is designed to be highly practical, emphasizing “Tech” skills.
Downloading and Extracting PHP: The Core Files
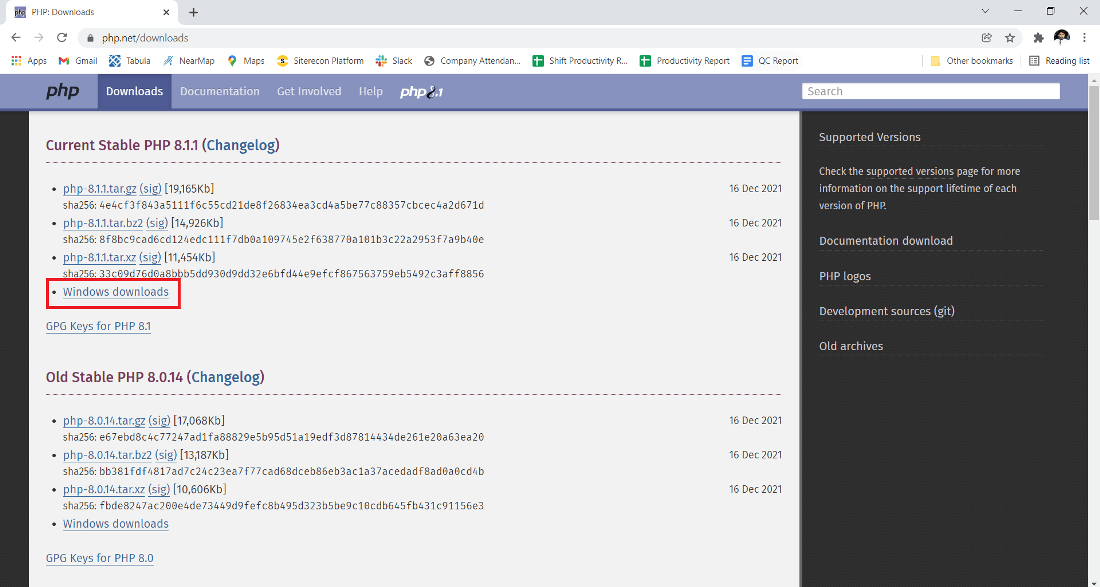
- Visit the Official PHP Website: Navigate to the official PHP downloads page: https://windows.php.net/download/.
- Choose the Correct PHP Version: You’ll see different versions (e.g., PHP 8.2, PHP 8.1). It’s generally recommended to download the latest stable version.
- Select the Thread Safe (TS) or Non-Thread Safe (NTS) Version:
- Thread Safe (TS): Choose this version if you are using PHP with a multi-threaded web server like Apache through
mod_php. - Non-Thread Safe (NTS): Choose this version if you are using PHP with a FastCGI process (like with Nginx or Apache’s
mod_fcgid/mod_proxy_fcgi). For manual Apache installation usingmod_php, Thread Safe is usually the correct choice.
- Thread Safe (TS): Choose this version if you are using PHP with a multi-threaded web server like Apache through
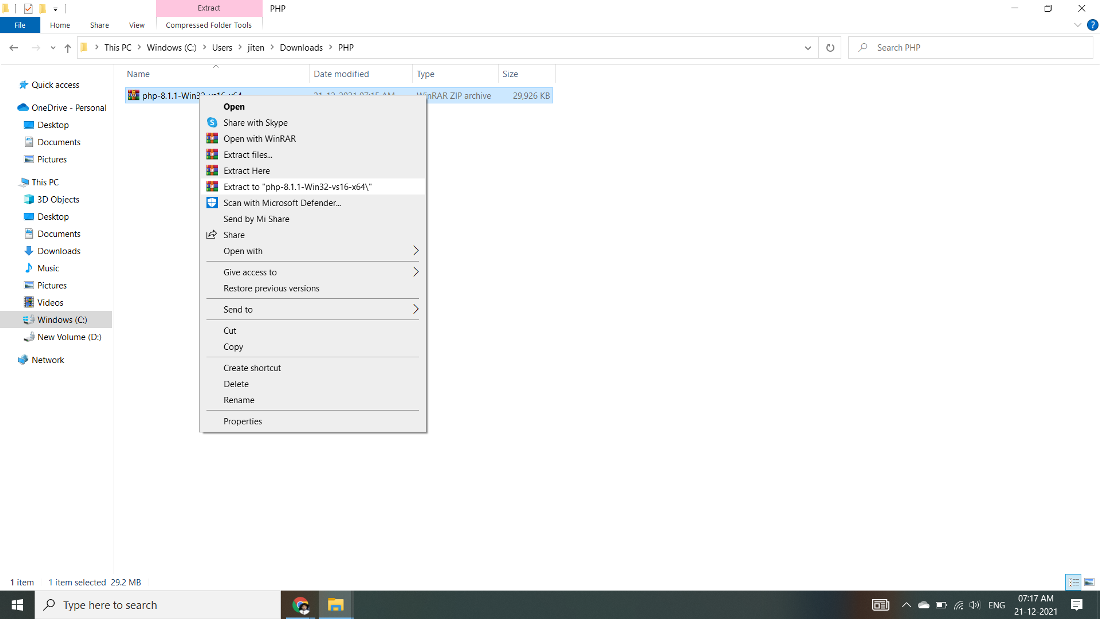
- Download the Zip File: Download the appropriate
.zipfile for your system architecture (x64 for 64-bit Windows, which is standard for most modern machines). - Create a Directory for PHP: Create a new folder on your
C:drive, for example,C:php. - Extract the PHP Files: Extract the contents of the downloaded
.zipfile into theC:phpfolder. After extraction, yourC:phpfolder should contain all the PHP executable files, DLLs, and configuration templates.
Configuring PHP: The php.ini File
The php.ini file is PHP’s primary configuration file. It dictates how PHP behaves, from error reporting to resource limits. Proper configuration is critical for both functionality and “Digital Security.”
- Locate the Configuration Template: In your
C:phpdirectory, you’ll find files namedphp.ini-developmentandphp.ini-production. - Rename
php.ini-development: For a local development environment,php.ini-developmentis a good starting point as it has more lenient error reporting. Make a copy ofphp.ini-developmentand rename it tophp.ini. - Edit
php.ini: Open thephp.inifile with a text editor (like Notepad++, VS Code, or Sublime Text) and make the following crucial changes:extension_dir: Uncomment (remove the semicolon;) and set this to your PHPextdirectory.
ini

extension_dir = "ext"
(Make sureextis relative to yourC:phpdirectory, or use the full path likeextension_dir = "C:phpext")- Enable Extensions: Uncomment the extensions you’ll need. For most web development, you’ll want at least:
extension=curlextension=gd(for image manipulation)extension=mysqli(for MySQL database interaction)extension=pdo_mysql(another way to interact with MySQL)extension=opensslextension=mbstringextension=fileinfoextension=json
date.timezone: Set your local timezone. This is important for date and time functions.
ini

date.timezone = "America/New_York" ; Replace with your actual timezone
display_errors: For development, you might want to set this toOnto see errors directly in the browser. For production, it should beOfffor “Digital Security” reasons.
ini

display_errors = On
upload_max_filesizeandpost_max_size: Adjust these if you need to upload larger files (e.g., for media-heavy websites, critical for “Productivity”).
ini

upload_max_filesize = 64M

post_max_size = 64M
- Save the
php.inifile.
Integrating PHP with Your Web Server: Apache Example
This section assumes you have Apache HTTP Server already installed (e.g., in C:Apache24). If not, you’ll need to install it first.
-
Locate Apache’s Configuration File: Open your Apache
httpd.conffile, typically found atC:Apache24confhttpd.conf. -
Add PHP Module Configuration: At the very end of the
httpd.conffile (or in a separate configuration file included byhttpd.conf), add the following lines. Ensure theLoadModulepath points to thephp_module.dllin your PHP installation, and thePHPIiniDirpoints to yourC:phpdirectory.# PHP8 Handler LoadModule php_module "C:/php/php8apache2_4.dll" # Adjust for your PHP version (e.g., php7apache2_4.dll) AddHandler application/x-httpd-php .php PHPIniDir "C:/php"Self-correction: The dll name needs to match the PHP version. For PHP 8.x, it’s typically
php8apache2_4.dll. -
Configure DirectoryIndex: Ensure Apache knows to look for
index.phpfiles. Find theDirectoryIndexdirective and addindex.phpto it:
apache

<IfModule dir_module>

    DirectoryIndex index.html index.php

</IfModule>
-
Save and Restart Apache: Save the
httpd.conffile and then restart your Apache service. You can do this via the Services manager in Windows or by runninghttpd.exe -k restartin your Apachebindirectory from the command line.
Verifying Your PHP Setup: The First Test
To confirm that PHP is installed and configured correctly, you’ll create a simple test file. This quick check is crucial for “Productivity” and ensures your “Software” environment is ready.
- Create a Test File: In your Apache web server’s document root (e.g.,
C:Apache24htdocs), create a new file namedinfo.php. - Add PHP Code: Open
info.phpin your text editor and add the following single line of PHP code:
php

<?php phpinfo(); ?>
- Access in Browser: Open your web browser and navigate to
http://localhost/info.php.
If the installation was successful, you should see a detailed page displaying information about your PHP configuration, including the PHP version, loaded extensions, server information, and the path to your php.ini file. This phpinfo() page is invaluable for “Troubleshooting” any issues that may arise during development.
Optimizing and Securing Your PHP Development Environment
Beyond the basic installation, there are further steps to optimize your PHP environment for “Productivity,” enhance “Digital Security,” and lay the groundwork for building a successful “Brand” and “Money”-generating applications.
Advanced Configuration and Environment Variables
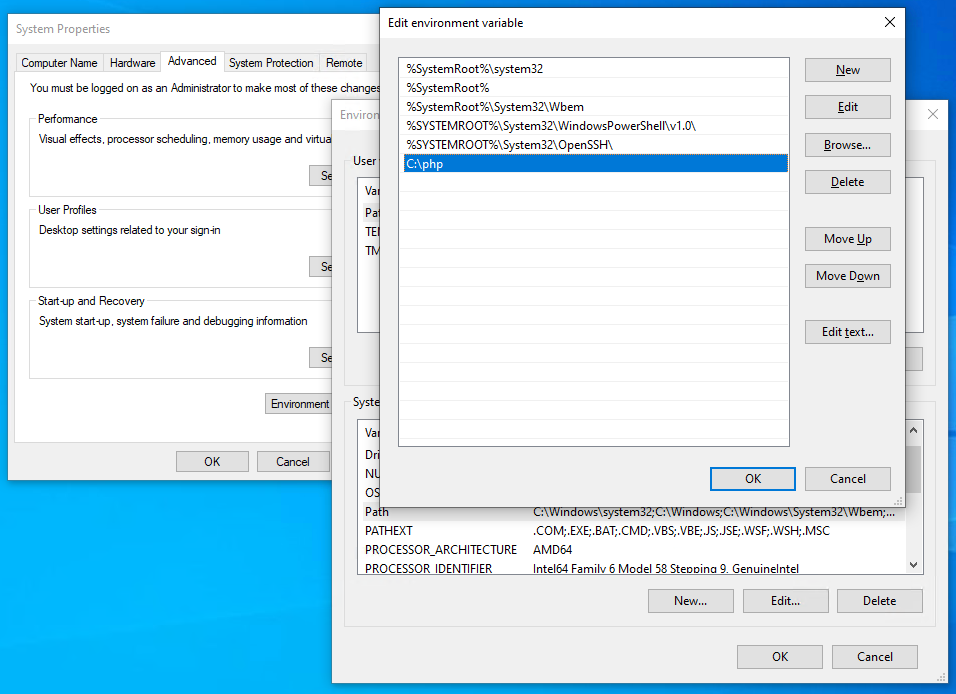
- Environment Variables: While
PHPIniDirtells Apache where to findphp.ini, adding PHP to your WindowsPATHenvironment variable (e.g.,C:php) allows you to run PHP commands directly from any command prompt. This is essential for command-line tools like Composer (PHP’s dependency manager) and for executing PHP scripts outside of a web server context.- To do this: Search for “Environment Variables” in Windows, click “Edit the system environment variables,” then “Environment Variables,” select “Path” under “System variables,” click “Edit,” and add
C:phpto the list.
- To do this: Search for “Environment Variables” in Windows, click “Edit the system environment variables,” then “Environment Variables,” select “Path” under “System variables,” click “Edit,” and add
- Composer: Once PHP is in your PATH, install Composer. Composer is a vital “Software” tool for managing project dependencies and frameworks (like Laravel, Symfony), significantly boosting “Productivity” in modern PHP development.
- Caching: For production environments, implementing opcode caches like OPcache (built into PHP) can drastically improve performance. While less critical for local development, understanding its role contributes to your overall “Tech” knowledge.
- Error Logging: Configure
error_loginphp.inito write PHP errors to a specific file. This is better for tracking issues than displaying errors directly in the browser, especially in a team setting.
Common Pitfalls and Troubleshooting Tips
Even with careful steps, issues can arise. Here are some common problems and their solutions:
- PHP page displays as plain text or downloads: This indicates Apache is not processing PHP files. Double-check your
LoadModuleandAddHandlerdirectives inhttpd.conf. Ensurephp_module.dllexists at the specified path. phpinfo()page blank or HTTP 500 error:- Check Apache’s error logs (
C:Apache24logserror.log) for specific PHP-related errors. - Verify the correct Visual C++ Redistributable is installed.
- Ensure
php.iniis correctly named and located, andPHPIniDiris correct. - Check for syntax errors in
php.ini.
- Check Apache’s error logs (
- Extensions not loading: Ensure
extension_diris correctly set and the extension files (.dllfiles) exist in that directory. Also, confirm the extensions are uncommented inphp.ini. - Apache won’t start: Check Apache’s
error.log. Often, it’s a syntax error inhttpd.confor a port conflict (e.g., another program using port 80 or 443).
Effective “Troubleshooting” is a key “Productivity” skill. Learning to interpret error messages and consult logs will save you immense time.
Beyond Installation: Productivity, Performance, and Future-Proofing
Installing PHP is just the beginning. To truly leverage its power for “Brand” and “Money” initiatives, consider these next steps:
- Integrated Development Environments (IDEs): Use a dedicated IDE like VS Code, PhpStorm, or Sublime Text with PHP extensions. These tools offer code completion, debugging, and syntax highlighting, dramatically increasing “Productivity.”
- Version Control (Git): Implement Git for version control. This is a fundamental “Tech” practice for tracking changes, collaborating with teams, and ensuring project stability.
- Local Development Tools: Explore tools like Docker or Vagrant for creating isolated and consistent development environments. This “Software” approach helps prevent “it works on my machine” problems and simplifies team collaboration.
- Frameworks: Dive into popular PHP frameworks like Laravel or Symfony. These frameworks provide structured ways to build robust and scalable applications, accelerating development time and enabling you to take on more complex projects, which directly impacts “Business Finance” through reduced development costs and faster market entry for “Online Income” ventures.
- Learning Resources: Continuously invest in learning. Websites like PHP.net, Laracasts, and various online courses offer abundant “Tutorials” and resources to deepen your PHP expertise. This “Investing” in your skills is the best way to “Future-Proof” your career and projects.
By meticulously following these steps, you’ll establish a solid foundation for your web development endeavors on Windows. This journey from installation to advanced configuration not only equips you with crucial “Tech” skills but also empowers you to build digital products that bolster your “Brand,” streamline “Business Finance,” and unlock significant “Online Income” potential in the ever-evolving digital economy.
aViewFromTheCave is a participant in the Amazon Services LLC Associates Program, an affiliate advertising program designed to provide a means for sites to earn advertising fees by advertising and linking to Amazon.com. Amazon, the Amazon logo, AmazonSupply, and the AmazonSupply logo are trademarks of Amazon.com, Inc. or its affiliates. As an Amazon Associate we earn affiliate commissions from qualifying purchases.