
Minecraft, the sandbox phenomenon, continues to captivate millions with its endless possibilities, creative freedom, and evolving game world. From humble block-building to intricate redstone contraptions and sprawling survival adventures, the game offers something for everyone. However, as Minecraft evolves, adding new biomes, entities, and complex mechanics, its demands on your system can increase significantly. This is where OptiFine steps in – a legendary performance mod that has become a staple for countless players seeking both smoother gameplay and breathtaking visual enhancements.
For anyone playing Minecraft 1.21.6, the latest major update at the time of writing, integrating OptiFine is not just about boosting your frame rate; it’s about unlocking the game’s full aesthetic potential through features like shader support, dynamic lighting, and high-resolution textures. This comprehensive guide will walk you through every step of installing OptiFine 1.21.6, ensuring you can transform your blocky world into a truly immersive digital canvas. We’ll delve into the ‘how-to’ with precision, while also touching upon why this ‘Tech’ enhancement is a no-brainer for any serious player, how it’s built a strong ‘Brand’ reputation, and the ‘Money’ value it adds by maximizing your existing investment in the game.
Understanding OptiFine and Its Impact on Your Game
Before we dive into the installation process, it’s crucial to understand what OptiFine is, why it’s so highly regarded, and the profound impact it can have on your Minecraft experience. It’s more than just a mod; it’s a fundamental upgrade for many.
What is OptiFine?
At its core, OptiFine is a performance-enhancing and visual-tweaking mod for Minecraft. Developed by sp614x, it’s a client-side utility, meaning it only affects your local game client and doesn’t require server-side installation to function. Its primary goal is to optimize Minecraft’s performance, allowing it to run faster and utilize system resources more efficiently. This often translates to a significant boost in Frames Per Second (FPS), especially on lower-end hardware, but even powerful gaming rigs benefit from its optimizations, ensuring a smoother, more stable framerate.
Beyond performance, OptiFine is renowned for its extensive suite of visual customization options. It enables features that are otherwise impossible or difficult to achieve in vanilla Minecraft, such as:
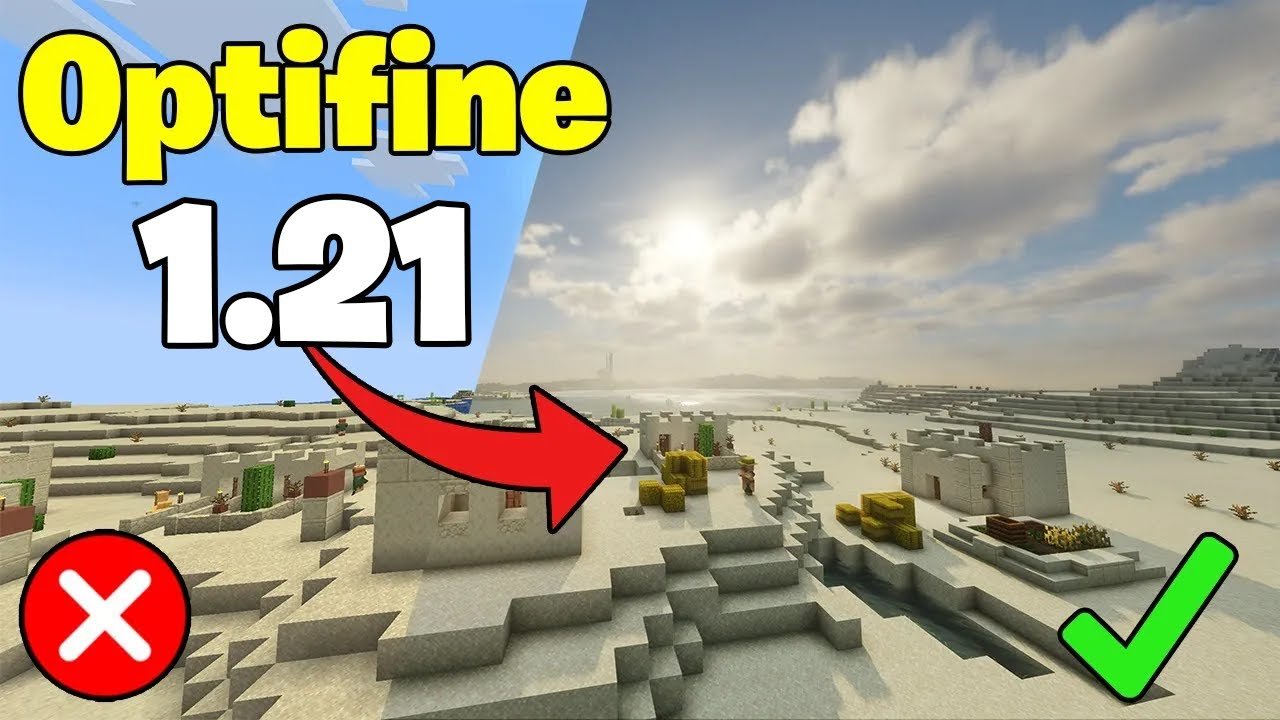
- Shader Support: This is arguably OptiFine’s most popular feature. It allows players to install and use shader packs, which completely transform Minecraft’s lighting, shadows, water reflections, foliage movement, and atmospheric effects, making the game look incredibly realistic and vibrant.
- HD Texture Pack Support: OptiFine allows Minecraft to utilize high-resolution texture packs without performance bottlenecks, supporting custom animations, CTM (Connected Textures Mod), and various other advanced texture features.
- Dynamic Lights: Held torches or glowing items will cast dynamic light, illuminating the surrounding area as you move.
- Variable Render Distance: Offers finer control over render distance, letting you render chunks much further than vanilla Minecraft allows, or significantly closer for performance.
- Advanced Graphics Settings: Options like custom skies, connected textures, clear water, better grass, better snow, and enhanced fog provide unparalleled control over the game’s aesthetics.
- Performance Tweaks: Fine-grained control over animations, details, quality, and performance settings empowers users to tailor the game precisely to their system’s capabilities and personal preferences.
In essence, OptiFine bridges the gap between Minecraft’s inherent blocky aesthetic and the desire for modern graphical fidelity and smooth performance, making it an indispensable tool for many players.
Why OptiFine 1.21.6 Matters for Modern Minecraft
Minecraft 1.21.6, like its predecessors, introduces a wealth of new content, including blocks, items, mobs, and game mechanics. While these updates enrich the gameplay experience, they also incrementally increase the computational demands on your system. Every new block texture, mob AI, or generation algorithm adds to the processing load. Without optimization, this can lead to frame rate drops, stuttering, and an overall less enjoyable experience, particularly in dense areas or when engaging in complex activities.
OptiFine 1.21.6 is specifically tailored to work with this latest version of Minecraft, ensuring that all its optimizations and features are compatible and effective. Installing it means you’re not just getting a performance boost; you’re future-proofing your game experience for the latest content. It allows players to fully immerse themselves in the new Trial Chambers, craft with the crafter, and explore the revamped combat mechanics without being hampered by technical limitations. This commitment to staying current with Minecraft updates is a testament to the mod’s development prowess and its importance within the game’s ecosystem.
The OptiFine ‘Brand’ and Community Trust
The longevity and widespread adoption of OptiFine have solidified its status as a trusted ‘Brand’ within the Minecraft community. Unlike many other mods that come and go, OptiFine has maintained consistent development, reliability, and broad compatibility for over a decade. This track record has fostered immense community trust, making it often the first mod recommended to new players looking to improve their game.
Its reputation is built on several pillars:
- Reliability: OptiFine is known for its stability and minimal bug count, especially in its stable release versions.
- Consistent Updates: The developer, sp614x, is diligent in updating OptiFine to new Minecraft versions shortly after they release, sometimes even providing preview versions to allow players to enjoy the benefits earlier.
- Feature-Rich: No other single mod offers the same breadth of performance optimizations and graphical enhancements.
- Ease of Use: The standalone installer makes it incredibly easy for even novice users to get it up and running.
This strong ‘Brand’ identity means that when players think of enhancing Minecraft, OptiFine is usually the first name that comes to mind. It’s not just a utility; it’s an expected part of the premium Minecraft experience for many, highlighting how a well-executed and consistently delivered piece of ‘Tech’ can build an unparalleled reputation.
Preparing for Installation: Essential Prerequisites
A smooth OptiFine installation begins with proper preparation. Ensuring your system meets the basic requirements and that your Minecraft setup is ready will save you a lot of potential headaches later.
Java Installation and Verification
OptiFine is a Java-based mod, distributed as a .jar (Java Archive) file. For the installer to run and for Minecraft itself to function correctly with OptiFine, you need to have Java installed on your system. Modern versions of Minecraft (like 1.21.6) typically use Java 17 or newer. The Minecraft Launcher often comes with its own bundled Java runtime environment (JRE), but the OptiFine installer sometimes relies on a system-wide Java installation.
How to Check Your Java Version:
- Open your Command Prompt (Windows: search “cmd”) or Terminal (macOS/Linux).
- Type
java -versionand press Enter. - The output will display your installed Java version. Look for “openjdk version” or “Java(TM) SE Runtime Environment (build…)” with a version number like “17.0.x” or “21.0.x”.
How to Install/Update Java:
If you don’t have Java installed or your version is too old, you can download the latest Java Development Kit (JDK) or JRE from Oracle or OpenJDK providers like Adoptium (Temurin). We recommend a recent LTS (Long Term Support) version, such as Java 17 or Java 21, which are compatible with Minecraft 1.21.6.
- Go to a reliable source like
adoptium.netororacle.com/java/technologies/downloads/. - Download the appropriate installer for your operating system (Windows x64, macOS ARM/x64, Linux).
- Run the installer, accepting the default options. Ensure it adds Java to your system’s PATH variable during installation.
- After installation, re-verify your Java version using the steps above.
Ensuring a Clean Minecraft Installation
Before adding any mods, it’s always best practice to have a clean, working base.
- Launch Minecraft 1.21.6 at least once: Open your Minecraft Launcher, select the “Latest Release (1.21.6)” profile, and click “Play.” Let the game fully load to the main menu. This ensures that all necessary game files for version 1.21.6 are downloaded and set up correctly. You can then close the game.
- Verify Version: Double-check that you are indeed using Minecraft 1.21.6. The OptiFine version must match your Minecraft version exactly. Attempting to install OptiFine 1.21.6 on Minecraft 1.21.5, for example, will lead to errors.
Backup Your Worlds (Optional but Recommended)
While OptiFine is generally very stable and doesn’t directly modify your world files, it’s always a good habit to back up your important Minecraft worlds before installing any new software or mods. This falls under the ‘Digital Security’ aspect of ‘Tech’, protecting your valuable creations.
- Open Minecraft, go to “Singleplayer,” and select the world you want to back up.
- Click “Edit,” then “Open World Folder.”
- Navigate one folder up to find the
savesfolder. - Copy the entire folder of your desired world to a safe location on your computer (e.g., your Documents folder or an external drive).
This simple step can prevent heartache if anything unexpected were to occur during the modding process.
Step-by-Step Installation of OptiFine 1.21.6
Now that your system is prepared, let’s proceed with the straightforward installation of OptiFine 1.21.6.
Step 1: Downloading the Official OptiFine Installer
The most critical step in avoiding potential security risks and ensuring you get the correct, working version of OptiFine is to download it from the official source.
- Go to the Official Website: Open your web browser and navigate to
https://optifine.net/downloads. - Locate Minecraft 1.21.6: On the downloads page, look for the section dedicated to Minecraft 1.21.6. There might be several versions listed, potentially including “Preview” versions if 1.21.6 is very new. It’s generally recommended to download the latest stable version if available. If only preview versions exist, pick the most recent one.
- Click “Download”: Next to the appropriate version, click the “Download” button.
- Beware of Ads: OptiFine uses ad services to support its development. You’ll likely be redirected to an ad-filled page (like
adfocusoradf.ly). Do not click on any ads! Wait for the “Skip” or “Skip Ad” button to appear (usually in the top right corner after a few seconds), and then click it. This will take you to the direct download link. - Save the
.jarFile: Once on the final download page, click the direct download link (e.g., “Download OptiFine1.21.6HDUG9.jar”). Save the.jarfile to a location you can easily find, such as your Downloads folder or Desktop.
Important Security Note: Never download OptiFine from unofficial sources. Third-party websites might host outdated versions, modified versions with malware, or fake installers. Always use optifine.net.
Step 2: Running the OptiFine Installer
With the .jar file downloaded, running the installer is typically a one-click process.
- Locate the Downloaded File: Navigate to where you saved the OptiFine
.jarfile. - Double-Click the
.jarFile:- Windows: If Java is correctly installed and associated with
.jarfiles, simply double-click the OptiFine.jarfile. This should open a small installer window. - macOS/Linux: Double-click the file. If it doesn’t open, you might need to right-click (or Ctrl-click on macOS), select “Open With,” and then choose “Java(TM) Platform SE binary” or a similar Java runtime.
- Troubleshooting: If the installer doesn’t open or you get an error like “Java not found,” revisit the “Java Installation and Verification” section. You might also try running it from the command line: Open Command Prompt/Terminal, navigate to the directory where you saved the
.jarfile (e.g.,cd C:UsersYourUserDownloads), and then typejava -jar OptiFine_1.21.6_HD_U_G9.jar(replace with the actual filename) and press Enter.
- Windows: If Java is correctly installed and associated with
- Click “Install”: In the OptiFine installer window, you will see a simple interface with an “Install” button. Ensure the installation path is correct (it should default to your Minecraft installation folder, e.g.,
%appdata%.minecrafton Windows). Click “Install.” - Confirmation: A small message box will appear, typically stating “OptiFine is successfully installed.” Click “OK.”
OptiFine is now installed on your system! The installer automatically creates a new profile in your Minecraft Launcher.
Step 3: Configuring OptiFine in the Minecraft Launcher
The final step before enjoying your enhanced game is to select the OptiFine profile within the Minecraft Launcher.
- Open the Minecraft Launcher: Launch the official Minecraft Launcher as you normally would.
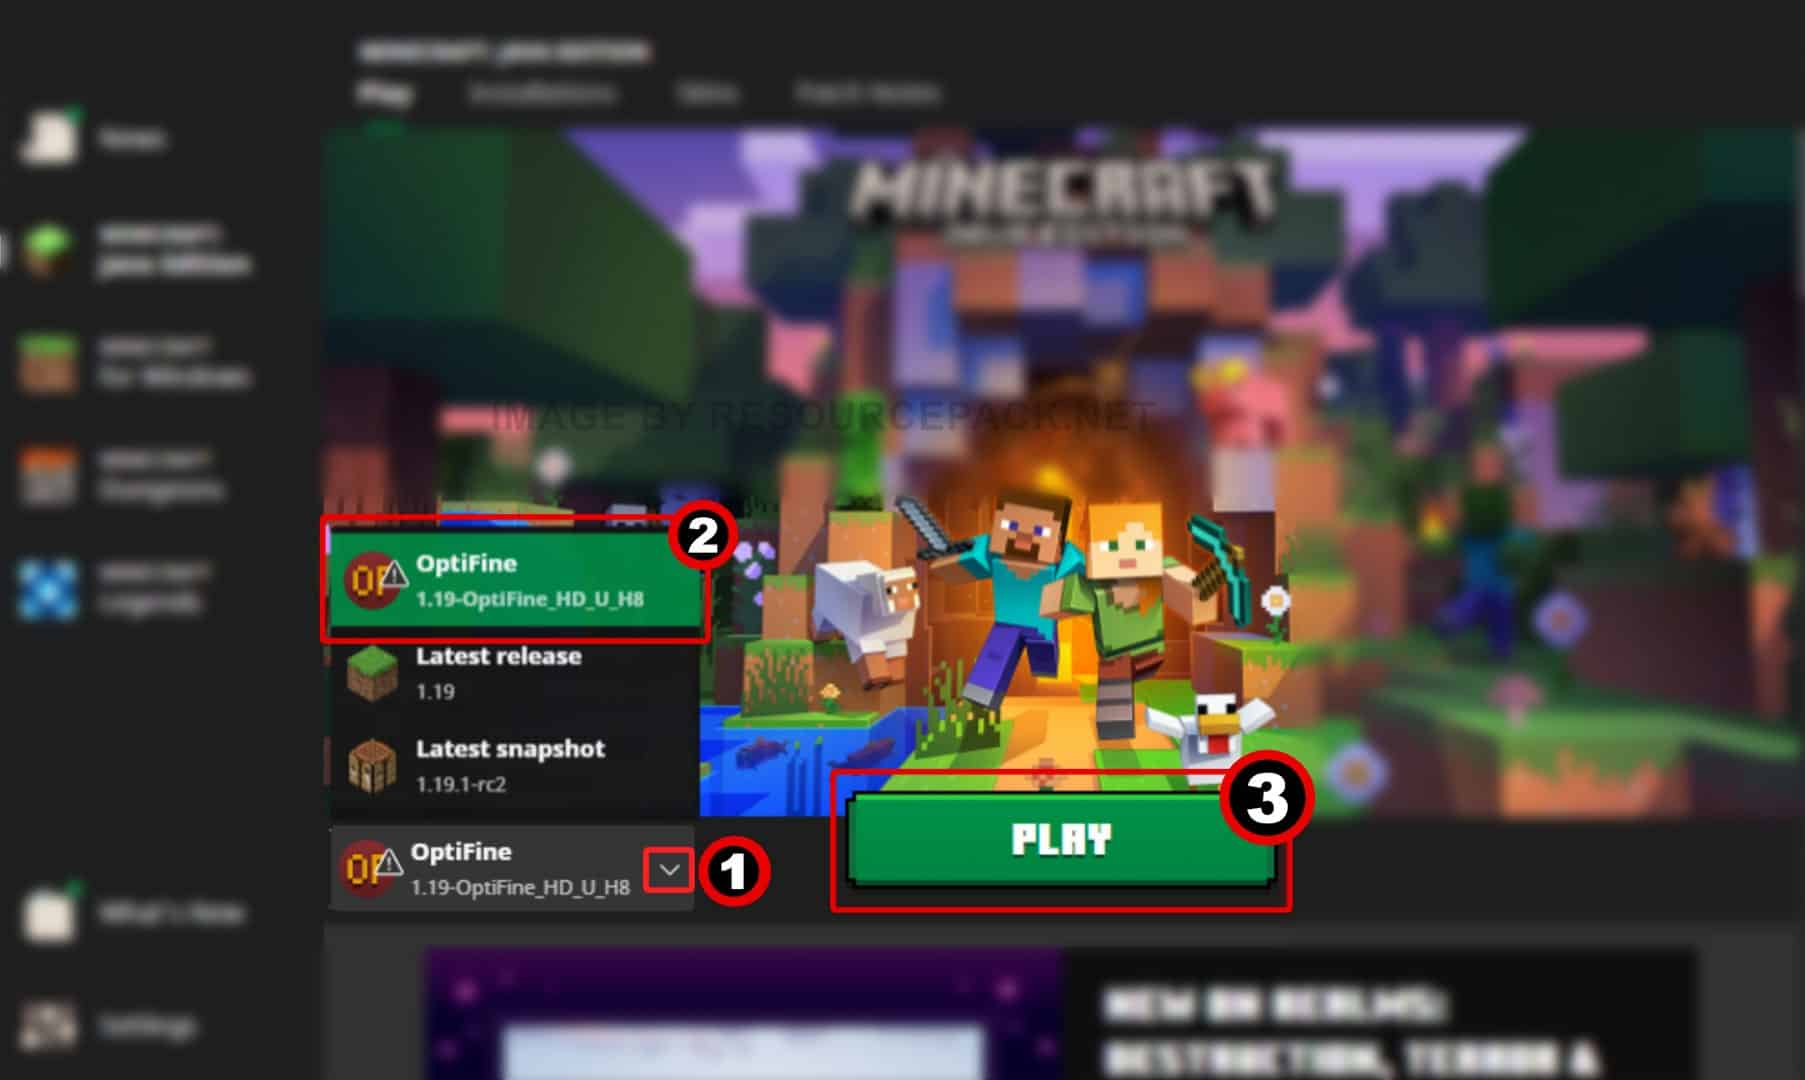
- Select the OptiFine Profile: Look for the profile dropdown menu, usually located on the bottom left of the launcher window (or at the top in some launcher versions). Click on it.
- Choose “OptiFine”: In the list of available profiles, you should now see an entry named “OptiFine” followed by the Minecraft version (e.g., “OptiFine 1.21.6”). Select this profile.
- Click “Play”: With the OptiFine profile selected, click the large “Play” button.
What if the OptiFine Profile is Missing?
In rare cases, the profile might not appear automatically. You can create it manually:
- In the Minecraft Launcher, go to the “Installations” tab.
- Click “New installation.”
- Give it a name (e.g., “My OptiFine 1.21.6”).
- Under “VERSION,” click the dropdown menu and scroll until you find the OptiFine entry (it will usually be labeled something like “release 1.21.6-OptiFineHDU_G9″). Select it.
- You can also adjust the “Game directory” if you have a custom setup, or allocate more RAM under “MORE OPTIONS” if your system allows and you plan to use heavy shaders (e.g., 4G or 6G).
- Click “Create.”
- Go back to the “Play” tab, select your newly created OptiFine profile, and click “Play.”
Step 4: Verifying Your OptiFine Installation
To confirm that OptiFine is running correctly and ready for use:
- Launch Minecraft with the OptiFine profile.
- Check the Main Menu: Once Minecraft loads to the main menu, look in the bottom-left corner of the screen. You should see “Minecraft 1.21.6” and underneath it, something like “OptiFine HD U G9” or similar, indicating the installed OptiFine version.
- Access Video Settings: Go to “Options…” -> “Video Settings…”. If OptiFine is successfully installed, this menu will look significantly different from vanilla Minecraft’s video settings, featuring many new categories and options such as “Shaders,” “Details,” “Animations,” “Quality,” and “Performance.”
Congratulations! You have successfully installed OptiFine 1.21.6 and are now ready to unleash its full potential.
Optimizing Your Game with OptiFine Settings
With OptiFine installed, the real fun begins: tweaking settings to perfectly balance performance and visual fidelity. This section will guide you through some key areas within OptiFine’s extensive video settings. Understanding these settings allows you to customize your ‘Tech’ experience to your hardware and personal aesthetic preferences.
Navigating OptiFine’s Extensive Video Settings
The “Video Settings” menu, accessed via Options > Video Settings from the Minecraft main menu, is your command center for OptiFine. It’s divided into several categories, each controlling different aspects of your game’s visuals and performance:
- Shaders: The gateway to installing and configuring shader packs.
- Details: Controls visual elements like clouds, trees, water, and entity shadows.
- Animations: Toggles various in-game animations, which can impact performance.
- Quality: Manages advanced graphical features like connected textures, custom skies, and better grass.
- Performance: Contains crucial settings for maximizing FPS.
- Other: Miscellaneous settings like weather, fullscreen mode, and lagometer.
Don’t be overwhelmed by the sheer number of options. Start with the “Performance” settings if you’re primarily seeking FPS boosts, or “Shaders” if visual enhancement is your main goal.
Boosting FPS: Key Performance Settings
If your primary goal is to make Minecraft 1.21.6 run smoother, focus on these settings:
- Render Distance: This is the most impactful setting for FPS. Lowering it significantly reduces the number of chunks your computer needs to render. OptiFine allows for finer control than vanilla, including “Tiny” and “Short” distances. Find a balance between visibility and performance.
- Smooth FPS: A performance setting that attempts to stabilize your frame rate, reducing large spikes and dips.
- Fast Render: Simplifies some rendering calculations, potentially offering a small FPS boost. Keep this “ON.”
- Fast Math: Uses faster (but slightly less accurate) mathematical functions. Also usually kept “ON.”
- Vsync (Vertical Sync): Synchronizes your game’s frame rate with your monitor’s refresh rate. Turn “ON” to eliminate screen tearing, but turn “OFF” if you want the highest possible FPS, regardless of tearing.
- Dynamic FPS: When enabled, this feature reduces FPS when Minecraft is in the background or when the menu is open, saving CPU/GPU cycles for other tasks.
- Chunk Updates: Controls how many chunks are updated per frame. Lowering this can smooth out stuttering caused by new chunks loading, but may cause chunks to appear more slowly.
- Smooth World: Can help reduce lag spikes when loading new chunks.
Experiment with these settings one by one to find the optimal configuration for your system. A good strategy is to start with all performance-enhancing options “ON” and gradually enable more visually demanding features until you find a comfortable balance.
Enhancing Visuals: Shaders, HD Textures, and More
This is where OptiFine truly transforms the look of your game.
- Shaders:
- Download a Shader Pack: Popular choices include BSL Shaders, SEUS (Sonic Ether’s Unbelievable Shaders), Complementary Shaders, and Sildur’s Shaders. Download them from their official sources (usually
.zipfiles). - Install Shaders: In Minecraft, go to
Options > Video Settings > Shaders. Click “Shaders Folder” to open the directory where shader packs are stored. Drag and drop your downloaded shader.zipfile into this folder. - Select Shader: Back in the game, select the shader pack from the list. The game will reload resources, and you’ll immediately see the visual changes.
- Tweak Shader Settings: Many shaders have their own internal settings (accessed by clicking on the shader in the list) that allow you to customize effects like bloom, color grading, and specific light behaviors.
- Download a Shader Pack: Popular choices include BSL Shaders, SEUS (Sonic Ether’s Unbelievable Shaders), Complementary Shaders, and Sildur’s Shaders. Download them from their official sources (usually
- HD Texture Packs: If you’re using a texture pack with resolutions higher than 16×16 (e.g., 64×64, 128×128, 256×256), OptiFine ensures they run smoothly and enables advanced features like connected textures (glass and bookshelves seamlessly connect) and custom block models, which many HD packs utilize.
- Quality Settings:
- Connected Textures: Set to “Fancy” or “Fast” to make textures like glass and bookshelves connect visually, removing unsightly borders.
- Custom Skies, Custom Colors, Custom Items, Custom GUI: These enable texture packs to implement highly customized visuals.
- Better Grass & Better Snow: Makes grass and snow blocks extend fully onto the sides of adjacent blocks, creating a more natural look.
- Clear Water: Makes water appear more transparent, allowing you to see further underwater.
- Details Settings:
- Clouds: Set to “Fast” or “Off” for performance, “Fancy” for detailed clouds.
- Trees: “Fast” for blocky leaves, “Fancy” for more transparent, realistic leaves.
- Dynamic Lights: Set to “Fast” or “Fancy” to enable held light sources (like torches) to illuminate the surroundings. This is a game-changer for spelunking.
Remember, enabling many of these visual enhancements, especially shaders, will significantly increase the demand on your graphics card. You might need to adjust your performance settings or lower your render distance to maintain a playable frame rate. Finding the sweet spot between beauty and performance is part of the OptiFine experience.
Troubleshooting Common OptiFine Installation Issues
Even with a detailed guide, issues can sometimes arise. Here are solutions to common problems encountered during or after OptiFine installation.
“Java not found” or Installer Won’t Run
This is typically a Java-related problem.
- Recheck Java Installation: Ensure you have a compatible Java version (Java 17 or 21 for Minecraft 1.21.6) installed correctly.
- Set Java as Default Program: On Windows, right-click the OptiFine
.jarfile, select “Open with,” then “Choose another app.” Find “Java(TM) Platform SE binary” or “OpenJDK Platform binary” in the list. Check “Always use this app to open .jar files.” - Run from Command Line: As mentioned earlier, open Command Prompt/Terminal, navigate to the directory of the
.jarfile, and runjava -jar YourOptiFineFilename.jar. This forces the system to use thejavaexecutable in your PATH.
OptiFine Profile Missing in Launcher
- Restart Launcher: Sometimes, a simple restart of the Minecraft Launcher can refresh the profile list.
- Manually Create Profile: Follow the instructions in “Step 3: Configuring OptiFine in the Minecraft Launcher” for creating a new installation profile. Make sure to select the correct “release 1.21.6-OptiFine…” version.
- Check Installation Path: During OptiFine installation, ensure the path defaults to your
.minecraftfolder. If it was installed elsewhere, you might need to reinstall or manually point the launcher to the correct game directory.
Game Crashes or Low FPS After Installation
- Conflicting Mods: If you have other mods installed (e.g., through Forge or Fabric), they might conflict with OptiFine. Try running OptiFine by itself first. If it works, gradually add other mods back to identify the culprit. Note that OptiFine often has standalone installers and can be incompatible with some mod loaders without additional compatibility mods (like OptiFabric for Fabric).
- Overly Aggressive Settings: If you immediately enable shaders or crank up all visual settings, your system might not be able to handle it.
- Start Minecraft with OptiFine.
- Go to
Video Settings. - Click “Restore Defaults” (if available, or manually set everything to “Fast” or “Off” in Details/Quality/Animations).
- Gradually enable features one by one, testing performance after each change.
- Update Graphics Drivers: Outdated graphics drivers are a common cause of performance issues and crashes in any graphically intensive game. Visit the website of your GPU manufacturer (NVIDIA, AMD, Intel) to download and install the latest drivers. This is a crucial ‘Tech’ maintenance step.
- Reinstall OptiFine: If all else fails, uninstall OptiFine (by deleting the OptiFine profile from the launcher and potentially the OptiFine
.jarfrom the versions folder in.minecraft/versions) and then follow the installation steps again carefully.
Compatibility with Other Mods (Forge/Fabric)
This is a slightly more advanced topic. While OptiFine provides a standalone installer, many players use mod loaders like Forge or Fabric to run multiple mods simultaneously.
- Forge: Older versions of OptiFine often provided a
.jarfile that could be placed directly into themodsfolder of a Forge installation. However, this compatibility can vary with newer Minecraft versions. Check the OptiFine website or community forums for specific instructions if you’re using Forge with 1.21.6. - Fabric: OptiFine is not directly compatible with Fabric. To run OptiFine alongside Fabric mods, you need an additional mod called OptiFabric. Install Fabric Loader, then OptiFabric (from CurseForge or Modrinth) into your
modsfolder, and then place the OptiFine.jarfile (the one you download from optifine.net, not the installer version) into yourmodsfolder.
Always prioritize checking community resources and official developer notes when combining OptiFine with other mod loaders.
Conclusion
Installing OptiFine 1.21.6 is arguably one of the most impactful upgrades you can make to your Minecraft experience. It’s a powerful ‘Tech’ tool that addresses both performance limitations and visual desires, transforming the game from a charming block-world into a breathtakingly immersive environment. By carefully following the steps outlined in this guide, you’ve equipped yourself with the means to not only boost your frame rates but also unlock a world of graphical fidelity previously unavailable in vanilla Minecraft.
The ‘Brand’ OptiFine has built over the years stands as a testament to its reliability and consistent value. It’s a free mod that delivers premium results, effectively extending the ‘Money’ value of your Minecraft purchase by enabling you to squeeze more enjoyment and aesthetic pleasure out of it without needing to upgrade your hardware prematurely. Whether you’re chasing every last FPS for competitive PvP, seeking the serene beauty of a shader-enhanced sunrise, or simply wanting a smoother journey through the Trial Chambers of 1.21.6, OptiFine is your gateway.
Now that OptiFine 1.21.6 is integrated into your game, don’t hesitate to dive into its extensive video settings. Experiment, tweak, and discover the perfect balance between performance and visuals that suits your play style and system. The world of Minecraft is vast and ever-evolving, and with OptiFine, you’re ready to explore it with unparalleled clarity and speed. Happy crafting, and enjoy your enhanced adventure!
aViewFromTheCave is a participant in the Amazon Services LLC Associates Program, an affiliate advertising program designed to provide a means for sites to earn advertising fees by advertising and linking to Amazon.com. Amazon, the Amazon logo, AmazonSupply, and the AmazonSupply logo are trademarks of Amazon.com, Inc. or its affiliates. As an Amazon Associate we earn affiliate commissions from qualifying purchases.