In the rapidly evolving digital landscape, where technology trends dictate the pace of innovation, understanding the fundamental building blocks of our digital lives is more crucial than ever. At the heart of every computer, smartphone, and tablet lies the operating system (OS) – the master software that manages hardware and software resources, provides common services for computer programs, and offers a user interface for interaction. Whether you’re a tech enthusiast building a custom PC, a professional looking to optimize your workflow, or someone simply seeking to revitalize an aging machine, the process of installing an operating system is a foundational skill.
This guide will walk you through the entire journey, from essential preparations to post-installation optimizations, ensuring a smooth and successful setup. We’ll delve into the nuances of various OS types, offer insights into safeguarding your digital assets, and provide practical advice that resonates with anyone looking to harness the full potential of their computing devices. A well-installed and configured operating system isn’t just about functionality; it’s about creating a stable, secure, and efficient digital environment that directly impacts your productivity, digital security, and even your personal brand in the tech-driven world.
The Foundation of Your Digital World: Understanding the Operating System
Before diving into the mechanics of installation, it’s vital to grasp the profound role an operating system plays. Think of the OS as the conductor of an orchestra, orchestrating every component of your computer – from the processor and memory to the keyboard and monitor – to work harmoniously. Without an OS, your powerful hardware is just an inert collection of parts; it’s the OS that breathes life into it, enabling you to run applications, browse the web, create content, and interact with the digital world.
Why a Fresh OS Installation Matters
The decision to install or reinstall an operating system often stems from several key motivations, each offering distinct benefits for the user. Understanding these drivers can help you appreciate the importance of a clean and proper installation.
New Builds and Upgrades
For those embarking on the exciting journey of building a new computer from scratch, installing an operating system is the very first step to bringing your custom rig to life. Similarly, if you’re upgrading from an older version of an OS (e.g., Windows 10 to Windows 11) or migrating to an entirely different ecosystem (e.g., from Windows to Linux), a fresh installation is often the recommended path. This ensures compatibility with new hardware, leverages the latest features, and provides a clean slate free from legacy issues that might hinder performance. For businesses, adopting the latest OS can align with tech trends, ensuring compatibility with cutting-edge AI tools and software, thereby enhancing productivity and staying competitive.
Performance Rejuvenation and Troubleshooting
Over time, even the most robust operating systems can accumulate digital clutter – remnants of uninstalled programs, corrupted files, registry errors, and malware. This can lead to system slowdowns, crashes, and general instability. A fresh OS installation is like giving your computer a complete factory reset, wiping away all the digital baggage and restoring it to its peak performance. This is also a common troubleshooting step for persistent software conflicts, intractable virus infections, or major system errors that cannot be resolved through conventional means. It’s an investment in your productivity, ensuring your digital tools are always running at their best.
Enhanced Security and Stability
Outdated operating systems or those riddled with corrupted files can become vulnerabilities, leaving your data exposed to security threats. A clean installation ensures you’re running a pristine version of the OS, free from hidden malware or deeply embedded exploits. Furthermore, it allows you to start with the latest security patches and updates, establishing a robust defense against cyber threats from day one. This level of digital security is not just about protecting personal data; it’s critical for financial security, protecting sensitive business information, and maintaining the integrity of your personal or corporate brand.
Essential Preparations Before You Begin
The key to a successful and stress-free OS installation lies in thorough preparation. Skipping these crucial steps can lead to data loss, frustrating setbacks, or even hardware damage. Approach this phase methodically, ensuring every prerequisite is met before you initiate the installation process.
Safeguarding Your Data: The Backup Imperative
This cannot be stressed enough: Backup all your critical data before you begin. An OS installation, especially a custom or clean install, will typically erase everything on the drive where the new OS is being installed. This includes documents, photos, videos, music, and any other personal or professional files.
How to Backup:
- External Hard Drive: One of the simplest methods is to copy your files to an external USB hard drive.
- Cloud Storage: Services like Google Drive, OneDrive, Dropbox, or Apple iCloud offer convenient cloud-based backup solutions.
- Network Attached Storage (NAS): For more extensive data or multi-user environments, a NAS provides a robust local network backup.
- System Image: For a complete backup that includes your OS, programs, and settings, consider creating a system image using built-in tools (like Windows Backup and Restore) or third-party software.
Ensuring your data is securely backed up is not just a technical step; it’s a crucial aspect of personal finance and risk management, protecting valuable information that could be costly or impossible to replace.
Gathering Your Arsenal: Hardware and Software Requirements
Once your data is safe, turn your attention to gathering the necessary tools and information for the installation itself.
Installation Media: USB Drive or DVD
You’ll need a bootable installation medium for your chosen operating system.
- USB Drive: This is the most common and recommended method today. You’ll typically need a USB flash drive with at least 8GB of storage (16GB or more for some OS versions) and a tool to create bootable media (e.g., Rufus for Windows/Linux, or macOS’s Disk Utility for macOS installers).
- DVD: While less common now, some older systems or preferences might still use a DVD. Ensure your computer has an optical drive if you plan to use this method.
Official download tools are available for Windows (Media Creation Tool), macOS (via App Store on an existing Mac), and various Linux distributions (downloadable ISO images).
Product Key and Internet Connection
- Product Key/License: For commercial operating systems like Windows, you’ll typically need a product key or digital license to activate the OS. Ensure you have this readily accessible. For macOS, activation is tied to your Apple ID. Most Linux distributions are free and open-source, requiring no product key.
- Internet Connection: While not always strictly necessary during the initial installation steps, an active internet connection is vital immediately afterward for downloading crucial drivers, system updates, and essential software. Consider having an Ethernet cable handy if Wi-Fi drivers aren’t immediately available post-installation.
Minimum System Specifications
Before you begin, verify that your computer hardware meets the minimum requirements for the operating system you intend to install. This includes aspects like processor speed, RAM, and storage space. Attempting to install a demanding OS on underpowered hardware will lead to poor performance and a frustrating user experience, negating any productivity gains.
BIOS/UEFI Configuration: Paving the Boot Path
Your computer’s Basic Input/Output System (BIOS) or Unified Extensible Firmware Interface (UEFI) is the firmware that initializes hardware during the boot process. You’ll need to access this to tell your computer to boot from the USB drive or DVD containing your OS installer instead of the internal hard drive.
Steps:
- Enter BIOS/UEFI: Restart your computer and repeatedly press the designated key (commonly F2, F10, F12, DEL, or ESC) as soon as it starts to boot. The specific key varies by manufacturer (e.g., Dell, HP, Lenovo, ASUS).
- Navigate to Boot Options: Look for a “Boot Options,” “Boot Order,” or “Boot Priority” section.
- Set Boot Priority: Change the boot order to prioritize your USB drive or DVD drive over your internal hard drive.
- Save and Exit: Save your changes (usually F10) and exit the BIOS/UEFI utility. The computer should then restart and boot from your installation media.
Step-by-Step OS Installation Walkthrough
With all preparations complete, you are now ready to embark on the actual installation process. While specifics may vary slightly between operating systems, the general workflow remains consistent.
Initiating the Installation: Booting from Media
After configuring your BIOS/UEFI, your computer will restart. If done correctly, you will see a prompt to “Press any key to boot from USB/DVD” or the OS installer will automatically begin loading. Follow any on-screen instructions to start the setup process.
Navigating the Setup Wizard: Language, Time, and Keyboard
The first screens of the OS installer typically ask for your preferences regarding:
- Language: The language the OS will use.
- Time and Currency Format: Your geographical region and preferred formats.
- Keyboard Layout: The layout that matches your physical keyboard.
Select the appropriate options for your region and needs, then click “Next” or “Continue.”
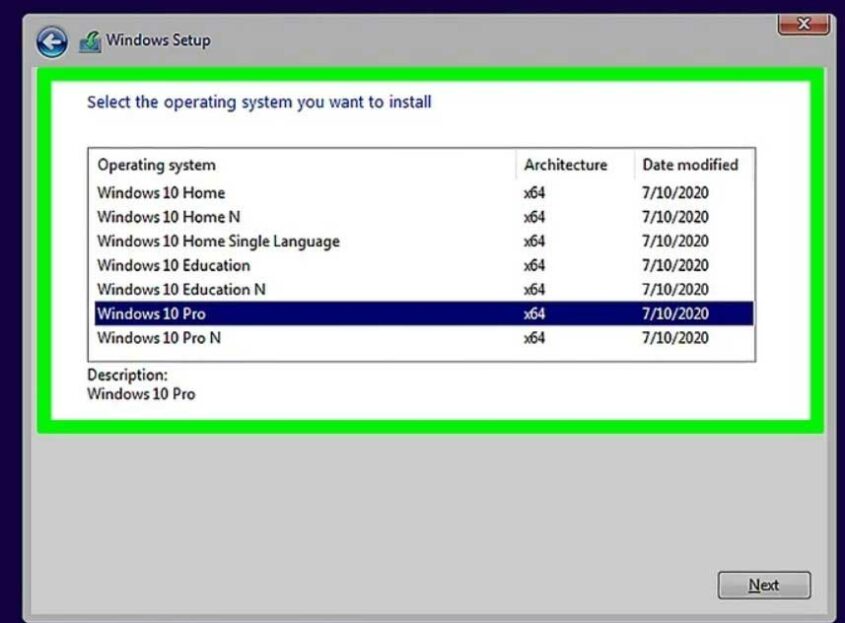
Product Key and Licensing: Activating Your OS
For commercial operating systems like Windows, you’ll usually be prompted to enter your product key at this stage. If you have a digital license or are reinstalling on a machine that previously had an activated copy, you might be able to skip this step, and the OS will activate automatically after connecting to the internet. Review and accept the license terms to proceed.
Partitioning Your Drive: A Strategic Approach
This is one of the most critical steps, as it dictates how your hard drive space is allocated. You’ll typically see options for “Upgrade” or “Custom” (or similar wording).

- Upgrade: If you’re upgrading an existing OS and want to keep your files and applications, this option attempts to install the new OS over the old one while preserving your data. This is often less reliable for performance rejuvenation.
- Custom (Clean Install): This is generally recommended for a fresh start. You’ll be presented with a list of drives and partitions.
- Delete Existing Partitions: To perform a truly clean install, delete all existing partitions on the drive where you want to install the OS. This will erase all data on those partitions.
- Create New Partition: Select the unallocated space and choose to create a new partition. The installer will typically create a primary partition for the OS and a small recovery partition.
- Format: The installer will format the new partition with the appropriate file system (e.g., NTFS for Windows, APFS for macOS, Ext4 for Linux).
- Select Destination: Choose the newly created and formatted primary partition as the installation destination.
Important Note: Be absolutely sure you select the correct drive for installation, especially if you have multiple drives, to avoid accidentally erasing data on a drive you intended to keep.
The Core Installation Process: Copying Files and Initial Reboots
Once you’ve selected your partition, the installer will begin copying files to your hard drive. This process usually involves several stages:
- Copying files: The initial transfer of OS files.
- Getting files ready for installation: Decompressing and preparing files.
- Installing features and updates: Integrating system components.
- Completing installation: Finalizing the setup.
During this phase, your computer will likely restart multiple times. Do not remove the installation media until the OS has fully loaded and you are prompted to do so, or until you reach the initial setup screens. After the first reboot, the system should automatically boot from the newly installed OS on your internal drive. If it tries to boot from the USB again, you may need to re-enter BIOS/UEFI and set the internal hard drive as the primary boot device.
First-Time Setup: Personalizing Your Experience
After the core installation, the OS will guide you through a series of initial setup steps to personalize your experience.
- User Account Creation: Create a username and password for your primary user account.
- Privacy Settings: Configure privacy options, such as location services, diagnostics, and targeted advertising. Carefully review these, as they impact your digital security and data privacy.
- Network Connection: Connect to a Wi-Fi network or verify your Ethernet connection.
- Other Settings: You might be asked about regional settings, linking a Microsoft/Apple account, or setting up voice assistants.
Complete these steps, and eventually, you’ll be presented with your new desktop environment – a testament to your successful OS installation.
Post-Installation Essentials: Optimizing Your New System
A fresh OS installation is just the beginning. To ensure your system is secure, performs optimally, and meets your productivity needs, several post-installation steps are crucial.
Driver Installation: Unlocking Full Hardware Potential
Drivers are software components that allow your operating system to communicate with your hardware (graphics card, motherboard, network adapter, sound card, etc.). While modern OS installers often include generic drivers, installing the latest manufacturer-specific drivers is vital for optimal performance and stability.
Steps:
- Graphics Card: Download the latest drivers from NVIDIA, AMD, or Intel’s website.
- Motherboard Chipset: Visit your motherboard manufacturer’s website for chipset drivers.
- Peripherals: Install drivers for any external devices like printers, scanners, or specialized input devices.
- Device Manager: Use your OS’s Device Manager (e.g., in Windows) to identify any devices with missing or outdated drivers.
Proper driver installation ensures that all your hardware components are working at their peak, directly impacting everything from gaming performance to video editing efficiency and overall user experience.
System Updates: Staying Secure and Current
Immediately after installing drivers, connect to the internet and check for system updates. Operating system developers constantly release updates that include security patches, bug fixes, performance enhancements, and new features.
- Windows: Go to Settings > Update & Security > Windows Update.
- macOS: Go to System Settings > General > Software Update.
- Linux: Use your distribution’s package manager (e.g.,
sudo apt update && sudo apt upgradefor Debian/Ubuntu-based systems).
Keeping your system updated is paramount for digital security, protecting you from emerging threats and ensuring compatibility with the latest software and web standards.
Essential Software and Application Setup
Your new OS is a blank canvas. Now it’s time to install the applications you need for work, creativity, and entertainment.
- Web Browser: Install your preferred browser (Chrome, Firefox, Edge, Brave, Safari).
- Productivity Suite: Microsoft Office, LibreOffice, or Google Workspace apps.
- Security Software: Antivirus (if not built-in), firewall, and VPN.
- Communication Tools: Slack, Zoom, Microsoft Teams.
- Creative Tools: Adobe Creative Cloud, GIMP, Blender.
- Development Tools: IDEs, version control systems.
Consider installing a package manager (like Chocolatey for Windows or Homebrew for macOS) to streamline future software installations and updates. Strategically choosing and installing software that aligns with your specific needs will dramatically boost your productivity and efficiency.
Customization and Personalization
Finally, take the time to customize your new OS to your liking.
- Desktop Background and Theme: Personalize the aesthetics.
- Display Settings: Adjust resolution, scaling, and multiple monitor setups.
- Sound Settings: Configure audio output and input.
- Notification Settings: Tailor how you receive alerts to minimize distractions.
- Privacy and Security Settings: Revisit and fine-tune these based on your comfort level.
Personalizing your environment enhances your user experience and can contribute to a more efficient workflow, allowing you to focus on your tasks rather than wrestling with an unfamiliar interface.
Choosing Your Digital Home: A Glimpse at Popular Operating Systems
The world of operating systems is diverse, with each major player offering a unique philosophy and ecosystem. Your choice of OS can significantly impact your workflow, compatibility with applications, and even your personal brand within certain tech communities.
Windows: The Ubiquitous Choice
Developed by Microsoft, Windows is by far the most widely used operating system globally, dominating the personal computing market.
- Pros: Broad software and hardware compatibility, extensive gaming support, familiar user interface, strong enterprise features.
- Cons: Can be resource-intensive, historically susceptible to malware (though greatly improved), less privacy-focused than some alternatives by default.
- Best For: General users, gamers, business environments that rely on Microsoft ecosystem, professionals requiring specific Windows-only software.
macOS: For Creativity and Ecosystem Integration
Apple’s macOS powers all Mac computers, known for its elegant user interface, strong security, and seamless integration with Apple’s ecosystem of devices.
- Pros: Intuitive and aesthetically pleasing UI, robust security features, excellent performance for creative tasks (video editing, graphic design), superb integration with iPhones/iPads.
- Cons: Limited hardware choice (only Apple-branded Macs), generally higher upfront cost, less software compatibility than Windows for certain niche applications.
- Best For: Creative professionals, users heavily invested in the Apple ecosystem, those prioritizing user experience and security.
Linux: Open Source Power and Flexibility
Linux is a family of open-source operating systems, with numerous “distributions” (distros) like Ubuntu, Fedora, Mint, and Debian. It’s known for its stability, security, and flexibility.
- Pros: Free and open-source, highly customizable, excellent security, stable, lightweight (can run on older hardware), strong community support, ideal for development and server environments.
- Cons: Can have a steeper learning curve for new users, hardware compatibility can sometimes be an issue, smaller selection of proprietary software (e.g., some professional creative suites).
- Best For: Developers, system administrators, privacy-conscious users, those who enjoy tinkering, users with older hardware, or anyone looking for a powerful, free alternative.
Troubleshooting Common Installation Hurdles
Even with meticulous preparation, you might encounter issues during or after installation. Here are a few common problems and their typical solutions.
Boot Issues and Drive Recognition
- Installer Not Starting: Double-check your BIOS/UEFI boot order. Ensure your USB drive or DVD is properly created and detected by the BIOS. Try a different USB port or re-create the bootable media.
- “No Operating System Found” After Installation: This often means the OS wasn’t installed correctly, or your BIOS/UEFI is still trying to boot from the wrong drive. Verify the boot order points to your internal hard drive where the OS was installed.
- Drive Not Recognized by Installer: Ensure your hard drive is properly connected and recognized in the BIOS. For newer NVMe drives or RAID configurations, you might need to load specific storage drivers during the initial OS installation phase.
Driver Conflicts and System Instability
- Display Issues/Low Resolution: Almost always a graphics driver problem. Install the latest official drivers from your graphics card manufacturer.
- No Sound/Network: Check Device Manager for missing drivers. Download and install audio and network drivers from your motherboard or laptop manufacturer’s website.
- Frequent Crashes/Blue Screens: Could indicate driver conflicts, hardware issues (RAM, CPU overheating), or a corrupted OS installation. Try installing drivers one by one to isolate the issue, or consider reinstalling the OS if the problem persists.
For all troubleshooting, leverage online forums, manufacturer support pages, and community resources specific to your OS and hardware. The tech community is vast and often willing to help.
Conclusion
Installing an operating system is a fundamental skill that empowers you to take full control of your computing experience. From setting up a brand-new machine to breathing fresh life into an old one, the process, when approached systematically, is remarkably straightforward. By meticulously preparing, following the step-by-step guide, and diligently completing post-installation tasks, you lay the groundwork for a stable, secure, and highly efficient digital environment.
This foundational knowledge not only ensures your devices perform at their best, directly impacting your productivity and financial efficiency but also contributes to your digital security posture, protecting your valuable data. Whether you choose the widespread accessibility of Windows, the creative prowess of macOS, or the open-source flexibility of Linux, mastering the art of OS installation is a critical step in navigating the ever-evolving world of technology, allowing you to confidently build, upgrade, and maintain your digital tools for both personal and professional success.
aViewFromTheCave is a participant in the Amazon Services LLC Associates Program, an affiliate advertising program designed to provide a means for sites to earn advertising fees by advertising and linking to Amazon.com. Amazon, the Amazon logo, AmazonSupply, and the AmazonSupply logo are trademarks of Amazon.com, Inc. or its affiliates. As an Amazon Associate we earn affiliate commissions from qualifying purchases.