In today’s interconnected digital landscape, the importance of robust security measures cannot be overstated. From securing web communications to encrypting sensitive data, cryptographic tools form the bedrock of trust and privacy online. Among these indispensable tools, OpenSSL stands out as a powerful, versatile, and widely used open-source toolkit that implements the SSL/TLS protocols and offers a full-strength general-purpose cryptographic library. For developers, system administrators, and even security-conscious users working on a Windows environment, having OpenSSL readily available is not just a convenience, but often a necessity.
This comprehensive guide will walk you through the entire process of installing OpenSSL on your Windows machine, ensuring you have this vital resource at your fingertips. We’ll cover everything from understanding what OpenSSL is and why you need it, to downloading the correct version, executing the installation, configuring your system’s environment variables, and finally, verifying that everything is set up correctly. Whether you’re aiming to generate SSL/TLS certificates for a web server, encrypt data, or perform various cryptographic operations, this tutorial will equip you with the foundational knowledge and practical steps to get started.
Understanding OpenSSL: Your Gateway to Digital Security
Before diving into the installation process, it’s crucial to grasp what OpenSSL is and why it holds such significance in the realm of digital security. Its multifaceted capabilities make it an invaluable asset for anyone dealing with network security, data protection, or secure communication protocols.
What is OpenSSL?
OpenSSL is a robust, commercial-grade, full-featured toolkit for the Transport Layer Security (TLS) and Secure Sockets Layer (SSL) protocols, as well as a general-purpose cryptography library. In simpler terms, it’s a command-line tool and a library that provides cryptographic functions, enabling secure communication over computer networks.
At its core, OpenSSL offers a suite of functionalities that include:
- SSL/TLS Protocols: It provides the underlying implementation for SSL (Secure Sockets Layer) and its successor, TLS (Transport Layer Security), which are protocols designed to provide communication security over a computer network. These protocols are fundamental to securing web traffic (HTTPS), email, and other network services.
- Cryptographic Algorithms: OpenSSL supports a wide array of cryptographic algorithms, including symmetric ciphers (like AES, DES), asymmetric ciphers (like RSA, DSA, ECC), hash functions (like SHA-256, MD5), and key exchange protocols.
- Certificate Management: It allows users to generate private keys, public keys, Certificate Signing Requests (CSRs), and self-signed certificates. This is vital for setting up secure servers, client authentication, and various public key infrastructure (PKI) operations.
- Random Number Generation: A cryptographically secure random number generator is critical for many security applications, and OpenSSL includes robust mechanisms for this.
Essentially, OpenSSL is the engine that powers much of the internet’s secure communications, making it a critical component for developers, system administrators, and security professionals.
Why Do You Need OpenSSL on Windows?
While OpenSSL is inherently a command-line utility more commonly associated with Linux or Unix-like environments, its utility extends equally to Windows. Here’s why you might need OpenSSL on your Windows machine:
- Web Development & Local Server Setup: If you’re developing web applications that require HTTPS, you’ll need OpenSSL to generate SSL certificates (even self-signed ones for local testing) for your local development server (e.g., Apache, Nginx, IIS).
- API Security & Integration: Many APIs and web services rely on TLS for secure communication. OpenSSL can be used to test connections, diagnose SSL/TLS handshake issues, or even programmatically handle certificates for secure client-server interactions.
- Data Encryption and Decryption: For encrypting sensitive files or communications, OpenSSL provides powerful command-line tools that can perform various cryptographic operations. This is crucial for protecting proprietary data or personal information.
- Digital Security & Forensics: Security professionals use OpenSSL for tasks like analyzing SSL/TLS traffic, extracting certificate information, and testing cryptographic implementations.
- VPN Configuration: Some VPN setups, especially those using OpenVPN, rely on OpenSSL for generating keys and certificates necessary for secure tunnel establishment.
- Learning and Experimentation: For anyone interested in understanding cryptography, PKI, and network security, OpenSSL offers a hands-on platform to experiment with fundamental concepts.
Given its broad range of applications, installing OpenSSL on Windows provides a crucial tool for anyone serious about digital security, development, or network administration.
Preparing for Installation
Before we begin the step-by-step installation, a little preparation goes a long way in ensuring a smooth and successful setup. This involves understanding your system’s requirements and making an informed choice about the OpenSSL distribution.
System Requirements and Prerequisites
OpenSSL itself is relatively light on system resources. However, there are a few prerequisites to consider for a seamless installation on Windows:
- Administrator Privileges: You will need administrator rights on your Windows machine to install software and modify system environment variables.
- Windows Version: OpenSSL installers are compatible with most modern Windows versions (Windows 7, 8, 10, 11, and corresponding Server versions). Ensure your operating system is up to date for optimal compatibility.
- Visual C++ Redistributable: Many applications compiled for Windows, including some OpenSSL distributions, rely on specific Microsoft Visual C++ Redistributable packages. If you encounter errors about missing DLLs (like
VCRUNTIME140.dllorMSVCP140.dll) during or after installation, you may need to install the appropriate Visual C++ Redistributable for Visual Studio. These can be downloaded directly from Microsoft’s official website. It’s often good practice to have the latest stable versions installed. - Internet Connection: You’ll need an active internet connection to download the OpenSSL installer.
Choosing the Right OpenSSL Distribution
Unlike Linux distributions where OpenSSL is often pre-installed or easily available via package managers, on Windows, you usually need to download a pre-compiled binary. The official OpenSSL project does not provide direct Windows binaries; instead, they recommend third-party distributors. The most common and recommended source for Windows binaries is the “Win32/64 OpenSSL” project, often found at websites like Shining Light Productions (slproweb.com).
When choosing your installer, consider the following:
- Architecture (32-bit vs. 64-bit): Most modern Windows systems are 64-bit. Ensure you download the
Win64 OpenSSLversion if you have a 64-bit operating system. If you are on an older 32-bit system, chooseWin32 OpenSSL. Mismatching the architecture can lead to compatibility issues. You can check your system type by going toSettings > System > Abouton Windows 10/11 orControl Panel > System and Security > Systemon older versions. - Version (Light vs. Full):
- Light: This version usually includes the core OpenSSL binaries and libraries. It’s often sufficient for most users who just need the command-line tool and basic cryptographic functions.
- Full: This version might include additional documentation, header files for development, or other supplementary components. Unless you plan on compiling applications against OpenSSL libraries, the “Light” version is usually adequate and saves disk space.
- Support for
_without-VC-Runtimes: Some installers specify_without-VC-Runtimes. This means the installer does not bundle the Visual C++ Redistributable. If you choose this, you must ensure you have the correct Visual C++ Redistributable installed manually beforehand, as mentioned in the prerequisites. For simplicity, often the versions with bundled runtimes are easier for general users.
Always download from reputable sources. The slproweb.com/products/Win32OpenSSL.html site is widely recognized and trusted for OpenSSL binaries on Windows.
Step-by-Step OpenSSL Installation on Windows
With the preparations complete, let’s proceed with the actual installation of OpenSSL on your Windows machine. Follow these steps carefully to ensure a successful setup.
Downloading the OpenSSL Installer
- Navigate to the Download Page: Open your web browser and go to a trusted source for OpenSSL Windows binaries, such as
slproweb.com/products/Win32OpenSSL.html. - Select the Correct Installer: On the download page, you’ll see various versions. Carefully select the appropriate installer based on your system’s architecture (Win64 or Win32) and whether you prefer the “Light” or “Full” version, and if you need the Visual C++ Redistributable bundled or not. For most users on a 64-bit Windows system,
Win64 OpenSSL Light(preferably one that bundles runtimes if available, otherwise ensure you install them) is a good choice. - Download the
.exefile: Click the download link for your chosen installer. Your browser will download an executable file (e.g.,Win64OpenSSL-Light-3_0_12.exe).
Running the Installation Wizard
Once the download is complete, locate the .exe file in your Downloads folder and proceed with the installation:
-
Run as Administrator: Right-click on the downloaded
.exefile and select “Run as administrator.” This ensures the installer has the necessary permissions. -
User Account Control (UAC): If prompted by UAC, click “Yes” to allow the installer to make changes to your device.
-
Welcome Screen: Click “Next” on the welcome screen.
-
License Agreement: Read the license agreement. If you agree, select “I accept the agreement” and click “Next.”
-
Select Destination Location: The installer will suggest a default installation directory, typically
C:Program FilesOpenSSL-Win64orC:Program Files (x86)OpenSSL-Win32. It is generally recommended to keep this default path, or choose a path without spaces (e.g.,C:OpenSSL-Win64) to avoid potential issues with some older applications that might struggle with spaces in directory names. Click “Next.” -
Select Components: This screen allows you to choose which components to install. For most users, the default selection is sufficient. If you downloaded the “Light” version, you won’t have many options here anyway. Click “Next.”
-
Copy OpenSSL DLLs to: This is a crucial step. You will be given options on where to copy the OpenSSL DLLs:
- “The OpenSSL binaries (/bin) directory”
- “The Windows system directory”
- “The OpenSSL binaries (/bin) directory (make DLLs available to applications that use OpenSSL, without modifying %PATH%)”
It is highly recommended to choose “The OpenSSL binaries (/bin) directory” or “The OpenSSL binaries (/bin) directory (make DLLs available to applications that use OpenSSL, without modifying %PATH%)”. This option places the necessary DLLs directly within the OpenSSL installation’s
binfolder, which is a cleaner approach and often sufficient when you add thebindirectory to your system’s PATH variable later. Avoid copying to the Windows system directory unless you have a specific reason to, as it can clutter your system directory and potentially lead to DLL conflicts. Click “Next.” -
Ready to Install: Review your settings and click “Install.”
-
Installation Complete: Once the installation finishes, uncheck any boxes to view release notes or documentation (unless you wish to review them) and click “Finish.”
Configuring Environment Variables for Seamless Access
After installing OpenSSL, you need to add its bin directory to your system’s PATH environment variable. This allows you to run OpenSSL commands directly from any command prompt window, without having to navigate to the installation directory each time.
-
Open System Properties:
- Search for “Environment Variables” in the Windows search bar and select “Edit the system environment variables.”
- Alternatively, right-click “This PC” (or “My Computer”) -> “Properties” -> “Advanced system settings” -> “Environment Variables…” button.
-
Edit PATH Variable:
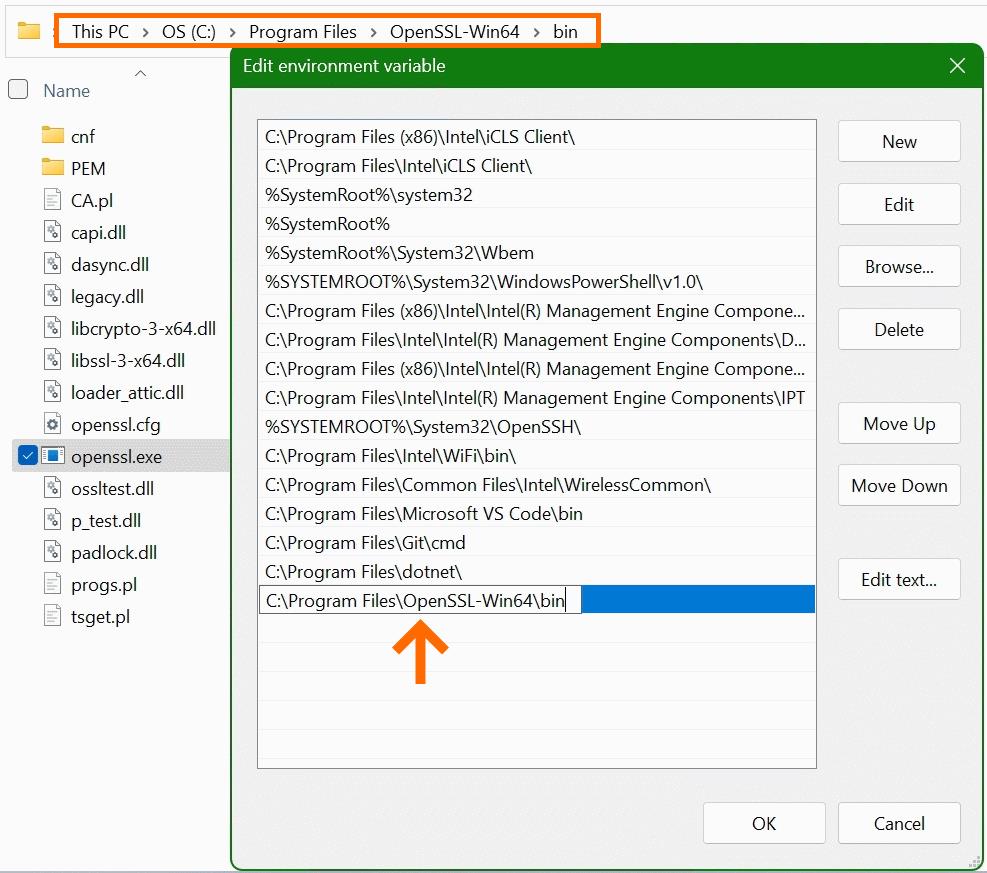
- In the “Environment Variables” window, under “System variables,” find the variable named
Path(it might be spelledPATH). Select it and click “Edit.” - In the “Edit environment variable” window:
- Click “New” and add the full path to your OpenSSL
bindirectory. For example, if you installed OpenSSL toC:Program FilesOpenSSL-Win64, you would addC:Program FilesOpenSSL-Win64bin. - Ensure this new entry is correctly added to the list. You can use the “Move Up” or “Move Down” buttons if you want to adjust its precedence, though for OpenSSL, its exact position usually doesn’t matter much.
- Click “New” and add the full path to your OpenSSL
- Click “OK” on all open dialog boxes (
Edit environment variable,Environment Variables,System Properties) to save the changes.
Note: If you are on an older Windows version that uses a single string for the PATH variable, you’ll need to append
;C:Program FilesOpenSSL-Win64bin(replacing with your actual path) to the existing string, ensuring a semicolon separates it from previous entries. - In the “Environment Variables” window, under “System variables,” find the variable named
Verifying Your OpenSSL Installation
To confirm that OpenSSL has been installed correctly and is accessible via the command line, follow these steps:
- Open a New Command Prompt: Close any existing command prompt windows and open a brand new one. This is crucial because environment variable changes only apply to new command prompt instances.
- Search for “cmd” in the Windows search bar and open “Command Prompt.”
- Run OpenSSL Version Command: In the command prompt, type:
bash

openssl version
- Expected Output: If the installation was successful and the PATH variable is configured correctly, you should see output similar to this (version numbers may vary):
OpenSSL 3.0.12 10 Oct 2023 (Library: OpenSSL 3.0.12 10 Oct 2023)
If you see an error like'openssl' is not recognized as an internal or external command, operable program or batch file., it means the PATH variable is not correctly set, or you haven’t opened a new command prompt after setting it. Refer to the troubleshooting section.
Essential First Steps and Basic Usage
With OpenSSL successfully installed, you’re now ready to explore its capabilities. Here are a couple of basic commands to get you started and illustrate its potential.
Testing OpenSSL Commands
Beyond openssl version, you can try a few more commands to ensure the toolkit is fully functional.
- Generate a Private Key: A common first step in certificate management is generating a private key.
bash

openssl genrsa -out mykey.pem 2048
This command generates a 2048-bit RSA private key and saves it to a file namedmykey.pemin your current directory. - Generate a Certificate Signing Request (CSR): After generating a private key, you can create a CSR, which is used to request an SSL certificate from a Certificate Authority (CA).
bash

openssl req -new -key mykey.pem -out mycsr.csr
This will prompt you for information (country, state, common name, etc.) which will be embedded in the CSR. - Generate a Self-Signed Certificate: For local development or testing, you might want to create a self-signed certificate directly.
bash

openssl req -x509 -new -key mykey.pem -out mycert.pem -days 365
This command uses your private key to create a self-signed certificate, valid for 365 days, and saves it asmycert.pem.
These commands demonstrate just a fraction of OpenSSL’s power, allowing you to manage essential cryptographic elements right from your Windows command line.
A Glimpse into OpenSSL’s Capabilities
OpenSSL’s functionality extends far beyond certificate generation. It’s a comprehensive cryptographic library that enables:
- Encryption and Decryption: Encrypt files using symmetric ciphers like AES, and decrypt them.
- Hashing: Compute cryptographic hash values (SHA-256, MD5) for data integrity verification.
- Certificate Inspection: View the details of SSL/TLS certificates (e.g.,
openssl x509 -in mycert.pem -text -noout). - TLS Client/Server Testing: Act as a client or server for TLS connections, useful for debugging network security issues.
- Diffie-Hellman Parameter Generation: Generate parameters for secure key exchange.
Mastering OpenSSL opens up a world of possibilities for managing and securing your digital assets and communications.
Troubleshooting Common Installation Issues
Even with careful steps, you might encounter issues during or after the OpenSSL installation. Here are some common problems and their solutions.
“OpenSSL is not recognized” Error
This is by far the most common issue after installation and almost always points to an incorrect or unrefreshed PATH environment variable.
- Symptoms: When you type
openssl versionin the command prompt, you get an error message like'openssl' is not recognized as an internal or external command, operable program or batch file. - Solution:
- Verify PATH Entry: Double-check that you correctly added the full path to the OpenSSL
bindirectory (e.g.,C:Program FilesOpenSSL-Win64bin) to the system’sPathenvironment variable. Ensure there are no typos. - Open a New Command Prompt: Crucially, environment variable changes do not affect already open command prompt windows. Close all existing command prompts and open a brand new one. Then, try
openssl versionagain. - System vs. User Variables: Ensure you added it to the “System variables” section of the PATH, not just “User variables,” as some applications or system processes might not recognize user-specific paths.
- Reboot (Last Resort): In rare cases, especially after significant system changes, a full system reboot might be necessary for environment variables to be fully recognized by all processes.
- Verify PATH Entry: Double-check that you correctly added the full path to the OpenSSL
Missing Visual C++ Redistributable
If the OpenSSL executable or commands fail to run with errors related to missing DLLs (e.g., VCRUNTIME140.dll was not found, MSVCP140.dll is missing), it means the necessary Visual C++ runtime libraries are not installed on your system.
- Symptoms: Error messages about missing DLLs when trying to run
openssl.exe. - Solution: Download and install the appropriate Microsoft Visual C++ Redistributable for Visual Studio.
- Go to the official Microsoft download page for Visual C++ Redistributable.
- Download the latest versions of both the
x86andx64redistributables. Even on a 64-bit system, some applications might still rely on 32-bit runtimes. Installing both ensures broad compatibility. - Run the installers for these packages and then try OpenSSL again.
Conflicts with Existing OpenSSL Versions
If you previously had OpenSSL installed (perhaps bundled with another application) or if you’re trying to manage multiple versions, you might encounter conflicts.
- Symptoms: Unexpected behavior, old versions running instead of new ones, or commands failing.
- Solution:
- Check All PATH Entries: Examine your PATH environment variable carefully for any other entries that might point to an older or different OpenSSL installation’s
bindirectory. Remove or correct these entries. - Order of PATH: The order of directories in your PATH matters. Windows searches them sequentially. If an older OpenSSL
bindirectory appears before your newly installed one, the system will use the older version. Move your desired OpenSSLbinpath to an earlier position in the list. - Uninstall Old Versions: If an older OpenSSL was installed via an installer, go to “Add or remove programs” in Windows settings and uninstall it completely before reinstalling your desired version.
- Check All PATH Entries: Examine your PATH environment variable carefully for any other entries that might point to an older or different OpenSSL installation’s
Conclusion: Empowering Your Digital Journey
Installing OpenSSL on Windows is a fundamental step for anyone looking to delve deeper into digital security, web development, or network administration. While the process involves a few distinct stages—from choosing the right distribution and running the installer to configuring environment variables and verifying the setup—each step is crucial for establishing a robust cryptographic toolkit on your system.
By successfully installing OpenSSL, you unlock a powerful set of capabilities for generating SSL/TLS certificates, encrypting sensitive data, understanding secure communication protocols, and much more. This tool empowers you to build more secure applications, manage your digital identities, and protect your information in an increasingly complex online world. Remember to always keep your software updated, download from trusted sources, and stay informed about best practices in digital security. With OpenSSL at your command, you are well-equipped to navigate the challenges and opportunities of the digital frontier.
aViewFromTheCave is a participant in the Amazon Services LLC Associates Program, an affiliate advertising program designed to provide a means for sites to earn advertising fees by advertising and linking to Amazon.com. Amazon, the Amazon logo, AmazonSupply, and the AmazonSupply logo are trademarks of Amazon.com, Inc. or its affiliates. As an Amazon Associate we earn affiliate commissions from qualifying purchases.