Node.js has become an indispensable tool for modern web development, powering everything from backend APIs and server-side rendering to command-line tools and even desktop applications. If you’re venturing into the world of JavaScript development on the Windows operating system, mastering the installation of Node.js is your crucial first step. This comprehensive guide will walk you through the process, ensuring you have Node.js up and running smoothly on your Windows machine. We’ll cover the essential installation methods, essential post-installation checks, and touch upon how Node.js fits into the broader landscape of technology, branding, and even the financial aspects of your development journey.
Understanding Node.js and Its Significance in Tech
Before we dive into the “how-to,” it’s vital to grasp what Node.js is and why it has gained such widespread adoption. At its core, Node.js is an open-source, cross-platform JavaScript runtime environment. This means it allows you to execute JavaScript code outside of a web browser. Traditionally, JavaScript was confined to the client-side, dictating the interactivity of web pages. Node.js breaks this barrier, enabling developers to use JavaScript for server-side programming, making it possible to build full-stack applications using a single language.
The key to Node.js’s efficiency lies in its event-driven, non-blocking I/O model. This architecture makes it highly scalable and performant, particularly for applications that handle a large number of concurrent connections, such as real-time applications, APIs, and microservices. Its vast ecosystem, managed by npm (Node Package Manager), offers an extensive library of pre-built modules and packages that significantly accelerate development by providing ready-made solutions for common tasks.
The implications of Node.js extend far beyond just backend development. In the broader Tech landscape, Node.js is a cornerstone for:
- Modern Web Development: Frameworks like Express.js, NestJS, and Next.js, all built on Node.js, are widely used for creating robust and scalable web applications.
- API Development: Its asynchronous nature makes it ideal for building fast and efficient RESTful APIs.
- Command-Line Interface (CLI) Tools: Many developer tools, including build tools, linters, and package managers themselves, are built with Node.js.
- Serverless Computing: Node.js is a popular choice for serverless functions, allowing developers to deploy code without managing servers.
- Desktop Applications: With frameworks like Electron, you can build cross-platform desktop applications using web technologies, including Node.js.
Understanding this context highlights why mastering Node.js installation on Windows is not just about following a technical procedure; it’s about unlocking a powerful toolkit that fuels innovation across the digital realm.
Installing Node.js on Windows: The Recommended Method
The most straightforward and recommended way to install Node.js on Windows is by using the official installer package provided by the Node.js project. This method ensures you get a stable version, along with npm, which is essential for managing Node.js packages.
Downloading the Node.js Installer
-
Visit the Official Node.js Website: Open your web browser and navigate to the official Node.js download page: https://nodejs.org/en/download/.
-
Choose the Right Version: You will typically see two download options:
- LTS (Long Term Support): This is the recommended version for most users. LTS releases are more stable, have a longer support period, and are generally preferred for production environments.
- Current: This version includes the latest features and is ideal for developers who want to experiment with cutting-edge functionalities. For a stable development setup, stick with LTS.
-
Select the Windows Installer: On the download page, under the LTS or Current section, you will find download links for different operating systems. Click on the Windows Installer (.msi) option. Ensure you select the correct architecture for your system (usually 64-bit, indicated by “x64”). If you’re unsure, it’s almost always 64-bit for modern computers.
Running the Installer
Once the .msi file has been downloaded, locate it in your Downloads folder and double-click to start the installation process.
-
Welcome Screen: The Node.js Setup wizard will appear. Click “Next” to proceed.
-
End-User License Agreement (EULA): Read through the license agreement. If you agree, check the box “I accept the terms in the License Agreement” and click “Next.”
-
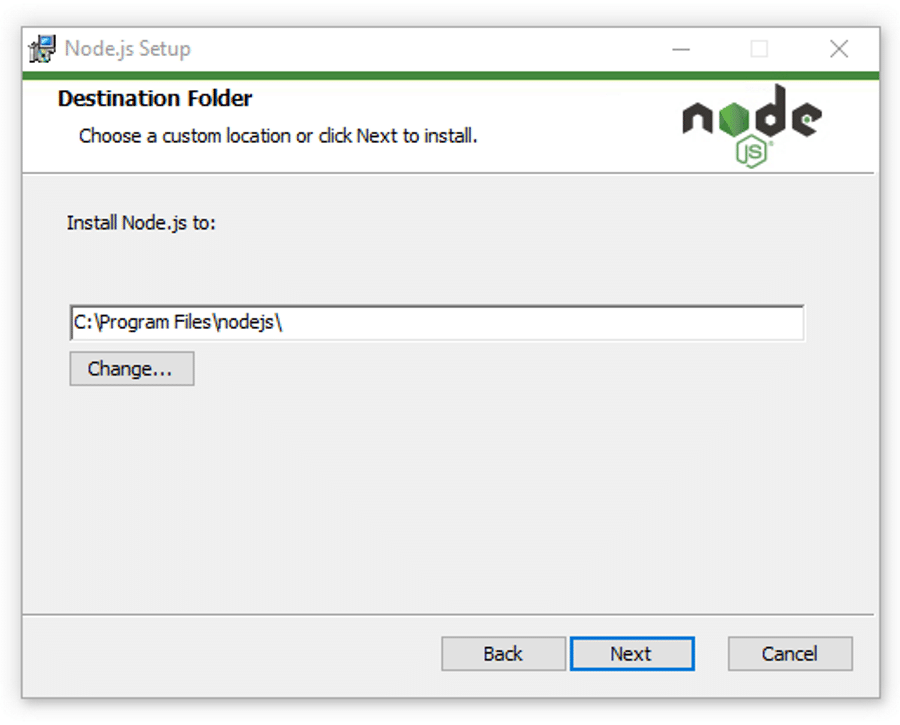
Destination Folder: You can choose the directory where Node.js will be installed. The default location is usually fine for most users (
C:Program Filesnodejs). Click “Next.” -
Custom Setup: This screen allows you to select which components to install. By default, “Node.js runtime” and “npm package manager” will be selected, which is exactly what you need. You might also see options for “Online documentation shortcuts” and “Add to PATH.” Crucially, ensure “Add to PATH” is selected. This is vital because it allows you to run Node.js commands (like
nodeandnpm) from any command prompt or terminal window without specifying the full installation path. Click “Next.” -
Tools for Native Modules: You may see an option to “Automatically install the necessary tools. Note that this will also install Chocolatey.” This option is for installing tools needed to compile native addon modules for Node.js. If you’re just starting, you can skip this for now. You can always install these tools later if needed. Click “Next.”
-
Ready to Install: The installer will summarize your chosen settings. Click “Install” to begin the installation. You might be prompted by User Account Control (UAC) to allow the installer to make changes to your device; click “Yes.”
-
Completing the Node.js Setup: Once the installation is complete, you’ll see a confirmation screen. Click “Finish.”
Verifying the Installation
After the installer has finished, it’s essential to verify that Node.js and npm have been installed correctly and are accessible from your command line.

-
Open Command Prompt or PowerShell:
- Press the Windows Key + R to open the Run dialog.
- Type
cmdand press Enter to open Command Prompt, or typepowershelland press Enter to open PowerShell.
-
Check Node.js Version: In the terminal window, type the following command and press Enter:
node -vThis command should output the version number of Node.js that you just installed (e.g.,
v18.17.1). -
Check npm Version: Next, check the npm version by typing:
bash

npm -v
This should output the version number of npm (e.g.,9.6.7).
If both commands successfully display version numbers, congratulations! You have successfully installed Node.js and npm on your Windows machine.
Alternative Installation Methods and Considerations
While the official installer is the most common and recommended method, there are other ways to install and manage Node.js on Windows, which can be particularly useful for developers working on multiple projects with different Node.js version requirements.
Using a Node Version Manager (NVM for Windows)
For developers who frequently switch between projects that require different Node.js versions, a Node Version Manager (NVM) is an invaluable tool. While the official NVM is primarily for Linux/macOS, a popular port exists for Windows: nvm-windows.
Why use NVM?
- Version Switching: Easily install and switch between multiple Node.js versions for different projects.
- Testing: Test your applications with different Node.js versions to ensure compatibility.
- Project-Specific Dependencies: Each Node.js installation can have its own set of global npm packages.
How to install NVM for Windows:
- Download NVM for Windows: Visit the
nvm-windowsGitHub repository release page: https://github.com/coreybutler/nvm-windows/releases. Download the latestnvm-setup.zipfile. - Extract and Run Installer: Extract the contents of the zip file and run the installer. Follow the on-screen prompts, similar to the Node.js installer.
- Install Node.js via NVM: After installing
nvm-windows, open your command prompt as an administrator. You can then install Node.js versions using commands like:
bash

nvm install latest  # Installs the latest version

nvm install lts     # Installs the latest LTS version

nvm install 18.17.1 # Installs a specific version
- Switch Versions: To use a specific installed version, run:
bash

nvm use 18.17.1
You’ll need to run this command every time you open a new terminal session.
Node.js and Your Development Workflow
The installation of Node.js is the gateway to a powerful development ecosystem. Once installed, you’ll likely be using it with:
- npm/Yarn: To install project dependencies. For example,
npm install expressto add the Express.js framework to your project. - Build Tools: Tools like Webpack or Vite, often installed globally or per project, to bundle your JavaScript code, manage assets, and optimize your application.
- Task Runners: Gulp or Grunt (though less common now) for automating development tasks.
- Linters and Formatters: ESLint and Prettier to maintain code quality and consistency.
These tools, all managed by npm or Yarn, are essential for any modern development workflow and rely on your Node.js installation.
Node.js in the Context of Branding and Money
While the installation of Node.js is a technical process, its impact resonates beyond the code and into the realms of Brand and Money.
Branding and Node.js
In the context of Brand, Node.js plays a significant role in how businesses and individuals present themselves digitally.
- Brand Experience: A fast, responsive, and reliable website or application directly contributes to a positive brand perception. Node.js’s performance characteristics enable developers to build such experiences. Companies that invest in efficient backend infrastructure powered by Node.js are investing in their brand’s digital front.
- Innovation and Agility: The speed of development facilitated by Node.js and its vast package ecosystem allows businesses to iterate quickly, launch new features, and adapt to market changes. This agility is crucial for maintaining a relevant and forward-thinking brand in a dynamic digital landscape.
- Developer Branding: For individual developers, mastering Node.js and contributing to open-source projects within the Node.js community can significantly enhance their personal brand. Demonstrating proficiency in a widely adopted technology like Node.js makes them more attractive to employers and collaborators.
- Marketing Technology: Many marketing automation tools, analytics platforms, and customer relationship management (CRM) systems are built or integrated using Node.js. This means Node.js is often powering the very tools that help brands reach and engage their audience.
Money and Node.js
The connection between Node.js and Money is multifaceted and directly impacts both individual developers and businesses.
- Career Opportunities and Income: Node.js developers are in high demand across the tech industry. Proficiency in Node.js can lead to lucrative job opportunities, higher salaries, and freelance gigs. The ability to build full-stack applications efficiently is a valuable skill that commands significant financial reward.
- Startup and Business Growth: For startups and established businesses, Node.js can be a cost-effective solution for building scalable applications. Its performance can reduce infrastructure costs, and the rapid development cycle can bring products to market faster, leading to quicker revenue generation.
- Online Income and Side Hustles: For individuals looking to generate Online Income or pursue Side Hustles, Node.js opens up various avenues. This includes building and selling web applications, creating custom tools for clients, developing plugins or themes for content management systems (like WordPress), or even offering Node.js development services on freelance platforms.
- Financial Tools and Platforms: Many modern financial technologies, from trading platforms and payment gateways to personal finance management apps, are built using technologies that leverage Node.js for their robust backend capabilities.
Conclusion
Installing Node.js on Windows is a fundamental step for anyone looking to engage in modern web development, backend services, or command-line tool creation. By following the straightforward installation process using the official installer, and understanding the benefits of tools like NVM, you’ll be well-equipped to harness the power of JavaScript beyond the browser. As you progress, remember that Node.js isn’t just a piece of software; it’s an enabler of innovation that impacts technological trends, shapes digital brands, and directly influences financial opportunities in the ever-evolving tech landscape. Embrace the journey, and happy coding!
aViewFromTheCave is a participant in the Amazon Services LLC Associates Program, an affiliate advertising program designed to provide a means for sites to earn advertising fees by advertising and linking to Amazon.com. Amazon, the Amazon logo, AmazonSupply, and the AmazonSupply logo are trademarks of Amazon.com, Inc. or its affiliates. As an Amazon Associate we earn affiliate commissions from qualifying purchases.