
In the rapidly evolving landscape of personal computing, few upgrades offer as dramatic a performance boost as replacing a traditional Hard Disk Drive (HDD) with a Solid State Drive (SSD). If your PC feels sluggish, takes an age to boot up, or struggles with application loading times, an SSD upgrade isn’t just a luxury—it’s a necessity. This comprehensive tutorial will guide you through every step of installing a new SSD in your PC, transforming your user experience from frustratingly slow to incredibly fast and responsive. As a staple in modern technology, understanding how to install and optimize an SSD is a valuable skill for any tech enthusiast looking to enhance their digital productivity and secure their investment in existing hardware.

Why Upgrade to an SSD? The Performance Imperative
Before diving into the mechanics of installation, it’s crucial to understand why an SSD is such a game-changer. Unlike HDDs, which rely on spinning platters and read/write heads, SSDs store data on flash memory chips, similar to a giant USB stick. This fundamental difference unlocks a host of performance benefits that directly contribute to a more efficient and enjoyable computing experience, aligning perfectly with modern technology trends focused on speed and reliability.
Speed and Responsiveness: The Need for Speed
The most immediate and noticeable benefit of an SSD is its unparalleled speed. SSDs can read and write data significantly faster than HDDs, often by factors of 5x to 10x or even more, especially with NVMe (Non-Volatile Memory Express) drives. This translates directly into:
- Lightning-fast boot times: Your operating system will load in seconds, not minutes.
- Rapid application launch: Programs like web browsers, photo editors, and games will open almost instantaneously.
- Smoother multitasking: Switching between applications becomes seamless, reducing frustrating delays.
- Quicker file transfers: Copying large files, whether documents or media, becomes a swift operation.
For anyone focused on productivity, these speed enhancements are invaluable, minimizing wait times and maximizing actual work or play time.
Durability and Reliability: Built to Last
Traditional HDDs, with their intricate mechanical parts, are susceptible to damage from drops, shocks, or even vibrations. The delicate read/write heads hovering over spinning platters are a clear point of vulnerability. SSDs, conversely, have no moving parts. This makes them inherently more durable and reliable.
- Shock resistance: Less prone to data loss or drive failure if your PC is accidentally bumped or dropped.
- Extended lifespan: While they have a finite number of write cycles, modern SSDs are designed to last for many years under typical consumer usage, often outliving other PC components.
- Reduced wear and tear: The absence of moving parts also means less friction and heat generation, contributing to the overall longevity of your system.
This enhanced durability is a significant advantage, particularly for laptops or PCs that might be moved frequently, offering peace of mind regarding your valuable data.
Energy Efficiency and Quiet Operation: A Cooler, Quieter PC
Another often-overlooked benefit of SSDs relates to their operational characteristics. Because they don’t have motors or moving parts:
- Lower power consumption: SSDs consume less power than HDDs, which can translate to longer battery life for laptops and slightly reduced electricity bills for desktops. This also means less heat generation, contributing to a cooler internal PC environment.
- Silent operation: The whirring and clicking sounds often associated with HDDs are completely absent with SSDs. Your PC will run much quieter, creating a more pleasant work or gaming environment.
These advantages contribute to a more optimized and enjoyable computing experience, making an SSD an excellent “gadget” upgrade that provides tangible improvements across the board.
Enhancing Overall System Productivity
Beyond the individual metrics, an SSD fundamentally changes how you interact with your computer. The cumulative effect of faster boots, quicker application launches, and seamless multitasking is a dramatic increase in overall system responsiveness and user productivity. Waiting for your computer saps focus and energy; an SSD eliminates much of that friction. It allows you to dedicate more time to actual tasks rather than waiting for your hardware to catch up, making it a pivotal component for anyone looking to maximize their digital efficiency.
Before You Begin: Essential Preparations
A successful SSD installation hinges on proper preparation. Rushing into the process without the necessary tools, information, or safeguards can lead to frustration or even data loss. Taking the time to prepare will ensure a smooth and hassle-free upgrade.
Gathering Your Tools: The Right Kit for the Job
Most SSD installations are straightforward and don’t require an extensive toolkit. However, having a few essential items on hand will make the process much easier:
- Phillips-head screwdriver: The most common tool you’ll need for opening your PC case and securing components.
- Anti-static wrist strap (recommended): While not strictly mandatory for everyone, an anti-static wrist strap is highly recommended to protect your sensitive PC components from electrostatic discharge (ESD), which can cause permanent damage. If you don’t have one, regularly touch a grounded metal object (like an unpainted part of your PC case while it’s still plugged in but turned off) to discharge static electricity.
- SATA data cable (for 2.5-inch SATA SSDs): Your new SSD might come with one, but if not, ensure you have an extra.
- SATA power cable (for 2.5-inch SATA SSDs): Most modern Power Supply Units (PSUs) have spare SATA power connectors. Ensure you have one available.
- 2.5-inch to 3.5-inch mounting bracket (for 2.5-inch SATA SSDs in desktop PCs): Many desktop cases have 3.5-inch bays for HDDs. Since 2.5-inch SSDs are smaller, you might need a bracket to secure them properly. Some cases have dedicated 2.5-inch mounts.
- Flashlight (optional but helpful): For illuminating cramped or dark areas inside your PC case.
Choosing the Right SSD: Compatibility and Performance
SSDs come in various form factors and interfaces. Understanding these is crucial for selecting the right drive for your PC:
- 2.5-inch SATA SSDs: These are the most common type, resembling traditional laptop hard drives. They connect via SATA data and power cables and are compatible with virtually any desktop or laptop that uses 2.5-inch or 3.5-inch drive bays (with an adapter). They offer significant speed improvements over HDDs but are limited by the SATA 3.0 interface’s maximum theoretical speed of 600 MB/s.
- M.2 NVMe SSDs: These are smaller, stick-like SSDs that plug directly into an M.2 slot on your motherboard. NVMe drives communicate directly with the CPU via the PCIe bus, offering dramatically higher speeds (often several gigabytes per second) compared to SATA SSDs. If your motherboard has an M.2 slot and supports NVMe, this is generally the fastest option.
- M.2 SATA SSDs: Less common, these also use the M.2 form factor but communicate via the SATA interface, offering speeds similar to 2.5-inch SATA SSDs. It’s crucial to check your motherboard’s M.2 slot specifications to see if it supports NVMe, SATA, or both.
Before purchasing, consult your PC or motherboard manual to determine which types of SSDs your system supports and what slots are available. Consider the capacity you need; 250GB-500GB is often sufficient for an operating system and essential applications, while 1TB or more is ideal for games and large media files.
Data Backup and Migration Strategy: Protecting Your Digital Life
This is perhaps the most critical preparatory step. Before you even think about opening your PC, you must back up your existing data. While SSD installation is generally safe, unexpected issues can occur, and having a recent backup ensures your irreplaceable files are protected.
You have two primary strategies for moving your operating system and files to the new SSD:
- Fresh Installation: This involves installing a clean copy of your operating system (Windows, macOS, Linux) onto the new SSD. This is often recommended for the cleanest performance but requires reinstalling all your applications and manually transferring your personal files from a backup. You’ll need your OS installation media (USB drive or DVD) and product keys.
- Cloning Your Existing Drive: This involves using specialized software (many SSD manufacturers provide cloning tools, or you can use third-party options like Macrium Reflect Free, Clonezilla, or Acronis True Image) to create an exact copy of your current hard drive onto the new SSD. This preserves your operating system, applications, settings, and files exactly as they were, allowing for a seamless transition. For cloning, you’ll need the new SSD connected to your PC (either internally if you have a spare port, or externally via a USB-to-SATA adapter) while the old drive is still running.
Choose the strategy that best suits your comfort level and needs. Regardless, a full backup of all critical data to an external drive or cloud service is non-negotiable. This is a fundamental aspect of digital security and ensures your productivity isn’t derailed by unforeseen technical glitches.
Static Electricity Precautions: Safeguarding Your Components

Electrostatic discharge (ESD) can fry sensitive electronic components without you even feeling a shock. Always take precautions:
- Unplug your PC: Before opening the case, ensure your PC is completely powered down and unplugged from the wall.
- Ground yourself: Wear an anti-static wrist strap connected to an unpainted metal part of your PC case. If you don’t have one, periodically touch a grounded metal object (like the PC case) to discharge any static buildup. Avoid working on carpeted floors.
- Handle components by their edges: Avoid touching the gold contacts or circuit boards directly.
Step-by-Step Installation Guide
With preparations complete, you’re ready to physically install your new SSD. This process differs slightly depending on whether you’re installing a 2.5-inch SATA SSD or an M.2 NVMe SSD.
Opening Your PC Case: Accessing the Internals
- Power Down and Unplug: Ensure your computer is completely shut down. Turn off the power supply switch at the back of the PC (if it has one) and unplug the power cable from the wall outlet and the PC itself. Disconnect all peripherals (monitor, keyboard, mouse, etc.).
- Move to a Clean, Flat Surface: Place your PC on a stable, non-carpeted surface.
- Open the Case: Typically, desktop PC cases have screws on the back panel that secure one or both side panels. Unscrew these (often thumb screws for convenience), and then slide the side panel(s) off. Consult your PC manual if you’re unsure how to open your specific case model. For laptops, consult the service manual for instructions on accessing the drive bay, as this often involves more intricate steps and specific tools.
Locating an Available Drive Bay/M.2 Slot: Finding the Right Spot
Once the case is open, identify where your new SSD will go:
- For 2.5-inch SATA SSDs: Look for 2.5-inch or 3.5-inch drive bays. These are usually cages or brackets located towards the front or bottom of the PC case. Some cases have tool-less trays; others require screws. If you’re replacing an existing HDD, simply locate that drive.
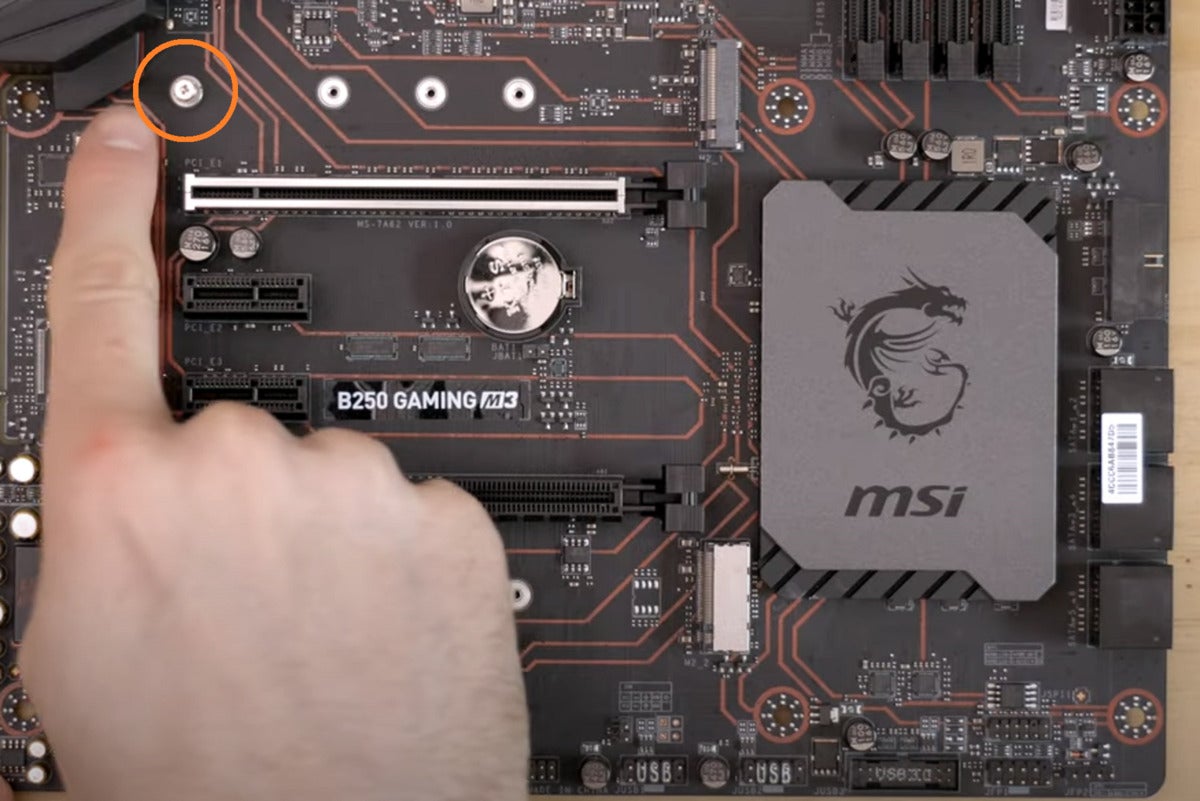
- For M.2 NVMe SSDs: Locate the M.2 slot(s) on your motherboard. These are small, horizontal slots, usually near the CPU or graphics card, often labeled “M.2” or “NVMe.” They typically have a small screw nearby that’s used to secure the M.2 drive. Motherboards can have one, two, or even more M.2 slots.
Physical Installation of the SSD: Mounting and Connecting
This is where the actual hardware installation takes place. Remember to ground yourself regularly during this process.
For 2.5-inch SATA SSDs:
- Mount the SSD:
- If replacing an HDD: Disconnect the SATA data and power cables from the old HDD. Unscrew or unclip the old HDD from its bay/bracket and remove it.
- If using a new bay: If your case has a dedicated 2.5-inch bay, slide the SSD into place and secure it with screws or clips. If you’re using a 3.5-inch bay, attach the 2.5-inch SSD to your 2.5-inch to 3.5-inch mounting bracket, then install the bracket into the 3.5-inch bay and secure it.
- Connect Cables:
- SATA Data Cable: Connect one end of the SATA data cable to the SATA port on your new SSD and the other end to an available SATA port on your motherboard. Motherboard SATA ports are typically found near the bottom-right corner of the board.
- SATA Power Cable: Connect an available SATA power connector from your PSU to the power port on your new SSD. Ensure both connections are firm.
For M.2 NVMe SSDs:
- Identify the M.2 Slot: Locate the correct M.2 slot on your motherboard. Some motherboards come with a small screw already inserted into the standoff at the end of the M.2 slot; remove it.
- Insert the SSD: Gently slide the M.2 SSD into the M.2 slot at about a 30-degree angle. It should slide in smoothly. Do not force it.
- Secure the SSD: Once fully seated, the SSD will naturally spring up slightly. Gently push the SSD down towards the motherboard and secure it with the small screw you removed earlier (or a new one provided with the motherboard or SSD) into the standoff. Ensure it’s snug but don’t overtighten. Some motherboards use a tool-less clip or latch system instead of a screw.
- Remove Protective Films: If your M.2 SSD or motherboard M.2 slot has a heatsink, it might have thermal pads with protective films. Remember to peel these off before reattaching the heatsink.
Securing and Closing the PC Case: Final Checks
- Double-Check Connections: Before closing up, visually inspect all connections. Ensure the SSD is securely mounted, and all cables (SATA data/power for 2.5-inch, or the M.2 SSD itself) are firmly seated.
- Manage Cables (Optional): If you have excess cables, try to tidy them up using zip ties or velcro straps to improve airflow and aesthetics.
- Reattach Side Panel(s): Slide the side panel(s) back onto your PC case and secure them with the screws.
- Reconnect Peripherals: Plug your monitor, keyboard, mouse, power cable, and any other peripherals back into your PC.
Post-Installation: Software Setup and Optimization
Physical installation is only half the battle. Now you need to prepare your SSD for use by your operating system and optimize it for peak performance and longevity. This often involves interacting with your PC’s software, from the BIOS to the operating system’s disk management tools.
Initializing and Formatting the SSD: Ready for Data
After the physical installation, your PC will likely boot up, but your new SSD won’t immediately appear as a usable drive in ‘My Computer’ or ‘File Explorer.’ You need to initialize and format it.
- For Windows:
- Right-click on the Start button and select ‘Disk Management.’
- You should see your new SSD listed as ‘Disk 1’ (or similar), often labeled ‘Unknown’ or ‘Not Initialized.’
- Right-click on the new SSD and select ‘Initialize Disk.’ Choose ‘GPT’ (GUID Partition Table) for modern systems and larger drives.
- Once initialized, right-click on the ‘Unallocated’ space on the new SSD and select ‘New Simple Volume.’ Follow the wizard to assign a drive letter, choose a file system (NTFS is standard for Windows), and give it a name. Perform a ‘Quick Format.’
- For macOS: Use Disk Utility to erase and format the new drive.
- For Linux: Use tools like
GPartedorfdisk/mkfscommands.
Migrating Your Operating System (OS) or Performing a Fresh Install: The Software Heart
Now that the SSD is formatted, it’s time to get your operating system onto it.
- If you chose the Fresh Installation route: Boot your PC from your OS installation media (USB drive or DVD). Follow the on-screen prompts to install the operating system onto your new SSD. Make sure to select the correct drive during installation to avoid accidentally overwriting your old drive.
- If you chose the Cloning route: If you haven’t already, now is the time to run your chosen cloning software. Follow its instructions carefully to clone your old drive to the new SSD. Once the cloning is complete, you might need to change the boot order in your PC’s BIOS/UEFI settings to ensure it boots from the new SSD. Alternatively, you can simply disconnect the old HDD after cloning to force the PC to boot from the SSD.
Installing Drivers and Essential Software: Keeping it Current
- Chipset Drivers: After an OS installation (especially a fresh one), install the latest chipset drivers for your motherboard from the manufacturer’s website. This ensures optimal communication between your CPU, SSD, and other components.
- SSD Management Software: Many SSD manufacturers provide their own utility software (e.g., Samsung Magician, Crucial Storage Executive). These tools can help you monitor SSD health, update firmware, and enable specific performance-enhancing features like TRIM and Over-Provisioning. It’s good practice to install these.
Optimizing Your SSD for Longevity and Performance: Fine-Tuning Your Gadget
Modern operating systems are generally well-optimized for SSDs, but a few settings are worth checking:
- TRIM: Ensure TRIM is enabled. TRIM is a command that tells the SSD which data blocks are no longer in use and can be erased, preventing performance degradation over time. Windows enables it by default. You can check its status in Command Prompt with
fsutil behavior query disabledeletenotify. A value of 0 means TRIM is enabled. - Defragmentation: Unlike HDDs, SSDs do not need defragmentation. In fact, defragmenting an SSD can reduce its lifespan by performing unnecessary write cycles. Windows 10/11 handles this by only optimizing (not defragmenting) SSDs, but ensure any third-party tools are not attempting to defrag your SSD.
- Over-Provisioning (Optional): Some SSD utility software allows you to allocate a small percentage of your SSD’s capacity (e.g., 5-10%) as over-provisioning. This reserve space helps maintain consistent performance and extends the drive’s lifespan. It’s not strictly necessary for most users but can be beneficial for heavy workloads.
- AHCI Mode: Ensure your SATA controller is set to AHCI (Advanced Host Controller Interface) mode in your BIOS/UEFI settings. This allows features like TRIM and NCQ (Native Command Queuing) to function correctly, which are essential for SSD performance. Most modern systems default to AHCI, but it’s worth a quick check if you encounter issues.
Conclusion
Installing a new SSD in your PC is one of the most impactful upgrades you can perform, fundamentally transforming your computer’s speed, responsiveness, and overall user experience. By following this detailed guide, you’ve not only mastered a practical skill but also invested in the longevity and productivity of your digital life.
From the initial planning and data backup to the physical installation and post-setup optimization, each step ensures a seamless transition to a faster, more reliable system. Embrace the rapid boot times, instant application launches, and smooth multitasking that your new SSD brings. This isn’t just about installing a new gadget; it’s about unlocking your PC’s full potential and enhancing your daily productivity in a world that increasingly values speed and efficiency. Enjoy your revitalized, lightning-fast computer!
aViewFromTheCave is a participant in the Amazon Services LLC Associates Program, an affiliate advertising program designed to provide a means for sites to earn advertising fees by advertising and linking to Amazon.com. Amazon, the Amazon logo, AmazonSupply, and the AmazonSupply logo are trademarks of Amazon.com, Inc. or its affiliates. As an Amazon Associate we earn affiliate commissions from qualifying purchases.