In today’s digitally driven world, a robust and reliable internet connection is no longer a luxury but a necessity. Whether you’re streaming high-definition content, engaging in online gaming, managing remote work, or simply browsing the web, a powerful router is the backbone of your digital experience. The Netgear Nighthawk series has become synonymous with high performance, advanced features, and blazing-fast speeds, making it a top choice for discerning users. However, the prospect of setting up a new piece of technology can sometimes feel daunting. This guide aims to demystify the process of installing your Netgear Nighthawk router, ensuring you can quickly and efficiently unlock its full potential, and in doing so, elevate your overall technological setup.
Preparing for Installation: What You Need and Where to Start
Before you dive headfirst into the physical setup, a little preparation goes a long way. This initial phase ensures a smooth and error-free installation, preventing potential headaches down the line. Think of it as laying the groundwork for a superior network experience.
Unboxing and Identifying Components
Your Netgear Nighthawk router likely arrived in a sleek, well-packaged box. Carefully unbox its contents, and take a moment to identify each component. Typically, you’ll find the router itself, a power adapter, an Ethernet cable, and a quick start guide. Familiarize yourself with these items; the power adapter is crucial for powering on the device, and the Ethernet cable will be used for the initial connection to your modem. The quick start guide, while brief, can offer a visual overview and some essential setup steps. It’s also a good idea to keep the box and any included documentation in a safe place, as they might be useful for future reference or if you ever need to contact Netgear support.
Choosing the Optimal Router Location
The placement of your router significantly impacts the reach and strength of your Wi-Fi signal throughout your home or office. Avoid placing your Nighthawk in enclosed spaces, behind large furniture, or near potential sources of interference.
- Central Location: The ideal spot is as close to the center of your home or the area you want to cover as possible. This allows the Wi-Fi signal to radiate outwards more evenly.
- Elevated Position: Placing the router on a shelf or a high surface, rather than on the floor, can help to improve signal dispersion.
- Minimize Obstructions: Walls, especially those made of brick or concrete, and large metal objects can significantly weaken Wi-Fi signals. Try to minimize the number of these between your router and your most frequently used devices.
- Avoid Interference: Keep your router away from other electronic devices that emit radio waves, such as microwaves, cordless phones, and Bluetooth devices. These can create interference and degrade your Wi-Fi performance.
Understanding Your Internet Service Provider (ISP) Equipment
Your Netgear Nighthawk router will connect to your existing modem, which is provided by your Internet Service Provider (ISP). It’s important to understand the type of modem you have and ensure it’s compatible with your new router. Most modern modems are capable of working with third-party routers. You’ll need to know how to access your modem, usually by locating its power and cable connections. Ensure your modem is powered on and has a stable internet connection before you proceed with installing your Nighthawk. If you’re unsure about your modem’s status, contact your ISP.
The Step-by-Step Installation Process: Connecting and Configuring Your Nighthawk
Once you’ve prepared your space and gathered your components, it’s time to bring your Netgear Nighthawk to life. This section will guide you through the physical connections and the initial software configuration.
Physical Connections: Powering Up Your Network Hub
This is the core of the installation. With your modem powered on and functional, you can begin connecting your Nighthawk.

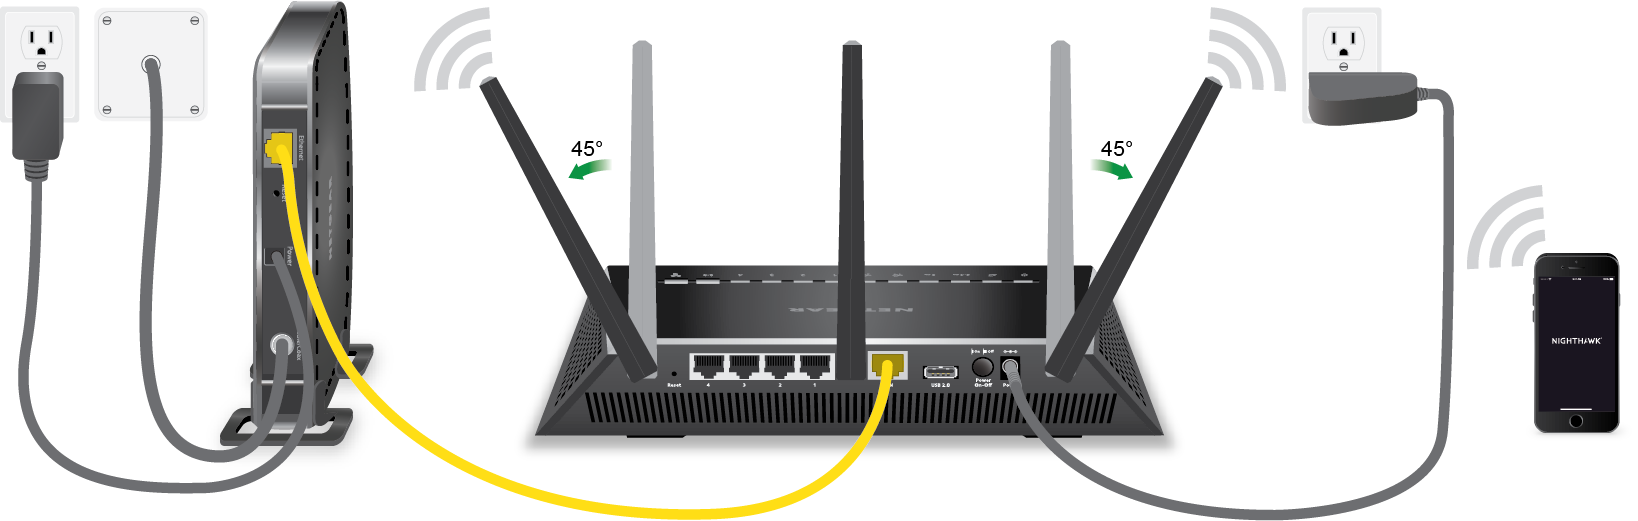
- Power Off Your Modem: Before making any connections, it’s a good practice to power off your existing modem. Unplug its power adapter. This prevents any potential electrical surges during the connection process.
- Connect Modem to Router: Take the included Ethernet cable. Plug one end into the LAN port on your modem. This port is usually labeled “LAN,” “Ethernet,” or has a network icon. Then, plug the other end of the Ethernet cable into the dedicated Internet or WAN port on your Netgear Nighthawk router. This port is typically a different color (often blue or yellow) and is clearly marked to distinguish it from the LAN ports.
- Power On Your Router: Now, plug the power adapter into the Nighthawk router and then into a power outlet. The router will begin to power up.
- Power On Your Modem: After a minute or two, power on your modem again by plugging in its power adapter. Allow the modem a few minutes to fully boot up and re-establish its internet connection. You should see stable lights indicating a successful connection.
- Router Boot-Up: Your Nighthawk router will also go through its own boot-up sequence. This can take a few minutes. Look for the power light to become solid, indicating it’s ready.
Initial Configuration: Accessing the Setup Interface
With the hardware connected, the next crucial step is to configure your router’s settings. Netgear provides user-friendly methods for this.
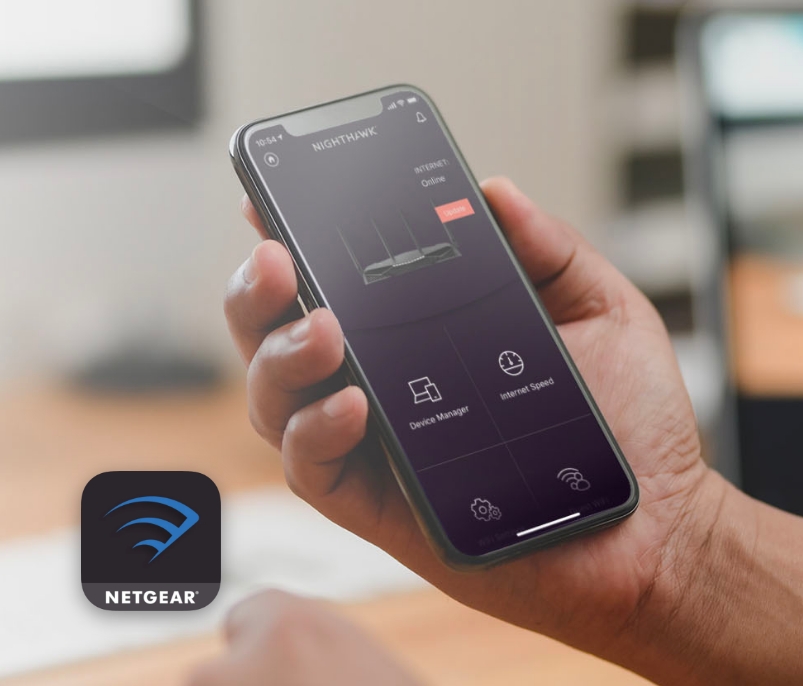
- Using the Nighthawk App: For a streamlined experience, download the Netgear Nighthawk app from your smartphone’s app store (iOS or Android). Open the app and follow the on-screen instructions. The app will guide you through connecting to the router’s temporary Wi-Fi network, detecting the router, and setting up your new network name (SSID) and password. This is often the quickest and most intuitive method, especially for less technical users.
- Using a Web Browser: Alternatively, you can use a web browser on a computer connected to the Nighthawk router via an Ethernet cable.
- Open a web browser (like Chrome, Firefox, Safari, or Edge).
- In the address bar, type
routerlogin.netor192.168.1.1and press Enter. - You will be prompted to log in. The default username is usually
adminand the default password ispassword. (It’s highly recommended to change these immediately for security). - The router’s web interface will guide you through a setup wizard. This wizard will help you set up your Wi-Fi network name (SSID) and password, and may also prompt you to update the router’s firmware.
Setting Up Your Wi-Fi Network: Naming and Securing Your Connection
This is where you personalize your network and ensure its security.
- Choosing a Network Name (SSID): Select a network name that is easy to identify but not overly personal for privacy reasons.
- Creating a Strong Password: This is paramount for digital security. Use a combination of uppercase and lowercase letters, numbers, and symbols. Avoid easily guessable information like your name, address, or birthday. A strong password will prevent unauthorized access to your network, protecting your data and online activities.
- Firmware Updates: During the setup process, you will likely be prompted to check for and install firmware updates. Do not skip this step. Firmware is the software that runs your router. Updates often include security patches, performance improvements, and new features. Keeping your firmware up-to-date is critical for maintaining a secure and efficient network.
Advanced Configuration and Troubleshooting: Maximizing Your Nighthawk’s Potential
Once your Nighthawk is up and running, you can explore its advanced features to further optimize your network. This section also covers common issues and how to resolve them.
Exploring Nighthawk Features for Enhanced Performance
Your Nighthawk router is packed with advanced features designed to give you greater control and better performance.
- Guest Network: This feature allows you to create a separate Wi-Fi network for visitors. It provides them with internet access without giving them access to your main network and connected devices, enhancing your privacy and security.
- Quality of Service (QoS): QoS settings allow you to prioritize certain types of internet traffic. For example, you can give priority to streaming services or online gaming to ensure a smooth, lag-free experience, even when other devices are consuming bandwidth.
- Parental Controls: If you have children, parental controls allow you to manage internet access for specific devices. You can set schedules, block certain websites, and limit screen time.
- Port Forwarding: For advanced users, port forwarding allows you to direct incoming internet traffic to specific devices on your network, which can be necessary for certain online games or applications.
- VPN Support: Many Nighthawk routers offer built-in VPN client support, allowing you to connect your entire network to a VPN service for enhanced privacy and security.
Troubleshooting Common Installation Issues
Even with the best routers, occasional hiccups can occur. Here are some common issues and their solutions:
- No Internet Connection:
- Check Cables: Ensure all Ethernet cables are securely plugged in at both ends.
- Modem Status: Verify that your modem has a stable internet connection (solid lights).
- Reboot Devices: Power cycle both your modem and router. Unplug them, wait 30 seconds, and plug them back in, starting with the modem.
- ISP Issue: Contact your ISP to confirm there are no outages in your area.
- Slow Wi-Fi Speeds:
- Router Placement: Re-evaluate your router’s location; try a more central and elevated spot.
- Interference: Move the router away from other electronic devices.
- Firmware Update: Ensure your router’s firmware is up to date.
- Too Many Devices: If you have many devices connected, consider upgrading your internet plan or router.
- Check Speed Test: Run an internet speed test directly connected to the router via Ethernet to rule out Wi-Fi issues.
- Unable to Access Router Login Page:
- Correct IP Address/URL: Double-check that you are using the correct IP address (
192.168.1.1orrouterlogin.net). - Wired Connection: Ensure your computer is connected to the router via an Ethernet cable.
- Reset Router: As a last resort, you may need to perform a factory reset on the router (refer to your router’s manual for specific instructions, usually involving pressing a small reset button for an extended period). This will revert all settings to their default, requiring you to reconfigure everything.
- Correct IP Address/URL: Double-check that you are using the correct IP address (
By following these steps and understanding the capabilities of your Netgear Nighthawk, you can establish a robust, secure, and high-performing network that will serve as the foundation for all your digital endeavors. Enjoy the enhanced connectivity and peace of mind that comes with a properly installed and configured Nighthawk router.
aViewFromTheCave is a participant in the Amazon Services LLC Associates Program, an affiliate advertising program designed to provide a means for sites to earn advertising fees by advertising and linking to Amazon.com. Amazon, the Amazon logo, AmazonSupply, and the AmazonSupply logo are trademarks of Amazon.com, Inc. or its affiliates. As an Amazon Associate we earn affiliate commissions from qualifying purchases.