
In the fast-paced digital world, where visual communication reigns supreme, typography plays a pivotal role in shaping brand identity, enhancing user experience, and conveying messages effectively. For designers, marketers, content creators, or even enthusiastic hobbyists, accumulating a diverse font library is not just a preference but often a necessity. From elegant serifs for corporate branding to playful sans-serifs for a vibrant social media campaign, the right font can transform a project. However, the process of installing numerous fonts one by one can be incredibly tedious, time-consuming, and counterproductive.
This guide is tailored for professionals and enthusiasts alike who seek to optimize their digital workflow. We delve into the most efficient strategies and tools to install multiple fonts simultaneously across various operating systems, saving you precious time and streamlining your creative process. Whether you’re refreshing a corporate identity (Brand), building a robust design toolkit (Tech), or managing assets for an online income stream (Money), mastering batch font installation is a crucial skill. We’ll explore methods for Windows, macOS, and Linux, discuss the advantages of dedicated font management software, and offer best practices to keep your font library organized and accessible.
The Easiest Ways to Batch Install Fonts Across Operating Systems
The fundamental principle behind installing multiple fonts at once involves leveraging your operating system’s capabilities to recognize and process a group of font files rather than individual ones. This section breaks down the most straightforward methods for Windows, macOS, and Linux users, ensuring that no matter your platform, you can quickly expand your typographic horizons.
For Windows Users: Streamlining Your Font Library
Windows offers several intuitive ways to install multiple fonts, primarily through its built-in font management features. These methods are generally efficient and don’t require any third-party software, making them ideal for quick bulk installations.
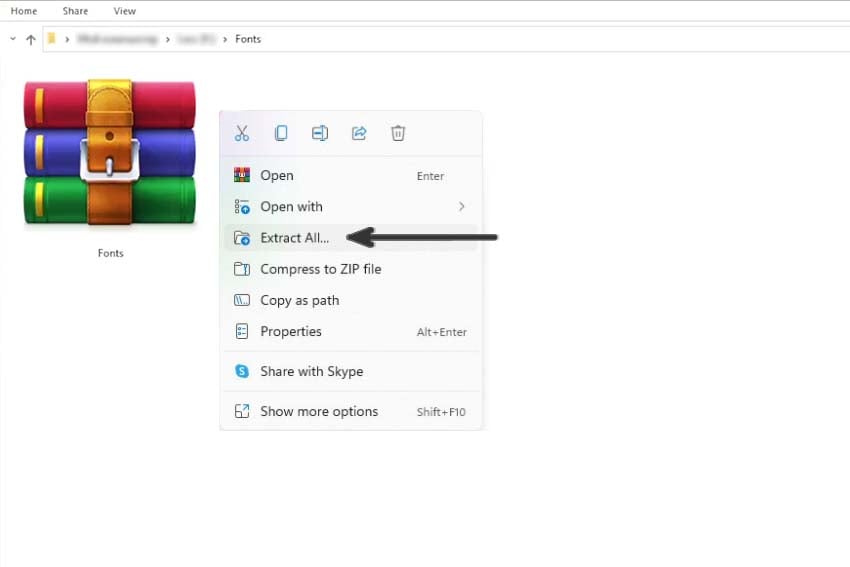
The most common and user-friendly method involves the “Install” context menu option. First, locate your downloaded font files. These are typically in .ttf (TrueType Font), .otf (OpenType Font), or occasionally .ttc (TrueType Collection) formats. If they are compressed in a .zip or .rar archive, you’ll need to extract them first. You can often right-click the compressed folder and select “Extract All” to unpack its contents into a new folder.
Once extracted, navigate to the folder containing your desired font files. Here’s how to proceed:
- Select Multiple Fonts: Click on the first font file you wish to install. Then, hold down the
Ctrlkey (orCmdon a Mac keyboard being used on Windows) and click on each additional font file you want to install. To select all fonts in a folder, simply pressCtrl + A. - Initiate Installation: With all the desired font files selected, right-click on any one of the highlighted files. From the context menu that appears, select “Install” or “Install for all users.” Choosing “Install for all users” is generally recommended as it makes the fonts available to all user accounts on that computer, ensuring consistency across different profiles and software installations.
- Confirm and Complete: Windows will then display a small dialog box, briefly showing the progress of each font as it’s installed. If any fonts are already installed, Windows will usually prompt you to replace them; you can choose to skip or replace as needed. Once the process is complete, the fonts should be immediately available in most applications without requiring a system restart.
Another method, which provides a bit more visual feedback, involves the Windows Font Settings:
- Open Font Settings: Press
Windows Key + Ito open Settings, then navigate to “Personalization” > “Fonts.” Alternatively, you can search for “Fonts” in the Windows search bar. - Drag and Drop: With the Fonts settings window open, locate your extracted font files in File Explorer. Select all the fonts you wish to install (using
Ctrl + Aor individual selections as described above) and then drag them directly into the “Drag and drop to install fonts” area within the Fonts settings window. - Monitor Installation: Windows will automatically detect and install the fonts, displaying their names as they are added to your system. This method is particularly satisfying for its visual simplicity and direct interaction.
These methods are efficient for designers working on multiple projects, ensuring new client requirements for specific branding fonts (Brand) can be met rapidly, boosting productivity (Tech) and allowing more time for creative work.
For macOS Users: Effortless Font Management
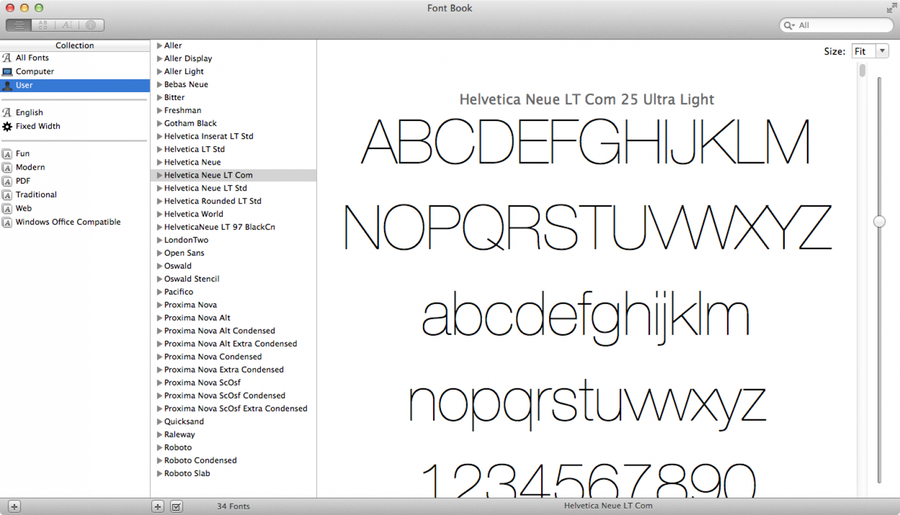
macOS offers a sophisticated and user-friendly built-in application called “Font Book,” which not only facilitates batch installation but also provides robust management features. Font Book is your central hub for activating, deactivating, previewing, and validating fonts.
To install multiple fonts on macOS:
- Locate Font Files: As with Windows, ensure your font files (typically
.ttf,.otf,.ttc, or.dfont) are extracted from any archives. Place them in a temporary folder for easy access. - Open Font Book: You can find Font Book in your Applications folder (Finder > Applications > Font Book) or by searching for it using Spotlight (
Cmd + Spacebarand type “Font Book”). - Add Fonts to Font Book:
- Drag and Drop: The simplest method is to select all the font files you want to install from your Finder window and drag them directly into the Font Book application window, specifically onto the “All Fonts” or “User” collection in the sidebar.
- “Add Fonts” Command: Alternatively, with Font Book open, go to
File > Add Fonts...(or pressCmd + Shift + F). A Finder window will open, allowing you to navigate to your folder of font files. Select all the fonts you wish to install (useCmd + Ato select all, orCmd + clickfor individual selections) and then click “Open.”
- Validate and Install: Font Book will then perform a validation check on the fonts to ensure they are not corrupted or duplicate. If any issues are found, it will prompt you. You can choose to install checked fonts or troubleshoot problematic ones. Once validated, confirm the installation.
- Availability: The newly installed fonts will become available across most macOS applications, including Adobe Creative Suite, Apple Pages, Microsoft Office, and other design and productivity tools.
Font Book also allows you to organize fonts into collections, which is invaluable for managing large libraries, especially when working on various branding projects (Brand) that require distinct font sets. This enhances productivity (Tech) significantly by reducing search time.
For Linux Users: Customizing Your Desktop Environment
Linux, with its diverse distributions and desktop environments, provides flexibility in font installation, though it often involves a slightly more manual approach or command-line interaction for batch processing.
The general principle on Linux is to place font files in specific directories where the system or user applications can find them.
- Locate and Extract Fonts: Ensure your
.ttfor.otffont files are extracted and ready. - User-Specific Installation (Recommended for most users):
- Create a
.fontsdirectory in your home folder if it doesn’t already exist. Open your file manager (e.g., Nautilus for GNOME, Dolphin for KDE), navigate to your home directory (~), and enable “Show Hidden Files” (oftenCtrl + H). Then, create a new folder named.fonts. - Copy and paste all your desired font files into this
.fontsdirectory.
- Create a
- System-Wide Installation (For all users – requires root privileges):
- To make fonts available to all users on the system, you’ll need to copy them to a system-wide font directory, typically
/usr/local/share/fonts/or/usr/share/fonts/. - Open a terminal and use the
sudo cpcommand. For example, if your fonts are in a folder namednew_fontsin your Downloads:
bash

sudo cp ~/Downloads/new_fonts/*.ttf /usr/local/share/fonts/

sudo cp ~/Downloads/new_fonts/*.otf /usr/local/share/fonts/
- It’s a good practice to create a sub-directory for new fonts within
/usr/local/share/fonts/(e.g.,sudo mkdir /usr/local/share/fonts/my_new_fonts) to keep things organized.
- To make fonts available to all users on the system, you’ll need to copy them to a system-wide font directory, typically
- Update Font Cache: After copying fonts, you must update the font cache so that applications recognize them. Open a terminal and run:
bash

fc-cache -f -v
This command rebuilds the font information cache, making the new fonts available. - Desktop Environment Specific Tools: Some Linux desktop environments offer graphical font managers (e.g., GNOME Fonts application). These can often simplify the process with a drag-and-drop interface, similar to macOS Font Book. Check your specific distribution’s documentation for details.
Efficient font installation on Linux empowers developers and content creators to quickly customize their development environments and create professional-looking documents or presentations, crucial for both personal productivity (Tech) and client-facing work (Brand).
Advanced Font Management Tools and Strategies
While operating system utilities are great for basic batch installations, dedicated font management software offers a higher level of control, organization, and efficiency, especially for professionals dealing with extensive font libraries or complex branding requirements. These tools go beyond simple installation, providing features for activation, deactivation, previewing, and even conflict resolution.
Leveraging Dedicated Font Managers (Third-Party Software)
Dedicated font managers are invaluable for designers, agencies, and anyone whose workflow depends heavily on typography. They streamline the entire font lifecycle, from discovery and installation to organization and usage.
Key benefits of using a dedicated font manager include:
- Centralized Library: A single place to store, organize, and access all your fonts, regardless of where they were originally installed.
- On-Demand Activation/Deactivation: Instead of permanently installing all fonts, you can activate them only when needed for specific projects. This prevents system slowdowns caused by a massive active font library and avoids font conflicts.
- Advanced Previewing: Tools often provide rich previewing capabilities, allowing you to see how fonts look with custom text, in different sizes, and against various backgrounds, making selection much easier.
- Conflict Resolution: They can identify duplicate fonts or corrupted files, helping you maintain a clean and efficient library.
- Cloud Synchronization: Many offer cloud capabilities, ensuring your font library is consistent across multiple devices or team members, vital for corporate identity (Brand) consistency.
Popular examples of dedicated font managers include:
- FontBase: A free, cross-platform (Windows, macOS, Linux) font manager that offers a clean interface, auto-activation for design applications, and robust organizational features. Its user-friendly design makes it an excellent choice for individuals and small teams.
- NexusFont (Windows): A free, portable font manager for Windows that excels at organization, previewing, and activation/deactivation without installing fonts to the system folder.
- RightFont (macOS, Windows): A premium font manager designed for creative professionals, offering extensive cloud sync (Google Drive, Dropbox), Adobe Creative Cloud integration, and advanced organizational tools.
- Suitcase Fusion/Connect Fonts (macOS, Windows): A robust, enterprise-grade solution often used by larger design studios, offering extensive font management, auto-activation, and shared font libraries for teams.
These tools significantly enhance productivity (Tech) by transforming font management from a chore into a seamless part of the design workflow. For businesses and freelancers, this efficiency translates directly into more billable hours or quicker project turnaround, directly impacting the “Money” aspect through increased earnings.
Cloud-Based Font Services and Ecosystems
Beyond local font managers, cloud-based font services have revolutionized how designers access and utilize fonts, especially for those immersed in creative ecosystems. These services often provide access to vast libraries of licensed fonts, which can be synced and used directly within design applications.
- Adobe Creative Cloud (Adobe Fonts): For subscribers to Adobe Creative Cloud, Adobe Fonts (formerly Typekit) is a game-changer. It offers access to thousands of high-quality fonts that can be activated directly within the Creative Cloud desktop app. Once activated, these fonts are available in all Adobe applications (Photoshop, Illustrator, InDesign, etc.) and often in other system applications. The key benefit here is that you don’t “install” them in the traditional sense; you simply activate them, and Adobe handles the licensing and synchronization. This ensures brand consistency across all Adobe projects (Brand) and eliminates the hassle of manual installation.
- Google Fonts: While not a “manager” in the same vein as Adobe Fonts, Google Fonts provides a vast, free, and open-source library of web fonts. You can browse and select collections, then download them as
.zipfiles. Once downloaded, you can use the batch installation methods discussed earlier (Windows, macOS, Linux) to install these collections locally. Google Fonts are not only excellent for web development but also for print and graphic design, offering a cost-effective way to build a diverse font library.
These cloud-based solutions represent a significant leap in digital asset management (Tech), providing a flexible and often collaborative approach to typography. They help businesses maintain brand guidelines effortlessly and allow individuals to explore a wider range of styles without significant upfront investment.
Best Practices and Troubleshooting Tips
Efficient font management extends beyond just installation; it encompasses organization, maintenance, and problem-solving. A well-managed font library can be a huge asset, while a chaotic one can lead to frustration and lost productivity.
Organizing Your Font Collection for Efficiency
A structured approach to your font library will save you countless hours in the long run.
- Categorize and Folderize: Group fonts by type (serif, sans-serif, script, display), project, or client. For example, create folders like “Client A Fonts,” “Brand Guidelines Fonts,” “Web Fonts,” “Handwriting Fonts,” etc.
- Consistent Naming Conventions: Rename font files if necessary to ensure clarity. For instance,
MyriadPro-Regular.ttfis clearer thanMP-R.ttf. - Backup Your Fonts: Fonts are digital assets. Regularly back up your entire font collection to a cloud service (e.g., Google Drive, Dropbox) or an external hard drive. This is crucial for disaster recovery and ensuring business continuity (Money, Tech).
- Archive Unused Fonts: If you have fonts you rarely use, consider archiving them to a separate storage location or deactivating them with a font manager. This keeps your active library lean and prevents system slowdowns.
- Delete Duplicates: Duplicates can cause conflicts and clutter. Use font managers or dedicated tools to scan and remove redundant font files.
Good organization practices are directly linked to productivity (Tech). A well-organized designer can find the right font for a marketing campaign (Brand) much faster, improving turnaround times and potentially increasing income (Money).
Common Issues and Quick Fixes
Even with the best practices, you might encounter issues with fonts. Here are some common problems and their solutions:
- Fonts Not Showing Up in Applications:
- Restart the Application: Most applications load fonts at startup. If you installed fonts while an app was open, close and reopen it.
- Restart Your System: For system-wide issues, a full reboot can often resolve caching problems, especially on Linux after
fc-cache. - Clear Font Cache: Operating systems maintain a font cache. On Windows, you might need to clear the font cache (search for “Font cache” online for specific steps). On macOS, using Font Book’s “Validate Fonts” often helps, or you can use third-party cache cleaners.
- Corrupt Font Files: If a font causes application crashes or displays incorrectly, it might be corrupt. Delete it and download a fresh copy from a reliable source. Font managers often identify corrupt files during validation.
- Font Conflicts: Two fonts with the same internal name but different actual files can cause issues. Dedicated font managers are excellent at identifying and resolving these conflicts by allowing you to choose which version to activate.
- Slow System Performance: An excessively large number of active fonts can sometimes impact system performance, especially on older hardware. Use a font manager to activate only the fonts you need for current projects.
- Licensing Concerns: Always be mindful of font licensing. Many free fonts are for personal use only, while commercial projects require specific licenses. Ensure you have the proper licenses for all fonts used in your client work or commercial projects to avoid legal issues. This is particularly important when building a professional brand or generating online income (Brand, Money).
Addressing these issues promptly ensures a smooth workflow, preventing costly delays and maintaining the professional integrity of your design work.
Why Efficient Font Management Matters for Your Brand and Productivity
Beyond the technical steps of installation, understanding the broader implications of efficient font management is key to unlocking its full value. It’s not just about getting fonts onto your system; it’s about optimizing your creative output, strengthening your brand, and ultimately, impacting your bottom line.
Elevating Your Design Workflow and Brand Identity
Typography is a cornerstone of effective visual communication. It influences readability, sets the tone, and establishes a critical part of your brand’s personality. Efficient font management directly contributes to:
- Consistent Brand Identity (Brand): By having easy access to your brand’s specific fonts, you ensure visual consistency across all touchpoints – websites, marketing materials, presentations, and social media. This reinforces brand recognition and professionalism.
- Accelerated Design Workflow (Tech): Time is money. Spending less time searching for, installing, or troubleshooting fonts means more time dedicated to actual design, creativity, and project execution. This efficiency is a massive productivity booster for designers, marketers, and content creators.
- Enhanced Creative Freedom: A well-organized and accessible font library empowers you to experiment with different typographic pairings and styles, pushing creative boundaries without the friction of a disorganized system. This leads to more innovative and impactful designs.
- Professional Output: The right typography elevates the perceived quality of any project. From pitch decks to product packaging, carefully managed fonts contribute to a polished and professional end product that stands out in a competitive market.
For any business or individual striving to build a strong presence, the power of typography, when coupled with efficient management, is indispensable. It’s an investment in your brand’s future.

Impact on Digital Projects and Online Presence (Tech & Money Link)
In the digital age, your online presence is often the first impression you make. Effective font management has tangible benefits for digital projects and can even contribute to your financial success.
- Faster Project Delivery: Whether you’re a web developer, a UI/UX designer, or a social media manager, quickly accessing and implementing fonts reduces project timelines. Faster delivery can mean meeting tight deadlines, pleasing clients, and taking on more projects, which directly impacts your earning potential (Money).
- Improved User Experience: On websites and applications, carefully chosen and consistently applied fonts improve readability and navigation, leading to a better user experience. A positive user experience translates to longer engagement, lower bounce rates, and higher conversion rates – all critical for online businesses and digital marketing (Tech, Money).
- Monetizing Design Skills (Money): For freelancers and those with side hustles in graphic design, web design, or content creation, a vast and efficiently managed font library is a core asset. It enables you to cater to a wider range of client demands, produce high-quality work efficiently, and ultimately, command better rates and secure more projects. The time saved through batch installation and good management is directly convertible into more billable hours or more creative output for your own ventures.
- Future-Proofing Your Assets (Tech, Money): By organizing and backing up your font collection, you protect valuable digital assets. This ensures that past projects can be revisited and updated with ease, and your design resources are always available, providing long-term value and preventing costly re-acquisition or recreation of assets.
In conclusion, knowing how to install multiple fonts at once is more than just a technical trick; it’s a strategic move towards a more productive, professional, and profitable digital life. By embracing the tools and techniques outlined in this guide, you can transform your font management process, giving you more time to create, innovate, and build a powerful visual identity for yourself or your brand. The synergy of efficient technology, thoughtful branding, and smart financial practices makes mastering font installation an indispensable skill in today’s digital economy.
aViewFromTheCave is a participant in the Amazon Services LLC Associates Program, an affiliate advertising program designed to provide a means for sites to earn advertising fees by advertising and linking to Amazon.com. Amazon, the Amazon logo, AmazonSupply, and the AmazonSupply logo are trademarks of Amazon.com, Inc. or its affiliates. As an Amazon Associate we earn affiliate commissions from qualifying purchases.