
In the intricate world of personal computers, the motherboard stands as the central nervous system, connecting all the vital components and facilitating their communication. Just as a human body needs its nerves to function flawlessly, a motherboard requires a set of specialized software, known as drivers, to interact effectively with the operating system and the hardware it controls. For anyone looking to build a new PC, upgrade existing hardware, or troubleshoot performance issues, understanding how to install motherboard drivers is an essential skill. This guide will walk you through the process, ensuring your system operates at its peak.
Why Motherboard Drivers Are Crucial
Before diving into the installation process, it’s important to grasp why these drivers are so vital. Motherboard drivers are small pieces of software that act as translators. They bridge the gap between the operating system (like Windows or Linux) and the specific hardware components integrated onto your motherboard. Without the correct drivers, these components might not be recognized by the OS, or they might function with limited capabilities or even cause system instability.
Think of it this way: your operating system speaks a general language, while your motherboard’s components have their own specific dialects. Drivers are the interpreters that allow them to communicate effectively. These drivers are responsible for managing everything from your audio output and network connectivity to your USB ports and chipset functionality. Installing them correctly ensures that:
- Full Hardware Functionality: All the features and capabilities of your motherboard’s onboard devices are unlocked and accessible.
- System Stability: Properly functioning drivers prevent crashes, blue screens of death (BSODs), and other frustrating system errors.
- Optimal Performance: Drivers are often optimized for specific hardware, allowing your components to perform at their best, leading to faster boot times, smoother multitasking, and improved gaming or application performance.
- Security Updates: Driver updates can sometimes include important security patches, protecting your system from potential vulnerabilities.
Given the significant impact of these drivers, keeping them up-to-date and correctly installed is a fundamental aspect of PC maintenance and performance optimization, directly aligning with our focus on Tech and ensuring your digital infrastructure is robust.
Locating Your Motherboard Drivers
The first step in installing any driver is identifying the correct one for your specific motherboard model. This might seem straightforward, but it’s where many users encounter difficulties. There are several reliable methods to pinpoint the exact drivers you need.
Identifying Your Motherboard Model
If you’ve just built your PC or are unsure about your motherboard’s exact model, don’t worry. You can find this information through a few easy steps:
- Visual Inspection: The most direct method is to physically inspect your motherboard. The model name and manufacturer are usually printed in large, clear lettering on the PCB (Printed Circuit Board) itself. Look around the CPU socket, RAM slots, or PCIe slots. This is particularly useful if you have physical access to your PC.
- System Information Tools (Windows):
- DirectX Diagnostic Tool: Press
Windows Key + R, typedxdiag, and press Enter. The “System” tab will display your “Main Board” or “Motherboard” product name. - System Information App: Press
Windows Key + R, typemsinfo32, and press Enter. Navigate to “System Summary.” The “BaseBoard Manufacturer” and “BaseBoard Product” fields will show your motherboard’s details. - Command Prompt/PowerShell: Open Command Prompt or PowerShell as an administrator. Type
wmic baseboard get product,Manufacturer,version,serialnumberand press Enter. This command will directly output your motherboard’s manufacturer and product name.
- DirectX Diagnostic Tool: Press
- Third-Party Software: Utilities like CPU-Z are excellent for hardware identification. Download and run CPU-Z; it has dedicated tabs that clearly display your motherboard’s manufacturer and model.
Once you have your motherboard’s exact model number (e.g., ASUS ROG Strix B550-F Gaming, Gigabyte Z690 AORUS Elite AX), you’re ready to find the drivers.
Finding the Manufacturer’s Website
The safest and most reliable place to download motherboard drivers is directly from the manufacturer’s official website. Avoid third-party driver download sites, as they can sometimes bundle unwanted software or even malware.
Navigate to the support or downloads section of your motherboard manufacturer’s website (e.g., ASUS, Gigabyte, MSI, ASRock, EVGA). Use their search function or browse their product lists to find the specific page for your motherboard model.
Downloading the Correct Drivers
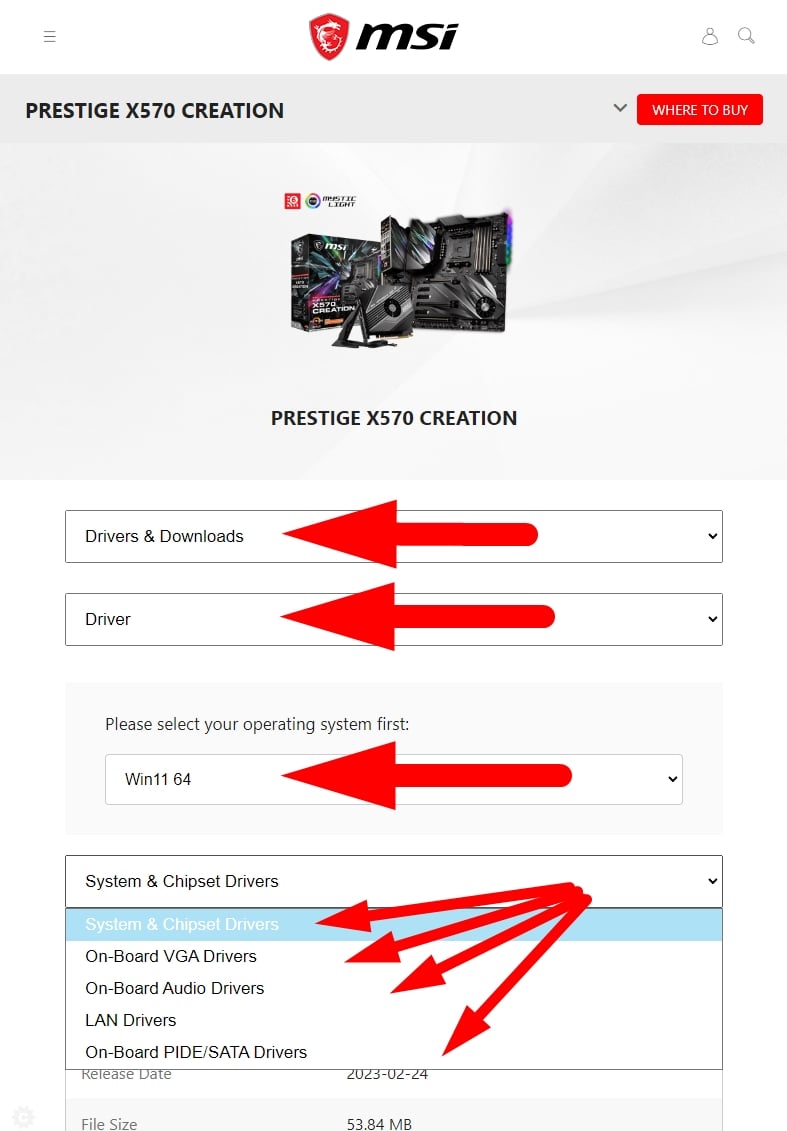
On your motherboard’s support page, you’ll typically find a list of available drivers categorized by function (e.g., Chipset, Audio, LAN, Wi-Fi, Bluetooth, SATA, USB). You’ll also need to select your operating system (e.g., Windows 10 64-bit, Windows 11).
Key Drivers to Prioritize:
- Chipset Drivers: These are arguably the most important. They govern the communication between your CPU and other motherboard components. Always install these first.
- LAN/Network Drivers: Essential for internet connectivity. Without this, you won’t be able to download other drivers easily if you’re performing a fresh OS install.
- Audio Drivers: To get sound from your speakers or headphones.
- Graphics Drivers (if onboard): If your CPU has integrated graphics, you’ll need these drivers. (Note: If you have a dedicated graphics card, you’ll download its drivers separately from NVIDIA, AMD, or Intel’s website).
- USB Drivers: To ensure all USB ports function correctly and at their optimal speed.
- SATA/Storage Drivers: Important for the proper functioning of your hard drives and SSDs.
- Wi-Fi/Bluetooth Drivers: If your motherboard has wireless capabilities.
Download the latest stable versions of these drivers. Sometimes, manufacturers offer a “driver utility” or “auto-detect” tool. While convenient, manually selecting and downloading individual drivers is often preferred for greater control and to ensure you’re only installing what you need.
Installing Motherboard Drivers: Step-by-Step Guide
With the necessary drivers downloaded, the installation process itself is generally straightforward. The order of installation can sometimes matter, especially for chipset drivers.
The Recommended Installation Order
While most modern operating systems are quite adept at recognizing hardware, following a specific order can prevent potential conflicts and ensure optimal system recognition.
- Chipset Drivers: Always install the chipset drivers first. These are fundamental to your motherboard’s operation and provide the framework for other devices.
- Storage Controller Drivers (SATA/AHCI/RAID): If your OS didn’t automatically detect your storage controllers, or if you’re looking for specific performance optimizations, install these next. This is especially relevant if you’re installing an OS onto an NVMe SSD.
- Network Drivers (LAN and Wi-Fi): Get your internet connection working as soon as possible. This allows you to download any remaining drivers or updates directly from the internet if you missed any.
- Audio Drivers: To restore sound capabilities.
- USB Drivers: To ensure all your USB ports are functioning correctly.
- Other Drivers: Install drivers for graphics (if integrated), Bluetooth, and any other specific onboard devices as needed.
Installation Methods
Most driver packages are provided as executable files (.exe). Double-clicking these files will launch an installation wizard.
- Run the Installer: Locate the downloaded driver file and double-click it.
- Follow the On-Screen Prompts: The installer will guide you through the process. This usually involves accepting license agreements, choosing an installation location (default is generally fine), and clicking “Next” or “Install.”
- Restart Your Computer: Most driver installations require a system restart to take full effect. It’s crucial to perform this restart to ensure the drivers are loaded correctly at system startup.
Important Considerations:
- Administrator Privileges: Ensure you are logged in as an administrator or have administrator privileges to install drivers.
- Disconnect from the Internet (Optional but Recommended): For a clean installation, especially when first installing an operating system, it’s often a good idea to disconnect from the internet before installing the LAN/Wi-Fi drivers. This prevents Windows from automatically trying to install its own generic drivers, which might not be as optimized. Once you’ve installed the manufacturer’s network drivers, you can reconnect.
- Driver Cleanup: If you encounter issues, sometimes old drivers can cause conflicts. Tools like Display Driver Uninstaller (DDU) are excellent for thoroughly removing old graphics drivers, but for motherboard drivers, a clean OS install is often the most definitive solution if problems persist.
Using Device Manager for Driver Management
Windows’ Device Manager is a powerful tool for managing drivers. You can use it to check if drivers are installed correctly, update them, or even uninstall them if necessary.
- Open Device Manager: Press
Windows Key + Xand select “Device Manager” from the menu. - Check for Devices with Exclamation Marks: Any device with a yellow exclamation mark next to it indicates a problem with its driver.
- Update Driver: Right-click on a device and select “Update driver.” You can choose to “Search automatically for drivers” (which may find newer ones online or on your system) or “Browse my computer for drivers” if you have downloaded the driver files manually and know their location.
- Uninstall Device: If you suspect a driver is causing issues, you can right-click on the device and select “Uninstall device.” Be sure to check the box to “Delete the driver software for this device” if available, and then restart your computer. Windows will often attempt to reinstall a generic driver upon reboot, or you can then manually install the correct driver you downloaded.
Advanced Considerations and Troubleshooting
While installing motherboard drivers is usually a smooth process, occasional hiccups can occur. Understanding common issues and their solutions can save you a lot of frustration.
When to Update Drivers
Not all drivers need to be updated constantly. However, there are specific scenarios where updating is highly recommended:
- New Operating System Installation: Always install the latest drivers for your motherboard when setting up a new OS.
- System Instability: If you’re experiencing crashes, freezes, or hardware malfunctions, outdated or corrupted drivers are often the culprit.
- Performance Issues: Sometimes, driver updates bring performance enhancements for your hardware.
- New Hardware Compatibility: If you’re adding new hardware that interfaces with your motherboard (e.g., a new PCIe card), you might need updated motherboard drivers for compatibility.
- Security Vulnerabilities: Manufacturers occasionally release drivers with security patches.
Troubleshooting Common Driver Issues
- “Driver Not Found” or “Device Not Recognized”: This usually means the incorrect driver was downloaded, or the driver files are corrupted. Re-download the drivers from the official manufacturer’s website, ensuring you select the correct model and operating system.
- Installation Fails: Ensure you have administrator privileges. Sometimes, antivirus software can interfere with driver installations; try temporarily disabling it (and remembering to re-enable it afterward).
- System Crashes After Installation: This could indicate a driver conflict. Try uninstalling the recently installed driver via Device Manager and rebooting. If the problem resolves, you might need to find an older, stable version of the driver or wait for a newer update.
- No Audio/Network After Update: This is a clear sign that the driver isn’t compatible or didn’t install correctly. Uninstall the problematic driver, reboot, and reinstall the correct version.
The Role of BIOS/UEFI Updates
While not strictly drivers, BIOS (Basic Input/Output System) or UEFI (Unified Extensible Firmware Interface) updates are firmware updates for your motherboard that are critical for hardware compatibility and stability. These are usually found in the same support section of the manufacturer’s website.
Caution: BIOS/UEFI updates are more advanced and carry a higher risk if done incorrectly. Always follow the manufacturer’s instructions precisely, ensure a stable power supply, and never interrupt the update process. A failed BIOS update can render your motherboard unusable.
Keeping Your System Optimized
Maintaining up-to-date motherboard drivers is a fundamental practice for anyone who values a stable, performant, and secure computing experience. It’s an investment of a small amount of time that pays significant dividends in the long run. By understanding where to find your drivers, the correct installation order, and how to troubleshoot common issues, you empower yourself to keep your PC running smoothly, just as a well-maintained engine ensures a car’s optimal performance. This proactive approach aligns perfectly with the principles of good Tech management and can indirectly impact your Money by extending hardware lifespan and preventing costly repair or replacement.
aViewFromTheCave is a participant in the Amazon Services LLC Associates Program, an affiliate advertising program designed to provide a means for sites to earn advertising fees by advertising and linking to Amazon.com. Amazon, the Amazon logo, AmazonSupply, and the AmazonSupply logo are trademarks of Amazon.com, Inc. or its affiliates. As an Amazon Associate we earn affiliate commissions from qualifying purchases.