
In the rapidly evolving landscape of digital technology, the demand for computing power continually escalates. Laptops, once considered secondary to desktops in terms of upgradeability, have become versatile workhorses for professionals, students, and casual users alike. However, even the most capable machines can begin to feel sluggish over time, struggling under the weight of modern applications and demanding multitasking. Often, the bottleneck isn’t the processor or storage, but insufficient Random Access Memory (RAM). Installing more memory is one of the most impactful and cost-effective upgrades you can make to breathe new life into an aging laptop or enhance the performance of a relatively new one. This comprehensive guide will walk you through the process, ensuring you have the knowledge and confidence to undertake this essential tech upgrade.
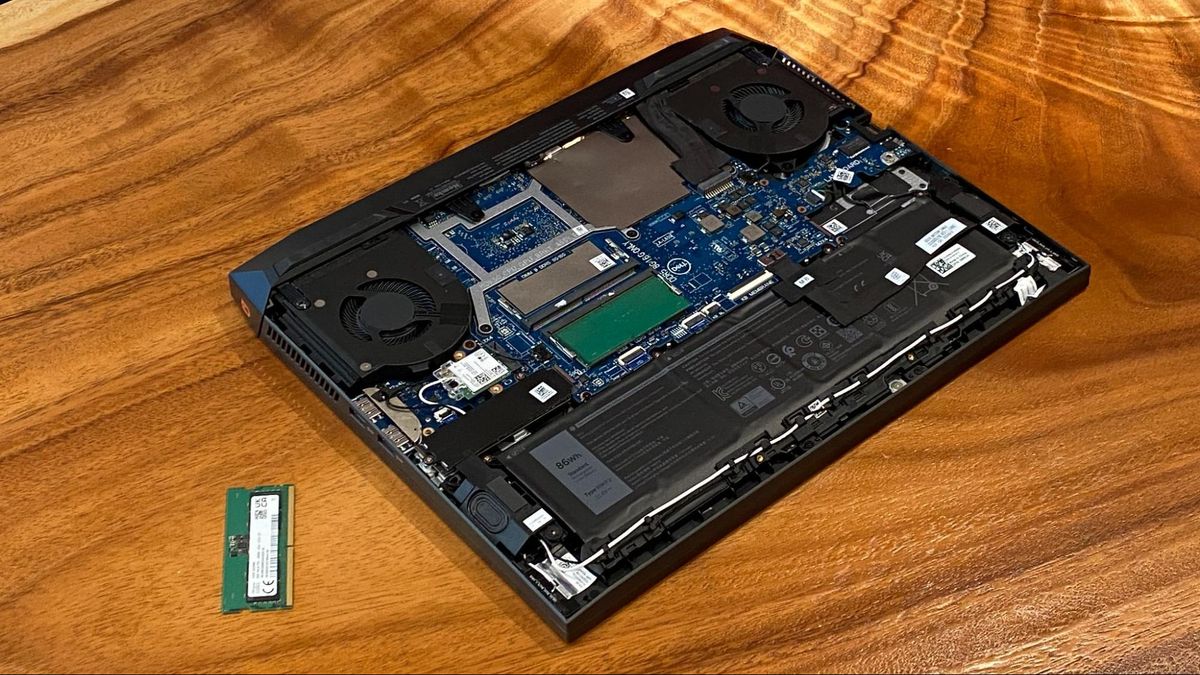
Understanding Laptop Memory (RAM)
Before diving into the mechanics of installation, it’s crucial to understand what RAM is, its role in your laptop’s performance, and how to identify the right type for your system. This foundational knowledge will empower you to make informed decisions throughout the upgrade process.
What is RAM and Why is it Important?
RAM, or Random Access Memory, is your computer’s short-term memory. Unlike permanent storage (like an SSD or HDD) that holds files and programs indefinitely, RAM stores data that your computer is actively using or will need to access quickly. When you open an application, load a webpage, or work on a document, that data is temporarily moved into RAM, allowing the CPU to access it almost instantaneously. The more RAM you have, the more applications you can run simultaneously and the larger the data sets your computer can handle without slowing down. Insufficient RAM forces your system to constantly swap data between the slower permanent storage and the CPU, leading to noticeable slowdowns, stuttering, and reduced responsiveness.
Signs You Need More RAM
Identifying the need for a RAM upgrade is often straightforward. Common indicators include:
-
Frequent Freezes and Crashes: Your laptop might randomly freeze or applications might crash, especially when multiple programs are open.
-
Slow Application Loading: Programs take an unusually long time to launch or switch between.
-
Multitasking Struggles: Switching between browser tabs, editing a document while streaming video, or running virtual machines becomes a frustratingly slow experience.
-
Disk Activity Spikes: Even when idle, your hard drive or SSD indicator light might be constantly flickering, indicating that the system is heavily relying on “virtual memory” (using storage as a substitute for RAM).
-
Error Messages: Specific warnings about low memory might appear, urging you to close applications.
If you consistently experience these issues, a RAM upgrade is likely to be a highly effective solution.
Types of RAM
Laptop RAM typically comes in a smaller form factor called SO-DIMM (Small Outline Dual In-line Memory Module). Beyond the physical size, the most critical distinction lies in the generation:
-
DDR3 (Double Data Rate 3): An older standard, still found in laptops manufactured before 2014-2015.
-
DDR4 (Double Data Rate 4): The prevalent standard for most laptops manufactured in the last several years. It offers higher speeds and lower power consumption than DDR3.
-
DDR5 (Double Data Rate 5): The newest standard, offering significantly higher speeds and efficiency. Found in the latest generation of laptops.
Each generation is physically incompatible with the others due to different pin configurations. Therefore, correctly identifying your laptop’s RAM type is paramount. Additionally, RAM modules have a speed rating (e.g., 2400MHz, 3200MHz), which should ideally match or exceed the speed of your existing RAM and be supported by your laptop’s motherboard.
Pre-Installation: Essential Preparations and Compatibility Checks
A successful RAM upgrade hinges on meticulous preparation. Rushing this stage can lead to purchasing incompatible parts or damaging your system. This section guides you through the critical steps before you even touch a screwdriver.
Determine Your Laptop’s Current RAM Configuration
The first step is to ascertain what kind of RAM your laptop currently has and how many slots are available.
-
Windows: Press
Ctrl + Shift + Escto open Task Manager. Go to the “Performance” tab, then click “Memory.” Here, you’ll see your current RAM capacity, speed, and how many slots are used. For more detailed information, open “System Information” (typemsinfo32in the Start search) and look under “System Summary” > “Memory.” -
Third-Party Tools: Software like CPU-Z provides exhaustive details about your RAM, including type (DDR3/DDR4/DDR5), size, speed, and even the manufacturer and part number. It can also tell you about your motherboard’s capabilities.
-
Physical Inspection (Advanced): If you’re comfortable opening your laptop, you can physically inspect the existing RAM modules. The sticker on the module will typically state its type (e.g., PC3 for DDR3, PC4 for DDR4), capacity, and speed.
Identify Maximum Supported RAM and Slot Availability
Knowing your current setup is good, but you also need to know your laptop’s upgrade potential.
-
Manufacturer Specifications: The most reliable source is your laptop’s manufacturer website. Search for your specific model number, and look for “specifications” or “memory upgrade” information. This will tell you the maximum RAM capacity your laptop supports and the number of RAM slots it has (e.g., 2 slots, max 32GB).
-
Online Resources: Websites like Crucial.com offer memory scanners that analyze your system and recommend compatible upgrades. While generally reliable, always cross-reference with manufacturer specs.
-
User Manual: If you still have it, your laptop’s user manual is an excellent source for upgrade information.
Understanding the number of slots is critical. Some laptops have one slot, others two, and some may even have RAM soldered directly to the motherboard with one additional upgrade slot. If you only have one slot and it’s already occupied, you’ll need to replace the existing module. If you have two slots and one is empty, you can add a new module.
Choosing the Right RAM
With your laptop’s specifications in hand, you can confidently select the new RAM.
-
Type: Must match your laptop’s existing RAM (DDR3, DDR4, or DDR5). You cannot mix generations.
-
Capacity: Determine how much RAM you want to add. If you have two slots and want 16GB total, you could go with two 8GB modules or replace an existing 4GB with a 16GB module, depending on your current setup.
-
Speed (MHz): Ideally, match the speed (e.g., 3200MHz) of your existing RAM. If you install a faster module, it will likely downclock to match the slowest module or the maximum speed supported by your motherboard. Installing a slower module can force all RAM to operate at the slower speed.
-
Latency (CL): While less critical for most users, lower CAS Latency (CL) numbers generally indicate better performance. Matching CL to existing RAM is recommended but not always essential.
-
Brand: While many brands offer reliable RAM, sticking to reputable manufacturers (e.g., Crucial, Kingston, Corsair, Samsung, Hynix) is a good practice.
-
Single vs. Dual Channel: If you have two RAM slots, installing two identical modules (same capacity, speed, and ideally brand/model) allows them to run in “dual-channel” mode, which can provide a significant performance boost.
Gathering Your Tools
Preparation also includes having the right tools on hand:
-
Small Phillips-head Screwdriver: Essential for opening the laptop’s back panel.
-
Anti-static Wrist Strap: Highly recommended to prevent electrostatic discharge (ESD) from damaging sensitive components. If unavailable, frequently touch a grounded metal object before handling RAM.
-
Plastic Pry Tool (Spudger): Useful for gently separating plastic clips or panels without scratching the laptop.
-
Clean, Well-lit Work Surface: A clear, non-carpeted area helps prevent static and keeps small screws from getting lost.
-
Container for Screws: A small dish or magnetic mat will keep screws organized.
Backing Up Data
While a RAM upgrade is generally low-risk to your data, it’s always good practice to back up important files before any hardware modification. This safeguards against unforeseen issues, though data loss due to a RAM upgrade is extremely rare.
The Installation Process: A Step-by-Step Guide
With preparations complete, you’re ready to physically install the new memory. Take your time, follow each step carefully, and don’t force anything.

Power Down and Disconnect
Safety is paramount.
-
Shut Down Completely: Do not just close the lid or put it to sleep. Perform a full shutdown.
-
Disconnect Power: Unplug the AC adapter.
-
Remove Battery (If Removable): For older laptops with external, removable batteries, take it out. For most modern laptops with internal batteries, you’ll need to disconnect the battery connector inside the laptop, which will be covered in the next step.
-
Discharge Static Electricity: Wear your anti-static wrist strap, or firmly touch a grounded metal object (like a bare metal pipe or the unpainted metal part of a power outlet cover) for a few seconds.
Accessing the RAM Slots
This step varies most by laptop model.
-
Locate Access Panel/Screws: Most laptops have a removable back panel. Look for screws on the bottom of your laptop. Some might be hidden under rubber feet or stickers.
-
Remove Screws: Carefully unscrew all visible screws. Keep them organized, as some might be different lengths.
-
Gently Pry Open: Using your plastic pry tool, carefully work your way around the edges of the back panel, gently releasing clips until it comes off. Some laptops might require more force or specific opening techniques. Consult your laptop’s service manual or an online video tutorial for your specific model if unsure.
-
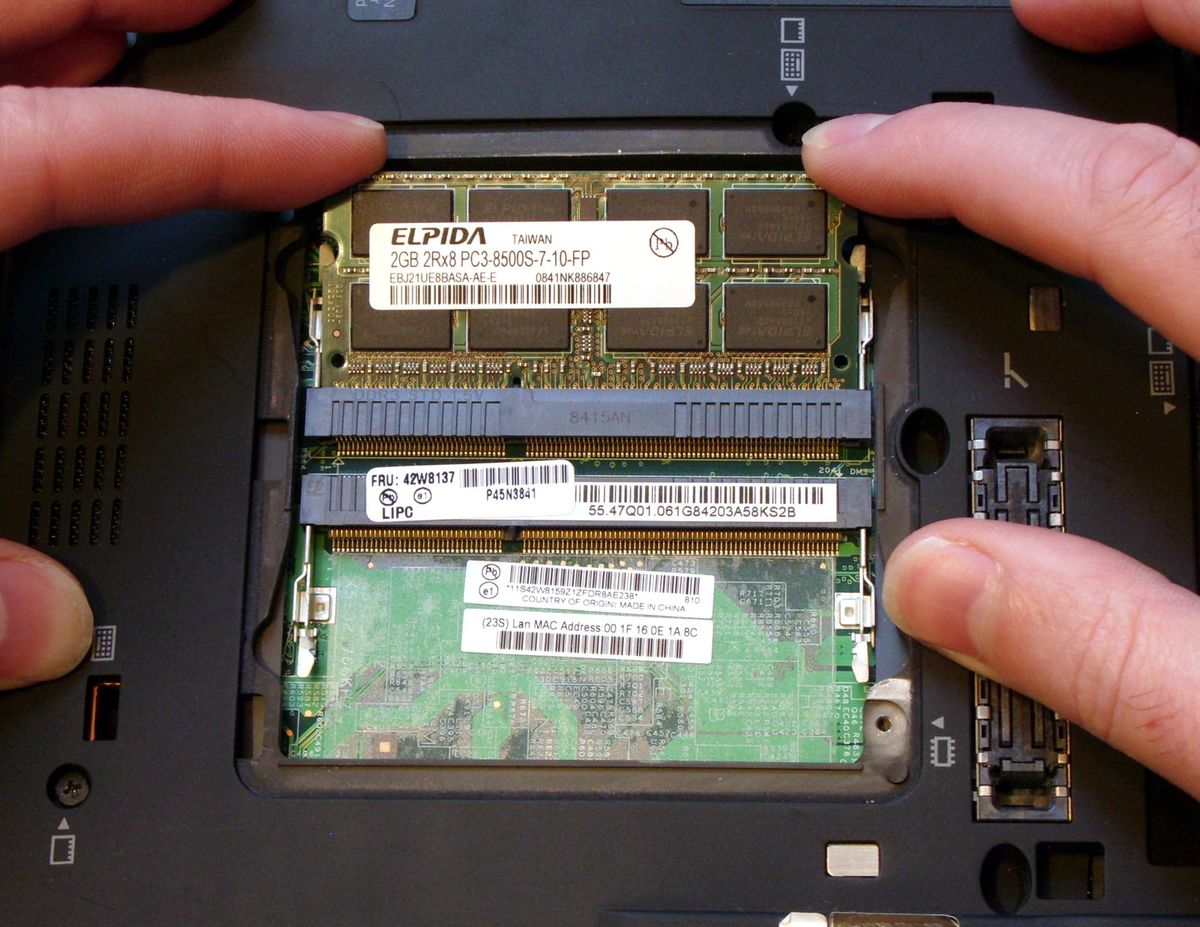
Locate RAM Slots: Once the back panel is off, identify the RAM slots. They typically look like small horizontal sockets with metal clips on either side, often covered by a black sticker.
-
Disconnect Internal Battery (Crucial): For laptops with internal batteries, you must locate and carefully disconnect the battery connector from the motherboard before proceeding. This completely de-energizes the system and prevents accidental shorts.
Removing Old RAM (If Applicable)
If you’re replacing existing RAM modules:
-
Release Clips: Gently push outward on the two metal clips on either side of the RAM module. The module should pop up at an angle.
-
Slide Out: Once angled, gently slide the module straight out of the slot.
-
Store Safely: Place the old RAM in an anti-static bag or a safe, clean place.
Installing New RAM
This is the core step.
-
Align the Notch: Carefully align the notch on the new RAM module with the corresponding notch in the RAM slot. This ensures it’s inserted in the correct orientation.
-
Insert at Angle: With the notch aligned, gently slide the RAM module into the slot at a 45-degree angle.
-
Press Down Firmly: Once fully seated in the angled position, gently but firmly push down on both sides of the module until the metal clips snap into place, securing the RAM flat and horizontally. You should hear a soft click.
-
Verify Seating: Double-check that both clips are fully engaged and the module is level. Do not force it. If it doesn’t go in easily, recheck the alignment and try again.
Reassembling Your Laptop
Once the new RAM is installed:
-
Reconnect Internal Battery: If you disconnected the internal battery, carefully reconnect its cable to the motherboard.
-
Replace Back Panel: Align the back panel and gently press it into place, ensuring all clips snap back securely.
-
Replace Screws: Screw all the screws back in their original positions.
Post-Installation: Verification and Troubleshooting
The physical installation is done, but the job isn’t complete until you’ve verified everything is working correctly.
Booting Up and Verifying New RAM
-
Power On: Plug in your AC adapter and power on your laptop. The first boot after a RAM upgrade might take slightly longer than usual as the system initializes the new memory. Don’t panic if it takes an extra minute or two.
-
Check System Information: Once booted into Windows (or your OS), verify the new RAM.
-
Windows: Open Task Manager (
Ctrl + Shift + Esc), go to the “Performance” tab, and click “Memory.” The displayed RAM capacity should now reflect your new total. You can also check “System Information” (msinfo32) under “Installed Physical Memory (RAM)”. -
Mac/Linux: Similar system information utilities will display the updated RAM.
-
-
Run Basic Applications: Open a few demanding applications or browser tabs to see if the performance improvements are noticeable.
Common Troubleshooting Tips
If your laptop doesn’t boot, experiences issues, or doesn’t recognize the new RAM:
-
No Boot/Black Screen:
-
Reseat RAM: The most common issue. Power down, disconnect the battery, open the laptop, and carefully remove and reinsert the RAM modules, ensuring they are firmly seated and clips are engaged.
-
Check Battery Connection: Ensure the internal battery connector is securely attached.
-
Try Old RAM: If issues persist, reinstall your old RAM to confirm the laptop still boots. If it does, the new RAM might be faulty or incompatible.
-
-
RAM Not Recognized/Incorrect Capacity:
-
Check Seating: Again, reseating is key. Even a slightly unseated module won’t be detected.
-
Confirm Compatibility: Double-check that the new RAM is the correct type (DDR3/DDR4/DDR5) and speed for your laptop.
-
Test Modules Individually: If you installed two new modules, try booting with just one at a time to identify a potentially faulty module.
-
BIOS/UEFI Update: In rare cases, an outdated BIOS/UEFI might not fully support newer, higher-capacity RAM modules. Check your manufacturer’s website for updates.
-
Performance Testing
After successful installation and verification, you can run some benchmarks or simply use your laptop as usual to appreciate the improvements. You should notice snappier multitasking, faster application launches, and an overall smoother computing experience.
Maximizing Your New RAM’s Potential
While new RAM provides a significant boost, a few additional practices can help you get the most out of your upgraded system.
Optimizing Software Usage
Even with abundant RAM, judicious software management can further enhance performance.
-
Close Unnecessary Programs: Don’t let dozens of background applications consume resources if you’re not actively using them.
-
Manage Startup Programs: Prevent non-essential applications from launching automatically with your system via Task Manager (Windows) or System Preferences (macOS).
-
Browser Tab Management: Modern web browsers are notorious RAM hogs. Consider extensions that suspend inactive tabs or simply close tabs you don’t need.
Maintaining System Health
Regular maintenance ensures your laptop runs efficiently and that your new RAM is always put to good use.
-
Keep OS and Drivers Updated: Operating system updates often include performance enhancements and bug fixes. Driver updates, especially for chipsets, can optimize hardware interaction.
-
Regular Malware Scans: Malicious software can consume significant system resources, including RAM.
-
Disk Cleanup: While RAM isn’t storage, a cluttered hard drive can impact overall system responsiveness, especially if your system is relying on virtual memory.
By following these steps, you will not only successfully upgrade your laptop’s memory but also ensure that your system is optimized to leverage this newfound power, resulting in a significantly enhanced and more enjoyable computing experience. This hands-on hardware upgrade is a testament to the fact that with a little knowledge and patience, you can dramatically improve your tech, extending its lifespan and boosting its capabilities.
aViewFromTheCave is a participant in the Amazon Services LLC Associates Program, an affiliate advertising program designed to provide a means for sites to earn advertising fees by advertising and linking to Amazon.com. Amazon, the Amazon logo, AmazonSupply, and the AmazonSupply logo are trademarks of Amazon.com, Inc. or its affiliates. As an Amazon Associate we earn affiliate commissions from qualifying purchases.