
In the ever-evolving landscape of technology, keeping your operating system up-to-date or performing a fresh installation is a common necessity. For Apple users, the ability to install macOS from a USB drive offers a flexible and often faster alternative to traditional methods. Whether you’re troubleshooting issues, upgrading to the latest version, or setting up a new Mac, a bootable macOS USB installer can be an invaluable tool. This guide will walk you through the entire process, from gathering your materials to booting from your newly created USB.
This process might seem daunting at first, but it’s a surprisingly straightforward and remarkably useful skill to have in your tech arsenal. It empowers you to take control of your macOS installation experience, offering a level of convenience and adaptability that directly impacts your productivity and digital security. Understanding how to create and utilize a bootable USB installer is not just about performing an operating system installation; it’s about gaining a deeper understanding of your Mac’s fundamental architecture and becoming a more resourceful technology user.

Why Install macOS from a USB Drive?
The advantages of installing macOS from a USB drive are numerous and cater to a variety of user needs. One of the primary reasons is speed and efficiency. Downloading the macOS installer directly from Apple’s servers and then initiating the installation can be a time-consuming process, especially if your internet connection is not consistently fast. Creating a bootable USB allows you to download the installer once and then use that same installer to set up multiple Macs, or to reinstall macOS on your current machine without relying on a constant internet connection during the installation itself. This is particularly beneficial in situations where internet access is limited or unstable.
Beyond speed, a bootable USB installer is crucial for troubleshooting and recovery. If your Mac is experiencing severe software issues, such as startup problems, persistent glitches, or a corrupted operating system, you might not be able to boot into macOS normally. In such scenarios, a bootable USB drive serves as a lifeline, allowing you to boot your Mac into a recovery environment and then reinstall macOS from scratch, effectively wiping the slate clean and resolving deep-seated problems. This is a fundamental aspect of digital security, ensuring you can recover your system in adverse situations.
Another significant benefit lies in performing clean installations. While macOS upgrades can often be installed over an existing system, a clean installation involves completely erasing your hard drive and then installing a fresh copy of macOS. This process can significantly improve performance, resolve lingering software conflicts, and remove accumulated digital clutter that may have accumulated over time. A bootable USB is the most efficient way to achieve this, as it provides a dedicated environment to format your drive and install the operating system without interference from your current installation.
Furthermore, a bootable USB is invaluable for deploying macOS on multiple machines. For businesses or individuals managing several Macs, creating a single bootable USB installer can streamline the setup process considerably. Instead of downloading and installing macOS on each machine individually, you can simply boot from the USB and repeat the installation for each device. This not only saves time but also ensures consistency in the software environment across all your Macs.
Finally, having a bootable USB installer is a proactive measure for future-proofing your setup. As Apple periodically releases new versions of macOS, you might want to prepare for these updates. Creating a bootable installer for a specific version allows you to have a reliable installation medium ready for when you decide to upgrade, or if you ever need to revert to a previous version. This level of control over your software installation process is a cornerstone of efficient technology management.
Preparing Your Tools for a Bootable macOS USB
Before you can embark on the journey of creating a bootable macOS USB installer, it’s essential to gather the necessary tools and ensure you have everything in place. This preparatory phase is critical for a smooth and successful installation process.
What You’ll Need
The primary components you’ll require are straightforward:
- A USB Flash Drive: The capacity of your USB drive is important. For most recent macOS versions, a 16GB or larger USB flash drive is recommended. Older versions might suffice with 8GB, but it’s always better to err on the side of caution with a larger drive to ensure compatibility and accommodate future macOS releases. Ensure the USB drive is in good working condition, as it will be formatted during the process.
- An Internet Connection: You’ll need a stable internet connection to download the macOS installer application from the Mac App Store.
- A Mac Computer: The process of creating the bootable USB must be performed on a Mac. This Mac will be used to download the macOS installer and to create the bootable drive itself.
- macOS Installer Application: This is the core component. You’ll download the full macOS installer from the Mac App Store. It’s important to download the desired version of macOS (e.g., Monterey, Ventura, Sonoma). The installer application typically resides in your Applications folder after the download is complete.
Downloading the macOS Installer
The first step in creating your bootable USB is to download the macOS installer application. This is done directly through the Mac App Store.
- Open the Mac App Store: Launch the App Store application on your Mac.
- Search for the macOS Version: In the search bar, type the name of the macOS version you wish to install (e.g., “macOS Sonoma,” “macOS Ventura”).
- Initiate the Download: Click on the desired macOS version and then click the “Get” or “Download” button. The installer will begin downloading to your Applications folder.
- Do Not Install: Once the download is complete, the installer will likely launch automatically, prompting you to begin the installation. Crucially, do not proceed with the installation. Instead, quit the installer application by going to the menu bar and selecting “Quit Install [macOS Name]” (or Command+Q). The downloaded installer application needs to remain in your Applications folder for the next step.
The installer application can be quite large, so ensure you have ample free space on your Mac’s hard drive. The download time will vary depending on your internet speed.
Creating the Bootable macOS USB Installer
With the macOS installer downloaded and your USB drive ready, you can now proceed to create the bootable USB drive. This process involves using the createinstallmedia command in the Terminal application. This command is a powerful built-in macOS utility designed specifically for this purpose.
Using the Terminal Command
The Terminal is a command-line interface that allows you to interact with your Mac in a more direct way. While it might appear intimidating to some, the process for creating a bootable USB is well-defined and relatively simple to follow.
-
Connect Your USB Drive: Plug your prepared USB flash drive into an available USB port on your Mac.
-
Format the USB Drive (Optional but Recommended): While the
createinstallmediacommand will format the drive, it’s good practice to ensure it’s formatted correctly beforehand.- Open Disk Utility (Applications > Utilities > Disk Utility).
- Select your USB drive from the sidebar on the left.
- Click Erase.
- For Format, choose Mac OS Extended (Journaled).
- For Scheme, choose GUID Partition Map.
- Give your USB drive a name. A simple name like “MyVolume” is fine, but you’ll need to remember it for the Terminal command.
- Click Erase and then Done.
-
Open Terminal: Navigate to Applications > Utilities > Terminal.
-
Execute the
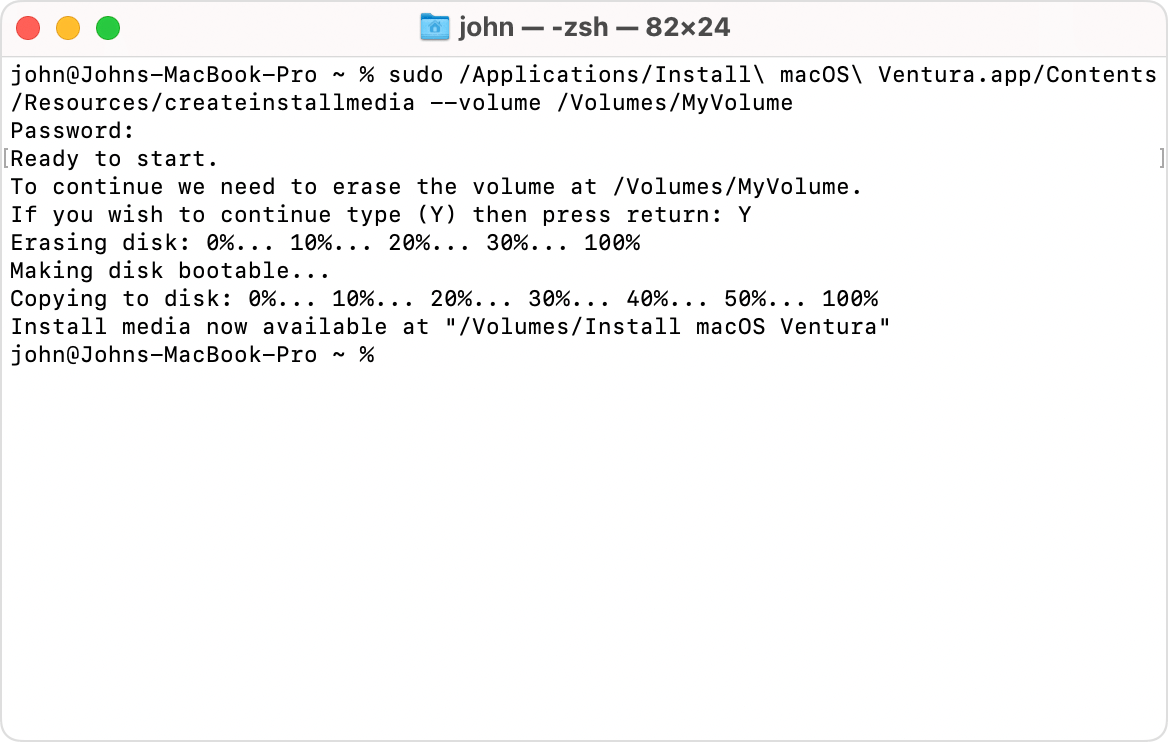
createinstallmediaCommand: This is the core of the process. The command structure varies slightly depending on the macOS version you’re creating an installer for. You’ll need to replaceMyVolumewith the actual name you gave your USB drive during formatting (or its default name if you skipped formatting).For macOS Sonoma:
```bash
sudo /Applications/Install macOS Sonoma.app/Contents/Resources/createinstallmedia --volume /Volumes/MyVolume
```

**For macOS Ventura:**

```bash
sudo /Applications/Install macOS Ventura.app/Contents/Resources/createinstallmedia --volume /Volumes/MyVolume
```

**For macOS Monterey:**

```bash
sudo /Applications/Install macOS Monterey.app/Contents/Resources/createinstallmedia --volume /Volumes/MyVolume
```

**For macOS Big Sur:**

```bash
sudo /Applications/Install macOS Big Sur.app/Contents/Resources/createinstallmedia --volume /Volumes/MyVolume
```

**For macOS Catalina:**

```bash
sudo /Applications/Install macOS Catalina.app/Contents/Resources/createinstallmedia --volume /Volumes/MyVolume
```

**For macOS Mojave:**

```bash
sudo /Applications/Install macOS Mojave.app/Contents/Resources/createinstallmedia --volume /Volumes/MyVolume
```

**Explanation of the Command:**
*   `sudo`: This command allows you to run another command with administrative privileges, which is necessary for modifying system files and drives. You'll be prompted for your Mac's administrator password.
*   `/Applications/Install macOS [Version].app/Contents/Resources/createinstallmedia`: This is the path to the `createinstallmedia` tool within the downloaded macOS installer application. The backslash `` is used to escape spaces in the file and folder names.
*   `--volume /Volumes/MyVolume`: This option specifies the target volume (your USB drive) where the installer will be created.
- Enter Your Password: After pressing Enter, you’ll be prompted to enter your Mac’s administrator password. Type it in (you won’t see any characters appear, which is normal for security reasons) and press Enter.
- Confirm Formatting: Terminal will then ask for confirmation to erase the disk. Type
Yand press Enter. - Wait for the Process to Complete: Terminal will now erase the USB drive and then copy the installer files. This process can take a significant amount of time, often 20-30 minutes or even longer, depending on the size of the installer and the speed of your USB drive and Mac. You’ll see progress updates in Terminal, such as “Erasing disk,” “Copying installer files to disk,” and finally, “Install media now available at ‘/Volumes/Install macOS [Version]’.”
- Eject the USB Drive: Once Terminal indicates that the process is complete, you can safely eject your bootable macOS USB drive.
Booting from the USB Installer and Installing macOS
With your bootable macOS USB drive successfully created, you’re ready to use it to install or reinstall macOS on your Mac. This involves booting your Mac from the USB drive, which initiates the macOS installer.
Starting Up from the USB Drive
The method for booting from a USB drive depends on the type of Mac you have: an Apple Silicon Mac (M1, M2, M3 series chips) or an Intel-based Mac.
For Apple Silicon Macs (M1, M2, M3 series):
- Shut Down Your Mac: Ensure your Mac is completely powered off.
- Connect the USB Installer: Plug the bootable macOS USB drive into your Mac.
- Press and Hold the Power Button: Press and hold the power button until you see “Loading startup options.”
- Select the USB Installer: You will see a list of startup disks. Select the USB installer (it will likely be named “Install macOS [Version]”).
- Click Continue: Click “Continue” to boot from the USB drive.
For Intel-based Macs:
- Shut Down Your Mac: Ensure your Mac is completely powered off.
- Connect the USB Installer: Plug the bootable macOS USB drive into your Mac.
- Turn On Your Mac and Press and Hold Option (Alt) Key: As soon as you turn on your Mac, immediately press and hold the Option (Alt) key on your keyboard.
- Release the Key When Startup Manager Appears: Keep holding the Option key until you see the Startup Manager, which displays icons for available bootable volumes.
- Select the USB Installer: Use your mouse or arrow keys to select the USB installer (it will likely be named “Install macOS [Version]”).
- Press Enter or Click the Arrow: Press Enter or click the arrow below the icon to boot from the USB drive.
Installing macOS
Once your Mac has booted from the USB installer, you will see the macOS Utilities window. This is where you can choose to install macOS, restore from a Time Machine backup, or use Disk Utility to erase or partition your drive.
- Choose “Install macOS”: Select the option to “Install macOS [Version]” and click “Continue.”
- Follow the On-Screen Prompts: The macOS installer will guide you through the installation process.
- Language Selection: You’ll be asked to choose your preferred language.
- Disk Selection: This is a crucial step. You’ll be presented with a list of available drives.
- For a clean installation: It is highly recommended to erase your Mac’s internal drive first. To do this, select Disk Utility from the macOS Utilities window, then select your internal Mac drive (usually named “Macintosh HD” or similar), click Erase, and follow the prompts to format it as APFS (Apple File System) with a GUID Partition Map. After erasing, return to the macOS Utilities window and proceed with installation.
- For an upgrade or reinstallation over an existing system: Select your internal Mac drive and click “Continue.”
- License Agreement: Read and agree to the software license agreement.
- Installation Process: The installer will then begin copying files and installing macOS. This will take some time, and your Mac will restart multiple times during the process.
- Setup Assistant: After the installation is complete, your Mac will restart into the Setup Assistant. Follow the on-screen instructions to set up your user account, Wi-Fi connection, and other preferences, just as you would with a new Mac.
By following these steps, you can effectively and efficiently install macOS from a USB drive, gaining flexibility and control over your operating system management. This skill is not only practical for troubleshooting and upgrades but also enhances your overall proficiency in managing your Apple technology.
aViewFromTheCave is a participant in the Amazon Services LLC Associates Program, an affiliate advertising program designed to provide a means for sites to earn advertising fees by advertising and linking to Amazon.com. Amazon, the Amazon logo, AmazonSupply, and the AmazonSupply logo are trademarks of Amazon.com, Inc. or its affiliates. As an Amazon Associate we earn affiliate commissions from qualifying purchases.