In the world of Apple computing, the stability and fluidity of macOS are legendary. However, there are moments when a simple software update isn’t enough. Whether you are looking to perform a clean sweep of your system to regain lost performance, upgrading a hard drive, or managing a fleet of Macs in a professional environment, knowing how to install macOS from a USB drive is an essential skill.
This technical guide provides a comprehensive, step-by-step walkthrough of the entire process, from preparing your hardware to navigating the final setup screens. By utilizing a bootable installer, you gain independence from internet-based recovery tools, which can often be slow or unreliable in low-bandwidth situations.

1. Preparation and Prerequisites: Setting the Stage for Success
Before diving into Terminal commands and disk formatting, you must ensure you have the right tools and that your data is protected. A “clean install” involves wiping your primary drive, meaning everything currently on your Mac will be deleted.
Choosing the Right Hardware
The first requirement is a high-quality USB flash drive or external SSD. While Apple suggests a minimum of 14GB of available space, it is highly recommended to use at least a 32GB drive. The speed of the drive matters significantly; using a USB 3.0 or USB-C drive will cut the installation time down from hours to minutes compared to older USB 2.0 technology.
Backing Up Your Data
It cannot be stressed enough: back up your data. Since the goal of a USB installation is often a “clean install,” you will likely be erasing your internal storage. Use Time Machine to create a full system snapshot or manually copy your essential documents, photos, and databases to an external cloud service or separate hardware.
Verifying System Compatibility
Before downloading a specific version of macOS (such as Sonoma, Ventura, or Monterey), verify that your hardware supports it. Apple’s official support pages provide compatibility lists for every major release. Attempting to install an unsupported OS version can lead to kernel panics or a “Prohibitory” symbol (a circle with a line through it) during the boot process.
2. Downloading the macOS Installer and Formatting the USB
Once your hardware is ready, the next step is to acquire the macOS installation files directly from Apple. It is vital to use official sources to ensure the integrity and security of the operating system.
Downloading from the Mac App Store
The most reliable way to get the installer is through the Mac App Store. Search for the version of macOS you desire and click “Get.” This will trigger the “Software Update” pane in System Settings. Once the download completes, the installer will likely open automatically. Do not click “Continue” or “Install.” Instead, quit the installer from the menu bar (Command + Q). The installer file must remain in your /Applications folder for the Terminal command to find it.
Formatting the Drive with Disk Utility
For the USB drive to become a bootable volume, it must be formatted correctly.
- Connect your USB drive to your Mac.
- Open Disk Utility (found in Applications > Utilities).
- Select View > Show All Devices to ensure you are selecting the root drive, not just a partition.
- Select your USB drive and click Erase.
- Name the drive something simple, like “MyVolume” (you will use this name in the Terminal command later).
- Set the Format to Mac OS Extended (Journaled) and the Scheme to GUID Partition Map.
- Click Erase and wait for the process to finish.
3. Creating the Bootable Installer via Terminal
This is the most technical part of the process. Apple includes a built-in tool within the macOS installer package called createinstallmedia. We will use the Terminal to trigger this tool, which turns your standard USB drive into a bootable recovery environment.
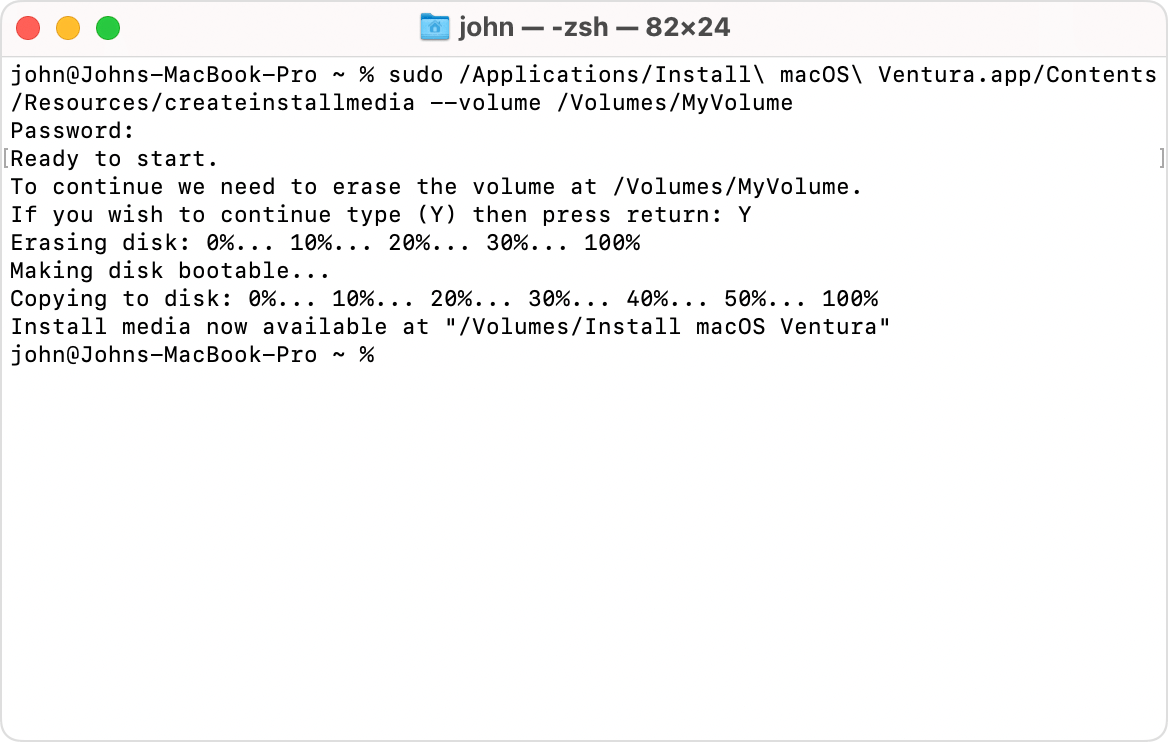
The ‘createinstallmedia’ Command Structure
The Terminal command varies slightly depending on which version of macOS you are installing. The general syntax looks like this:
sudo /Applications/Install macOS [VersionName].app/Contents/Resources/createinstallmedia --volume /Volumes/MyVolume
Step-by-Step Execution
- Open Terminal (Applications > Utilities).
- Type the command relevant to your OS version. If you are installing macOS Sonoma, for example, the command is:
sudo /Applications/Install macOS Sonoma.app/Contents/Resources/createinstallmedia --volume /Volumes/MyVolume - Press Return.
- Enter your administrator password when prompted. Note that Terminal does not show characters as you type your password.
- When prompted to confirm the erasure of the USB drive, type
Yand press Return. - Terminal will now begin “making disk bootable” and copying the installer files. This process can take anywhere from 10 to 30 minutes depending on your drive speed.
- Once you see “Install media now available,” you can safely eject the drive or proceed to the installation.
4. Booting from the USB and Performing the Installation
With your bootable USB ready, it is time to use it. The method for booting from an external drive has changed significantly with the transition from Intel-based Macs to Apple Silicon (M1, M2, M3 chips).
Understanding Intel vs. Apple Silicon Boot Procedures
- For Apple Silicon Macs: Shut down your Mac completely. Press and hold the Power button until you see “Loading startup options.” Select the USB installer from the list and click “Continue.”
- For Intel-based Macs: Shut down your Mac. Press the Power button and immediately press and hold the Option (Alt) key. Release it when you see the bootable volumes. Select the USB installer and press the upward arrow.
Note for T2 Chip Macs (Intel Macs from 2018-2020): You may need to enter macOS Recovery (Command + R at boot) and use the “Startup Security Utility” to allow booting from external media.
Navigating the Recovery Menu
Once the installer boots, you will be presented with the macOS Recovery window. You have two main paths:
- Upgrade: Simply select “Install macOS” to install the OS over your current files.
- Clean Install: This is the preferred method for performance. Select Disk Utility, choose your internal drive (usually named “Macintosh HD”), and click Erase. Format it as APFS. Close Disk Utility when finished.
The Installation Process
After preparing the internal drive, select “Install macOS [Version Name]” from the main menu. Follow the on-screen prompts, agree to the terms and conditions, and select your internal drive as the destination. Your Mac will restart several times during this process. Do not unplug the USB drive or close the lid until the “Hello” setup screen appears.
5. Post-Installation: Configuration and Troubleshooting
After the installation completes, you will be greeted by the Setup Assistant. This is where you configure your region, Wi-Fi, Apple ID, and Privacy settings.
Optimizing Your New System
If you performed a clean install, avoid the temptation to migrate everything back immediately via Time Machine, as this can sometimes bring back the very software “junk” or configuration errors you were trying to eliminate. Instead, install your essential apps manually and move your documents back from your backup. This ensures that your system remains lean and fast.
Common Error Messages and Fixes
- “The copy of the Install macOS application is damaged”: This is usually a date/time sync issue. Open Terminal in the recovery environment and type
ntpdate -u time.apple.comor manually set the date using thedatecommand to match the current time. - The USB Drive doesn’t appear in Startup Options: Ensure the drive was formatted with the GUID Partition Map. If it was formatted as MBR (Master Boot Record), the Mac will not recognize it as a bootable volume.
- Security Settings Block the USB: As mentioned previously, newer Intel Macs with the T2 security chip require you to enable “Allow booting from external media” within the Startup Security Utility.
Why This Method is Essential for Tech Professionals
Installing macOS from a USB drive isn’t just a troubleshooting step; it is a best practice for digital hygiene. It allows for a standardized environment across multiple machines and provides a fail-safe if the internal recovery partition becomes corrupted. By mastering this process, you gain full control over your hardware, ensuring that your Mac remains a high-performance tool tailored to your specific workflow.
Whether you are reviving an older Mac or setting up a brand-new workstation for maximum efficiency, the bootable USB installer remains the gold standard for macOS deployment and maintenance.
aViewFromTheCave is a participant in the Amazon Services LLC Associates Program, an affiliate advertising program designed to provide a means for sites to earn advertising fees by advertising and linking to Amazon.com. Amazon, the Amazon logo, AmazonSupply, and the AmazonSupply logo are trademarks of Amazon.com, Inc. or its affiliates. As an Amazon Associate we earn affiliate commissions from qualifying purchases.