Minecraft, a universe of endless creativity, constantly evolves, not just through official updates but also through the ingenuity of its passionate community. For dedicated builders and redstone engineers, the pursuit of efficiency and precision is paramount. This is where client-side mods like Litematica shine, transforming the way players construct intricate structures and manage complex projects. If you’ve ever dreamt of effortlessly replicating massive builds, designing with unprecedented accuracy, or collaborating on ambitious architectural marvels within your Minecraft world, Litematica is an indispensable tool. This guide will walk you through the precise steps to install Litematica version 1.21.4, ensuring you unlock its full potential for your latest Minecraft adventures.
In an ecosystem where technology trends dictate the pace of digital innovation, understanding how to integrate advanced software tools into your favorite platforms is a valuable skill. Litematica, as a prime example of a sophisticated app enhancing user productivity, aligns perfectly with the overarching themes of modern tech. We’ll delve into the necessary digital security precautions, troubleshoot common installation pitfalls, and provide you with a detailed tutorial to seamlessly incorporate this powerful schematic mod into your game. Get ready to elevate your building prowess to new heights.
Elevating Your Minecraft Experience with Litematica
Minecraft’s enduring appeal lies in its freedom to create, but even the most seasoned builders can benefit from tools that streamline the process. Litematica stands out as a critical enhancement, moving beyond mere aesthetic changes to fundamentally alter the building workflow. For those immersed in the world of block-by-block construction, understanding what this mod offers and why its specific version matters is the first step towards mastering its capabilities.
Understanding Litematica’s Core Functionality
At its heart, Litematica is a client-side schematic mod designed to assist players in building structures more efficiently and accurately. Think of it as a sophisticated blueprint system overlaid directly into your Minecraft world. Its primary function is to allow you to save your own builds as schematics and, more importantly, load existing schematics into your world as a transparent ghost outline. This outline then guides you, block by block, showing exactly where to place each material.
The utility of Litematica extends far beyond simple block placement. It offers a suite of powerful features:
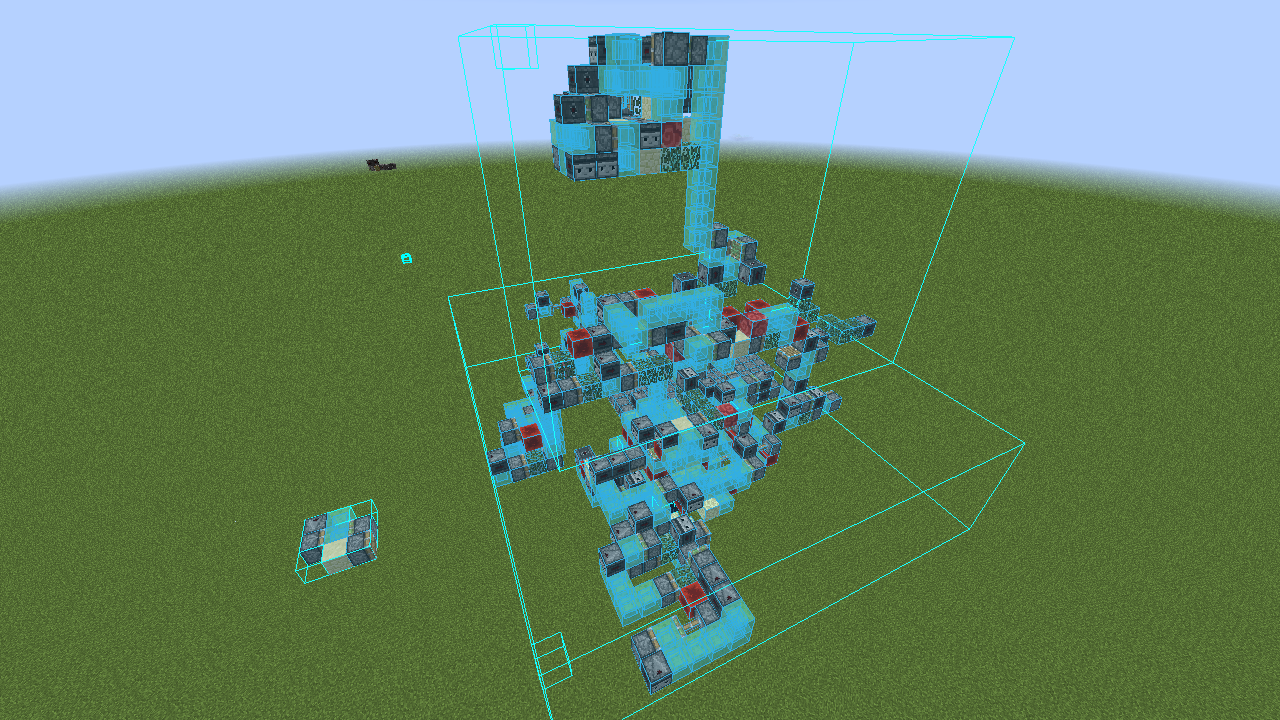
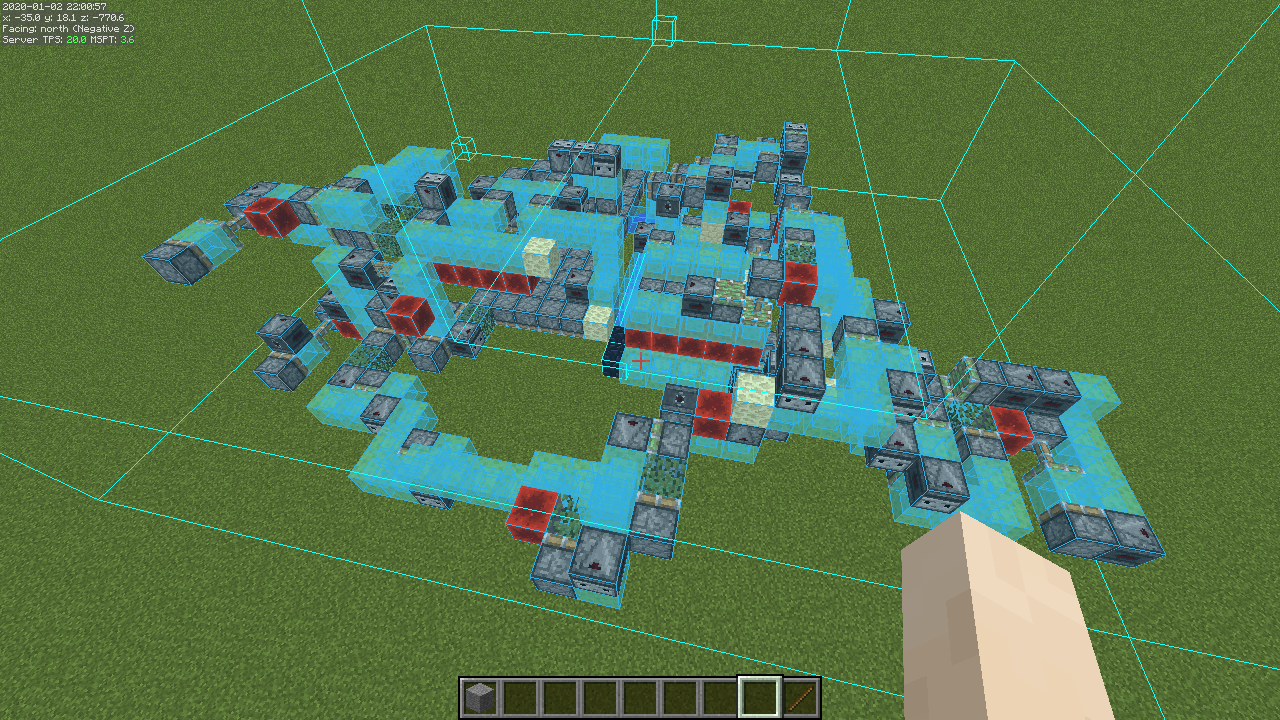
- Schematic Projection: Visualize any schematic directly in your world, providing a clear guide for construction. This is invaluable for replicating complex designs, learning new building techniques, or following community-shared blueprints.
- Material List: Generate a precise list of all blocks and items required for a given schematic, helping you gather resources efficiently before starting a build. This eliminates guesswork and minimizes trips back to storage.
- Placement Tools: Advanced tools allow for easy manipulation of schematics, including rotating, mirroring, moving, and even scaling. You can adjust the projection to fit any terrain or orientation.
- Area Selection: Define specific areas within your world to save as schematics, allowing you to capture and reuse your own creations or sections of larger projects.
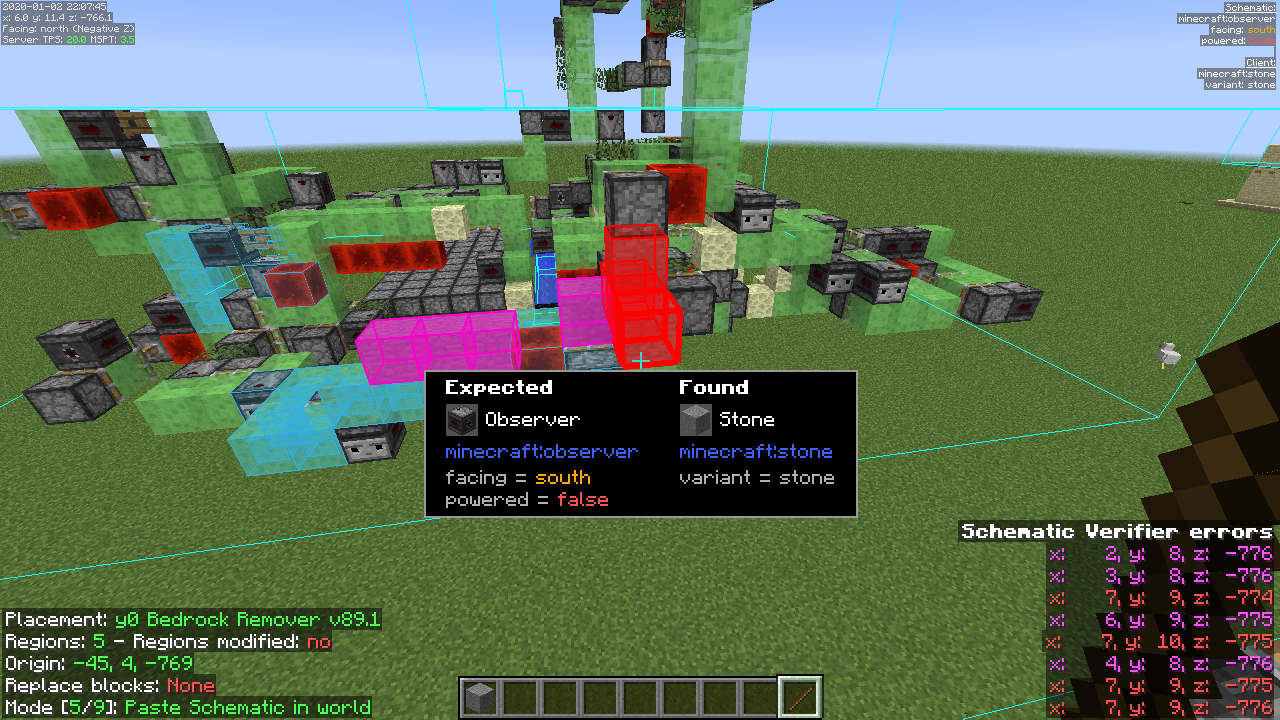
- Verification Mode: Check your current build against the projected schematic, highlighting any missing, extra, or incorrectly placed blocks. This is a godsend for identifying subtle errors in large-scale projects.
- Multiplayer Integration: While a client-side mod, Litematica can be incredibly useful in multiplayer environments, allowing you to build collaboratively or guide others with shared schematics, provided the server permits such client-side modifications.
In essence, Litematica transforms Minecraft building from a potentially tedious and error-prone process into a streamlined, guided, and highly accurate endeavor. It empowers builders to tackle projects previously deemed too complex or time-consuming, fostering both creativity and productivity.
Why Version 1.21.4 Matters
In the fast-paced world of Minecraft modding, version compatibility is paramount. Minecraft is an actively developed game, receiving frequent updates that can subtly or dramatically change its underlying code. Each new game version often requires mod developers to update their mods to maintain compatibility. Trying to run a mod designed for one Minecraft version on another can lead to crashes, glitches, or the mod simply failing to load.
Litematica 1.21.4 specifically refers to the version of the mod that is compatible with Minecraft Java Edition 1.21.4. This particular iteration of Minecraft introduced various changes, bug fixes, and potentially new features, which necessitated an update to Litematica (and its dependencies) to function correctly. When installing any mod, especially one as intricate as Litematica, always ensure that the mod file you download precisely matches your Minecraft game version. Ignoring this crucial detail is the most common reason for failed installations and frustrating crashes. By following this guide for 1.21.4, you ensure that your building tool integrates perfectly with the latest stable version of the game.
Preparing for Installation: Essential Prerequisites
Before diving into the actual installation steps, it’s vital to lay a solid foundation. This involves ensuring your Minecraft environment is correctly configured and that you’ve gathered all the necessary files. Rushing this preparatory phase often leads to troubleshooting headaches down the line. We’ll focus on setting up your system and acquiring the correct components for a smooth installation.
Setting Up Your Minecraft Java Environment
The very first prerequisite is having Minecraft Java Edition installed on your computer. Litematica, like most extensive Minecraft mods, is designed exclusively for the Java Edition, not the Bedrock Edition. If you’re currently playing Bedrock, you’ll need to purchase and install the Java Edition separately.
Beyond the base game, Litematica requires a “mod loader.” In the Minecraft modding community, two prominent mod loaders exist: Forge and Fabric. For Litematica, especially in recent Minecraft versions, Fabric is the recommended and often required mod loader. Fabric provides a lightweight and flexible API (Application Programming Interface) that many modern mods, including Litematica, utilize to interact with the game.
You’ll need to install the Fabric Loader before you can install Litematica itself. The Fabric Loader modifies your Minecraft game files to create a special “Fabric profile” in your Minecraft launcher, allowing you to launch a modded version of the game. This process is straightforward and typically involves running a dedicated installer. Ensure your Minecraft client has run version 1.21.4 at least once unmodded before attempting to install Fabric. This ensures all necessary game files for that specific version are downloaded and cached.
Acquiring the Necessary Mod Files
Installing Litematica 1.21.4 isn’t just about downloading one file; it requires a few interconnected components to function correctly. This is common for many advanced mods that rely on shared libraries to minimize code duplication and ensure compatibility across different modifications. You’ll need to download the following files:
- Fabric Installer: This is the tool that sets up the Fabric mod loader in your Minecraft launcher. You can download it from the official Fabric website (fabricmc.net). Always choose the universal JAR for desktop systems.
- Fabric API: This is a core library used by almost all Fabric mods, including Litematica. It provides common functionalities and hooks that mods use to interact with the game. Without Fabric API, most Fabric mods will simply not run. You must download the version of Fabric API that specifically matches Minecraft 1.21.4. Reputable sources include CurseForge and Modrinth.
- MaLiLib (Masa’s Library): Litematica is developed by Masa, and many of his mods share a common library called MaLiLib. This library contains shared code that Litematica (and other Masa mods like MiniHUD or Tweakeroo) depends on. Just like Fabric API, you need to download the MaLiLib version compatible with Minecraft 1.21.4. Find it on CurseForge or Modrinth.
- Litematica 1.21.4: Finally, you need the Litematica mod itself. Again, ensure you download the precise version labeled for Minecraft 1.21.4 and built for Fabric. Reliable download locations are CurseForge and Modrinth, typically found on Masa’s official project pages.
Crucial Note on Digital Security: When downloading any mod files, always prioritize official sources like fabricmc.net, curseforge.com, and modrinth.com. Avoid dubious third-party websites that might bundle malware or offer outdated/corrupted files. Always cross-reference the file names and versions to ensure they are correct for Minecraft 1.21.4. Look for the ‘Fabric’ tag on mod files, not ‘Forge.’
The Step-by-Step Installation Process
With your environment ready and all necessary files gathered, you’re now poised for the installation. This section will guide you through each step, from setting up the mod loader to placing the Litematica files, ensuring a seamless integration into your Minecraft game.
Installing the Fabric Mod Loader
The Fabric Loader is the gateway to running Litematica. Follow these steps carefully:
- Run the Fabric Installer: Locate the
fabric-installer-*.jarfile you downloaded. Double-click it to run the installer. If it doesn’t open, ensure you have a recent version of Java installed on your system. - Select Minecraft Version: In the Fabric Installer window, navigate to the “Client” tab. From the “Minecraft Version” dropdown, select
1.21.4. It’s crucial to pick the exact version you intend to mod. - Select Loader Version: The “Loader Version” will typically default to the latest recommended version. It’s generally safe to leave this as is.
- Installation Location: The “Install Location” should automatically detect your
.minecraftdirectory. Confirm that this path is correct. If you’ve moved your.minecraftfolder, you might need to browse to its location. - Initiate Installation: Click the “Install” button. The installer will download and install the necessary Fabric components. A success message should appear once completed.
- Close Installer: Close the Fabric Installer.
Now, open your Minecraft Launcher. You should see a new profile named “fabric-loader-1.21.4” (or similar) in the bottom-left corner of the launcher. Select this profile. Do not launch the game yet. We still need to add the mods themselves.
Integrating Litematica and Its Libraries
This is where you’ll place Litematica and its dependencies into your Minecraft installation:
- Locate Your
.minecraftFolder:- Windows: Open the Minecraft Launcher, select the “Installations” tab, hover over your “fabric-loader-1.21.4” profile, and click the folder icon that appears. This will open your
.minecraftdirectory. - Alternatively, press
Win + R, type%appdata%, and press Enter. Then navigate to the.minecraftfolder. - macOS: Open Finder, press
Cmd + Shift + G, type~/Library/Application Support/minecraft, and press Enter. - Linux: Navigate to
~/.minecraft.
- Windows: Open the Minecraft Launcher, select the “Installations” tab, hover over your “fabric-loader-1.21.4” profile, and click the folder icon that appears. This will open your
- Create the
modsFolder: Inside your.minecraftdirectory, you should see various folders likesaves,resourcepacks, etc. If there isn’t a folder namedmods, create one. This is where all your Fabric mods will reside. - Copy Mod Files: Drag and drop the three
.jarfiles you downloaded earlier (Fabric API 1.21.4, MaLiLib 1.21.4, and Litematica 1.21.4) into this newly createdmodsfolder.- Ensure that only these three files, and specifically their 1.21.4 Fabric-compatible versions, are in the
modsfolder. Remove any older or incompatible mod files that might be present from previous installations or other Minecraft versions.
- Ensure that only these three files, and specifically their 1.21.4 Fabric-compatible versions, are in the
- Verify Files: Double-check that all three
.jarfiles are correctly placed within themodsfolder and that their filenames clearly indicate compatibility with 1.21.4 and Fabric.
Verifying a Successful Installation
With all files in place, it’s time to launch Minecraft and confirm Litematica is working:
- Launch Minecraft with Fabric Profile: Open your Minecraft Launcher, ensure the “fabric-loader-1.21.4” profile is selected, and click “Play.”
- Monitor Launch: The game may take a bit longer to load the first time with mods. Keep an eye on the Mojang loading screen. If it crashes immediately, something went wrong (refer to the troubleshooting section).
- Check In-Game: Once Minecraft loads to the main menu, you might not immediately see any Litematica branding. However, if you load into a single-player world, you can typically open the Litematica main menu by pressing the default key
M(this can be configured in your controls). If the menu appears, congratulations, Litematica is successfully installed! - Check Mod List (Optional): Many modded Minecraft clients also feature a “Mods” button on the main menu or within the in-game options, which will list all loaded mods. You should see Litematica, MaLiLib, and Fabric API listed there.
If all checks out, you’re ready to start using Litematica to revolutionize your Minecraft building.
Troubleshooting Common Issues and Optimizing Performance
Even with meticulous attention to detail, installation issues can sometimes arise. Understanding common pitfalls and how to address them is crucial for a smooth modding experience. Furthermore, we’ll touch upon optimizing your setup for the best performance with Litematica.
Diagnosing and Resolving Installation Problems
Encountering problems during or after installation is a common part of modding. Here are the most frequent issues and their solutions:
-
Game Crashes on Startup:
- Incorrect Version Compatibility: This is the most common culprit. Ensure all files (Fabric API, MaLiLib, Litematica) are specifically for Minecraft 1.21.4 and are Fabric versions. A Forge mod in a Fabric setup, or vice-versa, will always crash.
- Missing Dependencies: Did you forget MaLiLib or Fabric API? Litematica will not run without them.
- Outdated Java: Ensure your system has a compatible Java version (usually Java 17 for Minecraft 1.17+). The Fabric Installer might have issues if your Java is too old or misconfigured.
- Corrupted Downloads: Redownload the mod files from official sources. Sometimes files can get corrupted during download.
- Conflicting Mods: If you have other mods installed, try removing them temporarily and test Litematica alone. If it works, gradually reintroduce other mods to find the conflict.
- Read the Crash Report: When Minecraft crashes, it usually generates a crash report (
crash-report-*.txt) in your.minecraftfolder. Open it and look for clues. The top few lines often point directly to the problematic mod or library.
-
Litematica Not Appearing In-Game (No ‘M’ menu, not in mod list):
- Wrong
modsFolder: Ensure the.jarfiles are in the correctmodsfolder within your currently selected.minecraftdirectory. Some users might have multiple.minecraftinstallations. - Incorrect Profile Selected: Double-check that you launched Minecraft using the “fabric-loader-1.21.4” profile in the launcher, not the vanilla Minecraft profile.
- Files Not
.jar: Make sure the downloaded files retain their.jarextension. Some browsers might rename them to.zip, which Windows might hide, making them unreadable by Minecraft. - Antivirus Interference: Rarely, an overzealous antivirus program might quarantine or block a
.jarfile. Check your antivirus logs.
- Wrong
-
Performance Issues (Lag, Low FPS):
- While Litematica itself is generally lightweight, projecting very large schematics can be demanding.
- Allocate More RAM: In your Minecraft Launcher, go to “Installations,” select your Fabric profile, click “Edit,” then “More Options.” Increase the JVM argument
-Xmxvalue (e.g.,-Xmx4Gfor 4 GB of RAM) to give Minecraft more memory. Do not allocate too much (leave at least 4-8 GB for your operating system). - Install Performance Mods: Consider installing other Fabric performance mods like Sodium (for graphics), Lithium (for server-side optimizations, even in single-player), and Phosphor (for lighting). These can significantly improve FPS in modded environments.
- Reduce Render Distance: Lower your in-game render distance, especially when working with large schematics.
Enhancing Your Modded Minecraft Experience
Beyond resolving issues, a few tips can enhance your overall modded experience:
- Backup Your World: Always back up your Minecraft worlds before installing new mods. Accidents happen, and a backup can save hours of progress.
- Keep Mods Updated: Periodically check for updates to Litematica, Fabric API, and MaLiLib. Updates often bring bug fixes, performance improvements, and new features. However, always verify compatibility with your Minecraft version before updating.
- Community Support: If you encounter persistent problems, the Litematica community (often found on Discord servers dedicated to Masa’s mods, or general Minecraft modding forums) can be an excellent resource for help.
Mastering Litematica: Beyond Installation
Installation is merely the first step. To truly leverage Litematica’s power, you need to understand its interface and explore its diverse applications. This mod isn’t just about placing blocks; it’s about transforming your approach to building.
Navigating the In-Game Interface
Once Litematica is successfully loaded, pressing the default key M (often referred to as ‘M-key menu’) will bring up the main configuration interface. This menu is the control panel for all Litematica functionalities. Key areas to explore include:
- Schematic Manager: This is where you load, save, and manage your schematic files. You can browse your saved schematics, preview them, and select one to project into your world.
- Placement Configuration: After loading a schematic, you’ll enter “placement mode.” Here, you can adjust the schematic’s position, rotation, and mirroring relative to your player or a fixed point. This allows you to precisely align your build.
- Hotkeys and Controls: Litematica has numerous hotkeys for quick actions, such as moving the schematic, changing its opacity, or toggling layers. Familiarize yourself with these in the “Controls” settings to speed up your workflow. You can also rebind keys to suit your preference.
- Material List Viewer: Access the comprehensive list of blocks required for the current schematic. This is invaluable for resource gathering and inventory management.
- Mode Selection: Litematica offers different modes like “Build,” “Verify,” and “Save.” Each mode enables specific tools relevant to that task.
Take time to explore each section of the M-key menu. Experiment with the different options and hotkeys in a creative test world to get a feel for how everything works before tackling a complex build in your survival world.
Unleashing Your Creative Potential
Litematica’s capabilities extend beyond simply copying existing builds. It fundamentally changes how you approach design and execution:
- Replicating Complex Structures: From intricate redstone contraptions to grand architectural designs, Litematica allows you to recreate any build with pixel-perfect accuracy. Download schematics from the community (e.g., on Planet Minecraft, CurseForge, or schematic sharing sites) and bring them into your world effortlessly.
- Learning New Building Techniques: By loading schematics from skilled builders, you can deconstruct their designs layer by layer, understanding block palettes, detailing, and structural integrity. It’s like having a master builder guide you through their creations.
- Efficient Resource Management: The material list feature helps you gather exactly what you need, minimizing wasted time and resources. This is especially beneficial in survival mode or on servers with limited access to materials.
- Collaborative Projects: Share your schematics with friends, allowing everyone to contribute to a shared vision, even if they’re not online at the same time. It facilitates standardized builds across a team.
- Designing and Iterating: Use Litematica in creative mode to design a structure, save it as a schematic, and then load it into your survival world as a guide. This allows for rapid prototyping and refinement of ideas without committing resources prematurely.
Litematica isn’t just a mod; it’s a powerful framework that empowers players to build smarter, faster, and with greater precision. It transforms the act of building from a potentially tedious chore into an exciting and efficient creative process.
Conclusion: Elevate Your Minecraft Building Experience
Installing Litematica 1.21.4 opens up a new dimension of building possibilities within Minecraft. By carefully following the steps outlined in this comprehensive guide, from understanding its core functionality and preparing your environment to navigating the installation process and troubleshooting common issues, you’ve equipped yourself with a tool that transcends the ordinary.
Litematica is more than just a mod; it’s an investment in your Minecraft productivity and creative output. It embodies the spirit of innovation found in the tech world, providing a software solution that enhances user experience and empowers intricate design. Whether you’re a seasoned architect, a redstone enthusiast, or an aspiring builder, mastering Litematica will undoubtedly transform your approach to the blocky world. Now, with Litematica 1.21.4 at your fingertips, the only limit is your imagination. Go forth and build something extraordinary!
aViewFromTheCave is a participant in the Amazon Services LLC Associates Program, an affiliate advertising program designed to provide a means for sites to earn advertising fees by advertising and linking to Amazon.com. Amazon, the Amazon logo, AmazonSupply, and the AmazonSupply logo are trademarks of Amazon.com, Inc. or its affiliates. As an Amazon Associate we earn affiliate commissions from qualifying purchases.