
In an ever-evolving digital landscape, the operating system you choose profoundly impacts your computing experience, from daily productivity to digital security. While proprietary systems like Windows and macOS have long dominated the market, a growing number of users are discovering the profound benefits of open-source alternatives. Among these, Ubuntu stands out as a beacon of user-friendliness, robust security, and unparalleled customization within the Linux ecosystem.
Ubuntu, a free and open-source Linux distribution, offers a compelling blend of stability, performance, and a vibrant community. It’s an ideal choice for a wide spectrum of users: developers seeking a powerful and flexible environment, students on a budget, privacy-conscious individuals, and even casual users looking for a refreshing change. Its elegant GNOME desktop environment is intuitive, making the transition from other operating systems surprisingly smooth, while its underlying Linux core ensures a secure and efficient foundation.
This comprehensive guide will walk you through the entire process of installing Ubuntu from a USB drive. Whether you’re planning a full migration, setting up a dual-boot system, or simply exploring a new OS, mastering this installation is your first step towards unlocking a world of digital freedom. We’ll delve into the necessary preparations, the step-by-step installation, and crucial post-installation configurations, ensuring you’re well-equipped to embark on your Ubuntu journey.
The Lure of Ubuntu: Why Make the Switch?
The decision to install a new operating system, especially one as distinct from the mainstream as Linux Ubuntu, often stems from a desire for improvement – be it in performance, security, cost, or freedom. Ubuntu excels in these areas, offering a compelling alternative that resonates with the core values of modern tech usage.
Understanding Ubuntu: A Gateway to Open Source
Ubuntu is more than just an operating system; it’s a philosophy embodied in software. Built upon the Linux kernel, Ubuntu is developed by Canonical and a global community, adhering strictly to the principles of open source. This means its source code is freely available, allowing anyone to view, modify, and distribute it. This transparency fosters innovation, security, and a collective commitment to creating a powerful, accessible computing experience.
For individuals and businesses alike, embracing Ubuntu means investing in an ecosystem that prioritizes user control and continuous improvement. It’s a testament to the power of collaborative development, delivering a polished and feature-rich OS that stands toe-to-toe with its commercial counterparts, often surpassing them in specific domains like server management and development environments.
Key Advantages: Security, Performance, and Freedom
The benefits of switching to Ubuntu are manifold, touching upon critical aspects of modern computing:
- Enhanced Security: Linux-based systems, including Ubuntu, are inherently more secure than widely targeted proprietary operating systems. Their open-source nature means vulnerabilities are often identified and patched by the community quicker. Furthermore, the permission-based system significantly reduces the risk of malware and viruses taking hold. This robust security makes Ubuntu an excellent choice for safeguarding sensitive data and maintaining digital integrity, a key concern in today’s tech landscape.
- Superior Performance: Ubuntu is known for its efficiency and ability to breathe new life into older hardware. It generally requires fewer system resources than Windows, resulting in faster boot times, smoother multitasking, and a more responsive user experience. This performance boost is particularly noticeable on machines that might struggle with the latest versions of other operating systems, offering a cost-effective way to extend the lifespan of your devices.
- Unparalleled Freedom and Customization: As an open-source OS, Ubuntu gives you complete control. You’re not locked into specific software vendors or predefined interfaces. You can customize nearly every aspect of the desktop environment, from themes and icons to widgets and workflow. The vast repository of free software means you can find an open-source alternative for almost any proprietary application, empowering you to shape your digital workspace exactly how you envision it.
- Cost-Effectiveness: Perhaps one of the most immediate benefits is the cost – Ubuntu is entirely free. Not only the OS itself but also a vast array of high-quality software (office suites, graphic design tools, media players, development environments) available through its software center comes at no cost. This significantly reduces the financial burden associated with software licensing, making it an attractive option for individuals, educational institutions, and startups managing their budgets carefully.
- Strong Community Support: With millions of users worldwide, Ubuntu boasts one of the largest and most active communities in the open-source world. Whether you encounter a technical issue or need advice on a specific application, countless forums, documentation, and online resources are available to help. This collective knowledge base ensures that help is always at hand, fostering a supportive environment for new and experienced users alike.
Preparing for Your Ubuntu Journey: Essential Prerequisites
A successful Ubuntu installation begins long before you click “Install Now.” Thorough preparation is key to a smooth, stress-free process, preventing potential data loss and ensuring compatibility. This section outlines the critical steps you must undertake before initiating the installation from your USB drive.
Gathering Your Arsenal: Ubuntu ISO and USB Drive
Before anything else, you’ll need the core components for your installation:
- The Ubuntu ISO File: This is the disk image containing the entire Ubuntu operating system. You’ll need to download the correct version from the official Ubuntu website (ubuntu.com/download/desktop). Most users opt for the latest Long Term Support (LTS) release, which receives five years of maintenance updates, ensuring stability and longevity. Choose between the 64-bit version, which is standard for most modern computers.
- A USB Flash Drive: You’ll need a USB drive with at least 8GB of storage capacity. This drive will be wiped clean during the process of becoming a bootable installer, so ensure it contains no important data or back up anything you wish to keep. A USB 3.0 drive is preferable for faster write and read speeds, which will significantly shorten the time it takes to create the bootable drive and install Ubuntu.
Forging the Bootable USB: Tools and Techniques
Once you have the Ubuntu ISO and your USB drive, the next step is to transform the USB into a bootable installer. This process involves writing the ISO image onto the USB drive in a specific format that your computer’s BIOS/UEFI can recognize.
Several reliable tools can accomplish this:
- Rufus (for Windows): Rufus is a popular, lightweight, and fast utility for creating bootable USB drives. It’s highly recommended for Windows users due to its ease of use and efficiency.
- How to use Rufus: Download Rufus from its official website. Insert your USB drive. Open Rufus, select your USB drive from the “Device” dropdown, click “SELECT” to choose your downloaded Ubuntu ISO, and then click “START.” Rufus will guide you through any prompts regarding download of supplementary files and data erasure.
- Etcher (Balena Etcher – for Windows, macOS, and Linux): Etcher is another excellent, user-friendly tool known for its cross-platform compatibility and simple interface. It’s often preferred for its visual simplicity.
- How to use Etcher: Download and install Etcher. Insert your USB drive. Open Etcher, click “Flash from file” and select your Ubuntu ISO. Click “Select target” and choose your USB drive. Finally, click “Flash!”
- dd command (for Linux/macOS): For users comfortable with the command line, the
ddcommand offers a powerful way to create bootable USBs.- How to use
dd(Caution: Incorrect usage can lead to data loss): First, identify your USB drive’s device name (e.g.,/dev/sdbor/dev/disk2). Then, executesudo dd if=/path/to/ubuntu.iso of=/dev/sdX bs=4M status=progress && sync(replace/path/to/ubuntu.isowith your ISO’s actual path and/dev/sdXwith your USB drive’s device name).
- How to use
Regardless of the tool you choose, the outcome is the same: a USB drive ready to boot your computer into the Ubuntu installer.
Safeguarding Your Data: The Indispensable Backup
This step cannot be overstressed: back up all critical data from any existing operating system on the target computer. While installing Ubuntu is generally safe, especially if you follow the instructions carefully, unforeseen issues can occur. A power outage during installation, an accidental misclick during partitioning, or a corrupt download could lead to data loss.
- What to back up: Documents, photos, videos, music, project files, browser bookmarks, and any other personal or professional data that you cannot afford to lose.
- Where to back up: External hard drives, cloud storage services (Google Drive, Dropbox, OneDrive), or a network-attached storage (NAS) device.
- How to back up: Simply copy and paste files, use backup software provided by your current OS, or specialized third-party backup solutions.
Taking the time to perform a thorough backup provides peace of mind and ensures that even if something goes wrong, your invaluable data remains safe.
BIOS/UEFI Configuration: Paving the Boot Path
Modern computers use either BIOS (Basic Input/Output System) or its successor, UEFI (Unified Extensible Firmware Interface), to manage hardware initialization and boot processes. To install Ubuntu from your USB, you’ll need to instruct your computer to boot from the USB drive before it tries to load your existing operating system.
- Accessing BIOS/UEFI: This usually involves pressing a specific key immediately after powering on your computer. Common keys include
Del,F2,F10,F12, orEsc. The exact key varies by manufacturer (e.g., Dell, HP, Lenovo, ASUS, Acer). Look for an on-screen prompt during startup. - Changing Boot Order: Once in the BIOS/UEFI setup utility, navigate to the “Boot” or “Boot Order” section. Here, you’ll need to move your USB drive (often listed by its brand name or as “USB HDD”) to the top of the boot priority list.
- Disabling Secure Boot (for some systems): UEFI systems often feature “Secure Boot,” a security feature designed to prevent unauthorized operating systems from loading. While newer Ubuntu versions generally support Secure Boot, you might encounter issues on some systems, particularly if you plan to dual-boot. If problems arise, disabling Secure Boot within your UEFI settings might be necessary.
- Disabling Fast Startup (for Windows Dual-Booters): If you’re planning to dual-boot Ubuntu alongside Windows, it’s crucial to disable “Fast Startup” in Windows’ power options. This feature can cause issues with disk access between the two operating systems, potentially leading to data corruption.
Save your changes and exit the BIOS/UEFI utility. Your computer will then restart and attempt to boot from the USB drive, initiating the Ubuntu installation process.
Step-by-Step Ubuntu Installation: A Seamless Transition
With your bootable USB ready and system configurations in place, it’s time for the main event: installing Ubuntu. This section guides you through each prompt and decision point of the installer, ensuring a smooth transition to your new operating system.
Initiating the Boot: Launching from USB
After configuring your BIOS/UEFI, restart your computer with the bootable Ubuntu USB drive inserted. If everything is set correctly, you should see the Ubuntu boot menu.
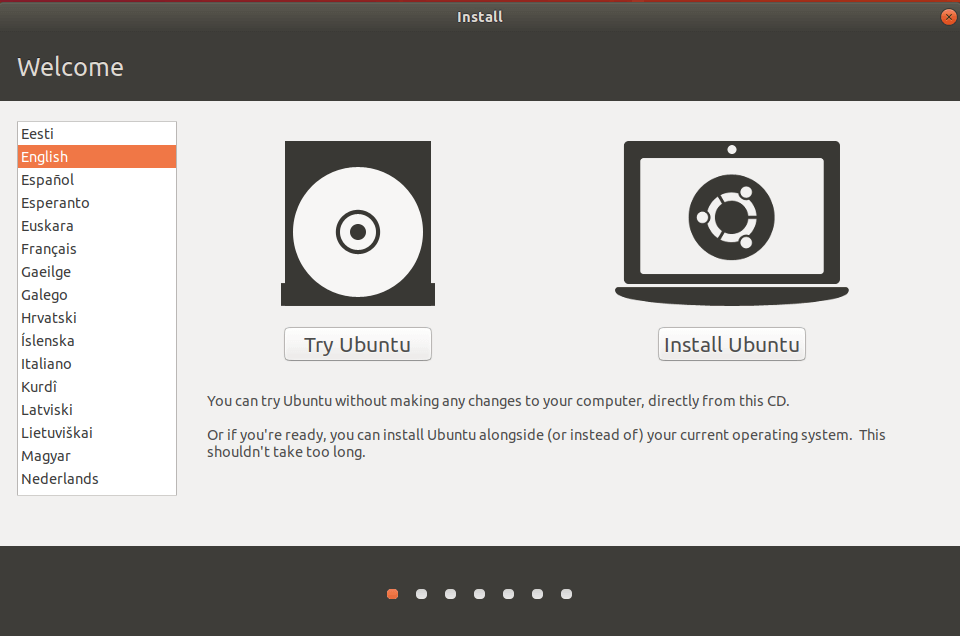
- “Try Ubuntu” vs. “Install Ubuntu”:
- “Try Ubuntu without installing”: This option loads Ubuntu into RAM, allowing you to explore the desktop environment, test hardware compatibility (Wi-Fi, sound, graphics), and experiment with applications without making any changes to your hard drive. It’s a fantastic way to get a feel for the OS before committing. You can still initiate the installation from within the live session by clicking the “Install Ubuntu” icon on the desktop.
- “Install Ubuntu”: This option bypasses the live session and goes straight to the installer. If you’re confident in your decision and have tested compatibility, this is the quicker route.
For most users, especially first-timers, choosing “Try Ubuntu” first is recommended. This allows you to verify that all your peripherals and network connections work as expected, preventing potential headaches down the line.
Navigating the Installer: Language, Keyboard, and Connectivity
Once you launch the installer (either directly or from the live session), you’ll be greeted with a series of simple setup screens:
- Welcome: Select your preferred language for the installation process. This will also be the default language for your installed Ubuntu system. Click “Continue.”
- Keyboard Layout: Ubuntu will attempt to detect your keyboard layout automatically. If it doesn’t, select your language and specific keyboard variant from the lists provided. You can test it in the input field to ensure accuracy. Click “Continue.”
- Network Configuration: If you’re connected via Ethernet, it should be recognized automatically. For Wi-Fi, select your network from the list, enter the password, and connect. A network connection is highly recommended during installation to download updates and third-party software. Click “Continue.”
- Updates and Other Software:
- “Normal installation” vs. “Minimal installation”: “Normal” includes a web browser, office suite, media players, and games. “Minimal” installs only basic utilities and a web browser. For most users, “Normal installation” is recommended.
- “Download updates while installing Ubuntu”: This saves time after installation but requires an internet connection. Highly recommended.
- “Install third-party software for graphics and Wi-Fi hardware and additional media formats”: This is crucial for hardware compatibility (especially NVIDIA/AMD graphics and some Wi-Fi cards) and playing multimedia files (MP3, videos). Always check this box unless you have a specific reason not to.
Click “Continue.”
Disk Partitioning Strategies: Single Boot, Dual Boot, or Custom Setup
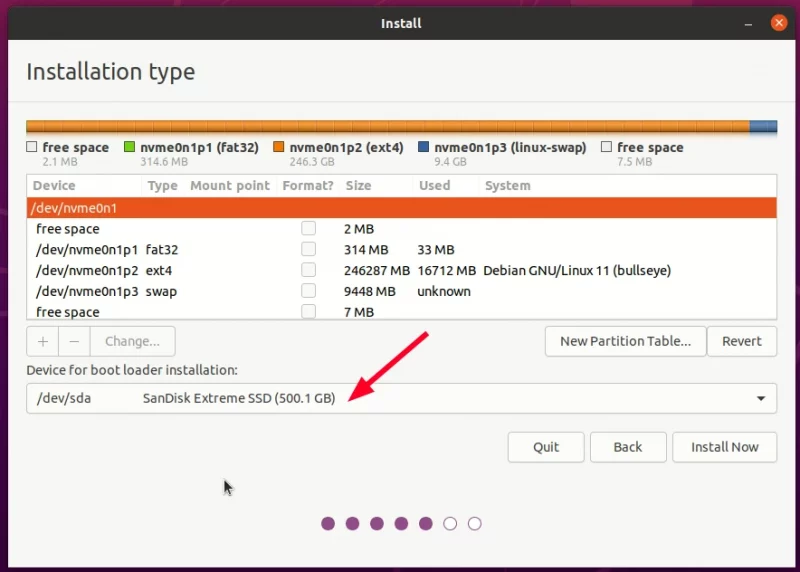
This is arguably the most critical and potentially intimidating step, as it determines how Ubuntu will use your computer’s storage. Proceed with caution and refer to your backup if you have any doubts.
The “Erase Disk and Install Ubuntu” Option (Simplest)
- Use Case: You want to dedicate your entire hard drive to Ubuntu, completely removing any existing operating systems (like Windows) and all their data.
- Process: Select “Erase disk and install Ubuntu.” The installer will automatically create the necessary partitions (root, swap, EFI if applicable). This is the easiest and most straightforward option for users who are fully committing to Ubuntu.
- Warning: This will delete everything on the selected disk. Ensure your backups are complete.
“Install Ubuntu alongside Windows” (Dual Boot)
- Use Case: You want to keep your existing Windows installation and install Ubuntu next to it, allowing you to choose between the two operating systems at boot time.
- Process: Select “Install Ubuntu alongside Windows.” The installer will automatically shrink your Windows partition (if there’s enough free space) and create new partitions for Ubuntu. You’ll usually get a slider to adjust how much space to allocate to each OS.
- Prerequisites: You must have sufficient unallocated space on your hard drive (at least 20-30GB for Ubuntu) or be prepared for the installer to shrink an existing partition. Remember to disable Windows Fast Startup as mentioned earlier.
The “Something Else” Option (Advanced Partitioning)
- Use Case: You have specific partitioning requirements, want to create a separate
/homepartition, already have unallocated space, or are setting up a complex multi-boot system. This option gives you full manual control. - Process:
- Select “Something Else” and click “Continue.”
- You’ll see a list of your hard drives and existing partitions. Identify the free space or an existing partition you wish to use.
- Minimum Recommended Partitions:
/(Root): This is where the core Ubuntu system files will reside. Typically 20-30GB is sufficient, formatted as Ext4. Set the mount point to/.swaparea: Used as virtual memory. A general rule of thumb is to create a swap partition equal to your RAM if you have 4GB or less, or 2GB if you have more RAM. Some modern installations might use a swap file instead of a dedicated partition./home: This partition stores your personal files, documents, downloads, etc. Separating/homefrom/allows you to reinstall Ubuntu without losing your personal data. Allocate the remaining space here, formatted as Ext4. Set the mount point to/home.EFI System Partition(ESP): If your system uses UEFI (most modern PCs), you’ll need an EFI partition, typically 100-500MB, formatted as FAT32, with the “boot” flag set, and mount point/boot/efi. If Windows is already installed, it likely has one that Ubuntu can use.
- Carefully select each new partition you create, define its size, file system (usually Ext4), and mount point.
- Double-check all your selections before proceeding. This step is irreversible.
After making your partitioning choice, click “Install Now.” The installer will present a summary of changes to be made. Review it carefully and click “Continue” if everything looks correct.
Finalizing Your Setup: User Accounts and Time Zones
With the partitioning decided, the installer moves to personalizing your Ubuntu experience:
- Who are you?: Enter your name, the name for your computer (hostname), a username, and a strong password. You can choose to “Require my password to log in” (recommended) or “Log in automatically.” Set up a secure password; this is critical for digital security and managing your system.
- Where are you?: Click on your location on the map, or type it into the search box. This sets your timezone correctly.
Click “Continue.”
The Installation Unfolds: Patience is a Virtue
At this point, the installer begins copying files, installing packages, and configuring your system. A progress bar will show its status, and a slideshow will highlight some of Ubuntu’s features. This process can take anywhere from 15 minutes to an hour, depending on your system’s speed and whether you opted to download updates during installation.
Do not shut down or restart your computer during this phase.
Once the installation is complete, a pop-up will inform you. You’ll be prompted to “Restart Now.” Remove your USB drive when instructed, and your computer will reboot, this time launching into your freshly installed Ubuntu system.
Post-Installation Essentials: Optimizing Your New OS
Congratulations! You’ve successfully installed Ubuntu. But the journey doesn’t end there. A few crucial steps after the initial boot will ensure your system is fully updated, optimized, and tailored to your needs, ready for peak performance and productivity.
First Boot and System Updates
Upon your first successful boot into Ubuntu, you’ll be greeted by the familiar login screen. Enter the password you created during installation. After logging in, you’ll often see a “Welcome” tour. It’s a good idea to go through this briefly to familiarize yourself with the desktop.
The absolute first thing you should do is ensure your system is fully updated. Open the “Software Updater” application (search for it in the Activities overview by pressing the Super key/Windows key) or use the terminal:
sudo apt update
sudo apt upgrade -y
These commands will fetch the latest package information and then install all available updates, including security patches, application updates, and kernel improvements. Keeping your system up-to-date is paramount for security, stability, and access to the latest features.
Driver Installation and Software Integration
- Proprietary Drivers: If you opted not to install third-party software during setup or if you encounter issues with graphics performance (especially with NVIDIA or AMD cards), Wi-Fi, or other hardware, you might need to install proprietary drivers. Navigate to “Software & Updates” (search in Activities) and then go to the “Additional Drivers” tab. Ubuntu will scan for available proprietary drivers and allow you to install them with a few clicks. A system restart is often required after installing drivers.
- Essential Software: While Ubuntu comes with a good set of pre-installed applications, you’ll likely want to add more based on your workflow. The Ubuntu Software Center is your primary hub for this. You can find popular applications like Google Chrome, VLC Media Player, Steam, GIMP (image editor), Inkscape (vector graphics), and various code editors. Many of these are available as Snap packages, offering sandboxed, universal Linux applications.
Customizing Your Ubuntu Experience
Ubuntu’s desktop environment, GNOME, is highly customizable.
- Appearance: Go to “Settings” > “Appearance” to change your desktop background, theme (light/dark), icon size, and dock position.
- Extensions: GNOME Extensions can significantly enhance your workflow. Visit extensions.gnome.org (you’ll need to install a browser extension) to add features like weather indicators, advanced window tiling, or system monitors directly to your top bar.
- Productivity Tools: Explore the vast array of open-source productivity software. LibreOffice (pre-installed) is a powerful office suite. For note-taking, try Joplin or Simplenote. For project management, there are web-based tools that integrate seamlessly.
Embracing the Ubuntu Ecosystem: Further Exploration
Your new Ubuntu system is a gateway to a vast world of possibilities. Beyond the initial setup, there’s a thriving ecosystem of tools, communities, and learning resources waiting to be explored.
Leveraging the Software Center and Snap Store
The Ubuntu Software Center is your portal to thousands of free and open-source applications. It simplifies software discovery and installation. Many applications are also available as “Snaps,” which are containerized packages that bundle an application with all its dependencies. Snaps ensure applications run consistently across different Linux distributions and are often updated more frequently than traditional packages. Dive in and discover powerful tools for development, multimedia, graphics design, and more.
Community Support and Continuous Learning
One of Ubuntu’s greatest strengths is its vibrant and welcoming community.
- Official Forums: The Ubuntu Forums (ubuntuforums.org) are an excellent place to ask questions, find solutions to common problems, and connect with other users.
- Ask Ubuntu: A Q&A site (askubuntu.com) specifically for Ubuntu users, often featuring highly detailed answers and solutions.
- Documentation: The official Ubuntu documentation provides extensive guides and information on various aspects of the operating system.
- Online Courses and Tutorials: Many free and paid resources are available online (e.g., YouTube, Udemy, Coursera) to help you deepen your understanding of Linux and Ubuntu, from basic command-line usage to advanced system administration.
Embrace the learning curve; the more you explore, the more proficient and efficient you’ll become with your new operating system.
Conclusion: A New Chapter in Your Digital Life
Installing Linux Ubuntu from a USB drive is more than just a technical procedure; it’s a deliberate step towards a more open, secure, and customizable computing experience. By following this comprehensive guide, you’ve not only successfully navigated the intricacies of setting up a new operating system but also opened the door to a world of enhanced digital freedom and productivity.
Ubuntu empowers you with control over your computing environment, offering robust security, impressive performance, and a vast ecosystem of free software. Whether you’re a developer seeking a powerful workstation, a privacy advocate, or simply someone looking for a fresh, efficient alternative, Ubuntu provides a solid foundation.
As you begin to explore and customize your new Ubuntu system, remember the strength of its community and the endless possibilities of open-source software. Embrace the learning, experiment with new tools, and tailor your environment to perfectly suit your needs. You’ve just started a new and exciting chapter in your digital life, one defined by choice, innovation, and empowerment. Welcome to the world of Ubuntu!
aViewFromTheCave is a participant in the Amazon Services LLC Associates Program, an affiliate advertising program designed to provide a means for sites to earn advertising fees by advertising and linking to Amazon.com. Amazon, the Amazon logo, AmazonSupply, and the AmazonSupply logo are trademarks of Amazon.com, Inc. or its affiliates. As an Amazon Associate we earn affiliate commissions from qualifying purchases.