
Chromebooks have carved out a significant niche in the computing world, celebrated for their simplicity, security, affordability, and cloud-centric design. Powered by Google’s ChromeOS, they offer a streamlined experience perfect for web browsing, email, and basic productivity tasks. However, for users with more demanding needs – such as software development, advanced photo editing, or running specific desktop applications – ChromeOS can sometimes feel restrictive. This is where Linux comes into play, offering a powerful gateway to transform your Chromebook from a web-focused device into a versatile workstation.
Installing Linux on a Chromebook isn’t just about expanding functionality; it’s about reclaiming control, fostering a deeper understanding of your hardware, and tapping into the vast open-source ecosystem. Whether you’re a seasoned developer, an aspiring programmer, or simply someone curious about the capabilities of your device beyond its default settings, integrating Linux can be a game-changer. This comprehensive guide will walk you through the various methods of installing Linux, focusing on the most accessible and officially supported options, while also touching upon more advanced techniques for those seeking a deeper dive. We’ll explore the benefits, potential challenges, and practical steps to help you unlock the true potential of your Chromebook.
Why Bring Linux to Your Chromebook? The Power of Choice
The decision to install Linux on a Chromebook often stems from a desire to overcome the inherent limitations of ChromeOS and to access a wider universe of software and development tools. While ChromeOS excels at its intended purpose, it’s not designed to be a full-fledged desktop operating system in the traditional sense.
Overcoming ChromeOS Limitations
ChromeOS is built on the Linux kernel, but its user-facing experience is primarily a web browser. This means that while it’s incredibly efficient for internet-based tasks and offers a robust app ecosystem via the Google Play Store (for Android apps) and progressive web apps (PWAs), it falls short when it comes to native desktop applications. Many professional-grade software packages – from integrated development environments (IDEs) like VS Code to graphics tools like GIMP or video editors like Kdenlive – are simply not available as native ChromeOS applications or even as fully functional Android apps. By installing Linux, you gain the ability to run these traditional desktop applications, breaking free from the constraints of a purely web-centric environment. This significantly broadens the scope of tasks you can perform on your Chromebook, turning it into a much more capable machine for a diverse range of activities.
Unlocking Development & Software Capabilities
For programmers, system administrators, and tech enthusiasts, Linux is a natural habitat. It provides a robust, stable, and highly customizable environment perfect for coding, scripting, and server management. Installing Linux on your Chromebook immediately opens the door to a wealth of development tools:
- Programming Languages: Easily install Python, Node.js, Ruby, Java, C++, Go, and more, along with their respective package managers and development kits.
- IDEs and Code Editors: Run popular editors like Visual Studio Code, Sublime Text, or even full-fledged IDEs like IntelliJ IDEA or Eclipse.
- Version Control: Utilize Git and interact with platforms like GitHub or GitLab directly from your terminal.
- Containerization: Experiment with Docker or Podman for application development and deployment.
- System Utilities: Access powerful command-line tools for networking, file management, system monitoring, and automation.
Beyond development, Linux grants access to a vast repository of open-source software for nearly every conceivable task. From office suites like LibreOffice to media players, email clients, and specialized scientific software, the Linux ecosystem is incredibly rich and diverse, often offering high-quality alternatives to proprietary applications.
Educational & Customization Opportunities
For those looking to deepen their understanding of operating systems, computing principles, or simply explore the world of open-source software, Linux on a Chromebook offers an excellent educational platform. It provides a safe and accessible environment to learn command-line interfaces, understand file system hierarchies, compile software from source, and experiment with different desktop environments. This hands-on experience can be invaluable for anyone pursuing a career in technology or simply wanting to become a more proficient computer user.
Furthermore, Linux is renowned for its unparalleled customization options. Unlike the relatively fixed interface of ChromeOS, a Linux desktop can be tailored to an extraordinary degree – from changing themes and icons to installing different desktop environments (like GNOME, KDE Plasma, XFCE, or LXDE) that completely alter the look and feel of your system. This level of personalization allows you to create a computing environment that perfectly suits your workflow and aesthetic preferences, making your Chromebook truly your own.
Preparing Your Chromebook for a Linux Transformation
Before embarking on the installation process, a few crucial preparatory steps are necessary. These steps ensure a smooth transition, protect your data, and help you understand the implications of integrating Linux with your existing ChromeOS environment.
Essential Prerequisites and Considerations
- Chromebook Compatibility: Most modern Chromebooks support the official Linux (Beta) feature, often referred to as Crostini. This method runs Linux in a virtual machine and is the easiest and safest approach. For older Chromebooks, or if you require deeper integration, alternative methods like Crouton (which uses a chroot environment) might be considered, though they come with more complexity and potential security implications. Always check if your specific Chromebook model supports the Linux (Beta) feature. You can usually find this information in your Chromebook’s settings under “Developers” or by searching online for your model.
- Sufficient Storage: Linux installations, especially with several applications, can consume a fair amount of disk space. While Crostini starts with a relatively small footprint, it will grow as you install more software. Ensure your Chromebook has ample free storage available, ideally 10GB or more, to accommodate the Linux environment and any applications you plan to install. If your Chromebook has limited storage (e.g., 32GB), you might need to manage your files carefully or consider an external drive for additional storage.
- Internet Connection: A stable internet connection is vital throughout the installation process, particularly for downloading the Linux container image and installing software packages within Linux.
- Power Supply: Ensure your Chromebook is connected to a power supply during the installation to prevent unexpected shutdowns that could corrupt the process.
- Understanding Developer Mode (for advanced methods): If you plan to use methods like Crouton or attempt to dual-boot or fully replace ChromeOS, you will need to enable Developer Mode. It’s crucial to understand that enabling Developer Mode wipes your Chromebook’s local data and reduces some of the security protections of ChromeOS. While it allows for greater system modification, it also makes your device slightly less secure against physical tampering. For most users, Crostini (Linux Beta) does not require Developer Mode.
Backing Up Your Data: A Crucial First Step
No matter which method you choose for installing Linux, backing up your data is absolutely paramount. While the official Crostini method is generally safe and doesn’t involve wiping your primary ChromeOS environment, unforeseen issues can always arise. For methods like Crouton or full Linux installations that require Developer Mode, a data wipe is an inherent part of the process.
What to back up:
- Google Drive Files: Since Chromebooks are cloud-centric, many of your important files are likely already stored on Google Drive. Double-check that all critical documents, photos, and projects are synchronized.
- Local Downloads Folder: Any files stored directly in your Chromebook’s “Downloads” folder or other local storage areas will be affected if you enable Developer Mode or if the system needs to be powerwashed. Move these to Google Drive, an external USB drive, or another cloud storage service.
- Linux (Beta) Data (if reinstalling): If you’re reinstalling Linux (Beta) or migrating to a new Chromebook, you can use the “Backup & Restore” feature within the Linux settings to save your entire Linux container. This will save all your installed applications and files within the Linux environment.
- Application Data: If you use any Android apps that store significant local data, ensure that data is backed up within the app itself (if available) or synced to the cloud.
Taking the time to back up your data is a small investment that can save you a lot of headache and potential data loss down the line.
Method 1: The Official Way – Linux (Beta) with Crostini
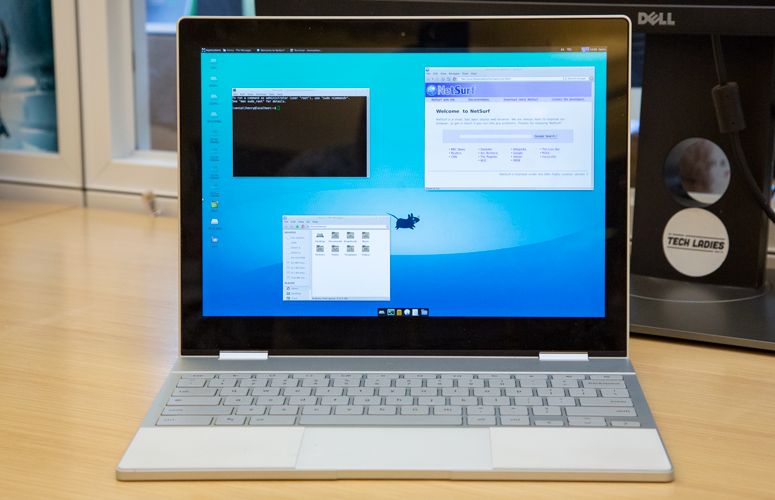
For the vast majority of users, the recommended and easiest method to get Linux on a Chromebook is through the official “Linux (Beta)” feature, also known as Crostini. This method creates a virtual machine that runs a Debian-based Linux distribution directly within ChromeOS, offering excellent integration without requiring Developer Mode or compromising your system’s security.
Activating Linux in ChromeOS Settings
The process to enable Crostini is straightforward:
- Open Settings: Click on the time/notification area in the bottom-right corner of your Chromebook screen, then click the gear icon to open “Settings.”
- Navigate to Developers: In the left-hand sidebar of the Settings window, scroll down and click on “Developers.”
- Turn On Linux (Beta): You should see an option labeled “Linux (Beta)” (or simply “Linux development environment”). Click “Turn on.”
- Follow On-Screen Prompts: A setup wizard will appear. Click “Next.” You’ll be prompted to choose a username and allocate disk space for your Linux installation. The default disk space is usually sufficient to start, but you can increase it later if needed. A good starting point is 10-20 GB if you have the available storage.
- Install: Click “Install.” Your Chromebook will then download and set up the Linux container. This process can take several minutes, depending on your internet speed and Chromebook’s performance. You’ll see a terminal window appear once the installation is complete.
Congratulations! You now have a functional Debian Linux environment running on your Chromebook. The terminal window that opens is your primary interface for interacting with Linux.
Navigating the Linux Terminal and Installing Applications
The terminal is the command-line interface (CLI) for Linux, and it’s where much of the power of Linux lies. Don’t be intimidated; learning a few basic commands will get you started.
-
Update and Upgrade: The first thing you should do in any new Linux installation is update its package lists and upgrade any pre-installed software. In the terminal, type the following commands, pressing Enter after each:
sudo apt update sudo apt upgradesudo(superuser do) allows you to run commands with administrative privileges.apt updatefetches the latest package information, andapt upgradeinstalls new versions of installed packages. You might be prompted to confirm the installation by typingYand pressing Enter. -
Installing Applications: Once your system is updated, you can start installing applications. The
apt installcommand is used for this. For example, to install the popular Visual Studio Code editor:sudo apt install codeOr to install a simple image editor like GIMP:
sudo apt install gimpYou can also install multiple applications at once:
sudo apt install htop neofetchOnce installed, most graphical Linux applications will appear in your ChromeOS app launcher, alongside your Android apps and PWAs. You can simply click their icons to launch them.
-
Removing Applications: To remove an application, use
apt remove:
bash

sudo apt remove gimp
To also remove configuration files, useapt purge:
bash

sudo apt purge gimp
Seamless Integration: Files, USB, and Graphics
One of the strengths of Crostini is its integration with ChromeOS:
- File Sharing: You can easily share files between your ChromeOS Downloads folder and your Linux container. In the ChromeOS Files app, right-click on a folder (e.g., “Downloads”) and select “Share with Linux.” This will make the folder accessible within your Linux environment, typically found at
/mnt/chromeos/MyFiles/Downloads. Similarly, files saved within your Linux environment are accessible from the ChromeOS Files app under “Linux files.” - USB Device Support: You can connect USB devices (like flash drives) to your Chromebook and then elect to “Connect to Linux” from the ChromeOS notification that appears. This allows your Linux applications to access the contents of the USB drive.
- Graphics and Audio: Crostini supports hardware acceleration for graphics (GPU passthrough) on most newer Chromebooks, leading to better performance for graphical applications. Audio also generally works seamlessly.
- Clipboard Sharing: Copy and paste functionality usually works effortlessly between ChromeOS and Linux applications.
Crostini offers an excellent balance of functionality, security, and ease of use, making it the preferred method for most users to run Linux applications on their Chromebooks.
Method 2: Crouton – A Glimpse into the Past (for Specific Needs)
While Crostini is the modern and recommended approach, Crouton (Chromium OS Universal Chroot Environment) was a popular method for many years, especially for older Chromebooks that didn’t support Crostini, or for users who desired a deeper, more integrated Linux experience. However, it requires enabling Developer Mode, which comes with significant caveats.
The Developer Mode Requirement and Its Implications
To use Crouton, you must enable Developer Mode on your Chromebook. This is a critical step with several implications:
- Data Wipe: Enabling Developer Mode will powerwash your Chromebook, wiping all local data. As mentioned earlier, backup everything!
- Reduced Security: Developer Mode bypasses some of ChromeOS’s security features, making your device slightly more vulnerable. You’ll also encounter a “scary screen” at boot-up every time you start your Chromebook, warning you that the OS verification is off. You must press Ctrl+D (or wait) to boot into ChromeOS.
- No Official Support: Crouton is not officially supported by Google. It’s a community-driven project, meaning support and troubleshooting rely on forums and community efforts.
Given these points, Crouton is generally only recommended for users with specific needs, such as those with older Chromebooks that lack Crostini support, or power users who fully understand and accept the trade-offs.
Installing and Managing Linux Environments with Crouton
The Crouton process involves downloading a script and running it from the ChromeOS shell (accessed by pressing Ctrl+Alt+T and typing shell).
- Enable Developer Mode: Follow the manufacturer’s instructions for your specific Chromebook model to enter Developer Mode. This typically involves holding Esc+Refresh and pressing the Power button, then pressing Ctrl+D at the recovery screen.
- Download Crouton Script: Once in Developer Mode and booted into ChromeOS, open your browser and download the
croutonscript from its GitHub page (e.g.,https://github.com/dnschneid/crouton). Save it to your Downloads folder. - Open Shell: Press
Ctrl+Alt+Tto open a Crosh (ChromeOS Shell) terminal window. Typeshelland press Enter to access the full Linux shell. - Install a Linux Distribution and Desktop Environment: Use the
shcommand with the Crouton script and specify the Linux distribution (e.g.,debian,ubuntu) and desktop environment (e.g.,xfce,kde,gnome). For example, to install Ubuntu with XFCE:
bash

sudo sh ~/Downloads/crouton -t xfce
This command can take a significant amount of time, as it downloads and sets up the entire Linux environment. - Enter the Chroot: Once installed, you can enter your Linux environment by typing:
bash

sudo enter-chroot -n xfce
(Replacexfcewith the name of your desktop environment). - Switching Between ChromeOS and Linux: You can switch between ChromeOS and your Linux desktop using keyboard shortcuts, typically
Ctrl+Alt+Shift+BackandCtrl+Alt+Shift+Forward.
Crouton provides a full Linux desktop experience, often with better direct hardware access than Crostini, but at the cost of increased complexity, security considerations, and the requirement for Developer Mode. For modern Chromebooks, Crostini is almost always the superior choice.
Method 3: Dual-Booting or Replacing ChromeOS – The Advanced Frontier (with Warnings)
For the truly adventurous or those who demand a pure Linux experience without ChromeOS in the picture, it is possible to dual-boot Linux alongside ChromeOS or even completely replace ChromeOS with a full Linux distribution. This method is the most complex, voids your warranty, and carries the highest risk of rendering your device unusable if not performed correctly.
Understanding the Risks: Firmware, Warranty, and Complexity
- Firmware Modification: This approach typically involves modifying your Chromebook’s firmware (BIOS/UEFI) to allow booting from a USB drive or to install a custom bootloader. This is a highly technical process that can permanently brick your device if done improperly.
- Voiding Warranty: Modifying firmware and replacing the operating system will almost certainly void your Chromebook’s warranty.
- Security Risks: Without the robust verified boot process of ChromeOS, your device’s security profile will be significantly altered and potentially weakened.
- Hardware Incompatibility: Not all Chromebook hardware is fully compatible with standard Linux kernels. You might encounter issues with Wi-Fi, Bluetooth, touchscreens, trackpads, or even basic display drivers, depending on your specific model and the Linux distribution you choose.
- Complexity and Time Commitment: This is not a beginner-friendly process. It requires deep knowledge of Linux, command-line operations, partitioning, and bootloaders. Expect to spend a considerable amount of time researching, troubleshooting, and potentially reinstalling.
This method is strictly for advanced users who are comfortable with these risks and possess strong technical skills.
A High-Level Overview of the Process
The general steps for dual-booting or replacing ChromeOS involve:
- Enable Developer Mode and Remove Write Protection: As with Crouton, Developer Mode is required. Additionally, you often need to physically remove a write-protect screw or disable an internal mechanism to allow flashing custom firmware. This can involve opening your Chromebook.
- Flash Custom Firmware: Tools like MrChromebox’s firmware utility script are commonly used to flash custom UEFI firmware that allows booting from USB or other non-ChromeOS operating systems.
- Create Bootable Linux USB: Prepare a USB drive with your chosen Linux distribution (e.g., Ubuntu, Fedora, Mint) using a tool like Etcher.
- Boot from USB and Install: Boot your Chromebook from the USB drive. You will then proceed with a standard Linux installation process, choosing to either wipe the internal drive entirely or create a new partition for dual-booting.
- Post-Installation Configuration: After installation, you will likely need to install specific drivers, configure Wi-Fi, and potentially compile custom kernel modules to get all hardware components working correctly.
Given the extreme complexity and risks, a detailed step-by-step guide for this method is beyond the scope of this article. For those determined to pursue this path, thorough research of your specific Chromebook model and consulting dedicated community forums (like the r/chrultrabook subreddit) is absolutely essential.
Maximizing Your Linux on Chromebook Experience
Once you have Linux up and running, there are several ways to optimize its performance, manage resources, and troubleshoot common issues to ensure a smooth and productive experience.
Performance Tips and Resource Management
Chromebooks come in a wide range of specifications, from budget-friendly models with limited RAM and storage to high-end devices. How well Linux performs will often depend on your Chromebook’s hardware.
- Choose Lightweight Applications: When selecting software for Linux, prioritize lightweight alternatives. For example, instead of a heavy IDE if you only need a text editor, opt for Sublime Text, VS Code (which is surprisingly efficient), or even simple terminal-based editors like Vim or Nano.
- Select a Lean Desktop Environment (if using Crouton/Full Install): If you’ve installed Linux via Crouton or as a full OS, your choice of desktop environment significantly impacts performance. GNOME and KDE Plasma are feature-rich but resource-intensive. XFCE, LXDE, MATE, or even a tiling window manager like i3 or bspwm are much lighter and can dramatically improve responsiveness on less powerful hardware. Crostini defaults to a CLI-focused environment, but graphical apps generally run within their own windowing system.
- Monitor Resource Usage: Use tools like
htop(install withsudo apt install htop) in the terminal to monitor CPU, RAM, and swap space usage. This can help you identify resource-hungry processes. - Manage Linux Disk Space: Crostini allows you to adjust the allocated disk space. If you find yourself running low, you can increase it via
Settings > Developers > Linux development environment > Disk size. Be mindful not to allocate too much, as it will reduce the space available for ChromeOS. Regularly clear youraptcache withsudo apt cleanand remove unneeded packages withsudo apt autoremove. - Close Unused Applications: Just like on any operating system, closing applications you’re not actively using in Linux (and ChromeOS) will free up valuable RAM and CPU cycles.
Addressing Common Issues and Troubleshooting
Even with the most straightforward installation, you might encounter a few hiccups. Here are some common issues and their solutions:
-
“Linux (Beta) failed to start” / Terminal not opening:
- Restart Chromebook: Often, a simple restart can resolve transient issues.
- Check Disk Space: Ensure you haven’t run out of disk space. If so, go to
Settings > Developers > Linux development environment > Disk sizeand increase the allocation. - Reset Linux: As a last resort, you can “Remove Linux development environment” from the settings and reinstall it. Warning: This will delete all data and applications within your Linux container. Ensure you’ve backed up anything important.
-
Applications not launching or crashing:
- Update Linux: Always ensure your Linux environment is up-to-date with
sudo apt update && sudo apt upgrade. - Check Dependencies: Sometimes, an application might require additional packages. The error message in the terminal often provides clues.
- Reinstall Application: Try removing and reinstalling the problematic application.
- Update Linux: Always ensure your Linux environment is up-to-date with
-
No Internet Connection in Linux:
- Crostini typically inherits the network connection from ChromeOS. If Linux can’t connect, ensure ChromeOS has an active internet connection.
- Restart the Linux container: Close the terminal and reopen it, or reboot your Chromebook.
-
Sound or Graphics Issues:
- For Crostini, these generally work out of the box on supported Chromebooks due to GPU/audio passthrough. Ensure your ChromeOS is up-to-date, as updates often include improvements for Linux integration.
- For Crouton or full Linux installs, these issues are more common and often require manual driver installation or specific kernel parameters, which can be complex.
-
Clipboard Not Working:
- Occasionally, clipboard sharing can become flaky. Restarting the Linux terminal or even the Chromebook usually fixes this.
Where to seek help:
- Official ChromeOS Support: For Crostini issues, Google’s support pages are a good starting point.
- Chromebook & Linux Communities: Subreddits like r/chromeos, r/Crostini, and r/chrultrabook are excellent resources for asking questions and finding solutions from experienced users.
- Linux Distribution Forums: If you’re using a specific Linux distribution (like Ubuntu or Debian), their official forums and documentation are invaluable.

Conclusion
Installing Linux on your Chromebook is a powerful decision that transforms your device from a simple web portal into a flexible, capable, and highly customizable personal computer. Whether you opt for the seamless integration of Crostini (Linux Beta), delve into the historical depths of Crouton, or bravely venture into the advanced realm of dual-booting, you’re embracing a world of open-source software, development tools, and unparalleled control.
For most users, Crostini offers the perfect balance: a secure, officially supported, and user-friendly way to harness the power of Linux applications without sacrificing the simplicity and security of ChromeOS. It’s an ideal environment for students, developers, and anyone eager to expand their Chromebook’s horizons for productivity, learning, and creative pursuits.
Remember, the journey of integrating Linux with your Chromebook is not just about the destination of a new operating system; it’s also about the learning experience, the problem-solving, and the satisfaction of unlocking capabilities you never knew existed. So, take the leap, experiment, and enjoy the expanded world that Linux brings to your trusty Chromebook. The potential for innovation, productivity, and personal growth on your device has just dramatically increased.
aViewFromTheCave is a participant in the Amazon Services LLC Associates Program, an affiliate advertising program designed to provide a means for sites to earn advertising fees by advertising and linking to Amazon.com. Amazon, the Amazon logo, AmazonSupply, and the AmazonSupply logo are trademarks of Amazon.com, Inc. or its affiliates. As an Amazon Associate we earn affiliate commissions from qualifying purchases.