
In an era defined by rapid technological advancement, the choice of operating system profoundly impacts our digital lives, productivity, and security. While Windows and macOS dominate the personal computing landscape, Linux stands as a formidable, often superior, alternative for many users. Offering unparalleled stability, security, and customization, Linux has evolved from a niche operating system for developers into a robust platform accessible to everyone. This comprehensive guide will walk you through the process of installing Linux from a USB drive, demystifying each step to empower you with a powerful, open-source operating system. Whether you’re a seasoned tech enthusiast or a curious beginner, embarking on this journey can unlock a new realm of digital possibilities, enhancing your productivity and bolstering your digital security.
I. Why Choose Linux? Unlocking Potential and Productivity
The decision to install a new operating system is significant, often driven by a desire for improved performance, enhanced security, or greater control. Linux offers all this and more, positioning itself as a compelling choice for individuals and businesses seeking a reliable and versatile computing environment.
The Linux Advantage: Beyond the Hype
At its core, Linux is an open-source operating system, meaning its source code is freely available for anyone to view, modify, and distribute. This philosophy fosters a vibrant global community of developers who continuously contribute to its improvement, patching vulnerabilities, adding features, and optimizing performance. The benefits derived from this model are manifold:
- Cost-Effectiveness (Money): Most Linux distributions are entirely free to download and use, eliminating the need for expensive licenses associated with proprietary operating systems. This significant financial saving extends to much of its software ecosystem, where open-source alternatives to commercial applications are readily available and often equally powerful. For small businesses, startups, or individuals on a budget, this can translate into substantial savings, freeing up capital for other investments.
- Security (Tech – Digital Security): Linux boasts a strong reputation for security. Its architecture, coupled with a vigilant open-source community, means vulnerabilities are often identified and patched swiftly. Furthermore, the permission-based system restricts administrative privileges, making it significantly harder for malware to gain a foothold and spread across the system. This inherent robustness makes Linux an excellent choice for those prioritizing digital security and peace of mind.
- Stability and Reliability (Tech): Linux systems are renowned for their stability. They rarely crash or slow down over time, making them ideal for long-term use, servers, and critical applications. This reliability translates directly into higher productivity, as users spend less time troubleshooting and more time accomplishing tasks.
- Customization (Tech): One of Linux’s most appealing features is its unparalleled customizability. Users can choose from a multitude of desktop environments (GNOME, KDE Plasma, XFCE, etc.), each offering a distinct aesthetic and workflow. Everything from themes and icons to system animations and keyboard shortcuts can be tailored to individual preferences, creating a truly personalized computing experience. This level of control fosters a sense of ownership and can significantly enhance user satisfaction and efficiency.
- Performance and Resource Efficiency (Tech): Many Linux distributions are lightweight, requiring fewer system resources than their proprietary counterparts. This makes them an excellent choice for older hardware, breathing new life into computers that might otherwise be considered obsolete. Even on modern machines, Linux often feels snappier and more responsive, contributing to a smoother user experience.
A Gateway to Enhanced Digital Security and Productivity
Beyond the technical merits, adopting Linux can be a strategic move for enhancing both your digital security posture and your overall productivity. Its robust security features make it a safer environment for handling sensitive data and browsing the internet. From a productivity standpoint, the stability of Linux means fewer interruptions, and its vast array of open-source software provides powerful tools for every task, from office suites and graphic design to programming and video editing. Many users find the clean, distraction-free interfaces of various Linux desktop environments conducive to focused work. Furthermore, mastering Linux can be a valuable asset for personal branding, especially within tech circles. Demonstrating proficiency in an open-source operating system signals a deeper understanding of computing principles and a commitment to secure, efficient workflows, which can be highly attractive in professional contexts.
II. Pre-Installation Essentials: Gathering Your Tools and Preparing Your System
Before you embark on the exciting journey of installing Linux, a few preparatory steps are crucial. These ensure a smooth installation process and protect your existing data.
The Digital Toolkit: What You’ll Need
To successfully install Linux from a USB drive, you’ll need three primary components:
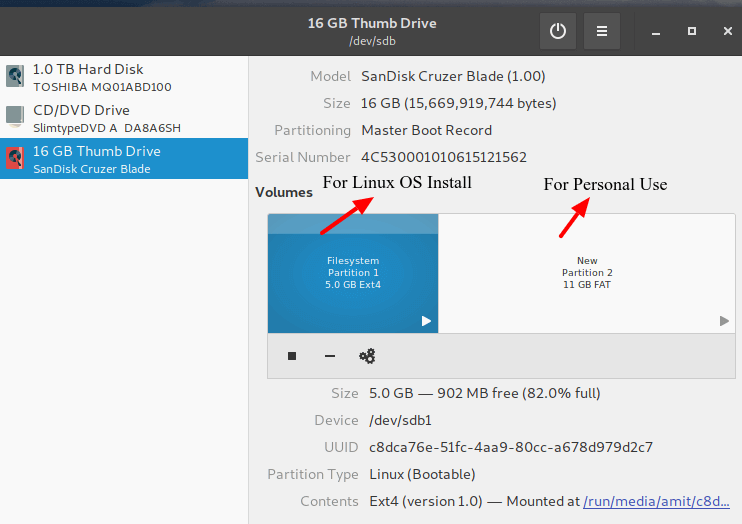
- A USB Flash Drive: This will serve as your installation media. It should have a minimum capacity of 8GB, though 16GB is recommended for larger distributions or if you plan to use it as a persistent live environment. Ensure the USB drive is empty or contains data you’re willing to erase, as the process of creating a bootable drive will wipe its contents.
- A Linux Distribution ISO Image: This is the disk image file (typically with a
.isoextension) of your chosen Linux operating system. Popular choices for beginners include Ubuntu, Linux Mint, Fedora, and Pop!_OS, each offering a user-friendly experience with slightly different aesthetics and philosophies. You will download this file from the official website of your chosen distribution. - A Bootable USB Creator Tool: This software will write the ISO image onto your USB drive, making it bootable. Popular options include:
- Rufus (Windows): A fast and reliable utility exclusively for Windows.
- Etcher (Balena Etcher – Cross-platform): A user-friendly, cross-platform tool available for Windows, macOS, and Linux. Its simplicity makes it an excellent choice for beginners.
- Ventoy (Cross-platform): A unique tool that allows you to store multiple ISO files on a single USB drive, letting you choose which one to boot from a menu. Ideal for those who experiment with different distributions.
ddcommand (Linux/macOS): A powerful command-line utility for advanced users.
Safeguarding Your Data: The Importance of Backups
This step cannot be stressed enough. Before making any changes to your hard drive, back up all your important files and documents. While the Linux installation process is generally safe, unexpected issues can occur, leading to data loss. This is especially critical if you plan to install Linux alongside an existing operating system (dual-booting) or if you’re reformatting your primary drive. Use an external hard drive, cloud storage, or a combination of both to ensure your precious data is secure. Think of this as your digital insurance policy.
System Prerequisites: Meeting Linux’s Demands
Most modern computers are well-equipped to run Linux. However, it’s wise to check the minimum system requirements for your chosen distribution. Generally, you’ll need:
- Processor: A 2 GHz dual-core processor (or better).
- RAM: 2 GB of system memory (RAM). While some lighter distributions can run on 1GB, 4GB is recommended for a smoother experience.
- Hard Drive Space: 25 GB of free hard drive space (more if you plan to store many files or install alongside another OS).
- Graphics Card: A graphics card capable of 1024×768 resolution (or better).
- Internet Connection: An active internet connection during installation is highly recommended to download updates and additional software/drivers.
- Power Supply: Ensure your laptop is plugged into a power source, or your desktop has a reliable power supply. You don’t want your system to shut down mid-installation.
III. Crafting Your Bootable Linux USB Drive
With your tools ready, the next step is to transform your USB drive into a bootable installation medium.
Selecting Your Linux Distribution and ISO Image
The first decision is which Linux distribution to install. For beginners, popular choices include:
- Ubuntu: Widely popular, well-supported, and user-friendly. A great starting point.
- Linux Mint: Based on Ubuntu, known for its familiar interface (especially for Windows users) and included multimedia codecs.
- Fedora: A cutting-edge distribution sponsored by Red Hat, offering a pure GNOME experience and up-to-date software.
- Pop!_OS: Based on Ubuntu, developed by System76, and optimized for developers and gamers with excellent driver support.
Visit the official website of your chosen distribution and download the latest stable ISO image. Be mindful of the download size, as these files can be several gigabytes.
Choosing the Right Bootable USB Creator
As mentioned, several tools can create a bootable USB. For simplicity, we’ll focus on Etcher, as it’s cross-platform and very intuitive.
- Etcher (Recommended for beginners): Download Balena Etcher from its official website (balena.io/etcher). It has a clean interface and guides you through the process, minimizing errors.
- Rufus (Windows only): Download Rufus from rufus.ie. It’s powerful but might present more options than a beginner needs.
- Ventoy: Download from ventoy.net. After installing Ventoy to your USB, you simply drag and drop ISOs onto the USB drive. It’s incredibly convenient for trying multiple distributions.
Step-by-Step: Creating Your Bootable USB
Using Etcher as an example, the process is straightforward:
- Download and Install Etcher: Get the appropriate version for your operating system and install it.
- Launch Etcher: Open the application.
- Select Image: Click “Flash from file” and navigate to the
.isofile you downloaded earlier. - Select Target: Click “Select target” and choose your USB flash drive. Double-check that you’ve selected the correct drive, as flashing will erase its contents.
- Flash!: Click the “Flash!” button. Etcher will then write the ISO to the USB drive and verify the process. This can take several minutes, depending on the size of the ISO and the speed of your USB drive.
- Eject Safely: Once the process is complete, Etcher will notify you. Safely eject the USB drive.
Your bootable Linux USB is now ready!
IV. Configuring Your System for Linux Installation
With your bootable USB created, the next hurdle is instructing your computer to boot from it instead of its internal hard drive. This involves navigating your system’s BIOS or UEFI firmware settings.
Accessing Your BIOS/UEFI Settings
The method to enter BIOS/UEFI settings varies by manufacturer. Typically, you need to press a specific key repeatedly immediately after powering on your computer. Common keys include:
- Dell: F2, F12
- HP: F10, Esc
- Lenovo: F1, F2, Fn+F2
- Acer: F2, Del
- Asus: F2, Del
- Microsoft Surface: Volume Up button
- Custom Builds: Del, F2
If these don’t work, consult your computer’s manual or search online for “[Your computer model] BIOS key” or “[Your computer model] UEFI settings.”
Navigating Secure Boot and Fast Boot
Modern computers often come with UEFI (Unified Extensible Firmware Interface) firmware, which replaced the older BIOS. UEFI introduces features like Secure Boot and Fast Boot, which can sometimes interfere with installing Linux.
- Secure Boot: This security feature prevents unauthorized operating systems or software from loading during startup. While beneficial for Windows, it can prevent some Linux distributions from booting. You may need to disable Secure Boot in your UEFI settings (often found under “Security,” “Boot Options,” or “Authentication”).
- Fast Boot (or Quick Boot): This feature speeds up Windows startup by skipping some hardware initialization steps. While not always problematic, it’s generally recommended to disable Fast Boot in both your UEFI settings and within Windows (if you’re dual-booting) before installing Linux. In Windows, it’s found in Power Options -> Choose what the power buttons do -> Change settings that are currently unavailable -> Untick “Turn on fast startup.”
Look for options like “Boot Mode” (choose “UEFI” or “Legacy/CSM” if your system requires it, usually UEFI is fine), and ensure “Secure Boot” is disabled.
Prioritizing Your Boot Device: Setting the USB First
Once in the BIOS/UEFI settings, you need to change the boot order to prioritize your USB drive.
- Locate Boot Options: Look for a “Boot,” “Boot Order,” or “Boot Priority” tab or section.
- Move USB to Top: You’ll see a list of bootable devices (e.g., your hard drive, DVD drive, USB drive). Use the arrow keys or instructions provided on screen (often F5/F6) to move your USB drive to the top of the boot order. It might be listed as “USB HDD,” “USB Device,” or the brand name of your USB drive.
- Save and Exit: Save your changes (often F10) and exit the BIOS/UEFI. Your computer will restart, and if configured correctly, it should now boot from your USB drive.
V. The Linux Installation Process: A Step-by-Step Walkthrough
With your computer set to boot from the USB, the actual installation of Linux begins. The specific steps might vary slightly depending on your chosen distribution, but the general flow remains consistent. We’ll use a generic approach applicable to most popular distributions like Ubuntu or Linux Mint.
Booting from the USB and Entering the Live Environment
Upon booting from the USB, you’ll typically be presented with a menu. Options often include:
- “Try [Distribution Name]” (Live Session): This allows you to run Linux directly from the USB drive without installing it to your hard disk. It’s an excellent way to test hardware compatibility, explore the desktop environment, and ensure everything works (Wi-Fi, sound, display) before committing to an installation. Any changes made in the live session are not saved.
- “Install [Distribution Name]”: This option bypasses the live session and proceeds directly to the installer.
For first-timers, choosing the “Try” option is highly recommended to verify hardware compatibility. Once you’re comfortable, you can usually find an “Install [Distribution Name]” icon on the desktop of the live environment to start the installation wizard.
The Installation Wizard: Initial Setup and Localization
The installation wizard will guide you through several basic configuration steps:
- Language Selection: Choose your preferred language for the installation process and the installed system.
- Keyboard Layout: Select your keyboard layout (e.g., English (US), English (UK), German). Most installers allow you to test your selection.
- Network Connection: Connect to a Wi-Fi network or plug in an Ethernet cable. An internet connection during installation allows the installer to download updates and additional software/drivers, ensuring a more complete setup.
- Installation Type (Updates and Other Software): You might be asked whether to install third-party software for graphics, Wi-Fi hardware, and media codecs. It’s generally a good idea to tick this option, as it improves hardware support and multimedia playback. You may also see an option to download updates during installation; this is also recommended if you have a stable internet connection.
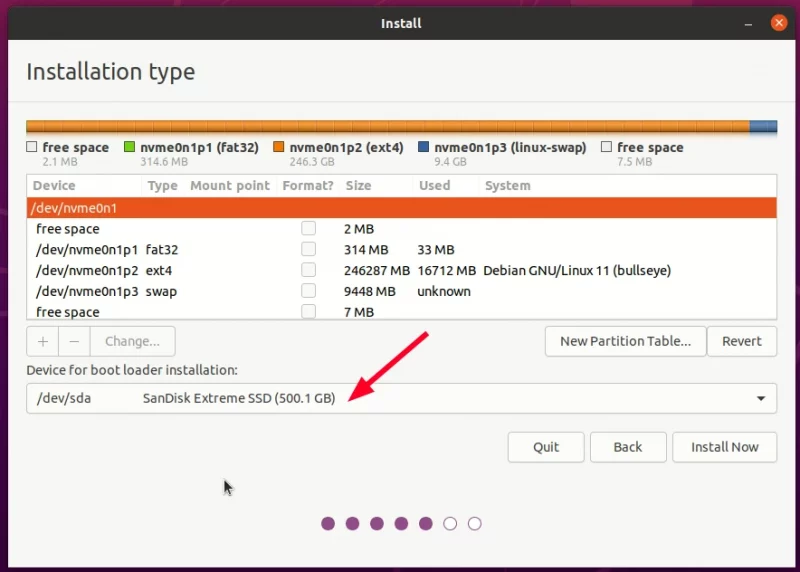
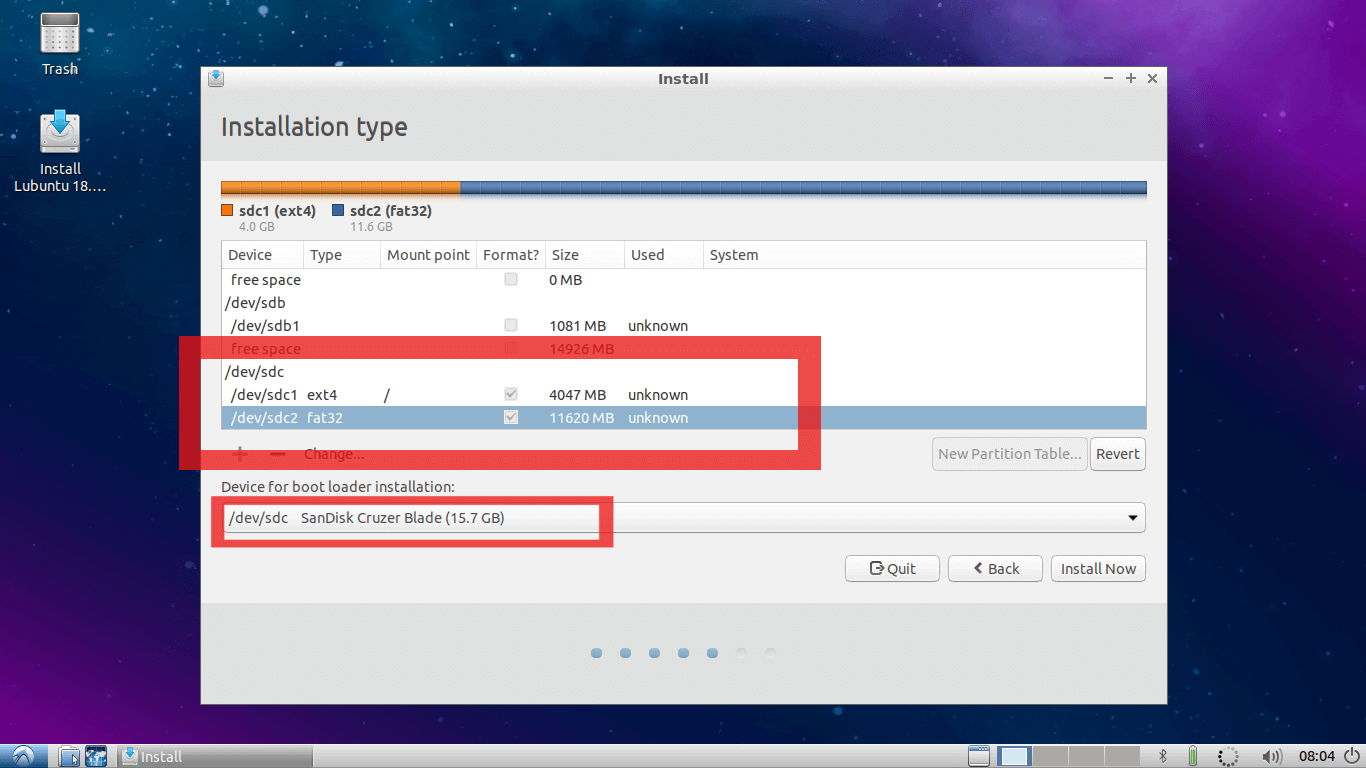
Disk Partitioning Strategies: How to Allocate Space
This is perhaps the most critical step, especially if you’re dual-booting. Proceed with extreme caution here, as incorrect choices can lead to data loss.
You’ll typically be presented with options like:
- “Erase disk and install [Distribution Name]”: This option will wipe your entire hard drive, deleting all existing operating systems and data, and dedicate the entire disk to Linux. Only choose this if you are absolutely sure you want to completely replace your current OS and have backed up all your data.
- “Install [Distribution Name] alongside [Other Operating System]”: This is the easiest option for dual-booting. The installer will automatically shrink your existing OS partition and create new partitions for Linux. You might be able to use a slider to adjust how much space to allocate to each OS.
- “Something else” (Manual Partitioning): This option provides full control over disk partitioning. It’s recommended for experienced users or those with specific partitioning schemes in mind (e.g., separate partitions for
/,/home,/boot,swap). If you’re unsure, stick to “Erase disk” or “Install alongside.”
For manual partitioning:
- You’ll need a root partition (
/) (at least 20-30 GB). - A swap partition (optional for modern systems with ample RAM, typically 2GB or equal to RAM if RAM is less than 4GB).
- A home partition (
/home) (optional but recommended for easier reinstallation without losing personal files). - A boot partition (
/boot) (optional, usually 500 MB-1 GB, sometimes handled by the root partition). - An EFI System Partition (ESP) if you’re installing on a UEFI system (usually existing if you have Windows, 100-500 MB, mounted as
/boot/efi).
Choose the appropriate option based on your needs and remember the importance of backups.
User Creation and Finalizing the Installation
After partitioning, you’ll configure your user account and location settings:
- Time Zone: Select your geographical location by clicking on a map or choosing from a list.
- Who are you? (User Creation):
- Your Name: Your full name.
- Your Computer’s Name (Hostname): A name for your computer on the network (e.g., “my-linux-pc”).
- Pick a Username: Your login name (lowercase, no spaces).
- Choose a Password: A strong password is crucial for security.
- Login Options: You can choose to log in automatically or require a password at startup. Requiring a password is more secure.
The installer will then proceed with copying files and setting up the system. This process can take anywhere from 15 minutes to an hour, depending on your system’s speed and the distribution’s size.
Once the installation is complete, you’ll typically be prompted to restart your computer. Remove the USB drive when prompted or before the system reboots.
VI. Post-Installation: Optimizing Your New Linux Environment
Congratulations! You’ve successfully installed Linux. Now, it’s time to refine your new operating system and tailor it to your workflow.
First Boot and Initial System Updates
Upon the first boot into your newly installed Linux system, log in with the username and password you created. The first thing you should do is update your system. This downloads and installs the latest security patches, bug fixes, and software versions.
Open a terminal (usually found in your applications menu) and run the following commands:
sudo apt update         # For Debian/Ubuntu-based systems (like Mint, Pop!_OS)
sudo apt upgrade        # For Debian/Ubuntu-based systems
For Fedora-based systems, you’d use:
sudo dnf update
This ensures your system is up-to-date and secure from the get-go, a critical aspect of digital security (Tech).
Driver Installation and Essential Software Setup
- Proprietary Drivers: If you have an NVIDIA graphics card, broadcom Wi-Fi adapter, or other proprietary hardware, your distribution might offer an “Additional Drivers” tool (often found in “Software & Updates” settings on Ubuntu/Mint) to easily install proprietary drivers. These can significantly improve performance and compatibility.
- Essential Applications: Most distributions come with a good set of default applications, including a web browser, office suite (LibreOffice), and media player. However, you’ll likely want to install additional software. Use your distribution’s software center (e.g., “Ubuntu Software,” “Software Manager” in Mint) or package manager from the terminal (e.g.,
sudo apt install [package-name]) to install:- Your preferred web browser (Chrome, Firefox, Brave)
- Communication tools (Discord, Zoom, Slack)
- Creativity software (GIMP, Krita, Inkscape)
- Productivity tools (VS Code, specific IDEs)
This customization aligns with enhancing your productivity (Tech).
Personalizing Your Linux Experience: Customization and Productivity Tools
One of Linux’s greatest strengths is its flexibility. Take advantage of it to create an environment that suits you:
- Desktop Environment (DE) Customization: Explore your DE’s settings for themes, icons, fonts, and desktop widgets. Change your wallpaper, adjust panel layouts, and set up hotkeys. Many distributions offer various desktop environments (GNOME, KDE Plasma, XFCE, MATE, Cinnamon) which you can even install alongside your current one and switch between at login.
- Productivity Tweaks:
- Tiling Window Managers: For power users, consider trying a tiling window manager (like i3, Sway, or AwesomeWM) for keyboard-driven, highly efficient window management.
- Dotfiles: Learn about “dotfiles” to manage your configuration files, allowing you to easily replicate your setup across different machines or after a fresh install. This contributes to a streamlined workflow and supports your digital brand as a meticulous tech user.
- Aliases and Scripts: Create custom aliases in your shell configuration (
.bashrcor.zshrc) for frequently used commands. Write simple shell scripts to automate repetitive tasks. This level of automation significantly boosts productivity (Tech).
- Explore the Terminal: While graphical interfaces are excellent, the Linux terminal is a powerful tool. Learning basic commands can drastically improve your efficiency, allow for more granular control, and open doors to advanced functionalities.
VII. Troubleshooting Common Installation Hurdles
Even with careful preparation, you might encounter issues. Don’t be discouraged; the Linux community is vast and supportive.
Addressing Boot Issues and Driver Conflicts
- System Not Booting from USB: Double-check your BIOS/UEFI settings, especially the boot order and Secure Boot status. Ensure your USB drive was created correctly; try another USB creator tool or a different USB drive.
- Black Screen or Display Issues After Installation: This often points to graphics driver problems. Try booting with the
nomodesetkernel parameter (you can usually edit boot options in the GRUB menu by pressing ‘e’ during startup). Once booted, install proprietary drivers or try different open-source drivers. - Wi-Fi Not Working: This is a common issue with certain wireless chipsets requiring proprietary drivers. Check your distribution’s documentation or forums for solutions specific to your Wi-Fi adapter model. Connecting via Ethernet temporarily can help download necessary drivers.
- Installation Freezes: Ensure your ISO download wasn’t corrupted (verify its checksum). Try a different USB port or USB drive. It might also indicate a hardware issue.
Seeking Community Support: Forums and Documentation
The strength of Linux lies not just in its code but in its vibrant community. If you encounter a problem:
- Check Official Documentation: Most distributions have excellent documentation, wikis, and FAQs.
- Search Online: A quick search for your specific error message or problem (e.g., “Ubuntu Wi-Fi not working [your laptop model]”) will often yield solutions from others who have faced similar issues.
- Visit Forums and Subreddits: Websites like Ask Ubuntu, Linux Mint Forums, r/linux, and r/distroname are teeming with helpful users and experts. Provide detailed information about your system, the steps you’ve taken, and any error messages you’ve received.
Leveraging these resources not only helps you solve problems but also connects you to the broader open-source ethos, reinforcing aspects of digital security through shared knowledge and community vigilance.
Conclusion
Installing Linux from a USB drive is more than just a technical procedure; it’s an entry point into a world of open-source innovation, enhanced digital security, and unparalleled control over your computing experience. By following this comprehensive guide, you’ve equipped yourself with the knowledge to perform a successful installation, moving beyond the confines of proprietary systems.
Linux empowers you to optimize your workflow, experiment with diverse desktop environments, and utilize a vast ecosystem of free and open-source software, directly contributing to increased productivity and cost-effectiveness (Money). Its robust security features ensure a safer digital environment, aligning perfectly with modern digital security best practices (Tech). Furthermore, becoming proficient in Linux can enhance your personal brand within the tech sphere, showcasing a valuable skill set that speaks volumes about your technical acumen and problem-solving capabilities (Brand).
Embrace the journey, explore the vast possibilities, and tailor your Linux environment to truly reflect your needs and preferences. The world of Linux is dynamic, ever-evolving, and waiting for you to discover its full potential. Happy computing!
aViewFromTheCave is a participant in the Amazon Services LLC Associates Program, an affiliate advertising program designed to provide a means for sites to earn advertising fees by advertising and linking to Amazon.com. Amazon, the Amazon logo, AmazonSupply, and the AmazonSupply logo are trademarks of Amazon.com, Inc. or its affiliates. As an Amazon Associate we earn affiliate commissions from qualifying purchases.