Python has cemented its place as one of the most versatile and powerful programming languages in the world, driving innovation across web development, data science, artificial intelligence, machine learning, automation, and beyond. A significant part of Python’s immense popularity and capability stems from its vast ecosystem of third-party libraries and packages. These pre-written modules provide specialized functionalities, allowing developers to build complex applications quickly and efficiently without reinventing the wheel. However, to harness this power, one must first master the fundamental skill of installing these libraries correctly.
This guide will take you through a comprehensive journey, demystifying the process of installing Python libraries. Whether you’re a budding developer taking your first steps or a seasoned professional looking to refine your workflow, understanding the nuances of package management is crucial for clean, reproducible, and robust Python projects. We’ll explore the primary tools and best practices, ensuring you’re well-equipped to integrate any library into your Python environment, fostering both technical proficiency and a reputation for efficient development.

The Foundation: Understanding Python Libraries and Their Indispensable Role
Before diving into the mechanics of installation, it’s vital to grasp what Python libraries are and why they are so fundamental to modern programming. In essence, a Python library (often used interchangeably with “package” or “module”) is a collection of related code – functions, classes, and variables – designed to perform specific tasks. Think of them as specialized toolkits that extend Python’s core capabilities.
Why Libraries are Indispensable for Developers
Imagine having to write all the code for networking, data manipulation, scientific computing, or even graphical user interfaces from scratch for every project. It would be an incredibly time-consuming, error-prone, and inefficient endeavor. Python libraries solve this challenge by providing ready-to-use solutions that have often been developed, tested, and optimized by countless contributors worldwide.
For individuals, leveraging libraries means faster project completion, allowing you to focus on the unique logic of your application rather than boilerplate code. For businesses and development teams, this translates directly into significant cost savings, reduced development cycles, and faster time-to-market for new products and features. In a competitive landscape, agility is key, and Python libraries are a cornerstone of agile development.
The Python Ecosystem: A World of Possibilities
The sheer breadth of the Python library ecosystem is staggering. From NumPy and Pandas for data analysis, Scikit-learn and TensorFlow for machine learning, Django and Flask for web development, to Requests for HTTP communication, there’s a library for almost any conceivable task. This rich ecosystem is a testament to the open-source community’s collaborative spirit and Python’s design philosophy, empowering developers to build sophisticated applications across diverse domains.
Mastering library installation is not just about technical execution; it’s about unlocking a world of potential, enabling you to build powerful solutions that can drive innovation, create revenue streams, and solidify your professional brand in the tech industry.
The Cornerstone: Installing Libraries with Pip
The primary and most widely used tool for installing Python packages is pip. pip stands for “Pip Installs Packages” (or sometimes “Pip Installs Python”), and it is Python’s standard package manager. If you’ve installed Python version 3.4 or later, pip typically comes bundled with it, making it immediately available for use.
Getting Started with Pip: The Basics
Before you can use pip, it’s good practice to ensure it’s up-to-date. An outdated pip can sometimes lead to installation issues. You can upgrade pip itself using the following command in your terminal or command prompt:
python -m pip install --upgrade pip
This command uses the python -m pip syntax, which is the recommended way to invoke pip. It ensures you’re using the pip associated with your current Python interpreter, especially if you have multiple Python versions installed on your system.
Once pip is updated, installing a new library is straightforward. You simply use the install command followed by the name of the package. For example, to install the popular requests library for making HTTP requests:
pip install requests
pip will automatically download the package from the Python Package Index (PyPI), resolve any dependencies (other packages that requests might need to function), and install them into your Python environment. You’ll typically see output indicating the progress of the download and installation.
Installing Specific Package Versions and Other Options
Sometimes, you might need to install a specific version of a library, perhaps to maintain compatibility with an existing project or to test a feature from an older release. pip allows this by specifying the version number using ==:
pip install requests==2.25.1
You can also specify a minimum version, or a version greater than or less than a certain point, using operators like >=, <=, <, >. For instance:
pip install requests>=2.25.0
This level of control is vital for ensuring your project environments are consistent and for troubleshooting compatibility issues that might arise when working with different libraries or existing codebases.
Upgrading and Uninstalling Packages
As libraries evolve, new features are added, and bugs are fixed. Keeping your packages updated is generally good practice to benefit from these improvements. To upgrade an already installed package to its latest version, use the --upgrade flag:
pip install --upgrade requests
If you ever need to remove a library from your environment, pip also provides an uninstall command. Be aware that pip uninstall will only remove the specified package and not its dependencies, which might leave some orphaned packages behind.
pip uninstall requests
You will typically be prompted to confirm the uninstallation.
Managing Dependencies with requirements.txt
For any serious Python project, especially those intended for production or collaborative development, manually tracking installed packages quickly becomes unmanageable. This is where requirements.txt files come in. A requirements.txt file is a plain text file that lists all the direct dependencies of your project, often with their exact version numbers.
You can generate a requirements.txt file based on your current environment using:
pip freeze > requirements.txt
This command outputs a list of all installed packages and their versions to standard output, which is then redirected into requirements.txt. A typical entry might look like:
requests==2.28.1
urllib3==1.26.15
To install all packages listed in a requirements.txt file, you use the -r flag:
pip install -r requirements.txt
This mechanism is crucial for ensuring that anyone working on the project, or any deployment environment, can set up an identical environment with the precise library versions required. This consistency is not only a technical best practice but also contributes to a strong professional brand, demonstrating meticulousness and foresight in project management.
Best Practices: Leveraging Virtual Environments for Clean Development
While pip is excellent for installing packages, installing everything globally (directly into your system’s Python installation) can quickly lead to problems, especially when working on multiple projects with conflicting dependency requirements. This is where Python virtual environments become indispensable.
The Problem of Global Installations
Imagine Project A needs requests version 2.20 and Project B needs requests version 2.28. If both projects try to install their required requests version globally, one will overwrite the other, leading to “dependency hell” and broken projects. This scenario is incredibly common and frustrating for developers.
A global installation also means that all projects share the same set of installed packages, making it harder to track which packages are truly needed for a specific project and increasing the risk of unintended side effects.
Setting Up a Virtual Environment (venv)
A virtual environment is an isolated Python environment that allows you to install packages for a specific project without interfering with other projects or your global Python installation. Each virtual environment has its own pip and its own set of installed packages. Python 3 comes with a built-in module for creating virtual environments called venv.
To create a virtual environment, navigate to your project’s root directory in the terminal and run:
python -m venv myenv
Replace myenv with a descriptive name for your environment (e.g., venv, env, .venv). This command creates a new directory named myenv (or whatever you chose) in your project folder, containing a copy of the Python interpreter, pip, and other necessary files.
Activating and Deactivating Environments
Once created, you need to “activate” the virtual environment. Activating modifies your shell’s PATH variable to use the Python and pip within the virtual environment instead of the global ones.
- On Windows:
bash

.myenvScriptsactivate
- On macOS/Linux:
bash

source myenv/bin/activate
After activation, your terminal prompt will usually change to indicate that you are inside the virtual environment (e.g., (myenv) preceding your prompt). Now, any packages you install with pip install will be isolated within myenv.
To exit a virtual environment, simply type:
deactivate
Your shell prompt will return to normal, and you’ll be back to using your global Python installation.
Benefits of Virtual Environments for Project Management
Virtual environments are a cornerstone of professional Python development for several reasons:
- Isolation: They prevent conflicts between project dependencies, ensuring that each project works with the exact versions of libraries it needs.
- Reproducibility: Combined with
requirements.txt, virtual environments make it easy to replicate a project’s exact development setup on any machine, which is critical for collaboration, deployment, and long-term maintenance. - Cleanliness: They keep your global Python installation lean and free from project-specific clutter.
- Professionalism: Using virtual environments is a hallmark of good development practice. It reflects a systematic approach to project management, enhancing your personal brand as a developer and contributing to a company’s robust software development lifecycle. By minimizing environment-related bugs and deployment headaches, virtual environments ultimately save time and money.
Alternative Installation Methods for Specialized Needs
While pip and venv cover the vast majority of Python library installations, there are situations and ecosystems where alternative methods are preferred or necessary.
Installing with Conda (Anaconda/Miniconda)
For users heavily involved in data science, machine learning, or scientific computing, Anaconda (or its minimalist cousin, Miniconda) is a popular choice. Conda is both a package manager and an environment manager that goes beyond Python packages; it can manage packages for other languages and system-level dependencies.
If you have Anaconda or Miniconda installed, you’ll use conda install instead of pip install:
conda install numpy pandas matplotlib
Conda excels at handling complex scientific library dependencies, especially those that include non-Python components or specific compiler requirements, often providing pre-compiled binaries that simplify installation. Conda also has its own environment management system, which is similar in concept to venv but more powerful in its scope:
conda create --name my_data_env python=3.9
conda activate my_data_env
conda install scikit-learn
Conda environments offer excellent isolation for data science projects, ensuring that your analytical pipelines are stable and reproducible, which directly impacts the reliability of data-driven insights and financial models.
Manual Installation from Source (setup.py)
Occasionally, you might encounter a library that isn’t available on PyPI or needs to be installed directly from its source code (e.g., a development version from GitHub, or a proprietary library). Many Python packages include a setup.py file in their root directory. This file defines how the package should be built and installed.
To install a package manually from source, you would typically:
-
Download or clone the source code to your local machine.
-
Navigate to the project’s root directory in your terminal.
-
Run the following command:
python setup.py installOr, for a more modern approach using
pipto handle dependencies specified insetup.py(orpyproject.toml):pip install .(The
.signifies the current directory).
Manual installation offers maximum control but requires a deeper understanding of package structure and dependencies. It’s often reserved for advanced scenarios or specific development workflows.
Using Jupyter Notebook for Package Management
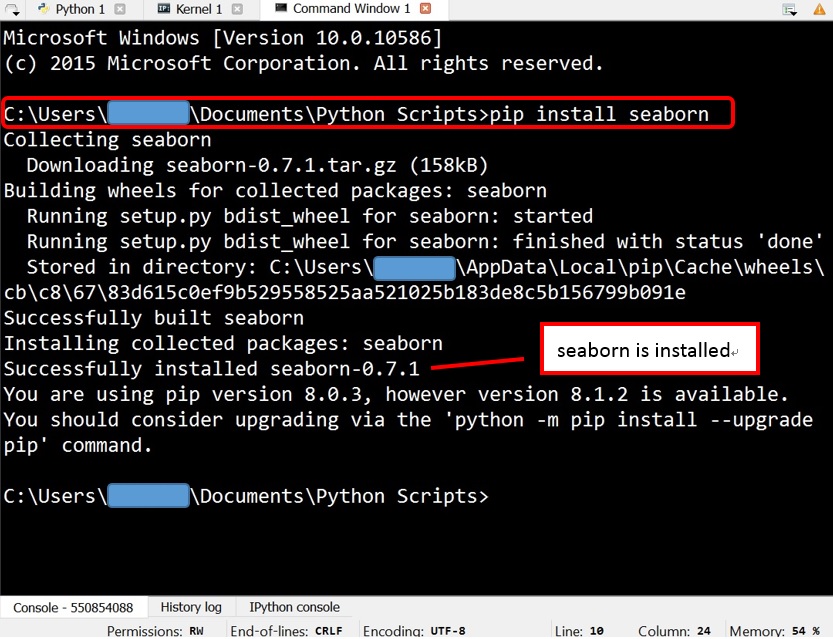
Jupyter Notebook and JupyterLab are interactive computing environments widely used in data science and education. While you can typically install packages via your system’s terminal before launching Jupyter, you can also install them directly within a notebook cell using pip commands prefixed with an exclamation mark (!) to execute shell commands:
!pip install seaborn
This method is convenient for quickly adding a missing library during an interactive session, but for larger projects, it’s generally better to manage dependencies in a requirements.txt file and install them in a virtual environment outside the notebook, ensuring your environment is fully configured before you begin.
Troubleshooting Common Installation Issues
Even with the best tools and practices, you might encounter issues during library installation. Knowing how to diagnose and resolve common problems is a vital skill that saves time and reduces frustration.
Permission Errors and How to Resolve Them
One of the most frequent issues, especially on Linux/macOS, is a “Permission denied” error when pip tries to install packages into system directories. This usually happens when you try to install globally without sufficient privileges.
Solution:
- Use a Virtual Environment: This is the recommended solution. Packages are installed in your project directory, where you have full write permissions.
- User-specific Installation: If you must install globally (though generally discouraged), you can install packages only for your user account:
bash

pip install --user package_name
- Use
sudo(Caution!): Usingsudo pip install package_namegrants root privileges. While it bypasses permission errors, it’s generally not recommended as it can lead to conflicts, pollute your system Python, and potentially create security vulnerabilities. Only use it if you understand the implications and have no other choice for system-wide tools.
Network Issues and Proxy Configurations
Installation issues can also stem from network connectivity problems, firewalls, or proxy servers blocking access to PyPI.
Solution:
- Check Network Connectivity: Ensure you have a stable internet connection.
- Configure Proxy: If you’re behind a corporate proxy,
pipneeds to be configured to use it. You can set environment variables (HTTP_PROXY,HTTPS_PROXY) or usepip‘s--proxyflag:
bash

pip install --proxy http://your_proxy_server:port package_name
Consult your IT department for proxy details.
Compiler Errors and Missing Build Tools
Some Python packages, especially those with C, C++, or Fortran extensions (like NumPy, SciPy, Pillow), require a C compiler and other development tools to be installed on your system. If these are missing, you’ll see errors during installation indicating issues with compiling C extensions.
Solution:
- On Windows: Install “Build Tools for Visual Studio” (specifically the C++ build tools) from Microsoft’s website.
- On macOS: Install Apple’s Xcode Command Line Tools:
bash

xcode-select --install
- On Linux (Debian/Ubuntu): Install essential build tools:
bash

sudo apt-get update

sudo apt-get install build-essential python3-dev
For other Linux distributions, use their respective package managers (e.g.,yum,dnf,zypper).
Version Conflicts and Dependency Hell
When multiple packages require different versions of the same dependency, you run into version conflicts. pip often tries to resolve these, but sometimes it can’t, or it resolves them in a way that breaks another package.
Solution:
- Use Virtual Environments: This is the primary defense against dependency hell. Each project gets its isolated dependencies.
requirements.txtwith Pinned Versions: Explicitly pin package versions in yourrequirements.txt(e.g.,package_name==X.Y.Z) to ensure consistency.pip check: After installing packages, runpip checkto identify incompatible dependencies:
bash

pip check
- Careful
pip install: When installing a new package, pay attention to the output, especially ifpipwarns about dependency conflicts. You might need to adjust other package versions or find alternative libraries.
By understanding these common pitfalls and their solutions, you can streamline your development process, reduce downtime, and present a more polished and reliable output in any tech-driven project.
Conclusion: Empowering Your Python Development Journey
Mastering the installation of Python libraries is far more than a mere technical chore; it’s a foundational skill that unlocks the true potential of the Python language. By understanding and effectively utilizing tools like pip, leveraging the power of virtual environments, and knowing how to troubleshoot common issues, you equip yourself to build robust, scalable, and maintainable applications across the vast landscape of technology.
For individual developers, these practices translate into a smoother, more efficient coding experience, allowing you to focus on innovation and problem-solving. For businesses and teams, they are critical for ensuring project consistency, reducing development costs, and accelerating delivery schedules. A clean, reproducible development environment built on sound library management practices is a hallmark of a strong technical brand and a direct contributor to project success and, ultimately, financial viability in the competitive digital economy.
The Python ecosystem is constantly evolving, with new libraries and tools emerging regularly. By staying current with these installation techniques and best practices, you ensure that you remain agile, adaptable, and ready to tackle any challenge, cementing your role as a proficient and invaluable contributor in the ever-expanding world of Python development. Embrace these principles, and empower your Python journey to new heights of productivity and innovation.
aViewFromTheCave is a participant in the Amazon Services LLC Associates Program, an affiliate advertising program designed to provide a means for sites to earn advertising fees by advertising and linking to Amazon.com. Amazon, the Amazon logo, AmazonSupply, and the AmazonSupply logo are trademarks of Amazon.com, Inc. or its affiliates. As an Amazon Associate we earn affiliate commissions from qualifying purchases.