In today’s fast-paced digital landscape, the ability to analyze data, develop intelligent systems, and prototype solutions quickly is more crucial than ever. For professionals ranging from data scientists and machine learning engineers to educators and researchers, an interactive development environment is not just a luxury but a necessity. Enter Jupyter Notebook – a powerful, open-source web application that has revolutionized how individuals interact with code, data, and insights. This comprehensive guide will walk you through the process of installing Jupyter Notebook on your Windows operating system, ensuring you’re equipped to dive into the world of interactive computing, data exploration, and AI development.

Jupyter Notebook stands as a cornerstone in the data science and machine learning community, lauded for its versatility and user-friendliness. It allows users to create and share documents that contain live code, equations, visualizations, and narrative text, all within a single, coherent environment. Whether you’re exploring complex datasets, developing sophisticated algorithms, or presenting your findings in an engaging format, Jupyter Notebook provides an unparalleled platform. Its integration into the “Tech” sphere is undeniable, serving as a critical tool that underpins advancements in AI, software development, and digital productivity. By the end of this tutorial, you’ll not only have Jupyter Notebook successfully installed but also a deeper understanding of its potential to transform your digital workflow and contribute to your professional growth.
Understanding Jupyter Notebook and Its Prerequisites
Before we delve into the step-by-step installation process, it’s essential to grasp what Jupyter Notebook is and why it has become such an indispensable tool. We’ll also cover the fundamental prerequisites needed for a smooth installation, ensuring your Windows system is ready to host this powerful application.
What is Jupyter Notebook? An Overview
Jupyter Notebook is much more than just a code editor; it’s an interactive computational environment that fosters creativity and collaboration. At its core, Jupyter (an acronym derived from Julia, Python, and R, the three core programming languages it was initially designed to support) allows users to combine code execution, rich text (using Markdown), mathematical equations (using LaTeX), and multimedia (images, videos) into a single document. These documents, known as “notebooks,” are saved with a .ipynb extension and can be easily shared and reproduced, making them ideal for scientific research, data analysis reports, educational materials, and even personal project portfolios.
The benefits of using Jupyter Notebook are manifold, resonating strongly with our website’s “Tech” focus:
- Interactive Computing: Unlike traditional scripts that run from start to finish, Jupyter Notebook allows you to execute code cell by cell, providing immediate feedback and enabling iterative development. This interactive nature is particularly beneficial for data exploration, where you might need to visualize data, tweak parameters, and re-run experiments quickly.
- Reproducible Research: By combining code, outputs, and explanations in one document, Jupyter Notebook makes it easy to reproduce analyses and experiments. This transparency is crucial for scientific integrity and collaborative projects, where others need to understand your methodology.
- Data Visualization: With robust libraries like Matplotlib, Seaborn, and Plotly, Jupyter Notebook excels at creating compelling data visualizations directly within the notebook, helping to uncover insights and communicate findings effectively.
- Versatility: While Python is its most popular kernel, Jupyter supports over 100 programming languages, extending its utility beyond the Python ecosystem. This flexibility makes it a powerful tool for diverse programming needs.
- Accessibility and Collaboration: As a web-based application, Jupyter Notebook can be accessed through a browser, making it relatively lightweight and platform-agnostic once installed. Notebooks can also be easily shared via platforms like GitHub or dedicated Jupyter services, fostering collaboration among teams.
For individuals looking to build a strong “Personal Branding” in the tech space, mastering Jupyter Notebook is a significant asset. It demonstrates proficiency in data handling, analytical thinking, and effective communication – skills highly valued by employers and essential for career advancement, which can ultimately tie into our “Money” topic through increased earning potential.
Essential Prerequisites: Python and System Readiness
To successfully install and run Jupyter Notebook on your Windows machine, a few fundamental components must be in place. The most critical of these is Python.
1. Python Installation:
Jupyter Notebook is built on Python and requires a Python installation to function. It’s generally recommended to use Python 3.x, as Python 2.x is officially deprecated and no longer supported. If you don’t have Python installed, or you have an older version, we’ll cover how to get the latest stable release during our installation methods. The proper installation of Python is paramount, as it forms the backbone of your data science environment.
2. System Requirements:
Jupyter Notebook is relatively lightweight. Any modern Windows operating system (Windows 7 or newer) with a reasonable amount of RAM (4GB or more recommended for comfortable data analysis) and processor power should be sufficient. Ensure you have enough free disk space for the installation files and any data you’ll be working with.
3. Command Line Familiarity (Basic):
While not strictly a prerequisite for Anaconda users, a basic understanding of using the Windows Command Prompt (or PowerShell) will be beneficial, especially for launching Jupyter Notebook and troubleshooting. Knowing how to navigate directories and execute simple commands will empower you to manage your environment more effectively.
Understanding these foundational elements sets the stage for a smooth installation. Now, let’s explore the two primary methods for getting Jupyter Notebook up and running on your Windows system.
Step-by-Step Installation Methods
There are two main approaches to installing Jupyter Notebook on Windows: using Anaconda (highly recommended for beginners and data science practitioners) or using pip (Python’s package installer, suitable for those who prefer a more minimalist setup or already have a specific Python environment). Each method has its advantages, and we’ll guide you through both.
Method 1: Installing Jupyter Notebook with Anaconda (Recommended for Beginners)
Anaconda is a comprehensive distribution that bundles Python, Jupyter Notebook, and over 250 popular data science packages (like NumPy, pandas, SciPy, and scikit-learn) into a single, easy-to-install package. It also includes Conda, a powerful package and environment manager. For anyone serious about data science, machine learning, or general Python development on Windows, Anaconda simplifies environment setup significantly.
Why Anaconda is Preferred:
- Batteries Included: You get a full data science toolkit right out of the box, saving you the hassle of installing individual libraries.
- Environment Management: Conda allows you to create isolated environments for different projects, preventing dependency conflicts – a common headache in software development.
- Ease of Use: The graphical installer and Anaconda Navigator (a desktop GUI) make it incredibly user-friendly, especially for those new to the command line.
Installation Steps:
-
Download Anaconda:
- Open your web browser and navigate to the official Anaconda website:
www.anaconda.com/download. - Scroll down to the “Anaconda Installers” section. You’ll see options for Windows, macOS, and Linux.
- Under the Windows section, download the graphical installer for the latest Python 3.x version (e.g., “64-bit Graphical Installer”). The file size will be significant (hundreds of MBs), so ensure you have a stable internet connection.
- Open your web browser and navigate to the official Anaconda website:
-
Run the Anaconda Installer:
- Once the download is complete, locate the
.exefile (e.g.,Anaconda3-2023.09-0-Windows-x86_64.exe) in your Downloads folder and double-click it to start the installation. - Welcome Screen: Click “Next” to proceed.
- License Agreement: Read the license terms and click “I Agree.”
- Installation Type: For most users, “Just Me (recommended)” is the best choice, installing Anaconda in your user directory. Choose “All Users” if you have administrative privileges and want Anaconda to be accessible to all user accounts on the computer. Click “Next.”
- Destination Folder: The installer will suggest a default installation path (e.g.,
C:UsersYourUseranaconda3). It’s generally safe to accept the default, but ensure you have enough disk space (several GBs are usually required). Click “Next.” - Advanced Installation Options (CRITICAL STEP):
- “Add Anaconda3 to my PATH environment variable”: This option is NOT RECOMMENDED unless you know what you are doing and want to manually manage your PATH. Modifying PATH can conflict with other Python installations.
- “Register Anaconda3 as my default Python 3.x”: This option IS HIGHLY RECOMMENDED for beginners. It ensures that any Python scripts you run or Jupyter Notebook invocations will use the Anaconda Python distribution, without cluttering your system PATH directly.
- Ensure only the second option is checked if you’re unsure. If you have other specific Python setups, you might consider leaving both unchecked and relying on Anaconda Navigator or the Anaconda Prompt.
- Click “Install.”
- Installation Process: The installation will now begin and may take several minutes. You’ll see a progress bar.
- Completion: Once the installation finishes, you’ll see a “Completed” screen. You might be offered to install VS Code; you can skip this for now or install it if you wish. Click “Next,” then “Finish.”
- Once the download is complete, locate the
-
Verify Anaconda and Jupyter Notebook Installation:
- Open the Windows Start Menu and search for “Anaconda Prompt.” Launch it.
- In the Anaconda Prompt, type the following commands and press Enter after each:
python --version(This should show a Python 3.x version, e.g.,Python 3.9.12)conda --version(This should show the Conda version, e.g.,conda 4.14.0)jupyter notebook --version(This should show the Jupyter Notebook version, e.g.,6.4.12)
- If all commands return version numbers, Anaconda and Jupyter Notebook are successfully installed and configured.
-
Launch Jupyter Notebook:
- Option A (Using Anaconda Navigator – Recommended for GUI users):
- Search for “Anaconda Navigator” in the Windows Start Menu and launch it.
- Once Anaconda Navigator loads, you’ll see a dashboard with various applications. Find “Jupyter Notebook” and click the “Launch” button beneath it.
- Option B (Using Anaconda Prompt – Recommended for command-line users):
- Open the “Anaconda Prompt” from the Start Menu.
- Navigate to the directory where you want to store your notebooks (e.g.,
cd DocumentsJupyter_Notebooks). If the directory doesn’t exist, you can create it first. - Type
jupyter notebookand press Enter. - This will open a new tab in your default web browser (usually on
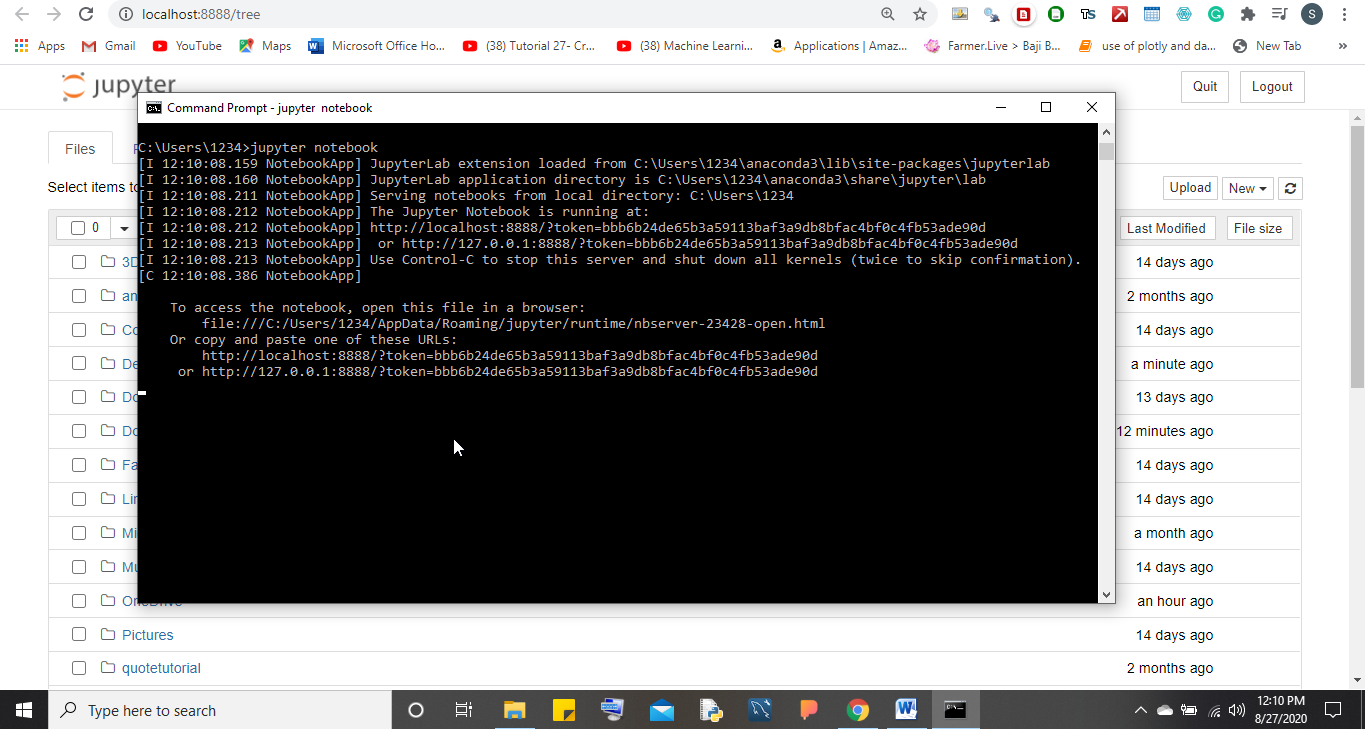
http://localhost:8888) showing the Jupyter Notebook dashboard, rooted in the directory you navigated to. The Anaconda Prompt window will also display some server logs; do not close this window as long as you are using Jupyter Notebook.
- Option A (Using Anaconda Navigator – Recommended for GUI users):
Method 2: Installing Jupyter Notebook with pip (For Experienced Users)
This method is for users who already have a standalone Python installation, prefer to manage their packages manually, or want a lightweight setup without the full Anaconda distribution. It requires a slightly better understanding of Python environments and the command line.
Prerequisites for this method:
- Python: Python 3.x installed and added to your system’s PATH.
- pip: Python’s package installer, which comes bundled with Python 3.4 and later.
Installation Steps:
-
Install Python (if not already installed or configured correctly):
- Go to the official Python website:
www.python.org/downloads/windows/. - Download the latest stable Python 3.x installer (e.g., “Windows installer (64-bit)”).
- Run the downloaded
.exefile. - CRITICAL STEP: On the first screen of the installer, ensure you check the box that says “Add Python.exe to PATH” before clicking “Install Now.” This is crucial for running Python and pip commands from any directory in the Command Prompt.
- Follow the rest of the prompts to complete the installation.
- Go to the official Python website:
-
Verify Python and pip Installation:
- Open the Command Prompt (search for
cmdin the Start Menu). - Type
python --versionand press Enter. It should show your Python 3.x version. - Type
pip --versionand press Enter. It should show the pip version. If you encounter an error like'pip' is not recognized, it means Python or pip is not correctly added to your PATH, and you might need to reinstall Python, making sure to check the “Add to PATH” option.
- Open the Command Prompt (search for
-
Create and Activate a Virtual Environment (Highly Recommended):
Using virtual environments is a best practice in Python development. It creates isolated spaces for your project’s dependencies, preventing conflicts between different projects.- In the Command Prompt, navigate to a directory where you want to create your project:
cd C:UsersYourUserDocumentsMyPythonProjects. - Create a virtual environment (e.g., named
jupyter_env):
python -m venv jupyter_env - Activate the virtual environment:
jupyter_envScriptsactivate(You’ll see(jupyter_env)prepended to your command prompt, indicating it’s active).
- In the Command Prompt, navigate to a directory where you want to create your project:
-
Install Jupyter Notebook:
- With your virtual environment active (if you created one), type the following command in the Command Prompt:
pip install jupyter - Press Enter and wait for pip to download and install Jupyter Notebook and all its dependencies. This might take a few minutes.
- With your virtual environment active (if you created one), type the following command in the Command Prompt:
-
Launch Jupyter Notebook:
- Ensure your virtual environment is still active (if you’re using one).
- From the Command Prompt (within your project directory, or wherever you want to open Jupyter’s file browser), type:
jupyter notebook - Press Enter. This will launch the Jupyter server in the background and open a new tab in your default web browser, displaying the Jupyter Notebook dashboard.
By following either of these methods, you’ll have Jupyter Notebook successfully installed and ready for use. Now, let’s explore how to get started with your first notebook.
Launching Jupyter Notebook and Your First Steps
With Jupyter Notebook installed, whether via Anaconda or pip, it’s time to open it up and create your first interactive document. This section will guide you through launching the application and introduce you to its basic interface and functionality.
Starting Jupyter Notebook
As covered in the installation methods, there are typically two ways to launch Jupyter Notebook on Windows:
- From Anaconda Navigator (if using Anaconda): Simply search for “Anaconda Navigator” in your Windows Start Menu, launch it, and then click the “Launch” button under Jupyter Notebook. This is an excellent option for users who prefer a graphical interface.
- From the Command Prompt (Anaconda Prompt or standard CMD/PowerShell):
- Open your preferred command-line interface.
- If you used
pipand a virtual environment, activate it first (e.g.,jupyter_envScriptsactivate). - Navigate to the directory where you store your project files or where you want your new notebook to be saved (e.g.,
cd C:UsersYourUserDocumentsDataProjects). This is important because Jupyter Notebook will open its file browser rooted in the directory you launch it from. - Type
jupyter notebookand press Enter.
Once launched, Jupyter Notebook will automatically open in your default web browser, usually at an address like http://localhost:8888. You’ll see a file browser interface, displaying the contents of the directory from which you launched it. The command-line window from which you launched Jupyter must remain open; closing it will shut down the Jupyter server.
Creating Your First Notebook and Running Code
Now that you’re in the Jupyter interface, let’s create a new notebook and execute some code.
-
Creating a New Notebook:
- In the top-right corner of the Jupyter dashboard, click on the “New” button.
- From the dropdown menu, select the kernel you want to use. For most users, this will be “Python 3” (or whatever version of Python Anaconda/pip installed for you).
- A new browser tab will open, displaying an empty notebook. This is your canvas!
-
Understanding the Notebook Interface:
- Cells: Jupyter Notebooks are composed of cells. There are two primary types:
- Code Cells: Where you write and execute your programming code (e.g., Python).
- Markdown Cells: Where you write narrative text, explanations, headings, lists, and embed images using Markdown syntax. This is great for documenting your work and making it readable.
- Toolbar: At the top, you’ll find a toolbar with icons for saving, adding new cells, cutting, copying, pasting, moving cells, running cells, and more.
- Kernel: The “kernel” is the computational engine that executes the code in your notebook. For Python 3, it’s a Python interpreter. The kernel’s status (busy or idle) is indicated in the top-right corner.
- File Name: By default, your new notebook will be named “Untitled.ipynb”. Click on the name to rename it to something more descriptive (e.g.,
My_First_Analysis.ipynb).
- Cells: Jupyter Notebooks are composed of cells. There are two primary types:
-
Running Your First Code:
- The first cell in a new notebook is a code cell. Click inside it.
- Type a simple Python command, for example:
python

print("Hello, Jupyter!")
- To run the code, click the “Run” button in the toolbar (it looks like a right-pointing arrow) or press
Shift + Enter. - Below the code cell, you’ll see the output:
Hello, Jupyter!. A new empty code cell will automatically appear below.
-
Adding Markdown Text:
-
Click on the new empty cell.
-
In the toolbar, click on the dropdown menu that says “Code” and change it to “Markdown.”
-
Now, type some Markdown text. For example:
# My First Jupyter Notebook This is an introduction to using Jupyter Notebook. ## Key Features * Interactive code execution * Rich text documentation * Data visualization -
Run this cell (Shift + Enter). The Markdown will be rendered into formatted text, creating an attractive and readable section.
-
-
Saving Your Notebook:
- Regularly save your work! You can click the floppy disk icon in the toolbar or go to
File > Save and Checkpoint. Your notebook will be saved as an.ipynbfile in the directory where you launched Jupyter.
- Regularly save your work! You can click the floppy disk icon in the toolbar or go to
Congratulations! You’ve successfully launched Jupyter Notebook, created a new notebook, run your first Python code, and formatted text using Markdown. This is the foundation upon which all your future data science and programming endeavors in Jupyter will be built.
Enhancing Your Jupyter Notebook Experience and Troubleshooting Common Issues
As you become more comfortable with Jupyter Notebook, you’ll likely want to customize your environment or encounter minor hurdles. This section will guide you through enhancing your experience with extensions and provide solutions to common installation and usage problems, further solidifying Jupyter Notebook’s role in boosting “Productivity” and digital security in your “Tech” toolkit.
Customizing Jupyter Notebook and Adding Extensions
Jupyter Notebook’s flexibility extends to its customizability. You can tailor its appearance and functionality to better suit your workflow and specific project needs, often by leveraging extensions.
-
Themes and Styling:
While Jupyter Notebook has a default minimalist theme, you can apply custom themes for a different look and feel. Thejupyterthemespackage is a popular choice for this.- Install it (preferably in your virtual environment or Anaconda base environment):
pip install jupyterthemes - You can then apply a theme (e.g.,
oceansideormonokai):
jt -t oceanside -T -N -kl(The flags-T,-N,-klare for toolbar, notebook name, and kernel logo visibility respectively). - To reset to the default theme:
jt -r.
- Install it (preferably in your virtual environment or Anaconda base environment):
-
Jupyter Notebook Extensions (nbextensions):
These are JavaScript modules that enhance the functionality of the notebook interface. They can add features like a table of contents, code auto-formatting, spell checkers, and more.- Install the
jupyter_contrib_nbextensionspackage along with its configuration utility:
pip install jupyter_contrib_nbextensions
jupyter contrib nbextension install --user - After installation, restart Jupyter Notebook. You’ll find a new “Nbextensions” tab on your Jupyter dashboard (at
http://localhost:8888/nbextensions). Here, you can enable and configure various extensions. For example, “Table of Contents (2)” automatically generates a navigation sidebar based on your Markdown headings, significantly improving “Productivity” for longer notebooks.
- Install the
-
Additional Kernels:
Jupyter Notebook is not limited to Python. You can install kernels for other languages like R, Julia, Scala, or even C++. Each kernel provides the ability to run code from that specific language within a Jupyter Notebook. For example, to add an R kernel:- First, install R and RStudio on your system.
- Then, open R and install the
IRkernelpackage:install.packages('IRkernel') - Finally, tell Jupyter about the R kernel:
IRkernel::installspec(). - Restart Jupyter, and you’ll see “R” as an option under “New” in the dashboard.
These customizations help in creating a personalized and more efficient development environment, aligning with the “Productivity” aspect of our “Tech” focus.
Common Installation and Usage Issues (and Their Solutions)
Even with careful steps, you might encounter issues. Here are some common problems and their fixes:
-
‘jupyter’ is not recognized as an internal or external command:
- Cause: Jupyter’s executable path is not in your system’s PATH environment variable.
- Solution (Anaconda): If you installed Anaconda, ensure you open “Anaconda Prompt” from the Start Menu, not the regular Command Prompt. If the issue persists, reinstall Anaconda and make sure “Register Anaconda as my default Python 3.x” was checked.
- Solution (pip): If you installed Python with pip, you likely didn’t check “Add Python.exe to PATH” during installation. Reinstall Python, ensuring this option is selected. Alternatively, if using a virtual environment, ensure it is activated before running
jupyter notebook.
-
Jupyter Notebook not opening in the browser (or showing “localhost refused to connect”):
- Cause: Often due to a port conflict (Jupyter defaults to port 8888), firewall blocking, or the Jupyter server crashing.
- Solution:
- Try a different port: In the command prompt where you launch Jupyter, use
jupyter notebook --port 9999(or any other available port number). - Check firewall: Temporarily disable your firewall to see if it’s the culprit. If it is, you’ll need to add an exception for Python or Jupyter.
- Check logs: Look at the output in the command-line window where you launched Jupyter for error messages.
- Restart server: Close the browser tab and the command-line window, then try launching Jupyter again.
- Try a different port: In the command prompt where you launch Jupyter, use
-
Kernel dies/restarts unexpectedly:
- Cause: This usually indicates a problem within your Python code or environment, such as a memory error, an infinite loop, or a conflict with an installed package.
- Solution:
- Check your code: Review the last code you ran for potential issues (e.g., trying to load a very large file into insufficient RAM, logical errors).
- Update packages: Old or corrupted packages can cause issues. In your Anaconda Prompt (or activated virtual environment), try
conda update --all(for Anaconda) orpip install --upgrade package_name(for specific pip packages). - Monitor memory: Use Task Manager to see if your system is running out of memory when the kernel dies.
- Restart kernel: Sometimes, simply restarting the kernel (
Kernel > Restartfrom the notebook menu) can resolve transient issues.
-
Slow performance:
- Cause: Large datasets, complex computations, or insufficient system resources.
- Solution:
- Optimize code: Use more efficient algorithms or data structures.
- Process in chunks: For very large datasets, avoid loading everything into memory at once; process data in smaller chunks.
- Upgrade hardware: More RAM or a faster CPU can significantly improve performance for intensive tasks.
- Virtual environments: Ensure you’re not running too many applications simultaneously.
By understanding these common issues and their resolutions, you can maintain a robust and efficient Jupyter Notebook environment, minimizing downtime and maximizing your “Productivity” and problem-solving skills, which are invaluable in any “Tech” career.

Conclusion
The journey to installing Jupyter Notebook on Windows, while seemingly a technical hurdle, is in fact an empowering step towards unlocking a world of interactive computing, data exploration, and advanced analytics. From understanding its fundamental role in modern “Tech” trends – particularly in AI, machine learning, and data science – to meticulously following the installation steps via Anaconda or pip, we’ve covered every crucial detail to get you started.
Jupyter Notebook is more than just a tool; it’s a paradigm for reproducible research, collaborative development, and effective knowledge sharing. Its ability to seamlessly blend live code, rich narrative, and compelling visualizations makes it an indispensable asset for students, educators, researchers, and industry professionals alike. Whether you’re aiming to build a stronger “Personal Branding” as a data-savvy individual, delve into complex datasets to inform financial decisions (tying into our “Money” category), or simply enhance your daily “Productivity” in coding projects, Jupyter Notebook provides the platform.
As you embark on your journey with Jupyter Notebook, remember that the interactive nature of the environment encourages experimentation and continuous learning. Don’t shy away from exploring its myriad features, customizing your workspace with extensions, or troubleshooting the occasional hiccup. Each challenge overcome deepens your technical acumen and fortifies your command over powerful digital tools. The digital landscape is ever-evolving, and mastering tools like Jupyter Notebook ensures you remain at the forefront of innovation, ready to contribute meaningfully to the next wave of technological advancements. So go ahead, launch your first notebook, and start creating – the future of interactive computing awaits!
aViewFromTheCave is a participant in the Amazon Services LLC Associates Program, an affiliate advertising program designed to provide a means for sites to earn advertising fees by advertising and linking to Amazon.com. Amazon, the Amazon logo, AmazonSupply, and the AmazonSupply logo are trademarks of Amazon.com, Inc. or its affiliates. As an Amazon Associate we earn affiliate commissions from qualifying purchases.