In the rapidly evolving landscape of technology, mastering essential tools is paramount for anyone venturing into data science, machine learning, or even just general programming. Among these indispensable tools, Jupyter Notebook stands out as a beacon of interactive computing, offering an unparalleled environment for developing, documenting, and sharing code. It’s an open-source web application that allows you to create and share documents containing live code, equations, visualizations, and narrative text, making it a favorite among researchers, educators, and data professionals worldwide.
Jupyter Notebook isn’t just a coding interface; it’s a dynamic workspace where you can blend executable code with rich text explanations, making your projects more understandable and reproducible. Whether you’re exploring a new dataset, building a machine learning model, or simply experimenting with Python code, Jupyter provides an intuitive and powerful platform. For those looking to stay ahead in tech trends and enhance their digital security and productivity, understanding and utilizing tools like Jupyter is crucial. This guide will walk you through the entire process of installing Jupyter Notebook, ensuring you’re ready to harness its full potential and embark on your journey of interactive data exploration and analysis.

Understanding Jupyter Notebook: The Gateway to Interactive Data Science
Before diving into the installation process, it’s beneficial to grasp what makes Jupyter Notebook such a transformative tool. Its design philosophy centers around interactivity and clarity, allowing users to execute code in small, manageable blocks and immediately see the results, fostering an iterative and experimental approach to problem-solving. This interactive nature is particularly advantageous in fields where rapid prototyping and visualization are key.
What Makes Jupyter Indispensable?
Jupyter Notebook offers a suite of features that collectively make it an indispensable asset for a wide range of tasks:
- Interactive Environment: Unlike traditional IDEs (Integrated Development Environments) where you often run entire scripts, Jupyter allows you to execute code cell by cell. This granular control is perfect for data exploration, debugging, and demonstrating specific steps in a complex process. You can instantly see the output, including variables, plots, and error messages, which significantly speeds up development cycles.
- Supports Multiple Languages (Kernels): While deeply associated with Python, Jupyter’s core strength lies in its ability to support various programming languages through what are known as “kernels.” The most common kernel is for Python (IPython), but you can also install kernels for R, Julia, Scala, and many others, extending its utility across diverse computational domains.
- Rich Media Output: Jupyter Notebooks are not limited to text-based outputs. They can seamlessly integrate rich media such as plots generated by libraries like Matplotlib and Seaborn, interactive visualizations from tools like Plotly, images, videos, and even mathematical equations rendered in LaTeX. This capability makes notebooks excellent for creating comprehensive and engaging reports or educational materials.
- Narrative Text and Documentation: Beyond code, Jupyter supports Markdown cells. Markdown is a lightweight markup language that allows you to add headings, bullet points, links, images, and formatted text directly within your notebook. This means you can intersperse detailed explanations, methodologies, and context alongside your code, transforming a raw script into a fully documented and understandable narrative. This feature is particularly valuable for reproducible research and team collaboration.
- Shareability and Reproducibility: Jupyter Notebooks are saved in a
.ipynbfile format, which is a JSON-based text file. This format encapsulates all the code, outputs, and Markdown text, making it highly portable. You can easily share these files with colleagues, publish them online (e.g., GitHub, nbviewer), or use them as reproducible research papers. This shareability ensures that others can not only view your work but also execute it and reproduce your results, fostering transparency and collaboration within the tech community. - Version Control Compatibility: Despite being a rich file format,
.ipynbfiles can be managed with version control systems like Git, though careful handling might be needed for diffs due to embedded outputs. Tools exist to strip outputs for cleaner version control, allowing data professionals to integrate Jupyter into their established development workflows.
A Glimpse into its Core Architecture
At its heart, Jupyter Notebook operates on a client-server model. When you launch Jupyter, a local web server starts, and your browser acts as the client. The server manages a “kernel” for each notebook you open. The kernel is a separate process (e.g., a Python interpreter) that executes the code sent from your browser and sends the results back to be displayed. This architecture allows for a flexible and powerful interactive computing experience, where the heavy lifting of code execution happens in the background, freeing up your browser for display and interaction.
Essential Prerequisites Before Installation
Before embarking on the installation journey, it’s crucial to ensure your system meets a few fundamental requirements. These prerequisites are straightforward and primarily revolve around having a working Python environment, as Python forms the backbone of Jupyter Notebook.
Python: The Backbone of Jupyter Notebook
Jupyter Notebook is predominantly used with Python, making it the most critical prerequisite.
- Importance of Python 3.x: While Jupyter can run with older Python versions, it is highly recommended to use Python 3.x (specifically Python 3.7 or newer) due to active development, improved features, and widespread library compatibility. Many modern data science libraries no longer support Python 2.x.
- How to Check if Python is Installed: You can easily check if Python is already installed on your system and determine its version by opening your command prompt (Windows) or terminal (macOS/Linux) and typing:
bash

python --version
or
bash

python3 --version
If Python is installed, you’ll see an output likePython 3.9.7. If not, or if you see an older version, you’ll need to install a current Python 3.x release. - Brief Mention of
pip:pipis the standard package manager for Python. It’s used to install and manage Python libraries and packages. If you install Python using the official installer,pipusually comes bundled with it. You can check its version withpip --versionorpip3 --version. - Operating System Compatibility: Jupyter Notebook is platform-agnostic and works seamlessly across Windows, macOS, and Linux operating systems. The installation steps might vary slightly depending on your OS, but the core process remains consistent.
Ensuring these basic components are in place will pave the way for a smooth and successful Jupyter Notebook installation.
Step-by-Step Installation Methods
There are primarily two popular methods to install Jupyter Notebook: using the Anaconda distribution or installing it directly with Python’s package manager, pip. Each method has its advantages, catering to different user needs and levels of technical familiarity.
Method 1: The Anaconda Distribution (Recommended for Beginners and Data Scientists)
Anaconda is a widely popular, free, and open-source distribution of Python and R for scientific computing and data science. It simplifies package management and deployment by bundling Python, Jupyter Notebook, and hundreds of other essential data science packages (like NumPy, Pandas, Scikit-learn, Matplotlib) into a single, easy-to-install package. This method is highly recommended for beginners and anyone focused on data science due to its comprehensive nature and streamlined environment management.
Benefits of Anaconda:
- All-in-one Solution: Comes pre-packaged with Python, Jupyter, and most common data science libraries, eliminating the need for individual installations.
- Easy Environment Management: Anaconda includes
conda, a powerful package and environment manager.condamakes it simple to create isolated environments for different projects, preventing dependency conflicts and ensuring reproducibility. - User-Friendly Interface: Anaconda Navigator provides a graphical interface to launch applications, manage environments, and install packages without resorting to the command line.
Detailed Steps for Anaconda Installation:
-
Download the Anaconda Installer:
- Visit the official Anaconda website: https://www.anaconda.com/products/distribution
- Scroll down to the “Anaconda Installers” section.
- Choose the installer appropriate for your operating system (Windows, macOS, Linux) and ensure you select the Python 3.x version. It’s typically a graphical installer.
-
Run the Installer:
- Windows: Locate the downloaded
.exefile and double-click it. Follow the prompts.- Accept the license agreement.
- Choose “Just Me” for installation unless you have administrative needs for “All Users.”
- Select an installation destination. The default is usually fine.
- Crucially, on the “Advanced Installation Options” screen, it’s generally recommended to check “Add Anaconda to my PATH environment variable” (though Anaconda advises against it for advanced users, for simplicity and ease of use, it’s often preferred for beginners). If you don’t check it, you’ll need to open Anaconda Prompt to use
condacommands. Also, ensure “Register Anaconda as my default Python 3.x” is checked. - Click “Install” and wait for the process to complete.
- macOS: Open the downloaded
.pkgfile. Follow the on-screen instructions. The process is similar to Windows, requiring you to accept terms and select an installation location. - Linux: Open a terminal and navigate to the directory where you downloaded the
.shinstaller. Run the installer using:
bash

bash Anaconda3-*-Linux-x86_64.sh
(ReplaceAnaconda3-*-Linux-x86_64.shwith the actual filename.) Follow the prompts, accepting the license and confirming the installation path. When prompted to initialize Anaconda by runningconda init, typeyes.
- Windows: Locate the downloaded
-
Verify Installation:
- Anaconda Navigator: Search for “Anaconda Navigator” in your applications (Start Menu on Windows, Applications folder on macOS, or via terminal on Linux if set up). Launch it. If it opens successfully, your Anaconda installation is working. You should see Jupyter Notebook listed among the applications.
- Command Line/Terminal: Open a new command prompt or terminal and type:
bash

conda --version
You should see the installedcondaversion. Also, check Python:
bash

python --version
This should show the Python version provided by Anaconda.
Method 2: Installing with Pip (For Existing Python Users and Advanced Control)
If you already have a Python installation and prefer a more minimalistic setup without the full Anaconda suite, or if you want to manage your packages more granularly, pip is the way to go. This method assumes you have Python 3.x and pip already installed and properly configured in your system’s PATH.
When to Use Pip:
- You have an existing Python environment you want to integrate Jupyter into.
- You prefer minimal installations and only want Jupyter without extra bundled libraries.
- You are comfortable managing Python virtual environments manually.
Detailed Steps for Pip Installation:
- Open Terminal/Command Prompt:
- Windows: Search for “Command Prompt” or “PowerShell” in the Start Menu and open it.
- macOS/Linux: Open your preferred terminal application.
-
Ensure Python and Pip are Up-to-Date:
It’s good practice to updatepipbefore installing new packages:python -m pip install --upgrade pip(Use
python3instead ofpythonifpython --versionshows Python 2.x andpython3 --versionshows Python 3.x.) -
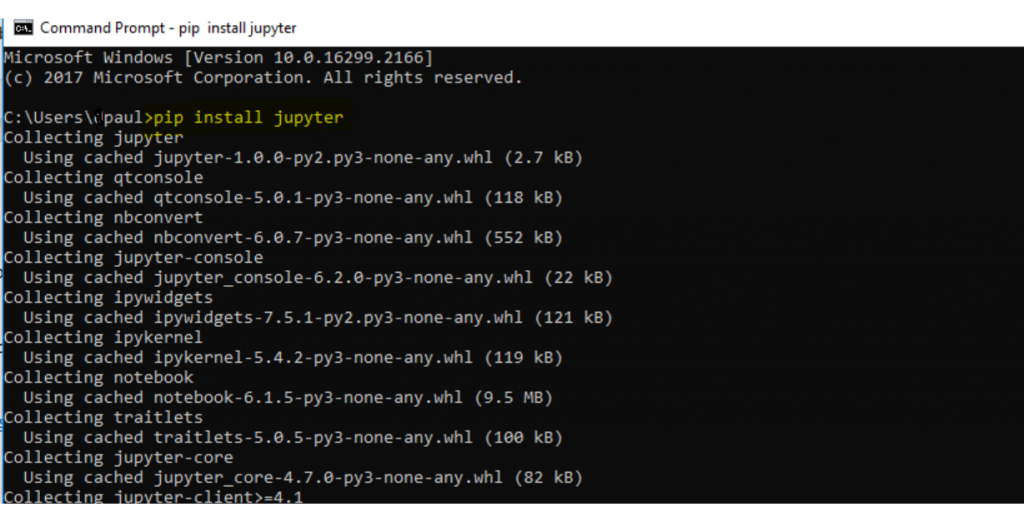
Install Jupyter:
You can install Jupyter Notebook using thepipcommand. Thejupyterpackage is a meta-package that includes the classic Jupyter Notebook, JupyterLab, and other core components.pip install jupyterAlternatively, if you strictly only want the classic Notebook interface and minimal dependencies, you could use:
pip install notebookHowever,
pip install jupyteris generally recommended as it gives you access to the broader Jupyter ecosystem, including JupyterLab (a more advanced and versatile interface). The installation might take a few minutes aspipdownloads and installs all necessary dependencies. -
Verify Installation:
After the installation completes, you can verify it by attempting to launch Jupyter Notebook:
bash

jupyter notebook
If it launches successfully in your web browser, the installation was successful.
Environment Management (Briefly)
For professional development and to avoid dependency hell, it’s highly recommended to use virtual environments, regardless of whether you use Anaconda or pip.
- With Conda: You can create new environments using
conda create -n myenv python=3.9. - With Pip (and
venv): Python’s built-invenvmodule allows you to create lightweight virtual environments:
bash

python -m venv myenv

source myenv/bin/activate # On macOS/Linux

myenvScriptsactivate # On Windows
Once activated, any packages installed withpip installwill reside only within that environment, keeping your global Python installation clean. This practice is crucial for maintaining project integrity and enhancing productivity.
Launching and Navigating Your First Jupyter Notebook
With Jupyter Notebook successfully installed, the next exciting step is to launch it and begin exploring its interactive interface. Understanding how to start a notebook server and navigate its basic features will quickly get you up and running with your data science projects.
Starting Jupyter Notebook
There are two primary ways to launch your Jupyter Notebook server, depending on your installation method and preference.
-
From Anaconda Navigator (Graphical Approach):
If you installed Jupyter via Anaconda, the simplest way to launch it is through Anaconda Navigator.- Open “Anaconda Navigator” from your applications list.
- In the Navigator window, you’ll see a list of applications. Locate “Jupyter Notebook” and click the “Launch” button beneath it.
- This will automatically open a new tab in your default web browser, displaying the Jupyter Notebook dashboard.
-
From Command Line/Terminal (Universal Approach):
This method works for both Anaconda andpipinstallations and gives you more control over where your notebook server starts.- Navigate to your desired project directory: Open your command prompt (Windows) or terminal (macOS/Linux). Before launching Jupyter, it’s good practice to
cd(change directory) into the folder where you want to store your Jupyter notebooks and related files. For example:
bash

cd Documents/MyJupyterProjects
Starting Jupyter from your project directory ensures that it has access to local files and libraries within that context. - Type
jupyter notebookand press Enter: Once in the desired directory, simply type the command:
bash

jupyter notebook
Note: If you installed withpip install notebookspecifically,jupyter-notebookmight be the command. - Upon executing the command, a few lines of text will appear in your terminal, indicating that the server has started. Simultaneously, a new tab will automatically open in your default web browser, pointing to
http://localhost:8888(or another port if 8888 is in use). This is your Jupyter Notebook dashboard.
- Navigate to your desired project directory: Open your command prompt (Windows) or terminal (macOS/Linux). Before launching Jupyter, it’s good practice to
Exploring the Jupyter Interface
Once the Jupyter Notebook dashboard opens in your browser, you’ll be greeted by a file browser that displays the contents of the directory from which you launched Jupyter.
- File Browser: This interface allows you to navigate through your files and folders, create new ones, upload existing files, and manage your notebooks. It looks much like a standard file manager.
- Creating a New Notebook:
- In the upper-right corner of the dashboard, click the “New” button.
- From the dropdown menu, select “Python 3” (or whatever kernel you wish to use, but Python 3 is standard).
- A new browser tab will open, containing an empty Jupyter Notebook, ready for your code.
- Cells: Code Cells vs. Markdown Cells:
A Jupyter Notebook is composed of a sequence of “cells.” Each cell can be of two primary types:- Code Cells: These are where you write and execute your Python (or other language) code. When you create a new notebook, the default cell type is usually a Code cell.
- Markdown Cells: These are for writing descriptive text, explanations, headings, lists, and equations using Markdown syntax. They are perfect for documenting your work.
- You can change a cell’s type using the dropdown menu in the toolbar (it usually defaults to “Code”).
- Running Cells: To execute the code in a Code cell or render the text in a Markdown cell:
- Select the cell by clicking on it.
- Press
Shift + Enter. - Alternatively, click the “Run” button (a triangle icon) in the toolbar.
- When a Code cell is run, the output appears directly below the cell.
- Kernel: The kernel is the “computational engine” that runs your code.
- You can manage the kernel from the “Kernel” menu in the notebook interface. Options include
Interrupt(to stop a running cell),Restart(to clear all variables and reset the kernel), andRestart & Clear Output(to restart and remove all previous cell outputs).
- You can manage the kernel from the “Kernel” menu in the notebook interface. Options include
- Saving and Checkpoints: Jupyter Notebooks are automatically saved periodically, but it’s good practice to manually save your work frequently using the “Save and Checkpoint” button (a floppy disk icon) or
Ctrl + S(Cmd + Son Mac). Checkpoints allow you to revert to previous saved states of your notebook. - Toolbar Options: The toolbar provides quick access to common actions: save, add new cell, cut, copy, paste, move cells up/down, run, interrupt, restart kernel, and change cell type.
Basic Commands and Interactivity
Let’s try a simple example in your new notebook:
-
In a Code cell, type:
print("Hello, Jupyter!")Then press
Shift + Enter. You should see “Hello, Jupyter!” printed below the cell. -
Change the next cell to a Markdown cell, type:
“`markdown
## My First Jupyter Notebook
This is an interactive environment for Python.- Data exploration
- Machine learning
``Shift + Enter`. The Markdown will render as formatted text.
Then press
This brief tour should provide you with enough information to start experimenting with your new Jupyter Notebook environment.
Unleashing the Power of Jupyter: Beyond Installation
Congratulations! You’ve successfully installed and launched Jupyter Notebook. But installation is merely the first step. The true power of Jupyter lies in its versatility and its ability to integrate seamlessly into diverse workflows, particularly within the tech and data science domains. Leveraging Jupyter effectively can significantly enhance your productivity, foster innovation, and even bolster your personal brand as a proficient technologist.
Integrating Jupyter into Your Workflow
Jupyter Notebook’s flexible design allows it to be a central hub for many stages of a data-driven project:
- Data Exploration and Visualization: Jupyter excels at the initial stages of data analysis. You can load datasets using libraries like Pandas, perform quick statistical summaries, clean data interactively, and generate stunning visualizations with Matplotlib, Seaborn, or Plotly. The immediate feedback loop of running cells makes iterating on plots and data transformations incredibly efficient.
- Machine Learning Prototyping: For machine learning engineers and data scientists, Jupyter is invaluable for prototyping models. You can experiment with different algorithms from libraries like Scikit-learn, TensorFlow, or PyTorch, tune hyperparameters, and evaluate model performance step by step. Each cell can represent a distinct part of the model building process, from data preprocessing to model training and evaluation, making it easy to track changes and results.
- Documentation and Report Generation: Beyond interactive code, Jupyter’s Markdown capabilities make it a superb tool for creating comprehensive reports and educational materials. You can combine live code, its outputs (including plots), and rich narrative text to tell a complete story about your data or project. Notebooks can even be converted into various formats like HTML, PDF, or presentation slides, making them excellent for sharing insights and communicating findings.
Best Practices and Advanced Tips
To truly master Jupyter Notebook and elevate your work, consider incorporating these best practices:
- Using Virtual Environments: As briefly mentioned during installation, always work within virtual environments (whether
condaenvironments orvenv). This practice isolates your project’s dependencies, preventing conflicts and ensuring that your code remains reproducible regardless of changes in your global Python installation. It’s a hallmark of a professional development workflow. - Master Keyboard Shortcuts: Jupyter has an extensive set of keyboard shortcuts that can dramatically speed up your workflow. Learn the most common ones (e.g.,
Escfor command mode,Enterfor edit mode,Afor insert cell above,Bfor insert cell below,DDfor delete cell,Mfor Markdown,Yfor Code,Ctrl/Cmd + Sfor save) to navigate and manipulate cells without constantly reaching for your mouse. - Explore Jupyter Extensions (nbextensions): The Jupyter ecosystem offers a variety of community-contributed extensions that add new features and functionalities to your notebooks. These can range from table of contents generators and code formatters to spell checkers and collapsible headings, enhancing both productivity and user experience.
- Version Control with Git: Integrate your Jupyter notebooks with Git for version control. While
.ipynbfiles can sometimes be challenging to diff due to embedded output, tools likenbstripoutorjupytextcan help manage this by cleaning outputs before committing or converting notebooks to simpler text formats for better version control. This ensures your projects are well-managed, auditable, and collaborative.
Conclusion
Jupyter Notebook is more than just a coding tool; it’s a dynamic platform that empowers individuals to explore, analyze, and communicate data-driven insights with unprecedented interactivity and clarity. From simple Python scripting to complex machine learning workflows, its versatility makes it an indispensable asset in the modern tech landscape. By following this comprehensive installation guide, you’ve taken a significant step toward mastering a tool that will enhance your productivity, foster your analytical skills, and open new avenues in your technical journey. Embrace the interactive nature of Jupyter, experiment with its features, and let it be your trusted companion in the exciting world of technology and data.
aViewFromTheCave is a participant in the Amazon Services LLC Associates Program, an affiliate advertising program designed to provide a means for sites to earn advertising fees by advertising and linking to Amazon.com. Amazon, the Amazon logo, AmazonSupply, and the AmazonSupply logo are trademarks of Amazon.com, Inc. or its affiliates. As an Amazon Associate we earn affiliate commissions from qualifying purchases.