Minecraft, the ubiquitous sandbox game, has captivated millions worldwide with its boundless creativity and explorative gameplay. While various editions exist, the Java Edition holds a special place in the hearts of tech enthusiasts and seasoned gamers alike, primarily due to its unparalleled modding capabilities, robust community-driven servers, and cross-platform compatibility across Windows, macOS, and Linux. For those looking to dive into the original and most flexible version of Minecraft, understanding the installation process is the first crucial step. This guide will walk you through everything you need to set up Minecraft Java Edition, from installing the underlying Java software to optimizing your game for the best performance, all while keeping a keen eye on digital security and best practices in software management.

The Enduring Appeal of Java Minecraft
In the rapidly evolving landscape of digital entertainment and software development, Minecraft Java Edition stands as a testament to the power of open-ended design and community collaboration. Unlike its Bedrock counterpart, which is optimized for consoles and mobile devices, Java Edition thrives on PC platforms, offering a deeper level of customization and a rich ecosystem for technical exploration.
Its enduring appeal stems from several key aspects that resonate strongly within the tech community. Firstly, the modding potential is virtually limitless. From subtle quality-of-life enhancements to complete overhauls that transform the game’s mechanics and visuals, mods empower players to tailor their experience precisely. This level of extensibility is a direct result of Java’s flexibility and the game’s architecture, allowing developers and hobbyists to create and share an astonishing array of user-generated content. This aspect alone makes Java Minecraft a dynamic platform for exploring software development principles, debugging, and understanding game design at a fundamental level.
Secondly, the community servers are a cornerstone of the Java Edition experience. These servers, often run by dedicated individuals or groups, offer unique gameplay modes, custom economies, and elaborate worlds that extend far beyond the vanilla game. Engaging with these servers is not just about playing; it’s about connecting with a global community, participating in complex digital societies, and sometimes even contributing to their development. This fosters a sense of digital citizenship and collaboration, echoing broader trends in open-source projects and online communities.
Lastly, its cross-platform nature for PC operating systems (Windows, macOS, Linux) underscores its accessibility and commitment to a broad user base. This technical flexibility ensures that regardless of your preferred desktop environment, you can join friends and dive into the blocky universe without compatibility hurdles, provided you have Java installed correctly. For anyone interested in software deployment across diverse environments, Java Minecraft offers a practical case study. Its role as a platform for education, from teaching basic coding concepts to fostering creative problem-solving, further cements its position not just as a game, but as a significant digital tool. Understanding its installation is not merely about playing a game; it’s about gaining access to a powerful, versatile, and enduring piece of technology.
Essential Pre-Installation Checks and System Requirements
Before embarking on the installation journey, it’s crucial to prepare your system to ensure a smooth and successful setup. Overlooking these preliminary steps can lead to frustrating errors and wasted time. This section will guide you through understanding the critical role of Java, verifying your system’s capabilities, and ensuring you have the necessary accounts ready.
Understanding Java’s Role: JRE vs. JDK
Minecraft Java Edition, as its name suggests, relies heavily on the Java Runtime Environment (JRE) to function. Java is a powerful, object-oriented programming language, and the JRE is essentially the engine that allows Java applications like Minecraft to run on your computer.
Historically, users might have installed the JRE directly. However, modern practices, especially for developers or those who might want to extend their tech capabilities, often lean towards installing the Java Development Kit (JDK). The JDK includes the JRE along with a suite of development tools. While Minecraft strictly needs the JRE, having the JDK installed ensures you have the complete Java ecosystem, which can be beneficial if you ever decide to delve into mod development, server administration, or other Java-based applications. For most users, any recent version of Java 17 or newer (like OpenJDK or Oracle Java) will suffice, but always ensure you download the 64-bit version if your operating system supports it, which is almost certainly the case for modern computers. This ensures optimal performance and compatibility with memory-intensive applications like Minecraft.
System Specifications: Minimum and Recommended
Even though Minecraft isn’t known for being a graphically demanding game in its vanilla form, your computer needs to meet certain specifications to run it smoothly, especially if you plan on using mods, shaders, or playing on large servers.
- Operating System: Windows 7 or newer, macOS 10.14.5 Mojave or newer, or various Linux distributions (e.g., Ubuntu 18.04+). Ensure your OS is 64-bit for best performance.
- Processor: Intel Core i3-3210 3.2 GHz / AMD A8-7600 APU 3.1 GHz or equivalent. For a better experience, an Intel Core i5-4690 3.5GHz / AMD A10-7800 APPA 3.5 GHz or equivalent is recommended.
- RAM: Minimum of 4GB. However, 8GB or more is highly recommended, particularly if you intend to run mods, texture packs, or allocate more memory to Minecraft for smoother gameplay.
- Graphics Card: Intel HD Graphics 4000 (Ivy Bridge) or AMD Radeon R5 series (Kaveri line) with OpenGL 4.4. A dedicated GPU like an Nvidia GeForce 700 Series or AMD Radeon Rx 200 Series (excluding integrated chipsets) with OpenGL 4.5 is recommended for a superior experience.
- Storage: At least 1GB for game core files, but account for much more if you download numerous mods, maps, and texture packs. An SSD is always preferable for faster loading times.
- Internet Connection: Required for downloading the game, logging in, and playing on online servers. A stable broadband connection is essential.
Checking these specifications will help you anticipate potential performance issues and ensure your system is ready to handle Minecraft.
Account Setup: Mojang/Microsoft Account
To play Minecraft Java Edition, you need a valid Minecraft account. Historically, these were Mojang accounts, but Mojang accounts have been migrated to Microsoft accounts. If you already have a Microsoft account (for Xbox, Windows, Outlook, etc.), you can use that. If not, you’ll need to create one and then purchase Minecraft Java Edition through the official Minecraft website. Ensure your account is active and you have your login credentials handy, as you’ll need them to authenticate within the Minecraft Launcher.
Internet Connection: Stable Download
Finally, a stable and reasonably fast internet connection is crucial. The Minecraft Launcher itself is small, but it will download significant game files (several hundred MB to over a gigabyte) upon first launch and whenever updates are released. A reliable connection minimizes download times and prevents corrupted files, ensuring a smooth initial setup. With these prerequisites thoroughly checked, you are now ready to proceed with the core installation steps.
Step-by-Step Guide to Installing Java Minecraft
Having prepared your system, the next phase involves the actual installation of Java and the Minecraft Launcher. This section breaks down each step into an easy-to-follow process, ensuring you download official software and configure it correctly.
Step 1: Installing Java on Your System
This is arguably the most critical and often overlooked step, as Minecraft Java Edition simply cannot run without a compatible Java Runtime Environment.
- Choose a Java Distribution: While Oracle provides Java, many users opt for OpenJDK distributions due as they are free and open-source. Popular choices include Adoptium (formerly AdoptOpenJDK), Amazon Corretto, or Microsoft Build of OpenJDK. For this guide, we recommend Adoptium due to its ease of use and widespread adoption.
- Download Java: Navigate to the Adoptium website (adoptium.net). Look for the “Latest LTS Release” (Long-Term Support) which is currently Java 17 or newer. Ensure you select the correct operating system (Windows, macOS, Linux) and the appropriate architecture (x64 for most modern PCs). Download the installer (usually an
.msifor Windows,.pkgfor macOS, or.tar.gzfor Linux). - Run the Java Installer:
- Windows: Double-click the
.msifile. Follow the on-screen prompts. It’s generally safe to accept the default installation location and features. Ensure “Set JAVA_HOME variable” is checked during installation if prompted, as this can help with various Java applications. - macOS: Double-click the
.pkgfile and follow the instructions. - Linux: For
.tar.gz, you’ll typically extract it and configure environment variables manually, or use your distribution’s package manager (e.g.,sudo apt install openjdk-17-jrefor Debian/Ubuntu) for a simpler installation.
- Windows: Double-click the
- Verify Java Installation: After installation, open your system’s command prompt or terminal.
- Type
java -versionand press Enter. - You should see output similar to
openjdk version "17.0.x" .... If you receive an error or an outdated version, you might need to check your system’s PATH environment variables or reinstall Java. This verification confirms that your system recognizes the newly installed Java environment.
- Type
Step 2: Downloading the Minecraft Launcher
Once Java is correctly installed, the next step is to acquire the official Minecraft Launcher. It’s paramount to download this from the official source to ensure security and prevent malware.
- Navigate to the Official Minecraft Website: Open your web browser and go to minecraft.net.
- Locate the Download Section: Look for a “Get Minecraft” or “Download” section. You’ll typically find an option for “Minecraft: Java & Bedrock Edition for PC” or “Minecraft Java Edition”.
- Download the Launcher: Select your operating system (Windows, macOS, or Linux) and click the download button for the Minecraft Launcher. This will download a small executable file (e.g.,
MinecraftInstaller.msifor Windows,Minecraft.dmgfor macOS,Minecraft.deborMinecraft.AppImagefor Linux).
Step 3: Installing and Launching Minecraft
With the launcher downloaded, the final stretch involves installing it and getting the game up and running.
- Run the Minecraft Launcher Installer:
- Windows: Double-click the
MinecraftInstaller.msifile. Follow the installation wizard. Again, accepting default options is usually fine. - macOS: Open the
Minecraft.dmgfile, then drag the Minecraft application icon into your Applications folder. - Linux: For
.debfiles, double-click to install via your software center or usesudo dpkg -i Minecraft.debin the terminal. For.AppImage, make it executable (chmod +x Minecraft.AppImage) and then run it.
- Windows: Double-click the
- Launch the Minecraft Launcher: Once installed, find the Minecraft Launcher icon (it might be on your desktop, in your Start menu, or in your Applications folder) and open it.
- Log In with Your Microsoft Account: The launcher will prompt you to log in. Use the Microsoft account you use to play Minecraft. This authenticates your game purchase and grants you access to the game files.
- Install the Game Files: After logging in, the launcher will detect that you haven’t installed Minecraft Java Edition yet. Click the “Install” or “Play” button. The launcher will then download all the necessary game files, which can take some time depending on your internet speed.
- First Launch and Profile Creation: Once the download is complete, the “Play” button will become active. Click it to launch Minecraft. The game will start, and you’ll be presented with the main menu. You can now create new worlds, join servers, and customize your game profile.
Congratulations! You have successfully installed Minecraft Java Edition. Now that the core game is running, you can explore ways to enhance your experience further.
Optimizing Your Java Minecraft Experience
Installing Minecraft is just the beginning. The real power of Java Edition lies in its potential for optimization and customization. By tweaking settings and introducing community-made enhancements, you can significantly improve performance, graphics, and gameplay.
Allocating More RAM
Minecraft, especially with mods or on large servers, can be quite memory-intensive. By default, the Minecraft Launcher allocates a modest amount of RAM to the game, which might not be enough for a smooth experience.
- Open the Minecraft Launcher.
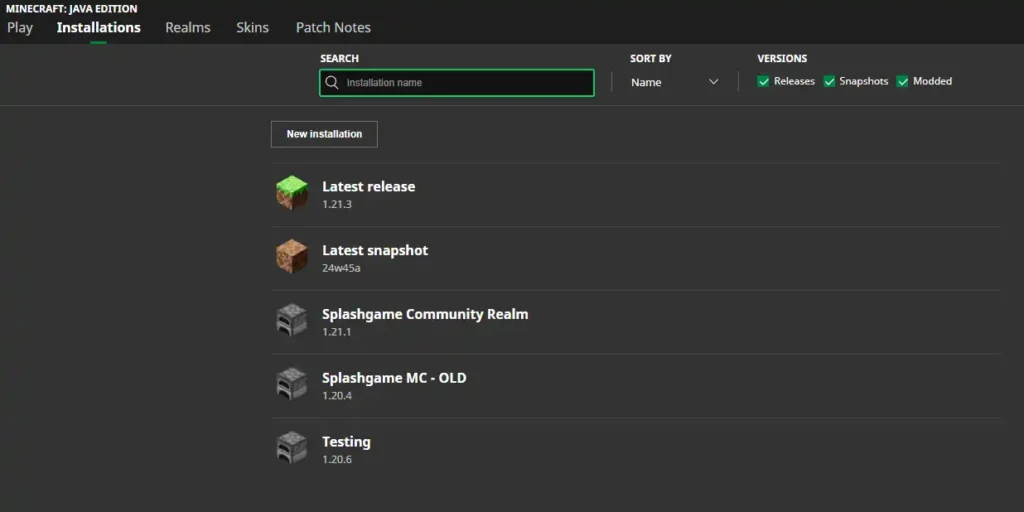
- Navigate to “Installations”: At the top of the launcher window, click on the “Installations” tab.
- Edit Your Profile: Hover over your default or preferred game installation (e.g., “Latest Release”) and click the three dots (
...), then select “Edit”. - More Options: In the edit screen, click “More Options” to expand advanced settings.
- Adjust JVM Arguments: Find the “JVM Arguments” field. This string contains various parameters for the Java Virtual Machine. Look for
-Xmx2G(or similar, where2Gindicates 2 Gigabytes of RAM). - Increase RAM: Change the number to allocate more RAM. For example, to allocate 4GB, change
-Xmx2Gto-Xmx4G. If you have 16GB of RAM on your system, allocating 6GB or 8GB (e.g.,-Xmx6Gor-Xmx8G) is often ideal for heavy mod packs, leaving enough for your operating system. Do not allocate more than half of your system’s total RAM. - Save Profile: Click “Save” to apply the changes.
Enhancing Graphics and Performance with OptiFine
OptiFine is a highly popular optimization mod for Minecraft Java Edition. It offers a significant boost in FPS, supports HD textures, and provides extensive configuration options for graphics, including shader support.
- Download OptiFine: Go to the official OptiFine website (optifine.net) and download the version compatible with your Minecraft game version (e.g., “OptiFine 1.20.1 HD U I6”).
- Run the OptiFine Installer: The downloaded file is a
.jarfile. Ensure Java is correctly installed (as per Step 1 of the main installation guide). Double-click the.jarfile. An installer window will appear. - Install OptiFine: Click the “Install” button. OptiFine will automatically create a new game profile in your Minecraft Launcher.
- Select OptiFine Profile: Open the Minecraft Launcher. On the “Installations” tab, you should now see a new profile named “OptiFine”. Select this profile before clicking “Play” to launch Minecraft with OptiFine enabled.
- Configure In-Game: Once in Minecraft, go to “Options” -> “Video Settings”. You’ll find a plethora of new settings to tweak, including animation controls, render distance, details, and the highly anticipated “Shaders” option.
Exploring the World of Mods
Beyond OptiFine, the modding scene for Minecraft Java Edition is vast and vibrant. To install other mods, you’ll typically need a mod loader. The two most popular mod loaders are Forge and Fabric.
- Choose a Mod Loader:
- Forge: Older, more established, and compatible with a huge number of traditional mods. Many larger modpacks rely on Forge.
- Fabric: Newer, lightweight, and often preferred for performance-focused mods and quicker updates to new Minecraft versions.
- Download and Install the Mod Loader:
- Go to the official Forge (files.minecraftforge.net) or Fabric (fabricmc.net/use) website.
- Download the installer for your Minecraft version.
- Run the installer (it’s usually a
.jarfile, like OptiFine). It will create a new profile in your Minecraft Launcher.
- Download Mods: Find mods from trusted sources like CurseForge (curseforge.com). Ensure the mod is compatible with your Minecraft version and your chosen mod loader (Forge or Fabric). Download the
.jarfiles for your desired mods. - Install Mods:
- Open your Minecraft Launcher.
- Go to the “Installations” tab.
- Hover over your Forge or Fabric profile, click the three dots (
...), and select “Open Game Directory”. - In the opened folder, locate or create a folder named
mods. - Drag and drop the downloaded mod
.jarfiles into thismodsfolder.
- Launch with Mod Loader Profile: Select your Forge or Fabric profile in the Minecraft Launcher and click “Play”. The mod loader will load all the mods from your
modsfolder.
Security Best Practices for Mods: Always download mods from official or highly reputable sources (like CurseForge). Be wary of unknown websites, as they might distribute malicious software disguised as mods. Regularly back up your Minecraft saves before adding many new mods, as conflicts can occasionally corrupt world data. This level of customization, while powerful, requires diligence and an understanding of file management and software compatibility.
Troubleshooting Common Installation and Launch Issues
Even with careful planning, technical issues can arise. Knowing how to diagnose and resolve common problems is a valuable skill for any tech user. Here are solutions to frequent Minecraft Java Edition installation and launch errors.
“Java Not Found” or “JVM Error” Messages
This is the most common issue and almost always points to a problem with your Java installation or its configuration.
- Cause: Minecraft cannot locate a suitable Java Runtime Environment (JRE) to run itself. This might be due to Java not being installed, an incorrect version being installed (e.g., 32-bit Java on a 64-bit OS), or incorrect system PATH variables.
- Solution:
- Re-verify Java Installation: Open Command Prompt/Terminal and type
java -version. If it doesn’t show the expected version (Java 17 or newer) or an error, Java might not be installed correctly. - Ensure 64-bit Java: If your OS is 64-bit, ensure you downloaded and installed the 64-bit version of Java.
- Reinstall Java: Completely uninstall any existing Java versions from your system (Control Panel > Programs and Features on Windows, or use
java -versionoutput to locate and remove on Linux/macOS) and then reinstall the latest LTS version of OpenJDK (e.g., Adoptium Temurin 17 or newer) following the steps in “Step 1: Installing Java on Your System.” - Check JVM Arguments in Launcher: In the Minecraft Launcher, go to “Installations,” edit your profile, and under “More Options,” ensure the “Java Executable” field is empty (allowing the launcher to auto-detect Java) or points to the correct
javaw.exe(Windows) orjava(macOS/Linux) path for your Java 17+ installation.
- Re-verify Java Installation: Open Command Prompt/Terminal and type
Minecraft Launcher Not Opening
If the launcher itself fails to start, it indicates an issue with the launcher application, not necessarily Java.
- Cause: Corrupted launcher files, conflicts with security software, or outdated graphics drivers.
- Solution:
- Restart Your Computer: A simple reboot can often resolve temporary software glitches.
- Reinstall Launcher: Uninstall the Minecraft Launcher completely from your system and then download and install a fresh copy from minecraft.net.
- Check Antivirus/Firewall: Temporarily disable your antivirus or firewall to see if it’s blocking the launcher. If it works, add an exception for the Minecraft Launcher in your security software.
- Update Graphics Drivers: Outdated graphics drivers can sometimes prevent applications from launching. Ensure your GPU drivers are up-to-date from the manufacturer’s website (Nvidia, AMD, Intel).
Game Crashing After Launch
The game launches, but then crashes shortly after showing the Mojang/Minecraft logo or entering a world.
- Cause: Insufficient RAM allocation, conflicting mods, outdated graphics drivers, or corrupted game files.
- Solution:
- Check RAM Allocation: Follow the “Allocating More RAM” section. If you have less than 8GB total RAM, try allocating 2GB to 4GB. If you have more, try 4GB-8GB. Do not allocate too much, leaving insufficient RAM for your OS.
- Update Graphics Drivers: As mentioned, outdated drivers are a common culprit for game instability.
- Remove Mods (If Applicable): If you’ve recently installed mods, temporarily remove them from the
modsfolder and try launching the game. If it works, reintroduce mods one by one to identify the culprit. - Force Reinstall Game Files: In the Minecraft Launcher, go to “Installations,” edit your profile, and click “Repair” or delete the
.minecraftfolder (after backing up your saves!) to force a fresh download of game files. - Check for Other Software Conflicts: Some overlay software (Discord overlay, GeForce Experience overlay) or system monitoring tools can interfere. Try disabling them.
Performance Lags and Low FPS
The game runs, but it’s choppy, slow, or has a low frame rate.
- Cause: Low-end hardware, default graphics settings too high, or lack of optimization mods.
- Solution:
- Install OptiFine: This is the primary solution for performance. Follow the “Enhancing Graphics and Performance with OptiFine” section.
- Adjust In-Game Video Settings:
- Reduce “Render Distance” (try 8-12 chunks).
- Set “Graphics” to “Fast.”
- Turn off “Smooth Lighting,” “Clouds,” and “V-Sync.”
- Lower “Particles” to “Minimal” or “Decreased.”
- Disable “Biome Blend.”
- Allocate More RAM: As discussed earlier, more RAM can prevent stuttering, especially with many loaded chunks or entities.
- Update Graphics Drivers: Always keep drivers updated for optimal performance.
- Close Background Applications: Ensure no other demanding applications are running in the background, consuming CPU or RAM.
Security Best Practices
When troubleshooting or installing software, always adhere to digital security best practices:
- Official Sources Only: Download Java, Minecraft Launcher, and mod loaders only from their official websites.
- Reputable Mod Sites: For mods, stick to well-known and reputable sites like CurseForge.
- Antivirus Scans: Regularly scan downloaded files with a reputable antivirus program.
- Backup Saves: Before making major changes (like installing mod loaders or deleting game folders), back up your
savesfolder.
By systematically addressing these common issues, you can often resolve most problems encountered during the Minecraft Java Edition installation and optimization process, ensuring a smooth and enjoyable gaming experience.
Conclusion: Your Journey into the Blocky Universe Begins
The journey to installing and optimizing Minecraft Java Edition is more than just a setup process; it’s an introduction to fundamental aspects of personal computing, software management, and digital customization. From ensuring your system meets the necessary specifications and correctly installing the Java Runtime Environment, to navigating the official download channels for digital security, each step reinforces best practices in technology use.
We’ve covered the crucial prerequisites, walked through the precise steps for installing both Java and the Minecraft Launcher, and explored powerful optimization techniques like RAM allocation and the integration of OptiFine for enhanced performance and graphics. Furthermore, we’ve armed you with troubleshooting strategies for common errors, transforming potential frustrations into learning opportunities in problem-solving.
With Minecraft Java Edition now successfully installed and potentially optimized to your preferences, a universe of infinite possibilities awaits. Whether you delve into intricate redstone contraptions, embark on epic survival adventures, contribute to massive community builds, or experiment with complex mod packs, you are now equipped to experience Minecraft in its most versatile and celebrated form. Embrace the blocky landscapes, unleash your creativity, and connect with a global community—your personalized journey into this enduring digital phenomenon has officially begun. Happy crafting!
aViewFromTheCave is a participant in the Amazon Services LLC Associates Program, an affiliate advertising program designed to provide a means for sites to earn advertising fees by advertising and linking to Amazon.com. Amazon, the Amazon logo, AmazonSupply, and the AmazonSupply logo are trademarks of Amazon.com, Inc. or its affiliates. As an Amazon Associate we earn affiliate commissions from qualifying purchases.