
In the dynamic world of technology, staying current with fundamental tools is paramount for developers, system administrators, and anyone keen on leveraging the latest advancements in software. Java, a language that has been the backbone of countless enterprise applications, mobile platforms, and web services for decades, continues to evolve. Its latest Long-Term Support (LTS) release, Java 21, brings a host of new features, performance improvements, and enhanced stability, making it an essential upgrade for both new projects and existing systems.
This comprehensive guide is designed to walk you through the process of installing Java 21 on various operating systems. Whether you’re a seasoned developer looking to migrate, a student eager to learn, or an IT professional setting up a new environment, understanding the installation process is your first step into harnessing the power of modern Java. We’ll cover everything from prerequisites and downloading the correct Java Development Kit (JDK) to setting up environment variables and verifying your installation, ensuring you have a robust and secure setup. By the end of this tutorial, you’ll be ready to compile and run your first Java 21 application, opening doors to advanced development, greater productivity, and robust digital security practices.
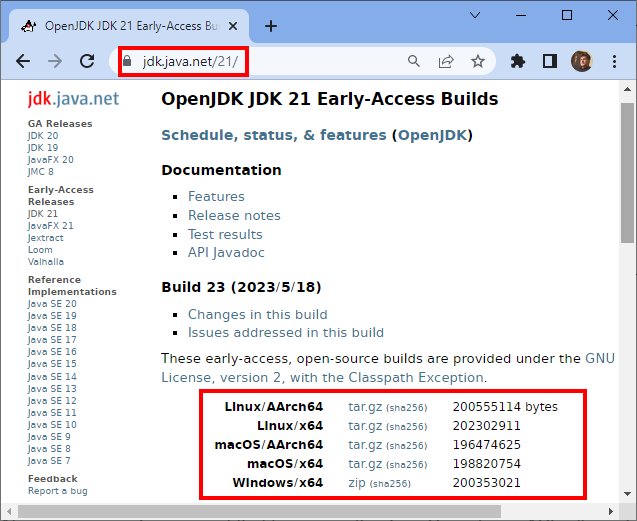
Understanding Java 21 and Its Importance in the Tech Landscape
Java’s enduring popularity is no accident. Since its inception, it has championed the “write once, run anywhere” philosophy, a powerful promise that has resonated deeply across diverse computing environments. Java 21, as an LTS release, represents a significant milestone, guaranteeing years of support and stability—a critical factor for enterprises and long-term projects.
Why Java Continues to Reign Supreme
Java’s dominance in the tech industry is multifaceted. Its robust, object-oriented nature, combined with a vast ecosystem of libraries, frameworks, and tools, makes it an ideal choice for complex enterprise applications. From financial services and e-commerce platforms to big data processing and Android app development, Java powers a significant portion of the digital world. Its strong type safety, memory management, and built-in security features contribute to building reliable and secure software, addressing crucial aspects of digital security that are ever more important in today’s interconnected landscape. The extensive community support, combined with its platform independence, ensures that Java remains a relevant and powerful language for solving a myriad of technological challenges. Furthermore, the JVM (Java Virtual Machine) itself has undergone continuous optimization, offering unparalleled performance benefits that make Java applications faster and more resource-efficient than ever before. For businesses, this translates into reduced operational costs and improved application responsiveness, directly impacting productivity and customer satisfaction.
Key Features and Enhancements in Java 21
Java 21 introduces several groundbreaking features and enhancements that streamline development, improve performance, and enhance the overall developer experience. Notable additions include:
- Virtual Threads (JEP 444): A game-changer for high-throughput, concurrent applications. Virtual Threads drastically reduce the cost of creating and managing threads, allowing developers to write high-concurrency code more easily and efficiently, moving closer to the “structured concurrency” paradigm. This has profound implications for server-side applications and microservices, where scalability and responsiveness are critical.
- Sequenced Collections (JEP 431): Introduces new interfaces for collections with a defined encounter order, making it easier and safer to manipulate elements in lists, sets, and maps. This enhancement improves API consistency and reduces the likelihood of errors when dealing with ordered data structures.
- Record Patterns (JEP 440): Expands pattern matching to record types, simplifying the extraction of components from record instances and enabling more concise and readable code, particularly when working with complex data structures. This helps developers write more expressive and less verbose code, boosting productivity.
- Pattern Matching for Switch (JEP 441): Further enhances the
switchexpression and statement, allowing for more powerful and expressive conditional logic. This reduces boilerplate code and improves the readability of branching statements, making complex logic easier to understand and maintain. - Unnamed Patterns and Variables (Preview) (JEP 443): Introduces a new way to declare variables that are not explicitly named but are still present in the code for structural reasons, such as in pattern matching or exception handling. This improves code clarity by reducing noise from unused variables.
- Generational ZGC (JEP 439): A significant improvement to the Z Garbage Collector, which aims to reduce the memory footprint and latency of large applications, providing better performance and responsiveness for demanding workloads. This optimization contributes directly to the efficiency and stability of large-scale Java applications.
These features, alongside numerous smaller improvements and optimizations, solidify Java 21’s position as a powerful, modern, and highly productive platform for building next-generation applications. Staying updated with such releases is not just about following trends; it’s about equipping yourself with the tools to build more efficient, secure, and scalable solutions, aligning perfectly with the productivity and digital security aspects of the broader tech landscape.
Prerequisites and Preparations for a Smooth Installation
Before diving into the installation process, a few preparatory steps can help ensure a seamless experience. Proper planning prevents common pitfalls and ensures that your system is ready to host Java 21 efficiently.
System Requirements and Compatibility Checks
While Java is known for its cross-platform compatibility, certain minimum system requirements must be met for optimal performance. Generally, Java 21 can run on most modern operating systems, including:
- Windows: Windows 10 or later (64-bit recommended).
- macOS: macOS 11 (Big Sur) or later.
- Linux: Most modern Linux distributions (e.g., Ubuntu 20.04+, Fedora 36+, RHEL 8+) with glibc 2.28 or later.
A minimum of 4GB RAM is recommended, with 8GB or more preferred for development tasks, especially when running IDEs like IntelliJ IDEA or Eclipse. Ensure you have sufficient disk space (at least 500MB, but more for development tools and projects) and a stable internet connection for downloading the JDK.
It’s also a good practice to check if you have existing Java installations. Multiple Java versions can coexist, but careful management of environment variables is crucial to avoid conflicts. You can check your current Java version by opening a terminal or command prompt and typing:
java -version
This command will display the installed Java Runtime Environment (JRE) version. To check the Development Kit (JDK) version, use:
javac -version
If you have older versions, consider uninstalling them if they are no longer needed, especially if they are non-LTS releases, to prevent potential conflicts and maintain a cleaner system.
Choosing the Right Java Development Kit (JDK) Distribution
Java is an open-source technology, and while Oracle provides the reference implementation, several other vendors offer their own distributions of the JDK. All these distributions are based on the same open-source OpenJDK project, meaning they are largely interchangeable in terms of functionality. Popular choices include:
- Oracle JDK: The official, commercial distribution from Oracle. It offers long-term support and is typically free for development and personal use, but commercial deployment may require a license.
- OpenJDK (from Adoptium/Eclipse Temurin): A widely used, free, and open-source distribution maintained by the Adoptium working group. It’s a popular choice for many developers and enterprises due to its open-source nature and robust support.
- Red Hat OpenJDK: Red Hat provides its own OpenJDK builds, often pre-installed or easily available on RHEL-based Linux distributions.
- Amazon Corretto: Amazon’s no-cost, multi-platform, production-ready distribution of OpenJDK.
For this tutorial, we will primarily focus on using OpenJDK from Adoptium (Eclipse Temurin), as it’s a popular, production-ready, and entirely free option suitable for all users. The steps are largely similar for other distributions, though download locations might vary. Always download the JDK from a trusted source to ensure digital security and prevent malware.
When downloading, ensure you select the correct architecture (e.g., x64 for most modern PCs) and operating system. Java 21 is an LTS release, making it a stable and recommended choice for most projects.
Step-by-Step Installation Guides Across Major Operating Systems
The installation process varies slightly depending on your operating system. Below, we’ll cover the detailed steps for Windows, macOS, and Linux, ensuring you can get Java 21 up and running no matter your platform.
Installing Java 21 on Windows
Windows remains a prevalent development environment. The process typically involves downloading an installer and setting environment variables.
Downloading the JDK Installer
- Navigate to Adoptium Website: Open your web browser and go to the Adoptium website (adoptium.net).
- Select Java 21 and OS: On the homepage, ensure “JDK 21 (LTS)” is selected. The website usually auto-detects your operating system. If not, manually select “Windows” from the platform options.
- Download the Installer: Click the “Latest LTS Release” button or locate the
.msiinstaller for Windows x64. Download the file to a convenient location on your computer (e.g., your Downloads folder).
Running the Installation Wizard
- Launch Installer: Locate the downloaded
.msifile and double-click it to start the installation wizard. - Follow Prompts:
- Click “Next” on the welcome screen.
- Accept the license agreement and click “Next.”
- You can choose the installation path or leave the default (e.g.,
C:Program FilesEclipse Adoptiumjdk-21.x.x.x). It’s generally recommended to stick with the default path unless you have specific reasons to change it. - Crucially, in the “Custom Setup” or “Advanced Options” screen, ensure that “Set JAVA_HOME variable” and “Associate .jar with Java” (if available) are selected. If not, you might need to manually configure them later. Most modern installers handle this automatically.
- Click “Next” and then “Install” to begin the installation.
- You might be prompted by User Account Control (UAC) to allow the installer to make changes to your system; click “Yes.”
- Finish Installation: Once the installation is complete, click “Finish.”
Setting Environment Variables (JAVA_HOME and PATH)
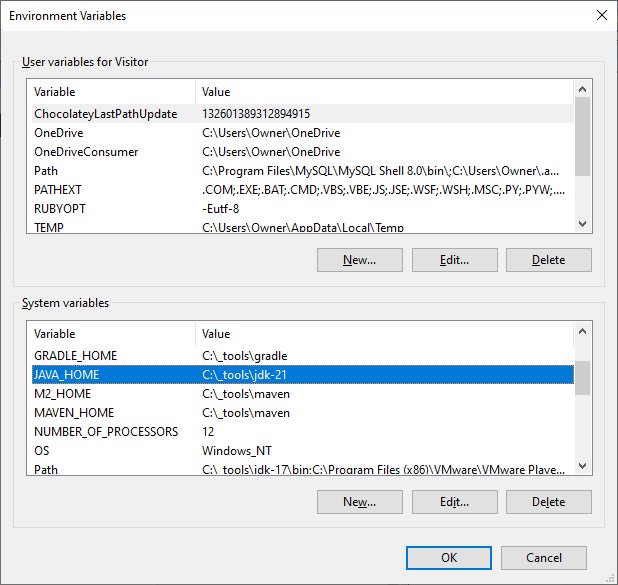
Even if the installer claims to set environment variables, it’s good practice to verify and understand how to do it manually, especially for JAVA_HOME. This step is crucial for many development tools (like IDEs, Maven, Gradle) to locate your Java installation.
- Open System Properties:
- Right-click on “This PC” (or “My Computer”) and select “Properties.”
- Click on “Advanced system settings” on the left-hand side.
- In the “System Properties” window, click the “Environment Variables…” button.
- Create/Edit JAVA_HOME:
- Under “System variables,” click “New…” (if
JAVA_HOMEdoesn’t exist) or selectJAVA_HOMEand click “Edit…” (if it does). - For “Variable name,” enter
JAVA_HOME. - For “Variable value,” enter the path to your Java 21 installation directory (e.g.,
C:Program FilesEclipse Adoptiumjdk-21.0.2.13-hotspot). Ensure this path points to the root of your JDK installation, not thebindirectory. - Click “OK.”
- Under “System variables,” click “New…” (if
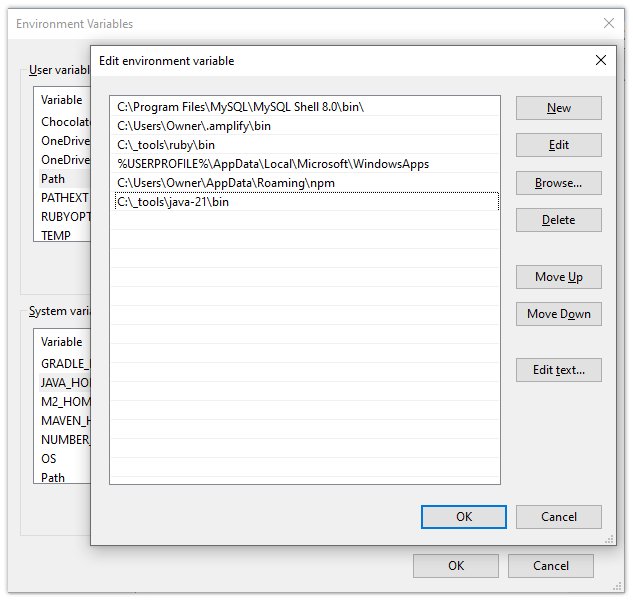
- Edit PATH Variable:
- Under “System variables,” locate and select the
Pathvariable, then click “Edit…” - Click “New” and add
%JAVA_HOME%bin. - Make sure this entry is moved up to ensure it takes precedence over older Java versions if they exist.
- Click “OK” on all open windows to save the changes.
- Under “System variables,” locate and select the
- Restart Command Prompt: Close any open Command Prompt or PowerShell windows and open a new one for the changes to take effect.
Installing Java 21 on macOS
macOS users have a few options for installing Java, including a dedicated installer or package managers like Homebrew.
Downloading the DMG Installer or Using Homebrew
Option 1: Using the Adoptium DMG Installer (Recommended for beginners)
- Navigate to Adoptium Website: Go to adoptium.net.
- Select Java 21 and macOS: Ensure “JDK 21 (LTS)” is selected and “macOS” is chosen as the operating system.
- Download DMG: Download the
.pkgor.dmginstaller for macOS x64 (or ARM64 for Apple Silicon Macs). - Run Installer: Open the downloaded
.dmgfile. Double-click the.pkginstaller inside the disk image. - Follow Prompts: Follow the on-screen instructions, which typically involve clicking “Continue,” agreeing to the license, and entering your administrator password. The installer will place the JDK in the standard location (
/Library/Java/JavaVirtualMachines/temurin-21.jdk).
Option 2: Using Homebrew (Recommended for developers)
Homebrew is a popular package manager for macOS that simplifies software installations.
- Install Homebrew (if not already installed): Open Terminal and run:
/bin/bash -c "$(curl -fsSL https://raw.githubusercontent.com/Homebrew/install/HEAD/install.sh)"
Follow the on-screen instructions. - Install Java 21: Once Homebrew is installed, simply run:
brew install openjdk@21
Homebrew will download and install Java 21. It will also provide instructions on how to link it and setJAVA_HOME. - Set JAVA_HOME (if using Homebrew): Homebrew often tells you how to set
JAVA_HOME. Typically, you’d add something like this to your shell profile (~/.zshrcor~/.bash_profile):
echo 'export JAVA_HOME="/opt/homebrew/opt/openjdk@21"' >> ~/.zshrc(for Apple Silicon)
echo 'export JAVA_HOME="/usr/local/opt/openjdk@21"' >> ~/.zshrc(for Intel Macs)
echo 'export PATH="$JAVA_HOME/bin:$PATH"' >> ~/.zshrc
source ~/.zshrc(to apply changes immediately)
Post-Installation Verification
macOS typically handles PATH variables automatically for JDK installations. However, if you installed via Homebrew or if you need to switch between multiple Java versions, setting JAVA_HOME explicitly in your shell profile (~/.zshrc or ~/.bash_profile) is a good practice.
You can verify the location of your Java installation using:
/usr/libexec/java_home -V
This command lists all installed JDKs and helps you set JAVA_HOME if needed.
Installing Java 21 on Linux (Ubuntu/Debian and RHEL/CentOS Examples)
Linux users have several robust options for installing Java 21, often leveraging package managers for ease of use and updates.
Using APT (Debian/Ubuntu)
For Debian-based systems like Ubuntu, you can often find OpenJDK in the default repositories or add third-party repositories for the latest versions.
- Update Package List:
sudo apt update - Install OpenJDK 21 (if available in repos):
sudo apt install openjdk-21-jdk
If it’s not available or you want Adoptium’s build, proceed to add their repository. - Add Adoptium Repository (for latest builds):
sudo apt install wget apt-transport-https -y
sudo mkdir -p /etc/apt/keyrings
wget -O - https://packages.adoptium.net/artifactory/api/apt/adoptium/deb/Release.gpg | sudo gpg --dearmor | sudo tee /etc/apt/keyrings/adoptium.gpg > /dev/null
echo "deb [signed-by=/etc/apt/keyrings/adoptium.gpg] https://packages.adoptium.net/artifactory/api/apt/adoptium/deb $(awk -F= '/^VERSION_CODENAME/{print$2}' /etc/os-release) main" | sudo tee /etc/apt/sources.list.d/adoptium.list - Update and Install:
sudo apt update
sudo apt install temurin-21-jdk - Set Default Java (if multiple versions):
sudo update-alternatives --config java
sudo update-alternatives --config javac
Select the desired Java 21 version from the list.
Using YUM/DNF (RHEL/CentOS)
For Red Hat-based systems like CentOS, Fedora, and RHEL, you use yum or dnf.
- Update Package List:
sudo dnf update(orsudo yum updatefor older systems) - Install OpenJDK 21:
sudo dnf install java-21-openjdk-devel
This typically installs the Red Hat build of OpenJDK. - Set Default Java (if multiple versions):
sudo alternatives --config java
sudo alternatives --config javac
Select the desired Java 21 version.
Manual Installation and Environment Variables (for all Linux distros)
If you prefer a manual installation or need a specific build not available via package managers:
- Download Tarball: Go to adoptium.net and download the Linux x64
.tar.gzarchive for Java 21. - Extract Archive:
sudo tar -xzvf jdk-21_linux-x64_bin.tar.gz -C /opt/
(Replacejdk-21_linux-x64_bin.tar.gzwith the actual filename). This extracts the JDK to/opt/jdk-21.x.x.x. - Set Environment Variables: Edit your shell profile (
~/.bashrc,~/.zshrc, or/etc/profilefor system-wide). Add the following lines:
export JAVA_HOME=/opt/jdk-21.x.x.x(adjust to your extracted directory name)
export PATH=$JAVA_HOME/bin:$PATH - Apply Changes:
source ~/.bashrc(or your respective profile file)
This manual approach provides flexibility, especially in server environments where package managers might not offer the exact version required.
Verifying Your Java 21 Installation and Running Your First Program
After completing the installation steps for your operating system, it’s crucial to verify that Java 21 is correctly installed and configured. This ensures that your system recognizes the new JDK and can execute Java applications.
Confirming Java and Javac Versions
Open a new terminal or command prompt (restart it if one was already open before setting environment variables) and execute the following commands:
-
Check Java Runtime Environment (JRE) version:
java -version
You should see output similar to this, indicating Java 21:openjdk version "21.0.2" 2024-01-16 LTS OpenJDK Runtime Environment Temurin-21.0.2+13 (build 21.0.2+13-LTS) OpenJDK 64-Bit Server VM Temurin-21.0.2+13 (build 21.0.2+13-LTS, mixed mode, sharing)The key is
version "21.0.x"andLTS. -
Check Java Compiler (Javac) version:
javac -version
This should display:
javac 21.0.2
If both commands show21.0.x, your Java 21 installation is successful. If you encounter “command not found” errors or older Java versions, revisit the environment variable setup for your operating system.
Writing and Compiling a Simple Java Program
To further confirm functionality and get a taste of Java 21, let’s write and run a classic “Hello, World!” program.
-
Create a Java file:
Open a text editor (like Notepad, VS Code, Sublime Text, or any IDE) and type the following code:public class HelloWorld { public static void main(String[] args) { System.out.println("Hello, Java 21!"); } }Save the file as
HelloWorld.javain an easily accessible directory (e.g., your Desktop or ajava_projectsfolder). -
Compile the program:
Open your terminal or command prompt, navigate to the directory where you savedHelloWorld.javausing thecdcommand. For example, if you saved it on your Desktop:- Windows:
cd C:UsersYourUsernameDesktop - macOS/Linux:
cd ~/Desktop
Then, compile the Java source file:
javac HelloWorld.java
If the compilation is successful, aHelloWorld.classfile will be created in the same directory. If there are errors, double-check your code for typos.
- Windows:
-
Run the program:
Execute the compiled Java class:
java HelloWorld
You should see the output:
Hello, Java 21!
Congratulations! You have successfully installed Java 21 and run your first Java program. This foundational step is crucial for any developer, as it validates the entire setup and prepares you for more complex projects.
Troubleshooting Common Installation Issues and Best Practices
Even with clear instructions, sometimes issues arise during software installations. Knowing how to troubleshoot these common problems and adopting best practices can save you time and ensure a more stable development environment.
Addressing Environment Variable Problems
Environment variables are the most frequent source of post-installation headaches.
- “java: command not found” or “javac: command not found”: This almost always indicates that the
PATHvariable is not correctly configured to include thebindirectory of your Java 21 installation. Double-check thePATHvariable to ensure%JAVA_HOME%bin(Windows) or$JAVA_HOME/bin(macOS/Linux) is present and correctly pointing to your Java 21 installation. Remember to restart your terminal or command prompt after making changes. - Running an older Java version despite installing Java 21: This happens when your
PATHvariable lists an older Javabindirectory before your Java 21bindirectory. Reorder thePATHentries so that the Java 21 path comes first. On Linux/macOS, you might also need to useupdate-alternativesor ensure yourJAVA_HOMEis correctly sourced. - Incorrect
JAVA_HOME: Many tools rely onJAVA_HOMEto find the JDK. EnsureJAVA_HOMEpoints to the root directory of your Java 21 installation (e.g.,C:Program FilesEclipse Adoptiumjdk-21.x.x.xor/opt/jdk-21.x.x.x), not thebinsubdirectory. - Persistence Issues: On Linux/macOS, if changes to
.bashrc,.zshrc, or.profiledon’t persist, ensure yousourcethe file after editing or restart your shell session. For system-wide changes, modify/etc/profileor create a script in/etc/profile.d/.
Dealing with Multiple Java Versions
It’s common for developers to have multiple Java versions installed for different projects.
- Switching Versions:
- Windows: You can manually update
JAVA_HOMEandPATHor use batch scripts to switch between versions. - macOS: Use
jenv(a popular tool for managing multiple JDKs) or manually setJAVA_HOMEin your shell profile. - Linux:
sudo update-alternatives --config javaandsudo update-alternatives --config javacis the standard way to switch system-wide.
- Windows: You can manually update
- IDE Configuration: Most Integrated Development Environments (IDEs) like IntelliJ IDEA, Eclipse, or VS Code allow you to configure the specific JDK for each project. This is often the most convenient way to manage different Java versions without altering system-wide settings. Ensure your IDE is pointing to your newly installed Java 21.
Security and Productivity Tips for Java Developers
Beyond just installing Java, adopting certain best practices can significantly enhance your digital security and boost your productivity as a Java developer.
- Regular Updates: Always keep your JDK updated, especially for LTS releases. Regular updates bring performance improvements, bug fixes, and critical security patches, which are vital for maintaining digital security. Check the Adoptium or Oracle website periodically for minor version updates.
- Source Control: Use Git or another version control system for all your Java projects. This is fundamental for collaboration, tracking changes, and reverting to previous states if necessary. It’s a core productivity tool for any development team.
- Integrated Development Environment (IDE): Leverage a powerful IDE like IntelliJ IDEA, Eclipse, or VS Code. These tools offer intelligent code completion, debugging capabilities, refactoring tools, and seamless integration with build tools (Maven, Gradle), dramatically increasing developer productivity. They also often include static code analysis features that can help identify potential security vulnerabilities early in the development cycle.
- Build Tools: For any non-trivial project, use build automation tools like Maven or Gradle. They manage dependencies, compile code, run tests, and package applications, streamlining the build process and ensuring consistency.
- Secure Coding Practices: When developing Java applications, adhere to secure coding guidelines (e.g., OWASP Top 10 for web applications). Be mindful of input validation, secure API usage, proper error handling, and avoiding common vulnerabilities. This proactive approach is essential for building robust and secure software that protects user data and system integrity.
- Dependency Management: Regularly audit your project dependencies for known vulnerabilities. Tools like OWASP Dependency-Check or Snyk can automate this process, ensuring that third-party libraries don’t introduce security risks. This is a critical aspect of maintaining digital security in modern software development.
- Performance Monitoring: For production applications, implement performance monitoring to detect and diagnose issues early. Tools integrated with the JVM can provide insights into memory usage, CPU load, and thread activity, helping you optimize applications for better performance and resource efficiency.
By diligently following these installation steps and adopting the recommended best practices, you’ll establish a solid foundation for your Java development journey, leading to more efficient workflows, secure applications, and ultimately, greater success in the tech world.
Conclusion
Installing Java 21 is a foundational step into the world of modern Java development, opening up access to a powerful, secure, and highly performant platform. This guide has walked you through the intricate process, from understanding the significance of Java 21’s new features like Virtual Threads and Pattern Matching for Switch, to providing detailed, platform-specific installation instructions for Windows, macOS, and Linux. We’ve also emphasized the importance of verifying your installation and provided essential troubleshooting tips to overcome common hurdles.
Embracing Java 21 positions you at the forefront of robust software development, equipped with tools that enhance productivity, streamline concurrency, and support the creation of highly scalable applications. Beyond the installation, the best practices highlighted – from continuous updates and secure coding to leveraging powerful IDEs and build tools – are crucial for any developer aiming for excellence and digital security in their projects.
With Java 21 successfully integrated into your environment, you are now ready to explore its advanced capabilities, build innovative applications, and contribute to the ever-evolving tech landscape. The journey of a thousand lines of code begins with a single, successful installation. Happy coding!
aViewFromTheCave is a participant in the Amazon Services LLC Associates Program, an affiliate advertising program designed to provide a means for sites to earn advertising fees by advertising and linking to Amazon.com. Amazon, the Amazon logo, AmazonSupply, and the AmazonSupply logo are trademarks of Amazon.com, Inc. or its affiliates. As an Amazon Associate we earn affiliate commissions from qualifying purchases.