In the dynamic world of Apple’s iOS ecosystem, installing applications typically involves a trip to the App Store. However, there’s a lesser-known, often historical, method involving IPA files and iTunes that once provided a pathway for developers, power users, and those seeking to install applications outside the traditional App Store channels. While Apple’s strategy has evolved significantly, making direct app management through iTunes largely obsolete for newer versions, understanding this process offers valuable insight into the past and illuminates the foundations of modern sideloading techniques. This guide delves into the nuances of IPA files, the specific iTunes versions required, a step-by-step installation process, and ultimately, explores the contemporary alternatives for sideloading apps in today’s mobile landscape.

Understanding IPA Files and the Evolving Role of iTunes
Before we dive into the “how-to,” it’s crucial to understand what we’re dealing with and the historical context that makes this topic both relevant and somewhat anachronistic.
What Exactly is an IPA File?
An IPA (iOS App Store Package) file is essentially an archive file format used by Apple for distributing and installing mobile applications on iOS devices like iPhones, iPads, and iPod Touches. Structurally, it’s very similar to a ZIP file, containing the binary for the ARM architecture (the processor used in iOS devices), along with resources like images, sounds, and other data required by the application, all bundled together.
Think of an IPA file as the complete package of an iOS application, ready to be installed. It’s the equivalent of an .exe file on Windows or an .apk file on Android. When you download an app from the App Store, you’re downloading an IPA file (though it’s handled automatically by the system). For developers, creating and testing IPA files is a routine part of the app development lifecycle.
Why Sideload IPA Files with iTunes? Historical Context and Modern Relevance
The concept of “sideloading” refers to installing applications on a device from a source other than its official app store. For iOS devices, this historically involved using iTunes. The reasons for wanting to sideload an IPA file, especially with iTunes, were varied:
- Developer Testing: Before submitting an app to the App Store, developers needed a way to test their applications on physical devices. iTunes provided a straightforward method to transfer and install these in-development IPA files.
- Older App Versions: Sometimes, a user might prefer an older version of an app that has been removed from the App Store or updated in a way they dislike. If they had access to the IPA of the older version, iTunes offered a way to install it.
- Unlisted or Custom Apps: For enterprise applications not intended for public distribution or specific custom tools, sideloading was (and still is, via other methods) the primary installation mechanism.
- Jailbreaking Community: Users who jailbroke their devices often used IPA files for custom apps and tweaks not available through official channels.
- Local Backups: iTunes once allowed users to manage and back up their installed applications locally on their computer, including their IPA files. This provided a sense of control and a way to reinstall apps without redownloading them.
However, the landscape began to change dramatically with iTunes version 12.7, released in September 2017. Apple removed the built-in App Store, ringtones, and books sections, effectively ending the direct management of applications and IPA files through iTunes for newer iOS devices and operating systems. This strategic shift was driven by Apple’s desire to streamline iTunes, focus it primarily on media (music, movies, TV shows), and reinforce the App Store as the sole official conduit for application distribution and management. Consequently, for most modern users with up-to-date software, the classic iTunes sideloading method is no longer viable. Our guide will therefore focus on the specific iTunes versions that still support this functionality.
Prerequisites for Sideloading IPA Files via iTunes
To successfully install IPA files using the traditional iTunes method, you need specific software, hardware, and an understanding of the necessary setup. This is where the age of your iTunes version becomes critical.
Essential Software and Hardware
-
A Computer (Windows or macOS): You’ll need a desktop or laptop computer.
-
An iOS Device: An iPhone, iPad, or iPod Touch capable of running the app you intend to install.
-
The IPA File: The application file itself, obtained from a trusted source (developer, official archive, etc.). Be extremely cautious about sourcing IPA files from unknown websites, as they can contain malware or compromised code.
-
A Compatible iTunes Version: This is the most crucial requirement. For direct app management and IPA sideloading, you must use an older version of iTunes.
- For Windows: iTunes 12.6.5.3 (or earlier) is the last version that included the App Store management feature.
- For macOS: If you’re on macOS Mojave (10.14) or earlier, iTunes 12.6.5.3 (or earlier) can be installed. For macOS Catalina (10.15) and later, iTunes was replaced by separate Music, TV, and Podcasts apps, and the App Store management functionality was completely removed from the system. If you’re on a newer macOS, this method is generally not possible without using a virtual machine running an older macOS or Windows.
Finding and installing older iTunes versions can be tricky and comes with caveats:
- Apple no longer officially supports or distributes these older versions for new installations.
- Downloading from unofficial sources can be risky; always verify the integrity of the installer.
- Using older software might pose security risks as it won’t receive the latest updates. It’s recommended to do this on a machine dedicated for such tasks or take appropriate security precautions.
Device Preparation and Trust
Once you have your compatible iTunes version installed and your IPA file ready, you need to prepare your iOS device and computer for communication.
- Connect Your iOS Device: Use a USB cable to connect your iPhone, iPad, or iPod Touch to your computer.
- “Trust This Computer” Prompt: Upon connection, your iOS device will likely display a “Trust This Computer?” prompt. Tap “Trust” and enter your device’s passcode if prompted. This establishes a secure connection between your device and computer, allowing iTunes to access its contents.
- Authorize Your Computer in iTunes: If this is your first time connecting, or if iTunes prompts you, you may need to authorize your computer. Go to
Account > Authorizations > Authorize This Computer...in iTunes, and enter your Apple ID and password. This is typically for media playback, but it ensures full functionality. - Disable “Find My iPhone” (Optional, for troubleshooting): In rare cases, especially when dealing with older devices or specific syncing issues, temporarily disabling “Find My iPhone” (Settings > your name > Find My > Find My iPhone) on your device can resolve conflicts. Remember to re-enable it afterward for security.
- Backup Your Device (Recommended): Before attempting any significant changes like sideloading, it’s always a good practice to back up your iOS device using iTunes (or iCloud). This ensures you can restore your data if anything goes wrong.
With these prerequisites met, you’re now ready to proceed with the actual installation process using the designated older version of iTunes.
Step-by-Step Guide: Installing IPA Files with iTunes (Older Versions)
This section outlines the precise steps to sideload an IPA file onto your iOS device using a compatible, older version of iTunes.
Acquiring and Preparing Your IPA File
- Source Your IPA File: As mentioned, obtain your IPA file from a trusted and reliable source. This might be a developer who provided you with a test build, a legitimate archive of an older application you legally own, or a custom application developed for internal use.
- Security Warning: Be extremely wary of downloading IPA files from random websites. Unauthorized or modified IPA files can contain malware, spyware, or other malicious code that could compromise your device and personal data. Always prioritize security and verify the source.
- Store It in an Accessible Location: Once downloaded, save the IPA file to an easily accessible folder on your computer, such as your desktop or a dedicated “IPA Files” folder. This will make it simple to locate during the installation process.
The Installation Process
Assuming you have iTunes 12.6.5.3 (or an equivalent older version) installed and your iOS device connected and trusted, follow these steps:
- Open the Compatible iTunes Version: Launch the specific older version of iTunes you’ve prepared. Ensure it’s not a newer version that lacks app management features.
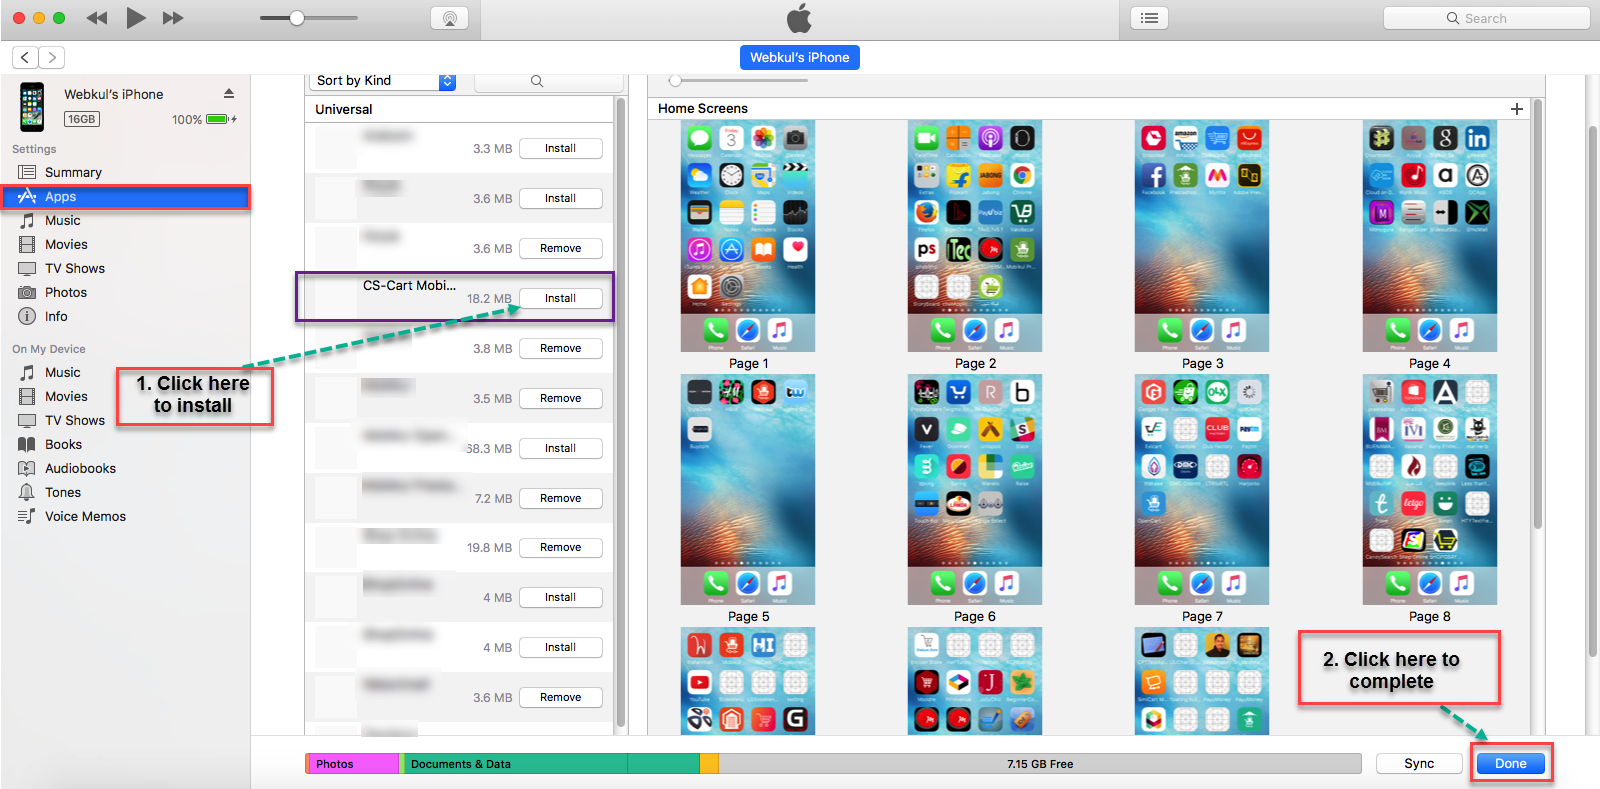
- Ensure Your Device is Connected and Recognized: In iTunes, look for your device icon (usually a small iPhone or iPad icon) near the top-left corner, next to the media type selector (Music, Movies, etc.). Click on it to access your device’s summary page.
- Navigate to the “Apps” Section: On your device’s summary page within iTunes, you should see a sidebar on the left. Look for a section labeled “Apps.” Click on it. This is the crucial section for managing applications. If you don’t see this section, you are likely using a newer version of iTunes that does not support app management.
- Add the IPA File to Your iTunes Library: There are two primary ways to do this:
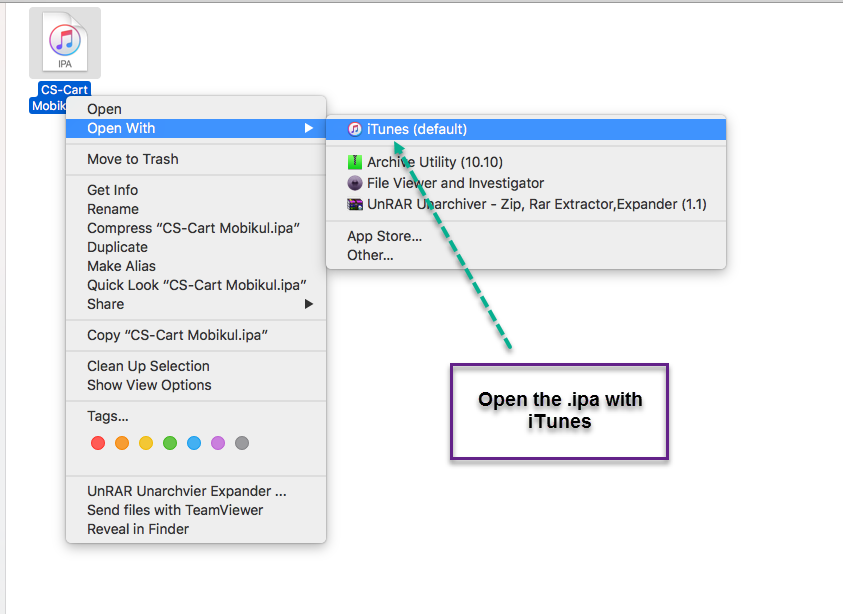
- Drag-and-Drop (Easiest): Locate your IPA file on your computer (e.g., on your desktop). Click and drag the IPA file directly into the “Apps” section within iTunes. You should see a visual cue indicating that the file is being added.
- File Menu: Alternatively, go to
File > Add to Library...in the iTunes menu bar. Navigate to where your IPA file is saved, select it, and click “Open.”
- Verify the App Appears in iTunes: After adding the IPA, it should appear in the list of applications within the “Apps” section in iTunes. You might see its icon, name, and version. This confirms that iTunes has successfully recognized and added the IPA file to its library.
- Install the App to Your Device:
- With the “Apps” section still open in iTunes, you should see a representation of your device’s home screens on the right-hand side.
- You can now click and drag the newly added app from your iTunes library (on the left) onto one of the home screens displayed for your device (on the right). Place it on an empty spot or over an existing app to create a folder.
- Alternatively, you might see an “Install” button next to the app in the list view. Click “Install” to queue it for installation.
- Sync Your Device: After placing the app or marking it for installation, you need to sync your device with iTunes to finalize the transfer.
- Look for the “Apply” or “Sync” button, usually located in the bottom-right corner of the iTunes window (when viewing your device summary or the Apps section).
- Click “Apply” or “Sync.” iTunes will begin the synchronization process, which includes transferring the IPA file to your iOS device and installing it.
- Check Your Device for the Installed App: Once the sync is complete, disconnect your iOS device from your computer. Unlock your device and navigate through your home screens. The newly installed app should now be present, often on the last available home screen or within a folder if you dragged it onto one.
Post-Installation Checks and Basic Troubleshooting
- App Icon Appears but Won’t Launch:
- Trust Developer: If the app is from an “Enterprise Developer” or an ad-hoc distribution, you might need to manually trust the developer profile on your device. Go to
Settings > General > VPN & Device Management(or “Profiles & Device Management” on older iOS versions), find the relevant developer profile, and tap “Trust.” - Compatibility: Ensure the IPA file is compatible with your device’s iOS version. An app built for iOS 15 might not run on iOS 10.
- IPA Integrity: The IPA file itself might be corrupted or incomplete. Try re-downloading it from a trusted source.
- Trust Developer: If the app is from an “Enterprise Developer” or an ad-hoc distribution, you might need to manually trust the developer profile on your device. Go to
- App Doesn’t Appear After Sync:
- Check Sync Settings: Go back to the “Apps” section in iTunes while your device is connected. Ensure the app is actually marked for installation (e.g., not grayed out, or explicitly marked “Will Install”).
- Free Space: Verify that your iOS device has enough free storage space for the application.
- Re-sync: Perform another sync. Sometimes, a second attempt resolves minor communication glitches.
- Restart Device/iTunes: Try restarting both your iOS device and iTunes.
- Authorization Issues: If iTunes complains about authorization, ensure your computer is authorized with the Apple ID associated with the IPA file (if it’s a paid app or tied to a specific developer account).
When iTunes Isn’t an Option: Modern Sideloading Alternatives
As established, the direct app management features in iTunes were deprecated. For anyone using newer versions of iTunes (or separate Music/Finder apps on macOS Catalina and later) or a modern iOS device, the method described above will not work. This shift necessitated the rise of alternative sideloading methods that cater to contemporary Apple ecosystem realities.
The Shift Away from iTunes for App Management
Apple’s decision to remove App Store management from iTunes 12.7 and subsequent versions was a deliberate move to:
- Streamline iTunes: Focus iTunes on its core media consumption functions.
- Emphasize the App Store: Reaffirm the App Store as the primary, secure, and controlled distribution channel for applications.
- Enhance Security: By limiting direct sideloading pathways for the general public, Apple sought to reduce the risk of users inadvertently installing malicious or poorly vetted applications.
- Modernize Workflows: With iCloud and direct device-to-device transfers, many of the original reasons for using iTunes as an intermediary for app management became less relevant.
This shift means that for most users today, especially those running current iOS versions, installing IPA files requires different approaches that circumvent or work around the App Store.
Popular Sideloading Tools and Methods
For those who still need to install IPA files outside the App Store on modern iOS devices, several powerful alternatives have emerged:
-
Xcode (for Developers):
- Purpose: Xcode is Apple’s integrated development environment (IDE) for macOS, primarily used by developers to create iOS, macOS, watchOS, and tvOS apps.
- Method: Developers can connect their iOS device to a Mac running Xcode and directly deploy their compiled IPA files (or project builds) onto the device for testing. This process involves “signing” the app with a developer certificate.
- Pros: Official Apple tool, full control for developers.
- Cons: Requires a Mac, a registered Apple Developer account (free or paid), and familiarity with Xcode. Not user-friendly for non-developers.
-
AltStore:
- Purpose: AltStore is an open-source alternative app store that allows users to sideload IPA files directly onto their non-jailbroken iOS devices using their free Apple ID.
- Method: It requires a desktop helper application (AltServer) running on a Windows PC or Mac. AltServer installs AltStore onto your iOS device, which then acts as an on-device app store. You can then download and install other IPA files through AltStore. Apps installed via AltStore need to be “refreshed” (re-signed) periodically (typically every 7 days) via AltServer to remain functional, as free Apple IDs have certificate limitations.
- Pros: No jailbreak required, user-friendly, on-device installation, supports installing many third-party apps.
- Cons: Requires a computer for initial setup and weekly refreshing, can be temperamental with network issues.
-
Sideloadly:
- Purpose: Sideloadly is a Windows and macOS utility that offers a more streamlined way to sideload IPA files onto iOS devices.
- Method: Similar to AltStore in principle, Sideloadly connects directly to your iOS device via USB, uses your Apple ID to sign the IPA file, and then installs it directly onto the device. It also handles the 7-day refreshing process.
- Pros: Very user-friendly, often more stable than AltStore for direct sideloading, supports jailbroken devices for indefinite signing.
- Cons: Still requires a computer for installation and refreshing.
-
TestFlight:
- Purpose: TestFlight is Apple’s official platform for beta testing apps. It allows developers to invite users to test pre-release versions of their apps.
- Method: Developers distribute beta apps through TestFlight, and invited testers download the TestFlight app from the App Store. Testers then use the TestFlight app to install and update beta versions of the app.
- Pros: Official and secure, easy for testers, integrated into the Apple ecosystem.
- Cons: Only for beta testing, developers control access, not for installing arbitrary IPA files.
-
Enterprise Distribution:
- Purpose: For large organizations that need to distribute custom internal applications to their employees without going through the public App Store.
- Method: Requires an Apple Developer Enterprise Program membership. Apps are signed with an enterprise certificate and can be distributed over-the-air (OTA) via an internal website or MDM (Mobile Device Management) solution. Users download and install these apps directly from the company’s internal portal.
- Pros: Full control over distribution for corporations, no App Store review.
- Cons: Very expensive developer program, strict usage guidelines (must be internal to the organization), risk of certificate revocation if abused.
Conclusion
The journey of installing IPA files on iOS devices has significantly evolved. While the classic method of using iTunes once offered a straightforward path for developers and early adopters, Apple’s strategic removal of app management from iTunes 12.7 onwards has relegated this technique to the annals of tech history, relevant only for those with older software setups. This shift was a clear signal of Apple’s commitment to a more centralized, secure, and curated App Store experience.
For modern iOS users and developers, the need to sideload hasn’t disappeared, but the tools and methods have adapted. Alternatives like Xcode, AltStore, and Sideloadly now empower users to install applications outside the App Store, each with its own advantages and limitations. TestFlight provides an official channel for beta testing, and Enterprise Distribution caters to corporate needs.
Regardless of the method chosen, the act of sideloading carries inherent risks, particularly when sourcing IPA files from untrusted origins. Malware and security vulnerabilities remain a significant concern. Therefore, exercising extreme caution and prioritizing digital security are paramount. Understanding both the historical context of iTunes-based sideloading and the current landscape of modern alternatives equips users with the knowledge to navigate the complex yet flexible world of iOS application management beyond the App Store.
aViewFromTheCave is a participant in the Amazon Services LLC Associates Program, an affiliate advertising program designed to provide a means for sites to earn advertising fees by advertising and linking to Amazon.com. Amazon, the Amazon logo, AmazonSupply, and the AmazonSupply logo are trademarks of Amazon.com, Inc. or its affiliates. As an Amazon Associate we earn affiliate commissions from qualifying purchases.