
The Canon Pixma series has long been a staple in homes and small offices worldwide, celebrated for its versatility, photo quality, and user-friendly design. However, even the most intuitive technology requires a bit of hands-on maintenance, and few tasks are as fundamental—or as frequently required—as replacing ink cartridges. While seemingly straightforward, proper ink installation is crucial for ensuring optimal print quality, preventing printer errors, and extending the lifespan of your device. This comprehensive guide will demystify the process, offering a professional, insightful, and engaging walkthrough for installing ink in your Canon Pixma printer, from understanding its inner workings to troubleshooting common post-installation hiccups.

Understanding Your Canon Pixma Printer and Ink System
Before diving into the mechanics of ink replacement, a foundational understanding of your Canon Pixma’s ink system is invaluable. Canon has engineered its Pixma line with various ink configurations, each designed to meet specific user needs and optimize print performance. Familiarizing yourself with these nuances will not only make ink installation smoother but also empower you to make informed decisions regarding your printer’s ongoing care.
The Canon Pixma Ecosystem: A Brief Overview
Canon Pixma printers range from compact all-in-ones perfect for casual home use to more robust photo printers favored by enthusiasts. Despite their diverse models (e.g., TS series, MG series, MX series, G series MegaTank), a common thread is their reliance on either cartridge-based or refillable ink tank systems. Cartridge-based systems are the most prevalent for typical Pixma models, involving the replacement of individual or combined ink units. MegaTank printers, while offering lower long-term costs due to user-refillable tanks, follow a distinct refill process beyond the scope of this cartridge-focused guide. Understanding your specific Pixma model is the first step, as cartridge types and installation procedures can vary slightly. Always refer to your printer’s specific manual for model-specific instructions, which often complement these general guidelines.
Identifying Your Ink Cartridge Type (FINE vs. Individual Ink Tanks)
Canon primarily uses two types of ink cartridge systems in its Pixma printers:
-
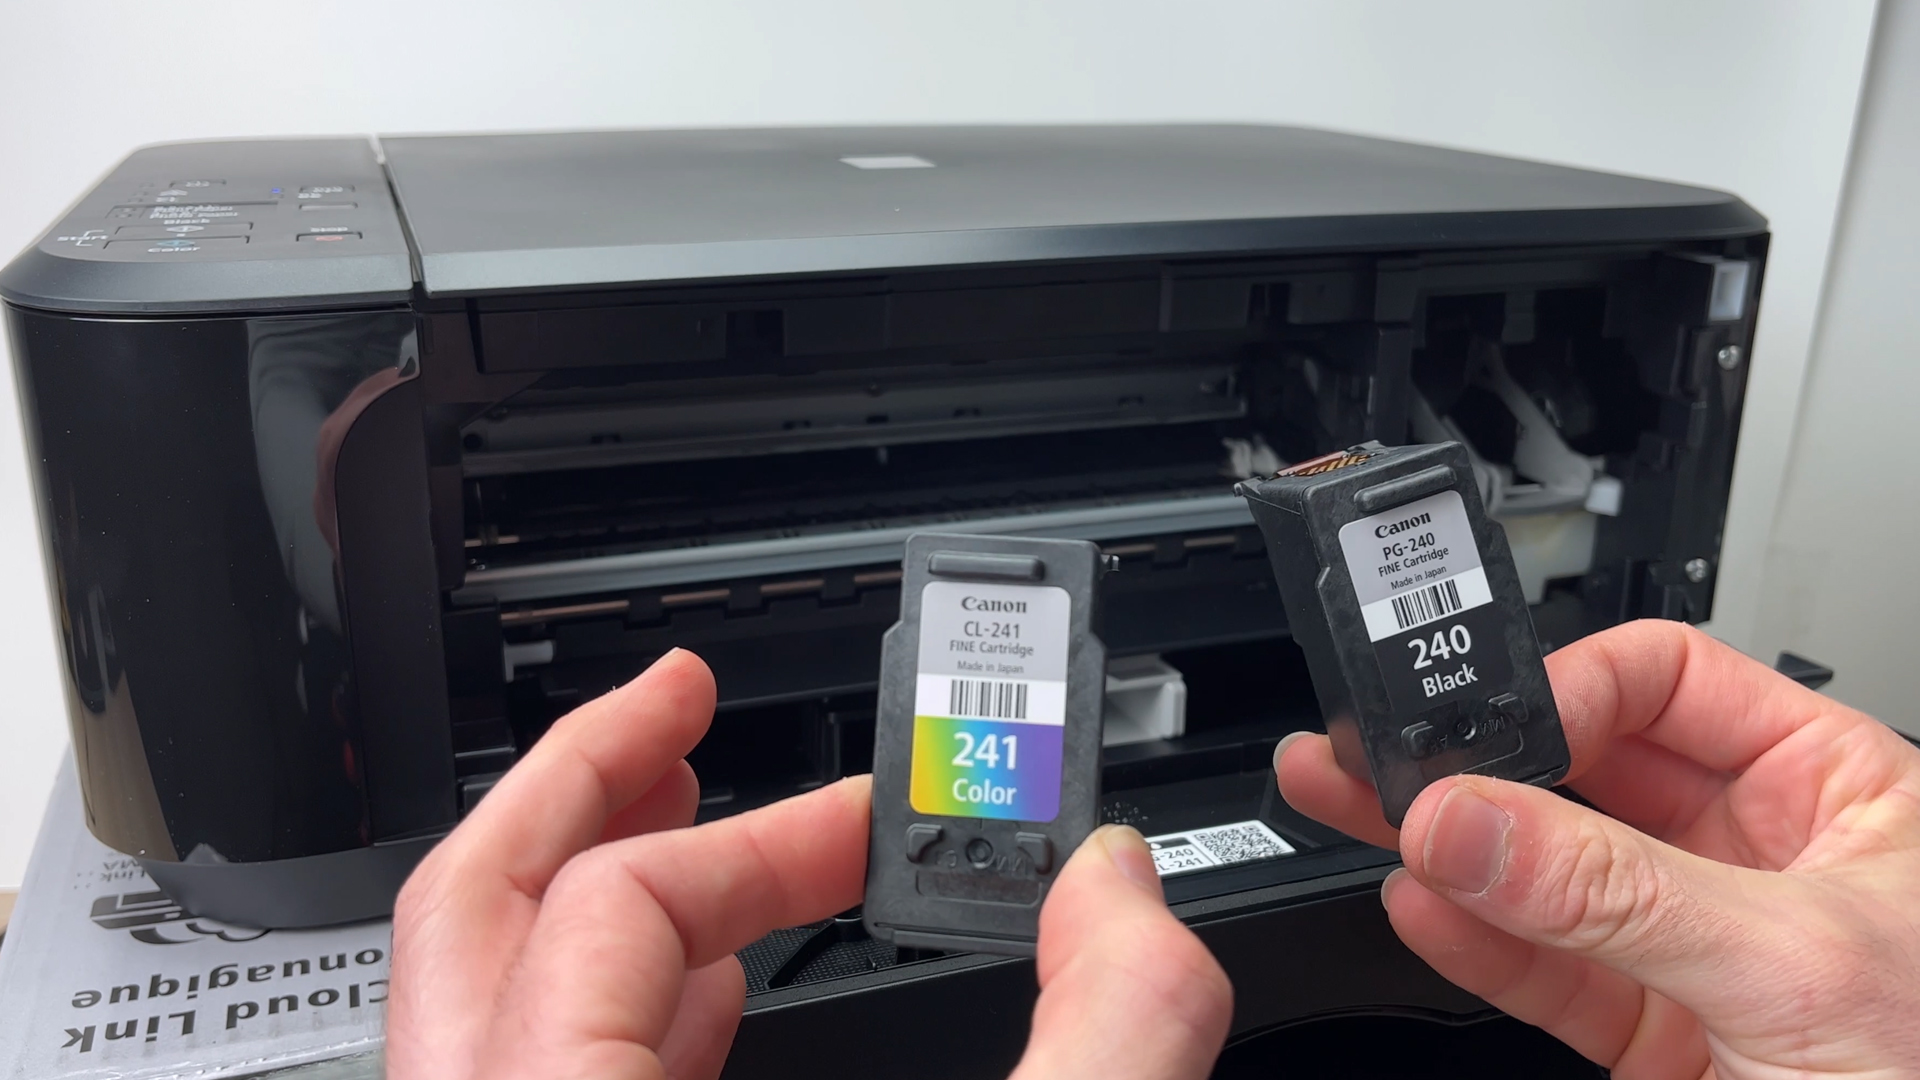
FINE (Full-Photolithography Inkjet Nozzle Engineering) Cartridges: These are often found in more entry-level Pixma models. A FINE cartridge typically combines multiple colors (e.g., Cyan, Magenta, Yellow) into a single tri-color cartridge, alongside a separate, larger black cartridge. This system is convenient and economical for general use but means that if one color runs out, the entire tri-color cartridge needs replacing.
-
Individual Ink Tanks: Higher-end Pixma models, especially those geared towards photo printing, usually feature individual ink tanks for each color (e.g., Black, Cyan, Magenta, Yellow, Photo Black, Gray, etc.). This system offers greater efficiency, as you only replace the specific color that runs out, potentially reducing waste and cost over time. It also allows for a wider color gamut and finer detail in photo prints.
Knowing which system your Pixma utilizes is critical when purchasing new ink, as incompatible cartridges are a common cause of installation frustration and printer errors.
Why Proper Ink Installation Matters
Beyond merely getting your printer to function, proper ink installation has several profound implications:
-
Print Quality: Incorrectly installed cartridges can lead to streaking, faded prints, or inaccurate colors. A properly seated cartridge ensures consistent ink flow and optimal nozzle performance.
-
Printer Longevity: Forcing cartridges or installing them improperly can damage the print head, the cartridge carriage, or the printer’s delicate internal mechanisms, leading to costly repairs or premature device failure.
-
Error Prevention: Most modern Pixma printers are equipped with sensors that detect cartridge presence, authenticity, and proper seating. Incorrect installation will trigger error messages, preventing printing until the issue is resolved.
-
Ink Efficiency: A well-installed cartridge seals correctly, preventing air ingress, which can dry out ink or cause blockages. It also ensures accurate ink level monitoring.
Preparing for Ink Cartridge Replacement
Preparation is key to a smooth and error-free ink installation. A few minutes spent gathering the right materials and understanding the immediate context can save significant time and frustration.
Essential Supplies and Safety Precautions
Before you begin, ensure you have:
-
New Ink Cartridges: Verify they are the correct model numbers for your specific Canon Pixma printer. Always check the packaging for compatibility.
-
Soft, Lint-Free Cloth or Paper Towels: For wiping up any accidental ink spills.
-
Gloves (Optional but Recommended): To protect your hands from ink stains, which can be surprisingly difficult to remove.
-
Good Lighting: A well-lit workspace helps you see the cartridge slots and printer mechanisms clearly.
Safety Precautions:
-
Power On: Ensure your printer is powered ON when replacing cartridges. Turning it off can prevent the print head carriage from moving to the accessible replacement position.
-
Avoid Touching Components: Do not touch the gold electrical contacts on the cartridge or the print head nozzles. Oils from your skin can interfere with ink flow and electrical connections.
-
Handle with Care: Ink cartridges, especially their seals and nozzles, are delicate. Avoid shaking them vigorously or dropping them.
Checking Ink Levels and Printer Status
Modern Canon Pixma printers typically provide digital readouts of ink levels, either on the printer’s LCD screen or through software on your connected computer. It’s advisable to replace cartridges when indicated as “low” or “empty” to avoid print interruptions. Some printers will alert you with flashing lights or error codes. It’s also good practice to ensure any pending print jobs are canceled before starting the replacement process, as sudden ink depletion mid-job can sometimes lead to print quality issues with the remaining cartridges.
Sourcing Authentic Canon Ink Cartridges
While third-party or refillable cartridges might seem like an economical alternative, sticking with genuine Canon ink is generally recommended for optimal performance and printer longevity. Canon’s proprietary ChromaLife100+ and PGI/CLI ink systems are engineered to work seamlessly with their print heads, ensuring consistent color accuracy, smudge resistance, and fade resistance. Using non-genuine ink can lead to:
-
Print Head Clogging: Inks with different chemical compositions can clog delicate nozzles.
-
Inaccurate Color Reproduction: Non-Canon inks may not match the precise color profiles used by your printer.
-
Invalidated Warranty: Using non-genuine ink can void your printer’s warranty if it causes damage.
-
Incorrect Ink Level Reporting: The printer’s sensors might not accurately read non-Canon cartridges.
While genuine ink might have a higher upfront cost, it often translates to better print quality and fewer maintenance headaches in the long run.
Step-by-Step Guide to Installing Ink Cartridges
This section provides a generalized procedure. Always consult your specific Canon Pixma model’s manual for precise visual guides and nuances.
Opening the Printer and Accessing the Cartridge Compartment
-
Power On the Printer: Ensure your Canon Pixma printer is switched on.
-
Open the Access Cover: Gently lift the top cover or front cover of your printer. This action will usually trigger the print head carriage to move automatically to the center or a designated replacement position. Wait for the carriage to stop moving completely before proceeding. Do not manually force the carriage; this can damage the printer.
-
Identify Cartridge Slots: Observe the cartridge carriage. You’ll see several slots, each corresponding to a specific color or type of ink cartridge. They are often labeled with colors (e.g., C, M, Y, BK, PBK) or cartridge numbers.
Removing Empty or Expired Cartridges
-
Locate the Cartridge to Replace: Identify the empty cartridge.
-
Release the Cartridge:
-
For FINE Cartridges: You might need to push down on the tab or lever at the front of the cartridge until it clicks and releases, then gently pull it out towards you.
-
For Individual Ink Tanks: Typically, there’s a lever or tab on the front of the cartridge. Press it until the cartridge lifts slightly. Then, gently pull the cartridge straight out from its slot.
-
-
Dispose Responsibly: Place the used cartridge aside. Consider recycling programs for empty ink cartridges.
Unboxing and Preparing New Ink Cartridges
-
Remove from Packaging: Carefully unwrap the new ink cartridge. Most cartridges come in sealed plastic or foil packaging to prevent drying out.
-
Remove Protective Tape/Film: Most new cartridges have an orange or yellow protective tape or film over the ink exit port or ventilation hole. Gently peel this off. Be careful not to touch the metal contacts or the ink nozzle area. Do not remove any clear film that covers only the electrical contacts; this is often part of the cartridge design.
-
Avoid Shaking: While it might be tempting, vigorously shaking a new cartridge is generally unnecessary and can sometimes cause ink leakage.
Inserting New Cartridges Correctly
-
Match Color/Type: Align the new cartridge with its corresponding slot in the print head carriage. Ensure the color or cartridge number matches the slot’s label.
-
Insert and Push Firmly:
-
For FINE Cartridges: Slide the cartridge into the slot at a slight upward angle, then push it firmly upwards and forward until it clicks securely into place. You should hear an audible click.
-
For Individual Ink Tanks: Insert the cartridge straight into its slot until it clicks securely. For some models, you might need to press down on the top of the cartridge until it locks.
-
-
Verify Seating: Double-check that all newly installed cartridges are seated firmly and properly. They should sit flush with the other cartridges and not be wobbly.
Closing the Printer and Initiating Alignment
-
Close the Access Cover: Gently close the printer’s top or front cover. The print head carriage will likely return to its home position.
-
Wait for Initialization: The printer may perform an initialization sequence, which can include whirring noises and indicator lights flashing. This is normal.
-
Perform Print Head Alignment (If Prompted): Many Canon Pixma printers will automatically prompt you to perform a print head alignment after installing new cartridges, especially if all cartridges were replaced or if it’s the first time replacing them. Follow the on-screen instructions on the printer’s display or your computer. This process prints a test pattern and then scans it to ensure precise ink droplet placement for optimal print quality. Do not skip this step if prompted, as it is vital for sharp and accurate prints.
Troubleshooting Common Ink Installation Issues
Even with careful execution, sometimes issues arise. Knowing how to diagnose and resolve them can save you a service call.
Printer Not Recognizing New Cartridges
-
Check Seating: The most common culprit. Open the cover, remove the cartridge, and reinsert it, ensuring it clicks firmly into place.
-
Remove Protective Tape: Double-check that all orange/yellow protective tape or caps have been removed from the cartridge.
-
Clean Contacts: Gently wipe the gold electrical contacts on the cartridge and the corresponding contacts inside the printer carriage with a clean, lint-free cloth. Be careful not to touch the nozzles.
-
Restart Printer: Turn the printer off, unplug it from the wall for a minute, then plug it back in and turn it on. This can reset the internal sensors.
-
Verify Authenticity/Compatibility: Ensure you are using genuine Canon cartridges specifically designed for your Pixma model.
Ink Smudges or Poor Print Quality After Replacement
-
Print Head Alignment: If you skipped it, perform a print head alignment. This is crucial.
-
Nozzle Check/Cleaning: Perform a nozzle check pattern print through your printer’s utility software (on your computer) or directly from the printer’s menu. If patterns are broken or missing, perform a print head cleaning cycle. You might need to do this 2-3 times.
-
Ink Levels: Ensure all cartridges have sufficient ink. Even a new cartridge can be faulty (though rare).
-
Paper Type: Make sure you’re using the correct paper type settings in your print driver.
Cartridge Not Fitting Properly
-
Orientation: You might be trying to insert the cartridge upside down or backward. Check the labels and shape carefully.
-
Incorrect Cartridge Type: Verify that the cartridge model number precisely matches your printer’s requirements. Even a slight difference can make it incompatible.
-
Obstruction: Look for any foreign objects or debris within the cartridge slot that might be preventing proper insertion.
Error Messages and Their Meanings
Canon Pixma printers use specific error codes (e.g., E05, B200) or messages (e.g., “Ink Empty,” “Cartridge Not Recognized”).
-
“Ink Empty” / “Low Ink”: Replace the indicated cartridge. If it’s a new cartridge, refer to “Printer Not Recognizing New Cartridges” troubleshooting.
-
“Cartridge Not Recognized”: Indicates a problem with cartridge seating, contacts, or compatibility. Follow the steps under “Printer Not Recognizing New Cartridges.”
-
“Print Head Problem”: This is a more serious error. Often requires print head cleaning, reinstallation, or professional service.
-
“Error Code”: Refer to your printer’s manual or Canon’s support website for specific error code meanings and resolutions.
Maximizing Your Canon Pixma Printer’s Lifespan and Print Quality
Beyond just ink installation, several practices can significantly enhance your Pixma printer’s performance and longevity. Regular, mindful maintenance is the hallmark of a savvy tech user.
Best Practices for Ink Cartridge Maintenance
-
Don’t Let Ink Dry Out: Print something, even a simple test page, at least once a week. Infrequent use is a common cause of dried ink in the nozzles, leading to clogs.
-
Store Spare Cartridges Properly: Keep new, unopened cartridges in their sealed packaging until ready for use. Store them in a cool, dry place, away from direct sunlight or extreme temperatures.
-
Replace When Indicated: While tempting to squeeze every last drop, continuing to print with critically low or empty cartridges can introduce air into the print head, potentially causing permanent damage.
-
Avoid Refilling Cartridges: Unless your printer is specifically designed for refillable ink tanks (like the MegaTank series), attempting to refill standard cartridges can lead to messy leaks, print head damage, and poor print quality due to incompatible ink.
Understanding Ink Yield and Cost-Effectiveness
Ink yield refers to the estimated number of pages a cartridge can print. This is often based on ISO/IEC standards, which involve a standardized 5% page coverage. In real-world usage, complex graphics or photos will use significantly more ink, reducing the actual page yield.
-
Consider High-Yield Cartridges (XL/XXL): For users with frequent printing needs, high-yield versions of Canon cartridges offer more ink at a lower per-page cost, reducing the frequency of replacements.
-
Black vs. Color Usage: Be mindful that many printers use a mix of black and color inks even for “black only” text printing, especially if “grayscale” or “black ink only” settings are not explicitly selected or available.

Firmware Updates and Printer Care
-
Keep Firmware Updated: Periodically check Canon’s website for firmware updates for your specific Pixma model. Firmware updates often improve performance, add new features, and resolve bugs, including those related to ink management and cartridge recognition.
-
Clean Exterior Regularly: Dust and debris can accumulate around the printer’s vents and paper trays. Gently wipe the exterior with a soft, dry cloth. Avoid using harsh chemicals.
-
Handle Paper with Care: Use good quality paper and load it correctly to prevent paper jams, which can stress printer mechanisms and sometimes even damage the print head.
Installing ink in your Canon Pixma printer doesn’t have to be a chore. By understanding your printer’s system, preparing adequately, following the steps carefully, and knowing how to troubleshoot, you can ensure a seamless experience and consistently enjoy high-quality prints. Your Pixma printer is a sophisticated piece of technology, and a little attention to its ink needs will keep it serving you faithfully for years to come.
aViewFromTheCave is a participant in the Amazon Services LLC Associates Program, an affiliate advertising program designed to provide a means for sites to earn advertising fees by advertising and linking to Amazon.com. Amazon, the Amazon logo, AmazonSupply, and the AmazonSupply logo are trademarks of Amazon.com, Inc. or its affiliates. As an Amazon Associate we earn affiliate commissions from qualifying purchases.