In today’s digital age, the reliance on printers remains surprisingly strong, whether for essential documents, creative projects, or even cherished photos. At the heart of every HP printer’s ability to bring your digital world to life lies the ink cartridge. While seemingly a simple component, a correctly installed ink cartridge is crucial for optimal print quality, printer longevity, and avoiding frustrating error messages. This guide delves into the straightforward process of installing HP ink cartridges, ensuring you get back to printing without a hitch. We’ll cover everything from preparation and identification to the actual installation and post-installation checks, drawing on our expertise in the Tech realm to demystify this common task.

Understanding Your HP Ink Cartridges
Before embarking on the installation process, a foundational understanding of your HP ink cartridges is beneficial. HP offers a diverse range of ink cartridges, each designed for specific printer models and printing needs. Identifying the correct cartridge is the first step towards a successful installation.
Identifying the Correct HP Ink Cartridge
The most common pitfall when replacing ink cartridges is using the wrong type. HP cartridges are not universally interchangeable. Several factors determine the correct cartridge for your printer:
- Printer Model Number: This is the most critical piece of information. You can typically find your printer model number on the front, top, or back of the printer itself. Once you have this, you can search HP’s official website, your printer’s manual, or reputable online retailers for compatible ink cartridges.
- Cartridge Number/Series: HP ink cartridges are often identified by a series number or alphanumeric code (e.g., HP 63, HP 950XL, HP 972A). This number is usually printed on the cartridge itself and on the packaging of the new cartridge. Ensure the number on your new cartridge matches the specifications for your printer.
- Ink Type (Color vs. Black): Printers typically require both black and color ink cartridges. Some printers have separate cartridges for cyan, magenta, and yellow, while others use a single tri-color cartridge. Make sure you are purchasing the correct type of ink (black for black text, and the appropriate color configuration for your printer).
- Ink Volume (Standard vs. XL): HP offers both standard yield and high-yield (XL) cartridges. XL cartridges contain more ink and are designed for users who print frequently. While an XL cartridge will fit in the same slot as its standard counterpart, it’s important to be aware of the difference in capacity and cost.
Where to Find Cartridge Information
- Printer Manual: Your HP printer’s user manual is an invaluable resource. It will explicitly list the ink cartridge numbers compatible with your specific model. If you’ve misplaced your physical manual, most HP printers have a digital version available for download on HP’s support website.
- Printer Display/Software: Many HP printers have an on-screen display or accompanying software that can inform you about the current ink levels and often suggest the correct replacement cartridge numbers.
- HP Website: HP’s official website offers a robust support section where you can enter your printer model to find a list of compatible ink cartridges, drivers, and troubleshooting guides.
- Old Cartridge: The easiest way to identify the correct cartridge is often to examine the one you are replacing. The cartridge number is usually printed clearly on its side.
Types of HP Ink Cartridges
HP utilizes two primary ink technologies for its consumer and small office printers:
- Dye-Based Ink: This type of ink uses colorants dissolved in a liquid solvent. Dye-based inks are known for producing vibrant colors and are commonly used in photo printers. However, they can be more susceptible to fading over time, especially when exposed to UV light.
- Pigment-Based Ink: In pigment-based inks, the colorants are suspended as solid particles in a liquid medium. These inks are generally more durable, fade-resistant, and water-resistant than dye-based inks, making them ideal for printing text documents and graphics that need to withstand handling and environmental exposure.
Most HP printers use a combination of these, with black ink often being pigment-based for sharp text and color cartridges being dye-based for vibrant photos. Always refer to your printer’s specifications to understand the ink types it uses.
The Step-by-Step Installation Process
Now that you have identified the correct ink cartridge, it’s time to proceed with the installation. This process is generally designed to be intuitive, but following these steps carefully will ensure a smooth and error-free experience.
Preparing for Installation
Before you begin, take a few moments to prepare:
- Turn on Your Printer: Ensure your HP printer is powered on and in a ready state. This will typically cause the ink carriage to move to a position where it’s accessible for cartridge replacement. Refer to your printer’s manual for specific instructions on accessing the ink carriage if it doesn’t automatically move.
- Open the Printer Cover: Locate the ink cartridge access door or cover on your printer. This is usually on the front or top of the device. Gently lift or slide it open as indicated by your printer model.
- Allow the Carriage to Move: Once the cover is open, the ink carriage, which holds the cartridges, should automatically move to the center of the printer, making the cartridges easily accessible. If it doesn’t, consult your printer’s manual for instructions on manually moving the carriage to the replacement position. Do not force the carriage to move.

Removing the Old Ink Cartridge
With the carriage exposed, you can now remove the old cartridge:
- Identify the Cartridge to Replace: Determine which ink cartridge needs to be replaced. This will likely be indicated by your printer’s display, the software on your computer, or because you’ve noticed a decline in print quality for a specific color or black text.
- Gently Release the Cartridge: Each HP ink cartridge is held in place by a latch or clip. To remove it, press down gently on the top of the cartridge or on the latch mechanism. The cartridge should then pop up slightly, allowing you to pull it straight out of its slot. Avoid touching the electrical contacts or the ink nozzles on the cartridge, as this can interfere with its performance.
- Dispose of the Old Cartridge Responsibly: Used ink cartridges can often be recycled. Check with your local electronics retailers or municipal recycling programs for options. Many office supply stores also offer ink cartridge recycling programs.
Installing the New HP Ink Cartridge
This is the core of the process. Handle the new cartridge with care:
- Unpack the New Cartridge: Carefully remove the new HP ink cartridge from its packaging.
- Remove Protective Tape: HP cartridges typically come with protective elements to prevent ink leakage during transport. This often includes a strip of plastic tape covering the ink nozzles and sometimes a plastic tab to remove. Locate and carefully peel off the plastic tape. Be sure to remove all of it. There may also be a pull tab that needs to be removed. Do not remove any other stickers or coverings.
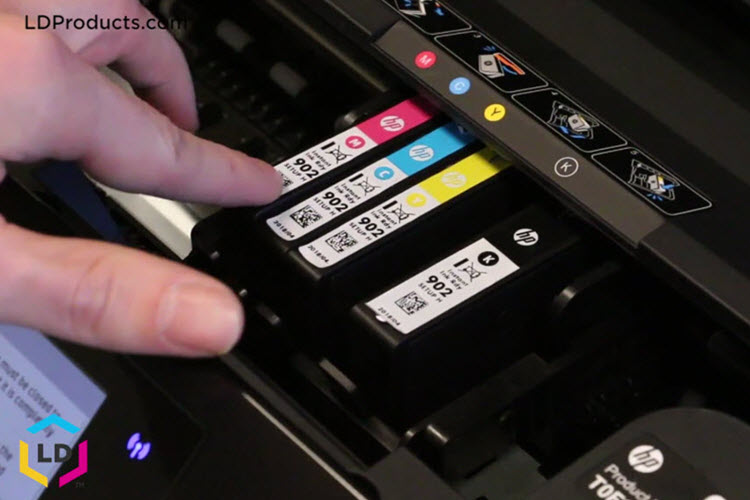
- Insert the New Cartridge: Hold the new cartridge by its sides, ensuring the ink nozzles are facing downwards. Align the cartridge with the correct slot in the carriage. Gently push the cartridge into the slot until it snaps firmly into place. You should hear or feel a click as it locks in securely.
- Close the Printer Cover: Once both cartridges (if you are replacing both black and color) are securely installed, close the ink cartridge access door or cover.
Post-Installation and Troubleshooting
After the physical installation is complete, there are a few crucial steps to ensure everything is working correctly.
Printer Alignment and Initialization
Most HP printers will automatically initiate an alignment process after a new ink cartridge is installed. This process ensures that the print heads are properly calibrated for optimal print quality.
- Follow On-Screen Prompts: Your printer’s display or your computer’s printer software will likely prompt you to print an alignment page. Follow these instructions carefully.
- Scan the Alignment Page: You will typically be asked to place the printed alignment page back onto the scanner bed and initiate a scan. This allows the printer to read the alignment marks and adjust itself accordingly.
- Automatic Calibration: In some cases, the printer may perform an automatic calibration without requiring you to print and scan an alignment page.
If the printer does not automatically prompt you for alignment, you can usually initiate it manually through the printer’s control panel or the printer software on your computer. Look for options like “Printer Services,” “Maintenance,” or “Tools” and select “Align Ink Cartridges” or a similar option.
Verifying Cartridge Recognition and Print Quality
Once the alignment is complete, it’s essential to verify that the printer recognizes the new cartridge and that the print quality is satisfactory.
- Check Printer Status: Look at your printer’s display or the printer software on your computer. It should indicate that the new ink cartridges are installed and recognized. If you receive an error message related to the ink cartridge, retrace the installation steps, ensuring the cartridge is seated correctly and all protective materials have been removed.
- Print a Test Page: The best way to confirm proper installation and cartridge function is to print a test page. You can usually do this through the printer’s control panel or the printer software. This page will typically include text and graphics in both black and color.
- Assess Print Quality: Examine the test page for any issues such as missing lines, incorrect colors, smudging, or banding. If you notice any problems, try printing a “print head cleaning” cycle through the printer’s maintenance options. If the issue persists, you may need to perform another alignment or, in rare cases, the new cartridge might be faulty.
Troubleshooting Common Issues
While the process is generally straightforward, occasional issues can arise.
- “Ink Cartridge Not Recognized” Error: This is a common error. Ensure the cartridge is fully seated in its slot and that the electrical contacts on both the cartridge and the printer are clean. Gently wipe the contacts with a dry, lint-free cloth if they appear dirty. Also, double-check that you have removed all protective tape and plastic tabs.
- Poor Print Quality After Installation: This could be due to an incomplete alignment, a dirty print head, or a faulty cartridge. Running a print head cleaning cycle is often the first step. If that doesn’t resolve the issue, re-running the alignment process might help.
- Leaking Ink: If you notice ink leaking, remove the cartridge immediately and inspect it for damage. Ensure you have correctly removed the protective tape. If the cartridge appears damaged or continues to leak after reinstallation, it may be defective and should be replaced.
By following these detailed steps, you can confidently install your HP ink cartridges and ensure your printer continues to deliver high-quality prints. Understanding your printer’s needs, handling the cartridges with care, and performing the post-installation checks are key to a successful and hassle-free printing experience. In the interconnected world of Tech, where productivity is paramount, a properly functioning printer is an essential tool. Mastering simple tasks like ink cartridge replacement ensures you can focus on what truly matters – getting your work done, sharing your memories, and expressing your creativity.
aViewFromTheCave is a participant in the Amazon Services LLC Associates Program, an affiliate advertising program designed to provide a means for sites to earn advertising fees by advertising and linking to Amazon.com. Amazon, the Amazon logo, AmazonSupply, and the AmazonSupply logo are trademarks of Amazon.com, Inc. or its affiliates. As an Amazon Associate we earn affiliate commissions from qualifying purchases.