Achieving a clean, modern aesthetic in your kitchen, bathroom, or any space with cabinetry often hinges (pun intended) on the details that aren’t immediately obvious. Hidden cabinet hinges are a prime example of this design philosophy. By concealing the hardware, these hinges allow the natural beauty of your cabinet doors and the overall design of your space to shine, free from the visual clutter of exposed metal. This guide will walk you through the process of installing hidden cabinet hinges, offering insights that touch upon the precision of technology, the enhancement of your home’s brand, and the smart financial decisions involved in this popular home improvement project.

Whether you’re a seasoned DIY enthusiast or a first-time homeowner looking to elevate your living space, understanding the nuances of hidden hinge installation is crucial. It’s more than just screwing pieces of metal together; it’s about precision, planning, and executing a project that adds significant value and aesthetic appeal to your property. Let’s delve into the art and science of perfecting your cabinetry with hidden hardware.
Understanding Hidden Hinges: The Foundation of Flawless Cabinetry
Before you pick up a drill, it’s essential to understand what hidden hinges are, how they function, and the different types available. This foundational knowledge is crucial for selecting the right hardware and executing a successful installation. From a “Tech” perspective, these hinges are marvels of engineering, designed for seamless operation and adjustability. From a “Brand” standpoint, their use instantly elevates the perceived quality and modernity of your cabinetry.
The Anatomy and Types of Hidden Hinges
Hidden cabinet hinges, often referred to as European hinges or concealed hinges, are distinguished by their two main parts: a cup (or boss) that fits into a drilled hole in the cabinet door, and a mounting plate that attaches to the inside of the cabinet frame. The magic happens within the articulated arm mechanism that connects these two parts, allowing for precise adjustments and a smooth opening and closing action. Many modern hinges also incorporate “soft-close” technology, a simple yet effective mechanical feature that prevents doors from slamming shut, enhancing both user experience and the longevity of your cabinets. This soft-close mechanism is a prime example of subtle “Tech” innovation improving daily life.
There are primarily two types of hidden hinges, categorized by the type of cabinet construction they are designed for:
- Full Overlay Hinges: These are for doors that completely cover the cabinet opening and the front face frame (if present). When the door is closed, only the door itself is visible from the front, creating a sleek, contemporary look.
- Partial Overlay Hinges: Used when doors cover only part of the cabinet opening and face frame, leaving a small gap between adjacent doors. This style is common in more traditional cabinetry.
- Inset Hinges: These hinges are for doors that sit flush inside the cabinet opening, exposing the entire cabinet face frame. This requires the most precise installation due to the zero-tolerance fit.
Choosing the right type is the first critical step, impacting both the aesthetic outcome and the ease of installation. Consider the existing style of your cabinets or the design you aim to achieve.
Essential Tools and Materials: Investing in Precision
Successfully installing hidden hinges relies heavily on having the right tools. While some basic tools are standard for any DIY project, certain specialized items will significantly improve accuracy and efficiency, underscoring the “Tech” aspect of modern craftsmanship. Making a small “Money” investment in these tools now can save you time, frustration, and potential costs from errors later.
Must-Have Tools:
- Drill: A cordless drill is ideal for versatility.
- Forstner Bit (35mm): This specialized drill bit creates the clean, flat-bottomed hole required for the hinge cup in the cabinet door. This is perhaps the most crucial “tech” tool for this project.
- Hinge Jig: While not strictly essential, a hinge drilling jig is highly recommended. It guides your Forstner bit, ensuring perfectly spaced and aligned holes, greatly reducing the risk of error. This is a game-changer for precision.
- Tape Measure and Pencil: For accurate marking.
- Screwdriver (Phillips head): For attaching the hinges and mounting plates.
- Level: To ensure doors hang straight. A small spirit level or even a digital level can be beneficial.
- Clamps: To hold the door securely while drilling or attaching hinges.
- Safety Glasses: Always protect your eyes.
Materials:
- Hidden Cabinet Hinges: Ensure you purchase the correct overlay type and quantity.
- Mounting Screws: Usually included with the hinges, but ensure they are appropriate for your cabinet material.
- Scrap Wood: Useful for testing drill depth and preventing blow-out when drilling.
Investing in quality tools, especially the Forstner bit and hinge jig, is a smart “Money” move. These tools simplify the process, minimize mistakes, and help you achieve a professional “Brand”-quality finish for your home improvement project.
Preparing for Installation: Precision and Planning
The success of your hidden hinge installation hinges on meticulous preparation. Rushing this stage can lead to misaligned doors, uneven gaps, and a frustrating outcome. This phase emphasizes precision and careful planning, essential elements that intertwine with both “Tech” (using tools accurately) and “Money” (avoiding costly mistakes).
Measuring and Marking: The Blueprint for Success
Accuracy in measuring and marking is paramount. This is where your attention to detail will pay off, preventing crooked doors or hinges that don’t fit. Proper measurement ensures that the aesthetic “Brand” of your cabinetry remains intact, with clean lines and uniform gaps.
- Determine Hinge Placement: Typically, hinges are placed 2-4 inches from the top and bottom edges of the cabinet door. For taller doors, a third hinge in the middle might be necessary for stability. Mark these positions clearly on the back of your cabinet door.
- Mark the Hinge Cup Hole: This is where the hinge jig becomes invaluable.
- Positioning the Jig: Place the hinge jig on the back of the cabinet door, aligning it with your measured marks. Ensure the jig’s edge is flush with the edge of the door where the hinge will be installed.
- Offset: Most jigs and hinges require an offset from the door edge (usually 3mm, 4mm, or 5mm). Consult your hinge manufacturer’s instructions for the precise offset measurement. The jig will typically have settings or guides for this. This small measurement is a critical “tech” specification that dictates how the door sits relative to the cabinet frame.
- Marking the Center: Use the jig to mark the exact center point for drilling the 35mm hinge cup hole. If you don’t have a jig, you’ll need to carefully measure the offset from the door edge and mark the center manually.
- Mark Mounting Plate Positions (Optional but Recommended): Once you have the hinge cup positions, you can also pre-mark where the mounting plates will attach to the cabinet frame. This can be done by temporarily holding the hinge and door in place or by precise measurement based on the hinge’s specifications.
Double-check all your measurements. As the old adage goes, “measure twice, cut once.” This step is your insurance policy against misalignment and material waste, a smart “Money” strategy.
Drilling the Hinge Cup Holes: The Critical Cut
This is arguably the most intimidating step, but with the right tools and technique, it’s straightforward. The goal is a clean, perfectly sized, and correctly depth-drilled hole for the hinge cup.
- Secure the Door: Place the cabinet door on a stable, flat surface. Use clamps to secure it firmly to prevent movement during drilling. Placing a piece of scrap wood underneath the drilling area can help prevent tear-out on the backside of the door as the Forstner bit exits.
- Set Drill Depth: This is crucial. The hinge cup typically requires a depth of around 1/2 inch (12-13mm), but always refer to your hinge manufacturer’s specifications. Most Forstner bits can be fitted with a depth collar, or you can use painter’s tape wrapped around the bit as a visual guide. Test the depth on a piece of scrap wood first. This “tech” consideration ensures you don’t drill straight through your door.
- Drill the Hole:
- If using a hinge jig: Attach the jig to the door and insert the Forstner bit into the jig’s guide hole.
- Begin drilling slowly, applying steady, even pressure. Allow the bit to do the work. The Forstner bit is designed to create a clean, flat-bottomed hole.
- Periodically clear wood chips from the hole to ensure a clean cut and to monitor your depth.
- Stop when you reach your predetermined depth.
- Clean the Holes: Once drilled, remove any sawdust or debris from the holes. A clean fit is a good fit.
This step requires focused attention and proper technique. A well-drilled hole ensures the hinge cup sits flush, leading to a professional “Brand” finish and smooth door operation.
The Step-by-Step Installation Process: From Hardware to Harmony
With your hinge cup holes perfectly drilled, you’re ready for the main event: attaching the hinges and mounting the doors. This stage requires a methodical approach, ensuring each component is correctly placed and adjusted. Here, the practical application of your prepared components brings your cabinet project to life, embodying both precision “Tech” and hands-on skill.
Attaching Hinges to the Cabinet Door
- Insert the Hinge Cup: Take a hidden hinge and carefully press its cup into the 35mm hole you drilled in the cabinet door. It should fit snugly.
- Secure the Hinge: The hinge usually has two small screw holes on either side of the cup. Using a Phillips head screwdriver (or your drill on a low torque setting to avoid stripping screws), drive the provided screws into these holes. Ensure the hinge body is flush against the door and perpendicular to the door’s edge. Do not overtighten, as this can strip the wood or damage the hinge.
Repeat this process for all hinges on the cabinet door. Ensure they are all oriented correctly and securely fastened. The consistency in this step contributes to the overall “Brand” quality and durability of your finished cabinets.
Mounting the Door to the Cabinet Frame
This is often a two-person job, especially for larger or heavier doors, but it can be done solo with careful planning and temporary supports.
- Position the Door: Hold the cabinet door in its closed position against the cabinet opening. If you have an assistant, have them hold the door while you position it. If working alone, use spacers or shims underneath the door to support its weight and achieve the desired bottom gap.
- Mark Mounting Plate Locations: With the door held firmly in the desired closed position (ensuring the correct gap around the door), align the hinge arms with the inside of the cabinet frame. Use a pencil to mark the screw holes of the hinge’s mounting plate onto the cabinet frame. Some hinges come with pre-attached mounting plates, others require you to attach the plate to the hinge first.
- Attach Mounting Plates (if separate): If your mounting plates are separate from the hinge arm, screw them into the cabinet frame at your marked locations. Ensure they are perfectly aligned.
- Attach Hinge Arm to Mounting Plate: Most hidden hinges feature a quick-release mechanism or a simple screw-in system. Align the hinge arm with the mounting plate on the cabinet frame and either snap it into place or screw it in. For initial attachment, just snug the screws; final tightening comes after adjustments.
- Check for Rough Fit: Gently open and close the door. Does it clear the frame? Is it reasonably straight? Don’t expect perfection yet; that’s what the adjustment screws are for.
This step is the moment of truth where your preparation translates into a physical attachment. Patience and care here will prevent rework.
Adjusting for Perfection: The Art of Fine-Tuning
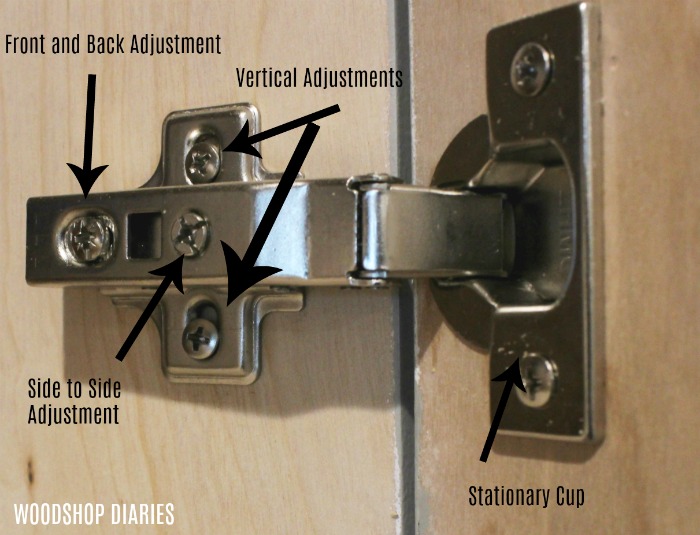
The greatest “Tech” advantage of hidden hinges is their adjustability. Most European hinges have three adjustment screws that allow you to fine-tune the door’s position in three dimensions:
- Side-to-Side Adjustment: This screw moves the door left or right, allowing you to achieve consistent gaps between doors or between the door and the cabinet frame. This is crucial for achieving a visually appealing “Brand” standard.
- Depth Adjustment: This screw moves the door closer to or further away from the cabinet frame. Use this to ensure the door sits flush with the frame when closed.
- Height Adjustment: On the mounting plate, there are usually slots that allow you to move the door up or down slightly. You might need to loosen the main mounting screws to adjust this, then retighten. Use this to align the top and bottom edges of doors in a multi-door setup.
Tips for Adjustment:
- Work Methodically: Make small adjustments to one screw at a time, then check the result.
- Start with Side-to-Side: This is often the most critical adjustment for visual alignment.
- Use a Straightedge or Level: To verify vertical and horizontal alignment.
- Achieve Even Gaps: The goal is consistent, narrow gaps around all sides of the door. This is what gives cabinetry a high-end, custom “Brand” appearance.
- Test Opening and Closing: Ensure the door opens and closes smoothly without binding or rubbing.
Once all adjustments are made and you’re satisfied with the fit and operation, fully tighten all screws. Do not overtighten.
Beyond Installation: Maintenance, Upgrades, and Value
Installing hidden hinges is an investment in your home. Like any investment, understanding its longevity, potential for upgrades, and impact on overall value is key. This section ties into “Money” (ROI, cost-effectiveness), “Brand” (home appeal), and “Tech” (future innovations, upkeep).
Troubleshooting Common Issues
Even with careful installation, issues can arise. Knowing how to troubleshoot common problems can save you time and potential “Money” on professional repairs.
- Sagging or Drooping Doors: This usually indicates loose hinge screws, especially where the hinge attaches to the door or the mounting plate. Re-tighten all screws, being careful not to strip them. If the screw holes are stripped, use slightly larger screws or repair the holes with wood filler.
- Uneven Gaps: Go back to the adjustment screws. The side-to-side and height adjustments are your primary tools here. Patience is key.
- Doors Don’t Close Fully: Check the depth adjustment. The door might be set too far back. Also, ensure there are no obstructions inside the cabinet. If soft-close hinges are stiff, they might need a break-in period or slight lubrication (check manufacturer guidelines first).
- Squeaking Hinges: A small amount of silicone spray lubricant can often resolve squeaks. Avoid petroleum-based lubricants, as they can attract dust.
Regularly checking your hinge adjustments, especially on frequently used cabinet doors, is a simple maintenance tip that extends the life of your installation and preserves your home’s “Brand” image of well-maintained spaces.
Upgrading to Soft-Close Mechanisms: A Smart “Tech” Enhancement
If you’ve installed standard hidden hinges, upgrading to soft-close technology is often a simple and impactful enhancement. Many hinge systems allow for easy replacement of standard hinges with soft-close versions, or the addition of external soft-close dampers that attach to the cabinet frame.
This “Tech” upgrade provides numerous benefits:
- Reduced Noise: No more slamming doors, creating a quieter, more peaceful home environment.
- Increased Longevity: Prevents wear and tear on cabinet doors, hinges, and frames from repeated forceful closures.
- Enhanced User Experience: A smooth, controlled close feels luxurious and adds to the perceived quality of your cabinetry.
From a “Brand” perspective, soft-close hinges are a hallmark of modern, high-end cabinetry. They contribute to a sophisticated feel and can be a selling point for your home. From a “Money” perspective, they protect your investment in your cabinets and can add to the resale value of your home.

The Long-Term Value of Hidden Hinges: A “Money” and “Brand” Perspective
Installing hidden cabinet hinges is more than just a functional update; it’s a strategic enhancement to your home.
- Aesthetic Appeal and Home Value (“Brand”): The clean lines and uncluttered look created by hidden hinges are highly sought after in contemporary home design. This upgrade instantly modernizes a kitchen or bathroom, significantly enhancing its visual appeal. A beautifully finished kitchen or bathroom is often the biggest factor in a home’s “Brand” perception and can lead to a higher resale value. It’s an investment that pays dividends in curb appeal and buyer interest.
- Durability and Longevity (“Money”): High-quality hidden hinges are designed for durability and many years of smooth operation. When properly installed and maintained, they reduce the need for future repairs or replacements, representing a sound “Money” decision. The precise adjustability also helps mitigate wear, ensuring doors stay aligned and functional longer.
- DIY Empowerment (“Money” & “Brand”): Taking on a project like installing hidden hinges yourself can lead to significant cost savings compared to hiring a professional. This “Money” saved can be reinvested in other home improvements. Furthermore, successfully completing such a project boosts your confidence and personal “Brand” as a capable and resourceful homeowner.
By understanding the interplay of technology in hinge design, the impact on your home’s aesthetic brand, and the financial benefits of proper installation and maintenance, you empower yourself to make informed decisions that will enhance your living space for years to come.
In conclusion, installing hidden cabinet hinges is a rewarding project that combines precision, patience, and a keen eye for detail. By following these steps and understanding the underlying principles, you can achieve a professional-grade finish that elevates the beauty and functionality of your cabinetry, contributing significantly to the overall “Brand” and “Money” value of your home. Embrace the blend of practical skill and thoughtful execution, and enjoy your beautifully finished, seamlessly functioning cabinets.
aViewFromTheCave is a participant in the Amazon Services LLC Associates Program, an affiliate advertising program designed to provide a means for sites to earn advertising fees by advertising and linking to Amazon.com. Amazon, the Amazon logo, AmazonSupply, and the AmazonSupply logo are trademarks of Amazon.com, Inc. or its affiliates. As an Amazon Associate we earn affiliate commissions from qualifying purchases.