Whether you’re looking to upgrade your laptop’s storage capacity, replace a failing drive, or breathe new life into an older machine, installing a new hard drive can be a rewarding and cost-effective endeavor. This guide will walk you through the entire process, from selecting the right drive to ensuring your system recognizes it. While modern laptops are increasingly shifting towards Solid State Drives (SSDs) for their speed and efficiency, traditional Hard Disk Drives (HDDs) still offer a compelling option for bulk storage due to their lower cost per gigabyte. This tutorial is designed to be comprehensive, covering both HDD and SSD installations, as the physical process of swapping these drives is remarkably similar.
Before we dive into the physical installation, it’s crucial to understand the types of storage drives available for laptops and the considerations that go into choosing the right one. This decision will impact not only the performance of your laptop but also the ease of installation and the overall cost of the upgrade.
Understanding Your Storage Options: HDD vs. SSD
The world of laptop storage has largely been divided between Hard Disk Drives (HDDs) and Solid State Drives (SSDs). Each has its distinct advantages and disadvantages, and understanding these will help you make an informed decision for your specific needs.
Hard Disk Drives (HDDs): The Traditional Workhorse
HDDs have been the standard for computer storage for decades. They work by using spinning magnetic platters to store data, read by a moving read/write head.
-
Pros:
- Cost-Effective Capacity: HDDs offer significantly more storage space for your money. If you need to store large amounts of data, such as extensive media libraries, large game collections, or vast archives of documents, HDDs are often the most economical choice.
- Mature Technology: HDDs are a well-established technology, meaning they are reliable and widely understood.
-
Cons:
- Slower Performance: The mechanical nature of HDDs, with their spinning platters and moving parts, makes them inherently slower than SSDs. This translates to longer boot times, slower application loading, and reduced file transfer speeds.
- Vulnerability to Shock: Because they have moving parts, HDDs are more susceptible to damage from drops or physical shocks. This is a significant consideration for portable devices like laptops.
- Higher Power Consumption: Spinning platters require more power, which can lead to slightly shorter battery life compared to SSDs.
- Noise and Heat: The spinning platters can generate audible noise and heat, especially under heavy load.
Solid State Drives (SSDs): The Speed Demons
SSDs are the modern standard for performance-oriented storage. They use flash memory chips to store data, with no moving parts whatsoever.
-
Pros:
- Blazing Fast Performance: This is the most significant advantage of SSDs. They offer dramatically faster boot times, application launches, file transfers, and overall system responsiveness. This can transform the user experience of even an older laptop.
- Durability and Reliability: With no moving parts, SSDs are far more resistant to physical shock and vibration, making them ideal for laptops.
- Lower Power Consumption: SSDs consume less power, contributing to longer battery life.
- Silent Operation: SSDs are completely silent in operation.
- Less Heat Generation: They tend to generate less heat than HDDs.
-
Cons:
- Higher Cost Per Gigabyte: While prices have come down considerably, SSDs are still more expensive per gigabyte than HDDs. This means that for the same price, you’ll get less storage capacity with an SSD.
- Limited Write Cycles (Historically): Early SSDs had concerns about limited write cycles, meaning they could only be written to a certain number of times before wearing out. Modern SSDs have significantly improved in this regard, and for typical consumer use, this is rarely an issue.
Factors to Consider When Choosing a New Drive:
- Capacity: How much storage do you need? Consider your current usage and future needs. If you’re upgrading from a small HDD, even a moderately sized SSD can feel like a massive leap in capacity and performance.
- Form Factor: Laptops typically use 2.5-inch SATA drives. However, some modern ultrabooks and gaming laptops might use M.2 NVMe SSDs, which are much smaller and plug directly into the motherboard. Crucially, you must identify which type your laptop supports before purchasing a new drive. Consult your laptop’s manual or the manufacturer’s website.
- Interface: Most laptops use SATA (Serial ATA) interfaces for both HDDs and 2.5-inch SSDs. NVMe (Non-Volatile Memory Express) is a newer, faster interface used by M.2 SSDs. Ensure your laptop’s motherboard supports the interface of the drive you choose.
- Budget: Determine how much you’re willing to spend. This will guide your decision between HDD and SSD, and the specific capacity and brand you opt for.
- Purpose: Are you looking for a drive primarily for speed (SSD) or for large-scale storage (HDD)? Some users opt for a hybrid approach, using a smaller SSD for the operating system and essential applications, and a larger HDD for data storage.
Preparing for the Installation: Gathering Your Tools and Data
Before you physically open up your laptop, proper preparation is key to a smooth and successful installation. This involves gathering the necessary tools and, most importantly, ensuring your data is safe.
Essential Tools You’ll Need:
- Small Phillips Head Screwdriver Set: Laptops use very small screws, so a precision screwdriver set with various Phillips head sizes is essential. Some laptops may also use Torx screws, so having a set that includes these is beneficial.
- Anti-Static Wrist Strap: This is a critical safety measure. Static electricity can easily damage sensitive electronic components. Wearing an anti-static wrist strap connected to a grounded object (like an unpainted metal part of your computer case or a grounded outlet screw) will dissipate any static charge from your body.
- Plastic Spudger or Opening Tool: To gently pry open the laptop casing without scratching or damaging it. Many electronics repair kits include these.
- Small Container or Tray for Screws: To keep track of the tiny screws you remove. Labeling sections of the tray can be helpful if there are different types or lengths of screws.
- Your New Hard Drive (HDD or SSD): Ensure it’s the correct form factor and interface for your laptop.
- Your Laptop’s Power Adapter: You’ll need to ensure your laptop is plugged in if you’re performing a BIOS/UEFI update or checking drive recognition.
- External Storage Device (USB Drive or External Hard Drive): For backing up your data.
- A Clean, Well-Lit Workspace: Free from distractions and potential hazards.
The Crucial Step: Backing Up Your Data
This is arguably the most important step in the entire process. Whether you are upgrading or replacing a failing drive, losing your precious data is a scenario to avoid at all costs.
- Full System Backup (Recommended): The most comprehensive approach is to create a full system image backup. This essentially creates an exact copy of your entire operating system, applications, settings, and all your files. If your current drive fails during the process, you can restore this image to your new drive. You can use built-in Windows tools (like “Backup and Restore” or “System Image Backup”) or third-party software like Macrium Reflect Free, Acronis True Image, or Clonezilla.
- Manual File Backup: If a full system image is not feasible, at the very least, back up all your important personal files. This includes documents, photos, videos, music, and any other data you can’t afford to lose. You can copy these files to an external hard drive, a large USB flash drive, or cloud storage services like Google Drive, Dropbox, or OneDrive.
Do not skip this step. A timely backup can save you immense frustration and potential financial loss.
Preparing Your New Drive (If Cloning)
If you’re upgrading and want to avoid reinstalling your operating system from scratch, you can “clone” your old drive to the new one. This copies everything, including the operating system and all installed programs, to the new drive.
- Cloning Software: You’ll need cloning software. Many drive manufacturers (Samsung, Crucial, etc.) provide their own free cloning tools for their drives. Alternatively, third-party software like Macrium Reflect, Acronis True Image, or EaseUS Todo Backup can be used.
- Connecting the New Drive: You’ll likely need a SATA-to-USB adapter or an external hard drive enclosure to connect your new drive to your laptop before you install it internally. This allows the cloning software to access both drives simultaneously.
- The Cloning Process: Once connected, run your chosen cloning software. It will typically guide you through selecting the source drive (your old drive) and the destination drive (your new drive). Ensure you select the correct drives to avoid accidentally overwriting your old data. The cloning process can take a significant amount of time, depending on the size of your data and the speed of your drives and connection.
Once the backup (or clone) is complete and you have all your tools ready, you’re prepared to begin the physical installation.

The Step-by-Step Installation Process
This section details the physical process of replacing or installing a hard drive in your laptop. The exact steps can vary slightly between laptop models, so it’s always a good idea to consult your laptop’s specific service manual if possible.
Step 1: Power Down and Disconnect
- Shut Down Completely: Ensure your laptop is completely shut down, not just in sleep or hibernation mode.
- Unplug the Power Adapter: Disconnect the laptop from its power source.
- Remove the Battery (If Possible): Many laptops have removable batteries. If yours does, remove it. This is a crucial safety step to prevent accidental power surges while you’re working. If your battery is not easily removable (e.g., internal), proceed with caution.
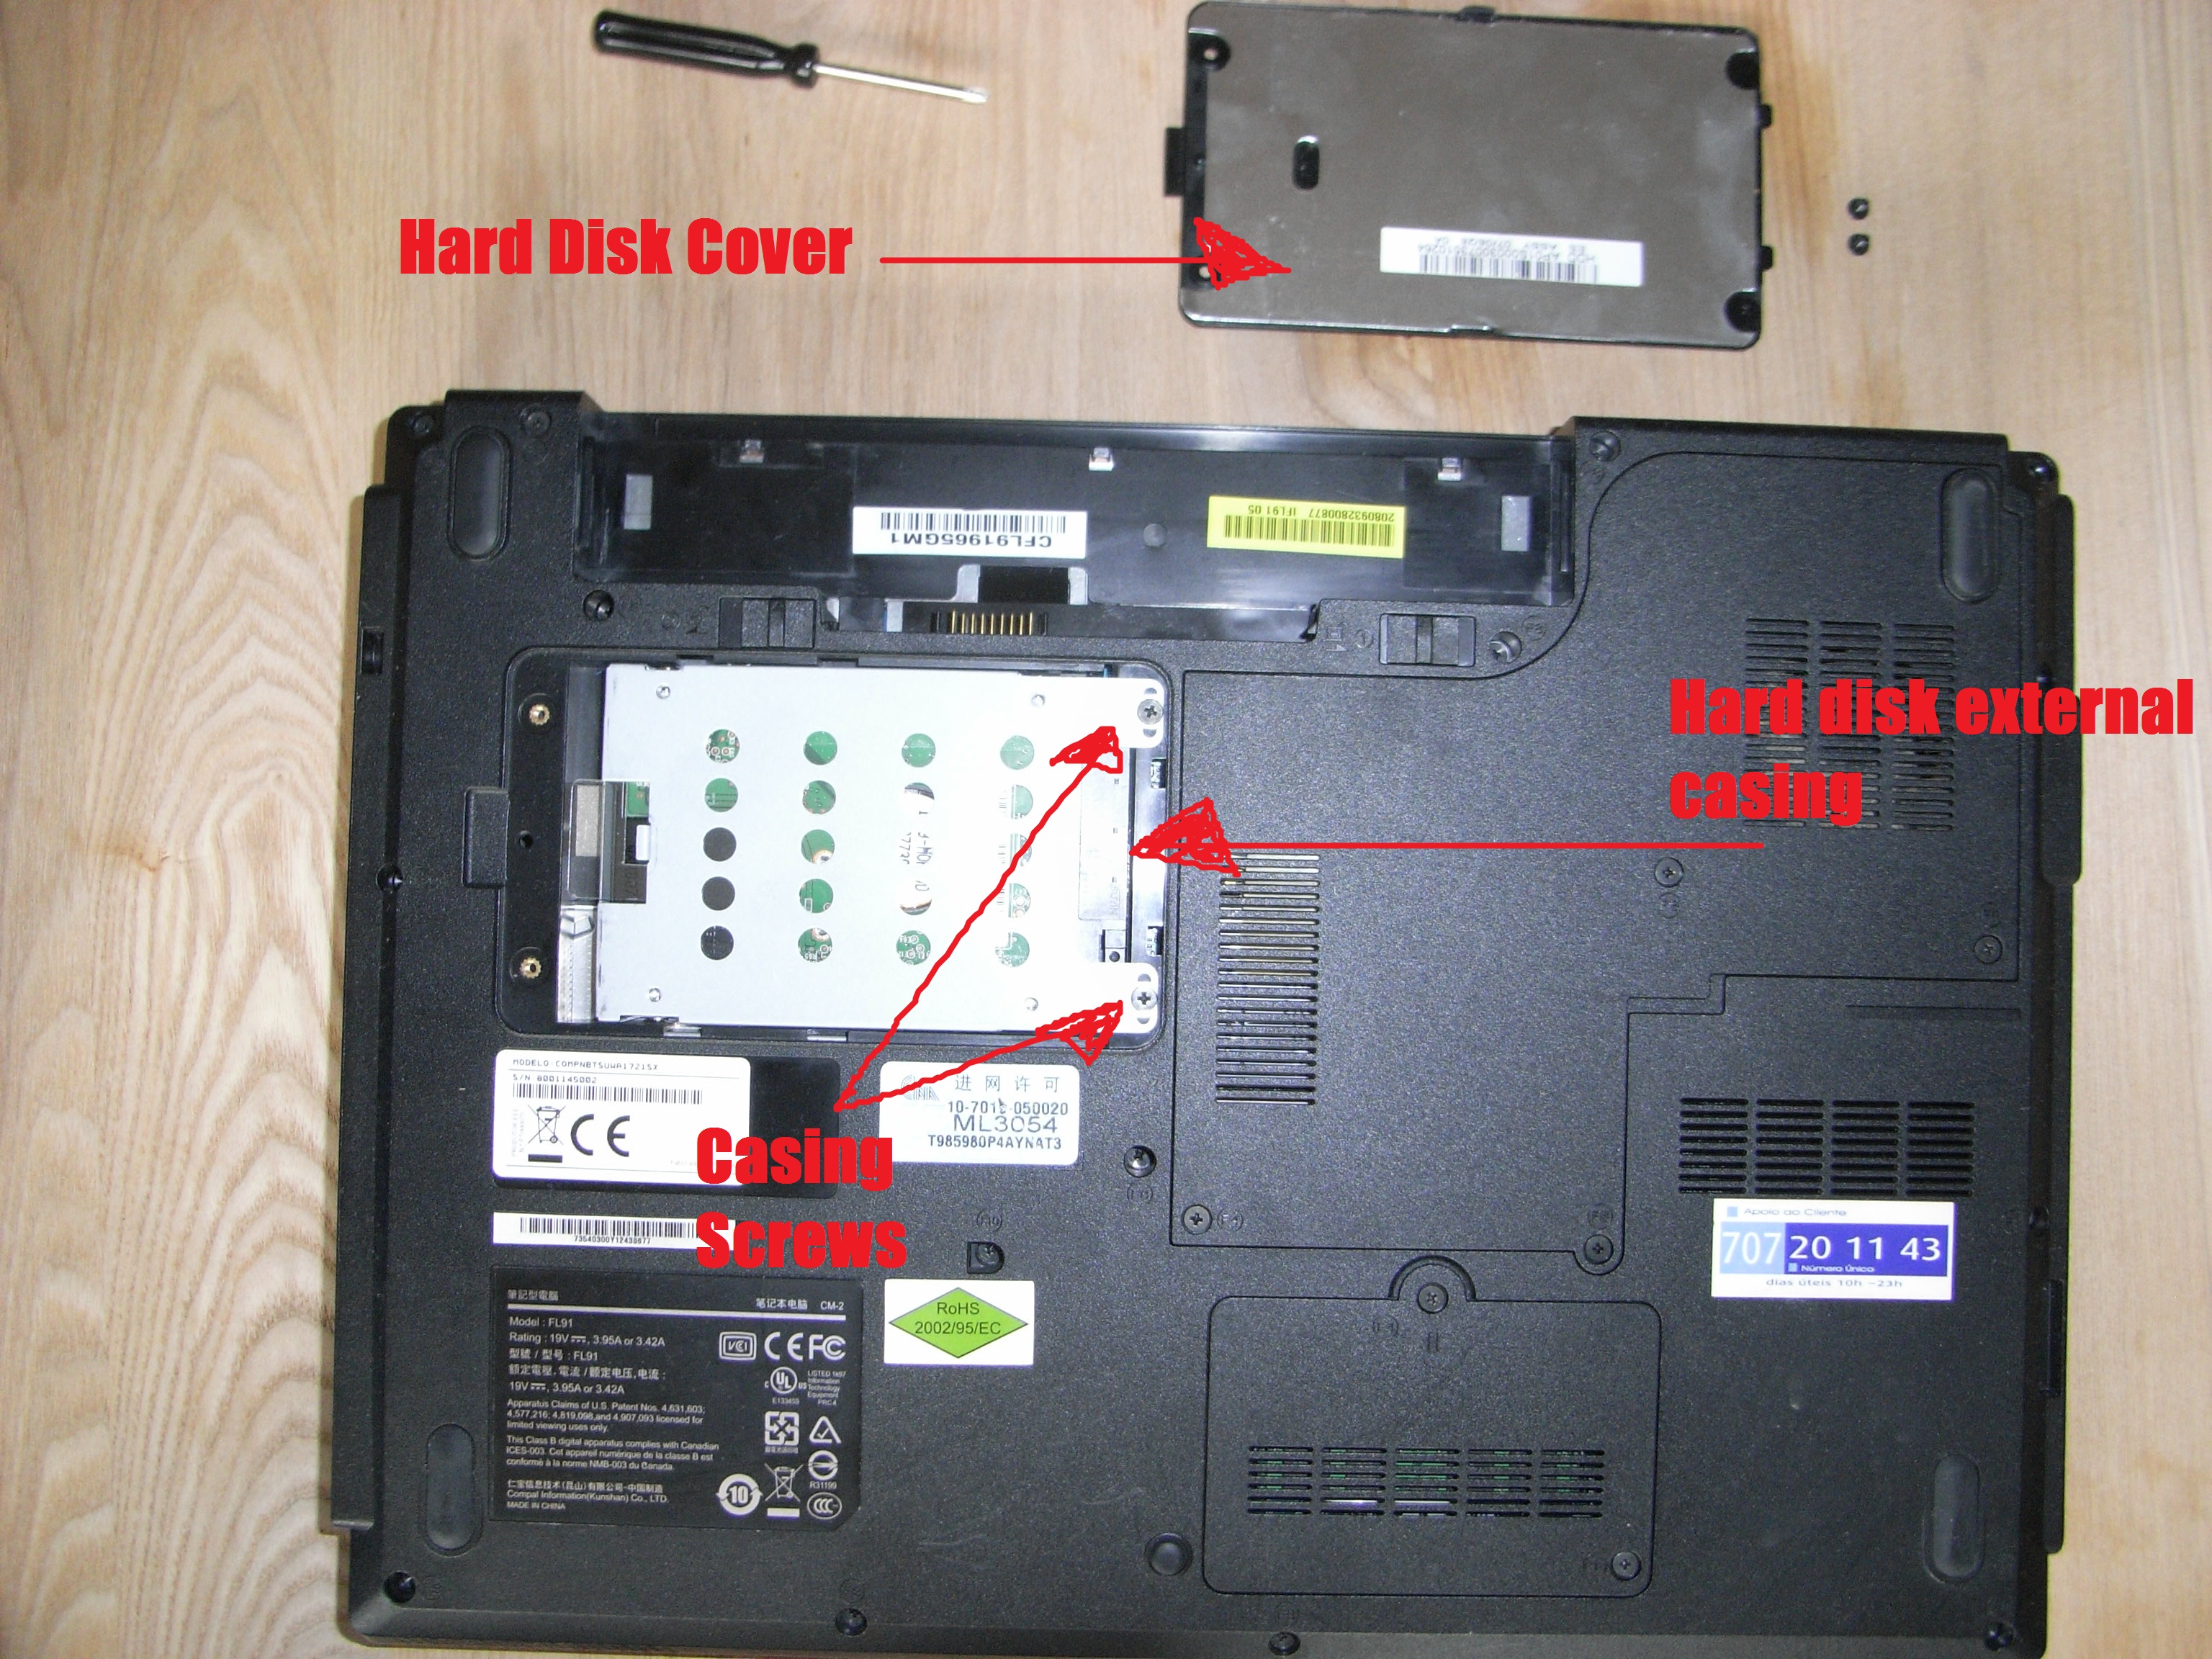
Step 2: Accessing the Hard Drive Bay
This is where laptop designs differ significantly. You’ll need to open the laptop’s casing to reach the hard drive.
- Locate the Access Panel: Some laptops have a dedicated small panel on the bottom that grants access to the hard drive. This is the easiest scenario. You’ll typically need to unscrew just a few screws to remove this panel.
- Remove the Bottom Cover: For many laptops, you’ll need to remove the entire bottom cover. Flip the laptop over and carefully identify all the screws on the bottom. They may be of different lengths, so keep track of where each one came from. Once all screws are removed, gently use your plastic spudger or opening tool to pry apart the bottom cover from the rest of the chassis. Start in a corner and work your way around. Be patient; some clips might be stubborn.
- Consult Your Laptop’s Manual/Online Resources: If you’re unsure how to open your specific model, search online for “[Your Laptop Model] service manual” or “[Your Laptop Model] hard drive replacement.” You’ll often find detailed guides or videos demonstrating the process.
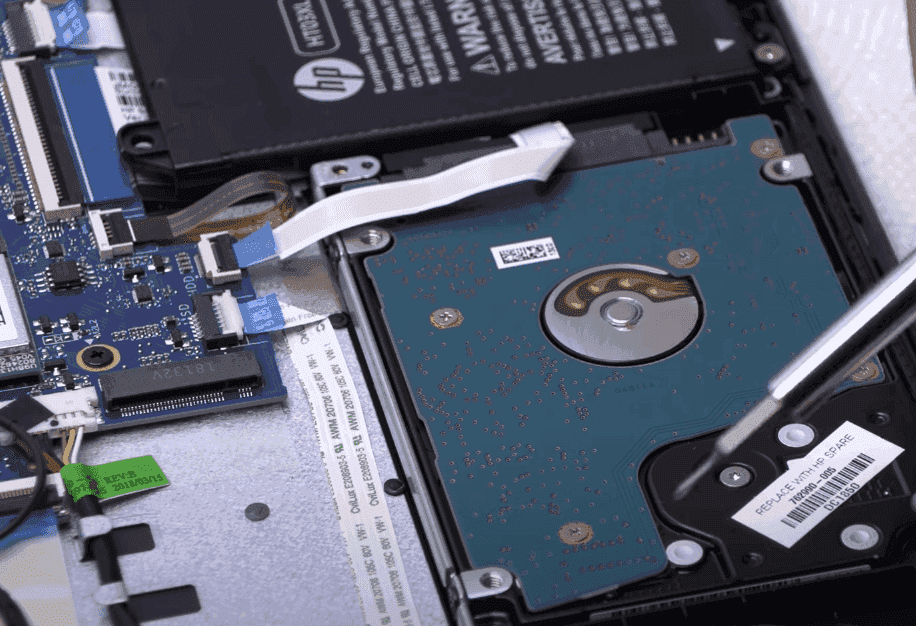
Step 3: Removing the Old Hard Drive (If Applicable)
Once you have access to the inside of your laptop, locate the hard drive. It’s usually a rectangular component secured in a bracket or directly to the chassis.
- Identify the Drive: It will likely be a 2.5-inch drive (for HDDs and most SSDs) or an M.2 stick (for some NVMe SSDs).
- Disconnect Cables: If there are any cables connected to the drive (usually a SATA data cable and a SATA power cable), gently disconnect them. They usually pull straight off.
- Unscrew the Drive/Bracket: The drive itself or its mounting bracket will be secured by screws. Carefully remove these screws.
- Slide or Lift Out the Drive: Once unscrewed, the drive can typically be slid out of its connector or lifted out of its bay. If it’s in a metal caddy or bracket, you’ll need to unscrew the drive from the bracket as well.
Step 4: Installing the New Hard Drive
This is the reverse of the removal process.
- Place the New Drive: If your old drive was in a bracket, install the new drive into the bracket first, securing it with screws. Then, place the bracket (with the new drive) into the drive bay.
- Connect Cables: Align the SATA data and power connectors on the new drive with the corresponding ports on the laptop’s motherboard and gently push them in. They should only fit one way.
- Secure the Drive/Bracket: Screw the drive or its bracket back into place.
Step 5: Reassembling the Laptop
- Replace the Bottom Cover: Carefully align the bottom cover and press down gently around the edges to snap it back into place. Ensure all clips engage.
- Reinsert Screws: Screw all the screws back into their original positions. Don’t overtighten them.
- Reinsert the Battery (If Removed): If you removed the battery, put it back in.
Post-Installation Steps: BIOS/UEFI and Operating System
With the physical installation complete, you’re not quite done. The laptop needs to recognize the new drive, and you’ll need to get an operating system on it.
Step 1: Initial Boot and BIOS/UEFI Configuration
- Connect Power: Plug in your laptop’s power adapter.
- Power On: Turn on your laptop.
- Enter BIOS/UEFI: Immediately after powering on, you’ll need to press a specific key to enter your laptop’s BIOS or UEFI settings. Common keys include F2, F10, F12, Del, or Esc. The screen will usually briefly tell you which key to press.
- Check Drive Recognition: In the BIOS/UEFI, navigate to the storage or boot order settings. Your newly installed hard drive should be listed there. If it’s not recognized, double-check your connections and ensure the drive is properly seated. If you cloned your drive, you might not need to do anything here as the boot order should remain the same.
- Set Boot Order (If Installing a New OS): If you’re installing a fresh operating system from a USB drive or DVD, you’ll need to set your boot order so that the laptop attempts to boot from the installation media first.
- Save and Exit: Once you’ve confirmed the drive is recognized and set the boot order (if necessary), save the changes and exit the BIOS/UEFI. The laptop will restart.
Step 2: Installing the Operating System (If Not Cloned)
If you did not clone your old drive, you’ll now need to install a fresh copy of your operating system.
- Boot from Installation Media: Ensure your bootable USB drive or DVD is inserted and that you’ve set the boot order correctly in the BIOS/UEFI.
- Follow On-Screen Prompts: The operating system installer will guide you through the process. This typically involves selecting your language, accepting license terms, choosing the installation location (your new drive), and creating user accounts.
- Partitioning and Formatting: During installation, you’ll be prompted to partition and format your new drive. For a single-drive setup, it’s usually best to let the installer create the necessary partitions or select the entire drive.
- Installation: The installation process can take some time. Your laptop will restart multiple times.
Step 3: Installing Drivers and Software
Once your operating system is installed and running from the new drive:
- Install Drivers: It’s crucial to install all necessary drivers for your hardware. This includes graphics drivers, audio drivers, network drivers, and chipset drivers. You can usually find these on your laptop manufacturer’s website by entering your model number.
- Install Updates: Run Windows Update (or your OS’s equivalent) to download and install all available security patches and system updates.
- Restore Your Data: If you performed a full backup, now is the time to restore your personal files from your external storage device or cloud service.
- Reinstall Applications: Reinstall all your essential applications, such as web browsers, office suites, media players, and any specialized software you use.
- Install Security Software: Ensure you have robust antivirus and anti-malware software installed.
Conclusion: A Revitalized Laptop Awaits
Upgrading your laptop’s hard drive can be a significant undertaking, but the rewards of increased storage, improved performance, or a renewed sense of reliability are well worth the effort. By carefully planning your purchase, gathering the right tools, and meticulously following the steps outlined in this guide, you can successfully install a new hard drive and give your laptop a new lease on life. Whether you choose the cost-effective bulk of an HDD or the lightning-fast speeds of an SSD, you’re making an investment that will enhance your daily computing experience. Remember to always prioritize data backups, work methodically, and consult your laptop’s specific documentation when in doubt. Happy computing!
aViewFromTheCave is a participant in the Amazon Services LLC Associates Program, an affiliate advertising program designed to provide a means for sites to earn advertising fees by advertising and linking to Amazon.com. Amazon, the Amazon logo, AmazonSupply, and the AmazonSupply logo are trademarks of Amazon.com, Inc. or its affiliates. As an Amazon Associate we earn affiliate commissions from qualifying purchases.