
In the dynamic landscape of modern technology, where innovation drives progress and collaboration is key, version control systems stand as indispensable tools for developers, content creators, and anyone managing complex digital projects. At the heart of this ecosystem lies Git, an open-source distributed version control system that has revolutionized how individuals and teams develop software. From tracking changes in source code to coordinating work among multiple contributors, Git ensures project integrity, facilitates seamless teamwork, and acts as a safety net against accidental data loss. For Linux users, embracing Git is a fundamental step towards enhancing productivity, streamlining workflows, and tapping into the vast world of open-source development.
This comprehensive tutorial will guide you through the process of installing Git on various Linux distributions. Beyond the installation itself, we’ll delve into why Git is crucial for your tech endeavors, how to configure it for optimal performance, and even touch upon some fundamental commands to kickstart your version control journey. Whether you’re a seasoned developer, an aspiring programmer, or simply someone looking to manage digital assets more efficiently, understanding and utilizing Git on your Linux system is a gateway to greater control and collaborative power. This journey into Git installation aligns perfectly with the “Tech” focus of our website, emphasizing software tutorials, digital security best practices, and tools that enhance productivity for individuals and brands alike.
Why Git Matters: The Core of Modern Development
Before diving into the technicalities of installation, it’s essential to grasp the profound impact Git has had on the software development world and beyond. In an era where projects are increasingly complex and often involve geographically dispersed teams, the ability to track, manage, and merge changes efficiently is paramount. Git addresses these challenges head-on, offering a robust and flexible solution that underpins countless successful projects, from small personal scripts to massive enterprise applications.
The Unseen Power of Version Control
At its simplest, version control is a system that records changes to a file or set of files over time so that you can recall specific versions later. Imagine working on a crucial document, making numerous edits, only to realize that a change you made several hours ago broke everything. Without version control, recovering that stable state might be a painstaking, if not impossible, task. Git provides a historical record of every modification, allowing you to easily revert to previous states, compare different versions, and understand who made what changes and when. This capability alone saves countless hours of debugging and prevents data loss, serving as a critical digital security measure for your project’s history.
For developers, this means being able to experiment with new features without fear of irrevocably damaging the main codebase. If an experimental branch doesn’t work out, it can simply be discarded, or its changes can be selectively merged back. This iterative and non-destructive approach fosters innovation and significantly reduces development friction. Furthermore, understanding the history of a project through Git’s logs helps in debugging by pinpointing when a bug was introduced and by whom, making the troubleshooting process far more efficient and productive.
Collaboration, Safety, and Agility in Software Development
Git’s distributed nature is one of its most powerful features, distinguishing it from older, centralized version control systems. In Git, every developer has a complete copy of the repository, including its full history, on their local machine. This means that work can continue even without an internet connection, and the project isn’t reliant on a single central server. If the central server goes down, each developer’s local repository acts as a full backup, ensuring project resilience and data safety. This decentralized model significantly enhances productivity, as developers aren’t constantly waiting for network access or server responses.
For teams, Git facilitates seamless collaboration. Multiple developers can work on different parts of a project simultaneously, and Git provides powerful tools for merging their changes together. Conflict resolution, when two developers modify the same part of a file, is managed efficiently, guiding users through the process of reconciling differences. This collaborative capability is essential for modern agile development methodologies, where rapid iteration and continuous integration are standard practices. Teams can break down large tasks, assign them to different members, and integrate their work fluidly, accelerating project delivery and improving overall team efficiency.
Beyond software, Git’s principles extend to content management, website development, configuration management, and even academic writing. Its ability to track changes, maintain history, and facilitate collaboration makes it an invaluable asset for any digital project. For professionals seeking to enhance their personal branding or for companies aiming to streamline their corporate identity through efficient project management, Git is an indispensable tool. It empowers individuals to contribute to open-source projects, build a public portfolio, and demonstrate proficiency in a highly sought-after skill, indirectly impacting career opportunities and potential for online income or side hustles within the tech sphere.
Preparing Your Linux System for Git Installation
Before initiating the Git installation process, it’s good practice to ensure your Linux system is up-to-date and ready. While Git is widely available in most distribution’s default repositories, a few preparatory steps can help ensure a smooth and trouble-free installation. This section emphasizes the “Tutorials” and “Digital Security” aspects by promoting best practices for system management.
Choosing Your Linux Distribution and Method
Linux is celebrated for its diversity, offering a plethora of distributions (distros) each with its own package management system. The method you use to install Git will primarily depend on your specific Linux distribution. The most common methods involve using the distribution’s native package manager, which is generally the recommended approach as it handles dependencies, updates, and security patches automatically.
- Debian/Ubuntu and derivatives (Linux Mint, Pop!_OS, etc.): These systems use
apt(Advanced Package Tool) for package management. This is one of the most popular and user-friendly families of Linux distributions. - Fedora/RHEL and derivatives (CentOS, Rocky Linux, AlmaLinux): Fedora now primarily uses
dnf(Dandified YUM) which supersededyum. RHEL/CentOS 7 and older usedyum. - Arch Linux and derivatives (Manjaro): These systems use
pacmanfor package management, known for its speed and simplicity. - OpenSUSE: Uses
zypperfor package management. - Gentoo: Uses
emerge.
While installing from source is an option, typically reserved for users who need the absolute latest features or specific configurations not available in repository versions, installing via your package manager is almost always the easiest and most reliable method for most users.
System Updates and Prerequisites
Regardless of your distribution, it’s always a wise first step to update your system’s package list and upgrade any installed packages to their latest versions. This ensures you have access to the most recent software versions and security fixes, minimizing potential conflicts during new software installations. This aligns with digital security best practices, ensuring your system remains robust against known vulnerabilities.
Open your terminal (usually by pressing Ctrl+Alt+T) and execute the appropriate command for your distribution:
-
For Debian/Ubuntu-based systems:
sudo apt update
sudo apt upgrade
sudo apt updaterefreshes the list of available packages, andsudo apt upgradeinstalls newer versions of the packages you have installed. -
For Fedora/RHEL-based systems:
sudo dnf updatesudo dnf update(orsudo yum updatefor older RHEL/CentOS) updates all packages on your system, including refreshing the package lists. -
For Arch Linux:
bash

sudo pacman -Syu
sudo pacman -Syusynchronizes package databases and updates all installed packages.
After updating, your system is better prepared for Git installation. You might also want to install some basic development tools if they aren’t already present, especially if you plan to install Git from source later or compile other software. These often include build-essential (Debian/Ubuntu), Development Tools (Fedora/RHEL), or base-devel (Arch Linux). However, for installing Git directly from repositories, these are usually not required as dependencies are handled automatically.
Step-by-Step Git Installation on Linux
Now that your Linux system is prepared, let’s proceed with installing Git using your distribution’s native package manager. This is the recommended and most straightforward approach for most users. Each set of instructions is tailored to common Linux distribution families.
Installing Git on Debian/Ubuntu-based Systems
Debian, Ubuntu, and their numerous derivatives (like Linux Mint, Pop!_OS, Zorin OS, Elementary OS) use apt as their package manager. This is generally the easiest and most popular way to install Git on these systems.
- Open your terminal: You can typically do this by searching for “Terminal” in your applications menu or by pressing
Ctrl+Alt+T. - Install Git: Execute the following command:
bash

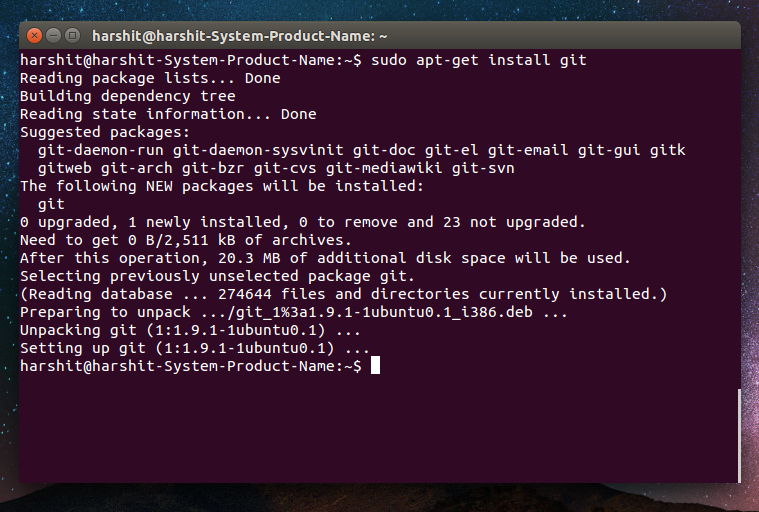
sudo apt install git
sudogrants administrative privileges,apt installis the command to install a package, andgitis the package name. - Confirm installation: The system will ask for your password and then display a list of packages to be installed along with their disk space requirements. Press
Yand thenEnterto proceed.
This command will download and install Git along with any necessary dependencies. The version of Git installed will be the stable version available in your distribution’s repositories, which is usually quite up-to-date and perfectly suitable for most users.
Installing Git on Fedora/RHEL-based Systems
For Fedora, CentOS, Rocky Linux, AlmaLinux, and other Red Hat-based distributions, dnf (or yum for older systems) is the package manager of choice.
- Open your terminal: As with Ubuntu, find your terminal application.
- Install Git: Use the
dnfcommand:
bash

sudo dnf install git
If you are on an older RHEL/CentOS system wherednfis not available, you would useyuminstead:
bash

sudo yum install git
- Confirm installation: After entering your password, review the package information and type
y(orY) followed byEnterto confirm the installation.
Similar to apt, dnf (or yum) will handle all dependencies and install the stable Git version from your distribution’s official repositories.
Installing Git on Arch Linux
Arch Linux, known for its rolling release model and user-centric approach, uses pacman as its package manager.
- Open your terminal:
- Install Git: Execute the following:
bash

sudo pacman -S git
pacman -Sis the command to synchronize and install packages. - Confirm installation: You will be prompted to confirm the installation. Type
yand pressEnter.
Arch Linux users typically get a very recent version of Git due to the rolling release nature of the distribution.
Verifying the Installation
After running the installation command for your respective distribution, it’s crucial to verify that Git has been installed correctly and is accessible from your terminal.
- Open your terminal (if not already open).
- Run the version command:
bash

git --version
This command should output the installed Git version, for example:git version 2.34.1. If you see a similar output, congratulations! Git is successfully installed on your system. If you receive an error like “command not found,” it indicates an issue with the installation or your system’sPATHenvironment variable. In such cases, double-check the installation commands and ensure no error messages were overlooked during the installation process.
Installing Git from Source (Advanced/Latest Version)
While installing from your distribution’s package manager is recommended for most users due to its simplicity and stability, some advanced users might need the absolute latest version of Git (which might contain new features or bug fixes not yet packaged for their distro) or a highly customized build. Installing from source gives you this flexibility. However, it requires more steps and manual dependency management.

Prerequisites for building from source:
You’ll need several development libraries and tools installed. The exact packages vary slightly by distribution, but generally include gcc (C compiler), make, zlib-devel, openssl-devel, perl-devel, libcurl-devel, and expat-devel.
For example, on Debian/Ubuntu:
sudo apt install libcurl4-gnutls-dev libexpat1-dev gettext libz-dev libssl-dev build-essential
On Fedora/RHEL:
sudo dnf install curl-devel expat-devel gettext-devel openssl-devel perl-CPAN perl-devel zlib-devel make gcc
On Arch Linux:
sudo pacman -S base-devel curl expat gettext openssl perl zlib
Steps to install from source:
- Download the latest Git source code: Visit the official Git website (git-scm.com/downloads) and copy the link for the latest tarball.
bash

cd /tmp

wget https://www.kernel.org/pub/software/scm/git/git-x.y.z.tar.gz # Replace x.y.z with the actual version

tar -xf git-x.y.z.tar.gz

cd git-x.y.z
- Compile and install:
bash

make prefix=/usr/local all

sudo make prefix=/usr/local install
Theprefix=/usr/localargument tells Git to install itself into/usr/local, which is a common location for software compiled from source, preventing conflicts with the system’s package-managed Git.
After installing from source, run git --version again. If you previously had a package-managed Git, you might need to adjust your PATH environment variable to ensure the newly installed version (from /usr/local/bin) is picked up first.
Post-Installation Configuration: Personalizing Your Git Environment
Once Git is installed, the next crucial step is to configure it with your personal information. This is vital for attributing your commits correctly and ensuring a professional digital footprint when contributing to projects, especially in open-source communities. Proper configuration enhances your “Personal Branding” as a developer and contributes to transparent project management.
Git uses a configuration file (.gitconfig) to store settings. These settings can be global (applying to all your repositories), system-wide (applying to all users on the system), or local (specific to a single repository). For most users, global configuration is sufficient.
Setting Your User Name and Email
Every Git commit includes the author’s name and email address. This information is crucial for tracking who made which changes and is prominently displayed in commit logs. You should set these globally so Git remembers them for all your projects.
- Set your user name:
bash

git config --global user.name "Your Name"
Replace"Your Name"with your actual name or preferred alias. This is how you’ll appear in commit history. - Set your email address:
bash

git config --global user.email "your_email@example.com"
Replace"your_email@example.com"with the email address you use for Git commits. If you contribute to open-source projects on platforms like GitHub or GitLab, it’s often best to use the same email associated with those accounts. For enhanced privacy, some platforms allow you to use a no-reply email address.
You can verify these settings by running:
git config --global user.name
git config --global user.email
Or to view all your global configurations:
git config --global -l
Configuring Your Default Editor
Git often needs to launch a text editor for tasks like writing commit messages or resolving merge conflicts. By default, it might try to use vi or vim, which can be daunting for newcomers. You can configure Git to use your preferred editor. Popular choices include Nano, VS Code, Sublime Text, or Atom.
- To set Nano as your default editor:
bash

git config --global core.editor "nano"
- To set VS Code (assuming
codecommand is in your PATH):
bash

git config --global core.editor "code --wait"
The--waitflag is crucial as it tells Git to wait for VS Code to close the file before continuing. - To set Sublime Text (assuming
sublcommand is in your PATH):
bash

git config --global core.editor "subl --wait"
Choosing a comfortable editor significantly boosts productivity and makes working with Git a smoother experience.
Caching Your Credentials for Convenience and Security
When interacting with remote repositories (e.g., GitHub, GitLab) that require authentication, Git will prompt you for your username and password (or token) every time you push or pull. This can quickly become tedious. Git provides a credential helper mechanism to cache your credentials securely, enhancing both convenience and digital security.
For most Linux distributions, the cache credential helper is a good default:
git config --global credential.helper cache
By default, this caches credentials for 15 minutes. You can increase the timeout (in seconds) if you wish, for example, to cache for an hour:
git config --global credential.helper "cache --timeout=3600"
For more robust and long-term caching, especially for HTTPS authentication, libsecret (part of GNOME Keyring) or KWallet (KDE’s wallet manager) can be used. These integrate with your desktop environment’s secure credential storage.
- For
libsecret(GNOME/GTK-based desktops):
First, installlibsecret‘s Git helper (package name varies, e.g.,git-credential-libsecretorgnome-keyringon Ubuntu/Debian).
bash

sudo apt install git-credential-libsecret # On Debian/Ubuntu

# Or for Fedora: sudo dnf install git-credential-libsecret
Then configure Git:
bash

git config --global credential.helper /usr/share/doc/git/contrib/credential/libsecret/git-credential-libsecret # Adjust path as needed

# Or, if installed as a binary, simply: git config --global credential.helper libsecret
This securely stores your credentials in your system’s keyring, usually unlocking when you log in.
Aliases and Customizations: Boosting Productivity
Git offers powerful aliasing capabilities, allowing you to create shortcuts for frequently used commands. This can significantly speed up your workflow and make Git commands more memorable. This is a direct productivity enhancement.
A few useful aliases to get you started:
- Shorten
committoci:
bash

git config --global alias.ci commit
- Shorten
statustost:
bash

git config --global alias.st status
- Create a beautiful log alias:
bash

git config --global alias.lg "log --color --graph --pretty=format:'%Cred%h%Creset -%C(yellow)%d%Creset %s %Cgreen(%cr) %C(bold blue)<%an>%Creset' --abbrev-commit"
Now, instead ofgit log, you can simply typegit lgfor a more readable and colorful history. - Unstage a file:
bash

git config --global alias.unstage 'reset HEAD --'
Nowgit unstage <file>is cleaner thangit reset HEAD -- <file>.
These aliases are stored in your .gitconfig file, which you can also edit directly with a text editor for more complex configurations. By customizing your Git environment, you’re investing in your long-term productivity and making your interaction with this powerful tool even more efficient.
Basic Git Usage: Your First Steps into Version Control
With Git successfully installed and configured, you’re ready to take your first steps into the world of version control. This section provides a brief overview of fundamental Git commands, offering practical insights into how to start using Git for your projects. Mastering these basics is essential for any developer or content creator, laying the groundwork for more advanced Git workflows and enabling seamless participation in collaborative software projects, which directly translates into marketable skills and potential for career growth or side hustles.
Initializing a Repository
The very first step to using Git in a project is to initialize a Git repository within that project’s directory. This creates a hidden .git subdirectory that contains all the necessary files for Git to track changes.
- Navigate to your project directory:
bash

cd /path/to/your/project
- Initialize the repository:
bash

git init
You’ll see a message likeInitialized empty Git repository in /path/to/your/project/.git/. Your project directory is now a Git repository.
Adding and Committing Changes
Once you’ve made changes to files in your repository, you need to tell Git which changes you want to include in the next commit. This is a two-step process: add and commit.
- Check the status of your files:
bash

git status
This command shows you which files have been modified, which are new, and which are staged for the next commit. - Stage your changes: To tell Git to include specific changes in the next commit, you “stage” them.
- To stage a specific file:
bash

git add my_file.txt
- To stage all changes in the current directory:
bash

git add .
Aftergit add, rungit statusagain. You’ll see the files now listed under “Changes to be committed.”
- To stage a specific file:
- Commit your staged changes: A commit is a snapshot of your repository at a specific point in time. Each commit should have a descriptive message explaining what changes were made and why.
bash

git commit -m "Initial commit: Added project structure"
The-mflag allows you to provide a short, single-line commit message directly. For longer messages, simply rungit commitwithout-m, and Git will open your configured text editor.
Checking Status and Logs
Keeping track of your project’s state and history is fundamental.
git status: As mentioned, this command is your go-to for understanding the current state of your working directory and staging area. It tells you what files are untracked, modified, or staged.git log: This command displays the commit history of your project. Each entry shows the commit hash, author, date, and commit message.
bash

git log
To exit the log view, pressq. You can use thegit lgalias we created earlier for a more visually appealing log.
Branching and Merging Fundamentals
Branching is one of Git’s most powerful features, allowing developers to diverge from the main line of development and continue work without messing up that main line. This is crucial for experimenting with new features, bug fixes, and collaborative workflows.
- Create a new branch:
bash

git branch new-feature
This creates a new branch callednew-featurebut doesn’t switch to it yet. - Switch to a new branch:
bash

git checkout new-feature
Now you are on thenew-featurebranch. Any commits you make here will only affect this branch until it’s merged back.
A shorthand to create and switch to a new branch simultaneously:
bash

git checkout -b another-feature
- List branches:
bash

git branch
The active branch will be highlighted (often with an asterisk). - Merge changes: Once you’ve completed your work on a feature branch, you’ll typically want to merge it back into your main branch (often named
mainormaster).- First, switch back to your main branch:
bash

git checkout main
- Then, merge your feature branch:
bash

git merge new-feature
Git will attempt to automatically merge the changes. If conflicts arise, Git will guide you through resolving them.
- First, switch back to your main branch:
These basic commands form the bedrock of daily Git usage. They empower individuals to manage their projects effectively, collaborate with others, and build a robust version history. Proficiency in these areas is a cornerstone skill for anyone serious about a career in technology, supporting not just personal branding but also contributing to the success and reputation of tech-driven companies.
Conclusion: Empowering Your Linux Workflow with Git
Installing Git on your Linux system is more than just adding another piece of software; it’s about equipping yourself with an essential tool that underpins modern software development and digital project management. From ensuring the integrity of your code to facilitating seamless collaboration with teams across the globe, Git transforms how you interact with your digital creations. As we’ve explored, its benefits extend far beyond simple file tracking, touching upon critical aspects of productivity, digital security, and even personal and corporate branding within the tech landscape.
By following the step-by-step instructions for your specific Linux distribution, you’ve not only installed a powerful version control system but also configured it to suit your workflow. Setting your user information, choosing your preferred editor, and implementing credential caching are small but significant steps that enhance your efficiency and streamline your daily development tasks. Furthermore, understanding the basic commands like git init, add, commit, status, log, branch, and merge provides you with the foundational knowledge to navigate your projects with confidence and control.
In the fast-evolving world of technology, where projects are increasingly complex and demand agility, Git stands as a testament to the power of open-source software in fostering innovation and collaboration. Its mastery is a highly valued skill that opens doors to new opportunities, enables contributions to the vibrant open-source community, and ultimately empowers you to build, manage, and scale your digital ventures more effectively. Whether you’re aiming for a new tech career, building a startup, or simply optimizing your personal projects, Git on Linux is an indispensable ally on your journey. Continue to explore its vast capabilities, and you’ll find it to be an invaluable asset in your technological toolkit.
aViewFromTheCave is a participant in the Amazon Services LLC Associates Program, an affiliate advertising program designed to provide a means for sites to earn advertising fees by advertising and linking to Amazon.com. Amazon, the Amazon logo, AmazonSupply, and the AmazonSupply logo are trademarks of Amazon.com, Inc. or its affiliates. As an Amazon Associate we earn affiliate commissions from qualifying purchases.