
In the ever-evolving digital landscape, customization and personalization are key to making your technology work for you. Whether you’re a creative professional crafting a stunning presentation, a student meticulously organizing your research, or simply someone who appreciates a touch of aesthetic flair in their digital life, the ability to modify your system’s fonts can significantly enhance your experience. This guide will walk you through the straightforward process of installing new fonts on Windows 10, transforming your documents, applications, and overall interface with a fresh visual identity.
Understanding Fonts and Their Impact
Before diving into the installation process, it’s beneficial to understand what fonts are and why they matter. Fonts, often referred to as typefaces, are the visual representation of text. They encompass the style, design, and arrangement of characters, letters, and symbols. The font you choose can profoundly influence how information is perceived, impacting readability, tone, and brand identity.
The Power of Typography in Digital Design and Branding
From a Tech perspective, fonts are fundamental building blocks of user interfaces and digital content. A well-chosen font can improve accessibility, guide the user’s eye, and convey a specific emotion or message. In the realm of Brand development, typography is a cornerstone. A consistent and impactful typeface is crucial for establishing a strong corporate identity and ensuring brand recognition across various platforms. Think about iconic logos – their typography is instantly recognizable. For businesses, selecting the right fonts for marketing materials, websites, and internal documents isn’t just an aesthetic choice; it’s a strategic branding decision that shapes perception.
For example, a law firm might opt for a classic serif font like Times New Roman to convey tradition and authority, while a tech startup might favor a clean, modern sans-serif font like Open Sans to project innovation and approachability. This deliberate choice in font selection contributes significantly to how a brand is perceived.
Fonts and Productivity
Beyond aesthetics and branding, fonts can also play a role in Productivity. Certain fonts are designed for enhanced readability, which can be particularly beneficial for extended reading sessions or for individuals with visual impairments. By reducing eye strain and improving comprehension, the right font can make your work more efficient and enjoyable. For instance, fonts with clear letterforms and good spacing can prevent misreading characters, saving you time and preventing errors.
The Money aspect might seem less directly connected to font installation, but consider the impact of professional-looking documents. A well-formatted report or proposal using appealing fonts can create a more credible and polished impression, potentially influencing business dealings or client perceptions. For freelancers or small business owners, this subtle attention to detail can contribute to a more professional online presence and a stronger brand image, indirectly impacting their financial success.
Acquiring Fonts: Where to Find Your Next Typeface
The Windows 10 font library is extensive, but the true power lies in the vast universe of downloadable fonts available online. From free resources to premium collections, you’re sure to find something that fits your needs.
Free Font Resources
Many websites offer a wide array of free fonts, perfect for personal projects or when budget is a concern. These platforms are a treasure trove for designers and everyday users alike. Some of the most popular include:
- Google Fonts: A highly curated collection of open-source fonts, optimized for web and print. They are free to use for any purpose.
- Font Squirrel: Offers a selection of high-quality, commercially licensed free fonts.
- DaFont: A vast archive of fonts, ranging from free for personal use to some that require licensing for commercial projects. It’s important to always check the license agreement.
- Urban Fonts: Another good source for free fonts, though also requiring careful attention to licensing.
When downloading fonts from these sources, it’s crucial to pay attention to the licensing terms. “Free for personal use” means you can use the font on your computer for your own documents and projects. However, if you intend to use the font for a business, on a website that generates revenue, or in commercial print materials, you might need a commercial license. Always read the license agreement provided with the font.
Premium Font Marketplaces
For those seeking unique, high-quality, and professionally designed fonts, premium marketplaces offer a vast selection. These fonts often come with more robust licensing options and are developed by experienced typographers.
- MyFonts: One of the largest marketplaces for commercial fonts, offering an enormous selection from various foundries.
- Fontspring: Known for its excellent licensing options and a wide range of designer fonts.
- Creative Market: A platform for independent creators to sell design assets, including a rich selection of fonts.
Investing in premium fonts can elevate your brand’s visual identity and provide a more distinctive look that sets you apart.
The Installation Process: Step-by-Step
Installing fonts in Windows 10 is a remarkably simple process, designed to be accessible to users of all technical skill levels. There are a few methods to achieve this, each offering a slightly different approach.
Method 1: The “Drag and Drop” or “Right-Click Install” Method (Most Common)
This is the most straightforward and widely used method.
Step 1: Download and Extract Your Font Files
First, download your desired font file(s) from your chosen source. Fonts typically come in compressed folders (ZIP files). You’ll need to extract these files before you can install them.
- Locate the downloaded ZIP file.
- Right-click on the ZIP file.
- Select “Extract All…”
- Choose a destination folder for the extracted files and click “Extract.”
Step 2: Locate the Font Files
Once extracted, navigate to the folder containing the font files. Font files usually have extensions like .ttf (TrueType Font) or .otf (OpenType Font). You might find multiple files for a single font family (e.g., Regular, Bold, Italic, Light).
Step 3: Install the Font

You have two primary options here:
-
Drag and Drop:
- Open the Windows “Fonts” folder. You can do this by typing “Fonts” into the Windows search bar and selecting “Fonts” from the results, or by navigating to
C:WindowsFontsin File Explorer. - Open the folder where you extracted your font files.
- Drag and drop the font files (
.ttfor.otf) directly into the Windows “Fonts” folder.
- Open the Windows “Fonts” folder. You can do this by typing “Fonts” into the Windows search bar and selecting “Fonts” from the results, or by navigating to
-
Right-Click Install:
- Open the folder where you extracted your font files.
- Select the font file(s) you wish to install (you can select multiple by holding down the
Ctrlkey). - Right-click on the selected font file(s).
- Choose “Install” from the context menu.
Windows will then automatically install the font(s). You’ll typically see a brief progress bar or animation indicating the installation.
Method 2: Using the Fonts Settings Menu
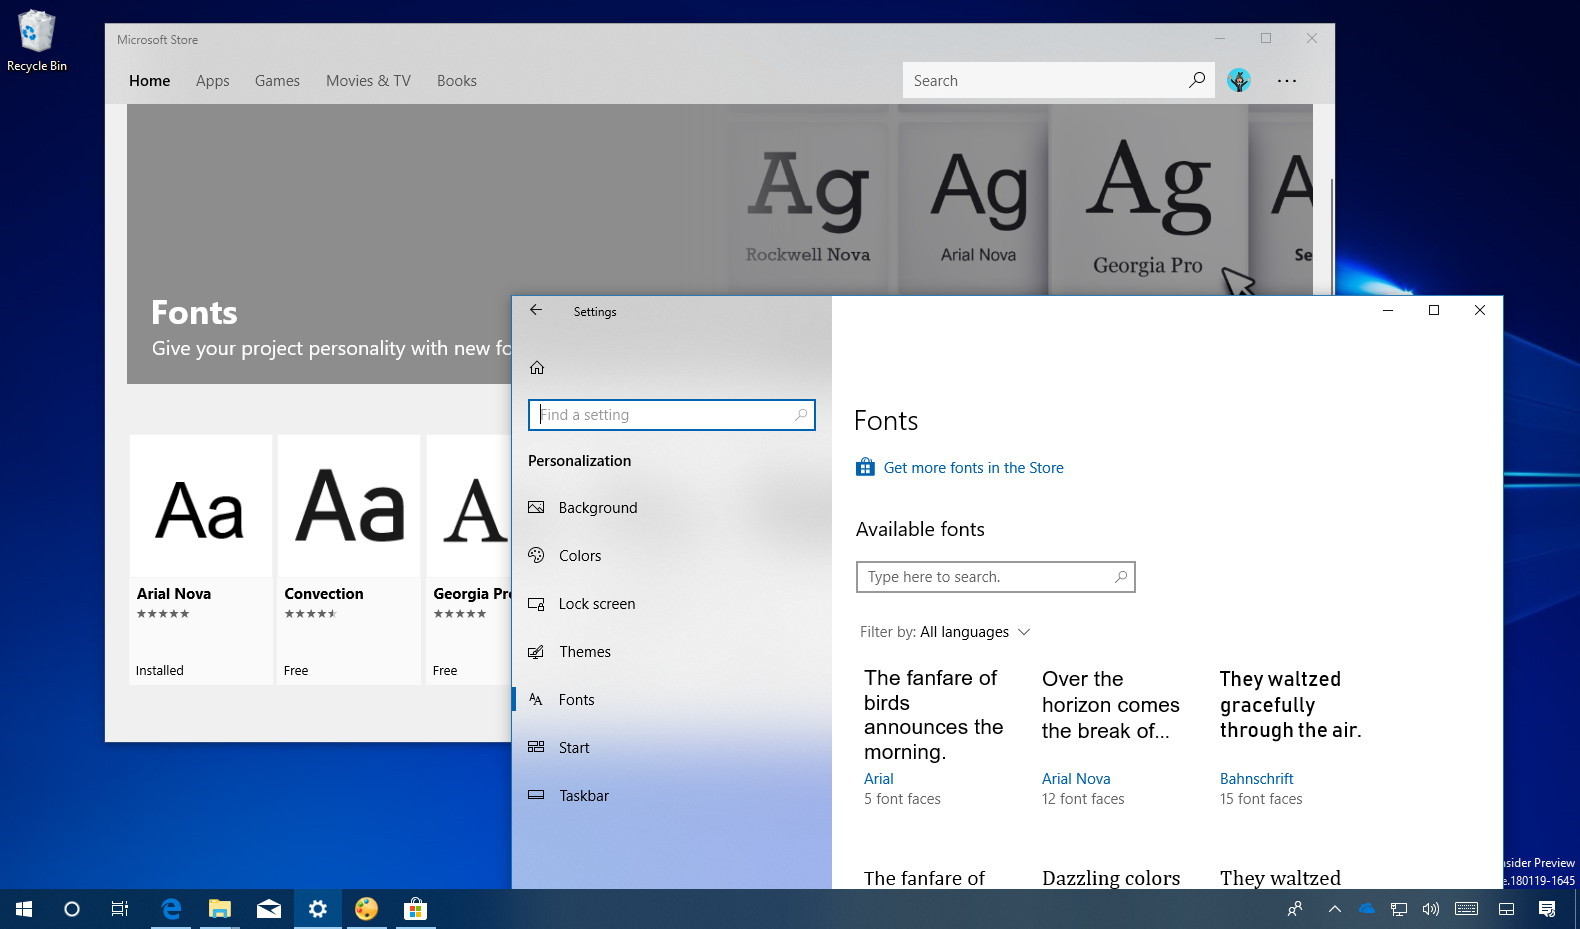
Windows 10 also provides a dedicated Fonts section within its Settings app, offering another intuitive way to manage your installed fonts and add new ones.
Step 1: Access Fonts Settings
- Click on the Start Menu.
- Click on the Settings gear icon.
- Select Personalization.
- In the left-hand menu, click on Fonts.
Step 2: Add Fonts via Drag and Drop
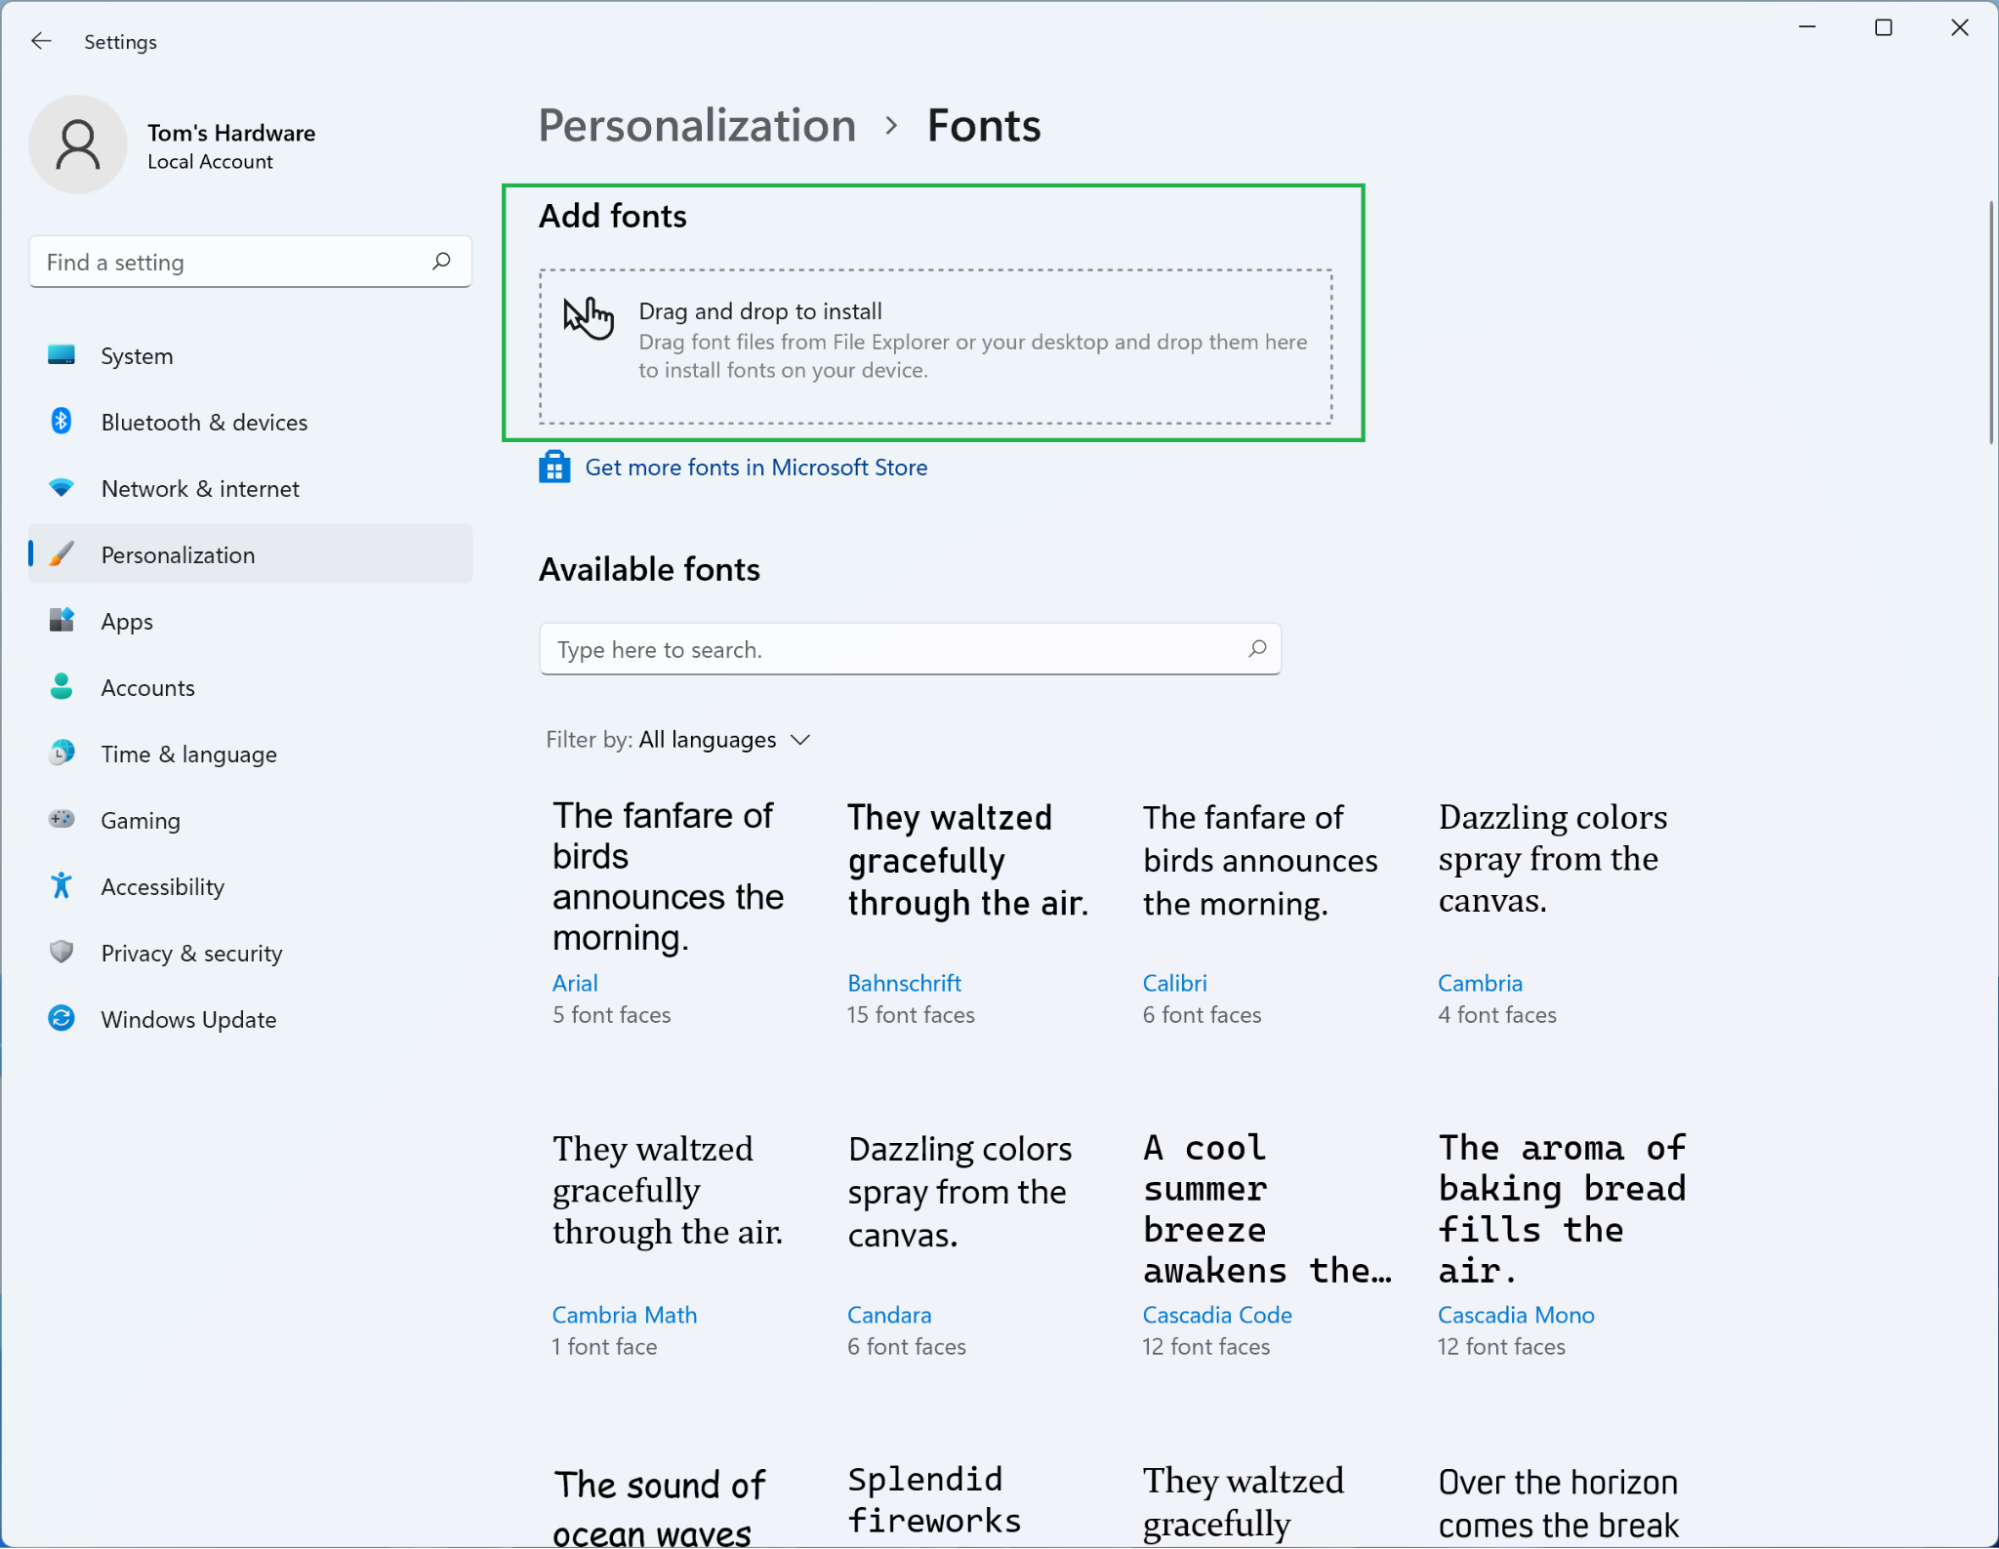
Within the Fonts settings, you’ll see a section labeled “Add fonts.” You can simply drag and drop your extracted font files (.ttf or .otf) directly into this designated area.
Step 3: Preview and Manage Fonts
The Fonts settings menu also allows you to preview all your installed fonts. Clicking on any font will show you its different styles and weights. You can also uninstall fonts from this menu by selecting the font and clicking the “Uninstall” button. This is a cleaner way to manage your font collection compared to manually deleting files from the C:WindowsFonts folder.
Verification and Application of New Fonts
Once the installation is complete, it’s important to verify that the fonts have been successfully added and then learn how to use them in your applications.
Confirming Successful Installation
After installing a font using either method, it’s good practice to confirm it’s recognized by Windows.
- Check the Fonts Folder: Open the
C:WindowsFontsfolder or go to Settings > Personalization > Fonts and look for your newly installed font in the list. - Restart Applications: For the newly installed font to appear in the font lists of most applications, you often need to restart those applications. If an application was open during the font installation, close and reopen it. For system-wide changes or for the font to be available in all programs, a restart of Windows might sometimes be necessary, though this is less common with modern Windows versions.
Utilizing Your New Fonts in Applications
Now that your fonts are installed, you can start using them in your favorite applications.
- Word Processors (Microsoft Word, Google Docs, etc.): Open your document, select the text you want to change, and then click on the font dropdown menu in the toolbar. Your newly installed fonts should appear in the alphabetical list.
- Presentation Software (PowerPoint, Google Slides, etc.): Similar to word processors, select your text and choose the font from the dropdown menu.
- Image Editors (Photoshop, GIMP, etc.): When using the text tool, you’ll find a font selection option in the tool’s options bar or properties panel.
- Web Browsers (for local HTML development): While not directly installed for web pages, you can use these fonts in your local HTML/CSS projects for previewing designs.
Choosing the right font can drastically alter the mood and professionalism of your work. For instance, using a bold, impactful font for headings can draw attention, while a light, airy font for body text can improve readability.
Troubleshooting Common Font Installation Issues
While font installation is generally seamless, you might occasionally encounter minor hiccups. Here are some common issues and their solutions:
Font Files Not Appearing in Applications
- Application Restart: As mentioned, this is the most common fix. Ensure the application you’re trying to use the font in has been completely closed and reopened after installation.
- Windows Restart: In rare cases, a full system restart might be required for Windows to fully register the new font.
- Corrupted Font File: The downloaded font file might be corrupted. Try downloading it again from a reputable source.
- Incorrect File Type: Ensure you are trying to install
.ttfor.otffiles. Other file types are not standard fonts for Windows.
“Font Not Valid” or Installation Errors
- Administrator Privileges: Sometimes, installing fonts requires administrator privileges. If you’re not logged in as an administrator, you might encounter errors. Try right-clicking the font file and selecting “Run as administrator.”
- Damaged Font Data: Similar to the above, the font file itself might be damaged or incomplete. Redownloading is the best course of action.
- Conflicting Fonts: Although rare, having multiple versions of the same font or very similar fonts installed could sometimes lead to conflicts. Try uninstalling similar fonts and then reinstalling the desired one.
Missing Font Styles (Bold, Italic)
- Incomplete Font Family: Ensure you downloaded all the necessary files for the font family. Often, font families come with separate files for regular, bold, italic, etc. You need to install each of these files individually.
- Font Limitations: Some fonts are designed with only a regular style. If you need bold or italic, you’ll have to find a font family that explicitly includes these styles.
By following these steps and troubleshooting tips, you can confidently expand your font library on Windows 10, adding a professional and personalized touch to all your digital endeavors, from business documents and marketing materials to personal creative projects. The ability to control your typography is a powerful tool in shaping your digital identity and enhancing your overall computing experience.
aViewFromTheCave is a participant in the Amazon Services LLC Associates Program, an affiliate advertising program designed to provide a means for sites to earn advertising fees by advertising and linking to Amazon.com. Amazon, the Amazon logo, AmazonSupply, and the AmazonSupply logo are trademarks of Amazon.com, Inc. or its affiliates. As an Amazon Associate we earn affiliate commissions from qualifying purchases.