
In the digital age, typography is more than just a functional element; it’s a powerful tool for communication, branding, and personal expression. From crafting compelling presentations and eye-catching marketing materials to personalizing your desktop experience, the right font can transform a plain document into a captivating visual story. Yet, many users remain unaware of how simple it is to expand their typographic horizons beyond the system defaults. This comprehensive guide will demystify the process of installing fonts on your computer, empowering you to unlock a world of creative possibilities. We’ll delve into understanding fonts, where to find them, step-by-step installation instructions for various operating systems, and essential tips for managing your growing font library.

Understanding Fonts and Their Impact
Before diving into the mechanics of installation, it’s crucial to grasp what digital fonts are and why they hold such significant sway in our digital interactions. Fonts are not merely decorative; they convey tone, establish hierarchy, and influence readability, directly impacting how information is perceived and consumed.
What are Digital Fonts?
At its core, a digital font is a file that contains a complete set of characters, numbers, and symbols designed in a specific style. These files instruct your computer on how to render text on screen and in print. The most common font file formats you’ll encounter are:
-
TrueType Font (TTF): Developed by Apple and Microsoft, TTF is one of the oldest and most widely supported font formats. It contains both screen and printer font data in a single file, making it highly versatile.
-
OpenType Font (OTF): A more advanced format co-developed by Microsoft and Adobe, OTF is an extension of TTF. It offers greater typographic capabilities, including support for more characters (e.g., small caps, old-style figures, ligatures) and advanced layout features, making it a favorite among professional designers.
-
Web Open Font Format (WOFF/WOFF2): These formats are specifically optimized for web use, allowing websites to use custom fonts without significantly impacting loading times. While you typically don’t install these directly on your computer for general use, understanding their existence highlights the diverse applications of digital type.
-
PostScript Type 1: An older, professional format primarily used in print publishing, often consisting of two separate files (one for screen, one for printer). It’s less common for direct user installation now but still present in legacy workflows.
Each format has its strengths, but for general computer use and most creative projects, TTF and OTF are what you’ll primarily be working with.
The Importance of Typography in Digital Communication
The choice of typeface is an often-underestimated aspect of effective communication. Just as words carry meaning, the style in which they are presented imbues them with emotion, authority, or friendliness. Consider these impacts:
-
Readability and Accessibility: A well-chosen font improves the ease with which text can be read, reducing eye strain and improving comprehension. Conversely, a poorly chosen or overly decorative font can hinder readability, frustrating the user. Accessibility also plays a role, with some fonts being clearer for individuals with visual impairments.
-
Brand Identity and Recognition: Fonts are a cornerstone of brand identity. Think of the iconic logos and marketing materials of major companies – their unique typography is instantly recognizable and evokes specific feelings or associations. For personal projects, consistent font usage helps establish a cohesive and professional aesthetic.
-
Tone and Emotion: Different fonts evoke different emotions. A clean, sans-serif font might suggest modernity and efficiency, while a flowing script font might convey elegance or creativity. Serif fonts often imply tradition, seriousness, or intellectualism. Matching the font’s personality to your message’s tone significantly enhances its impact.
-
Visual Hierarchy: Typography helps organize information on a page. Varying font sizes, weights (boldness), and styles (italic) can guide the reader’s eye, emphasizing key points and establishing a clear visual hierarchy that makes content easier to scan and understand.
By expanding your font library, you gain greater control over these aspects, allowing you to tailor your digital output with precision and personality.
Sourcing and Selecting the Right Fonts
Once you appreciate the power of fonts, the next logical step is to explore where to find them. The internet offers an immense repository of typefaces, ranging from free gems to professional-grade premium options. However, navigating this landscape requires an understanding of licensing and selection criteria.
Free vs. Premium Font Resources
The decision between free and premium fonts often depends on your budget, project scope, and specific needs.
-
Free Font Resources:
-
Google Fonts: An excellent starting point, Google Fonts offers a vast, high-quality library of open-source fonts. All fonts are available for commercial and personal use, and they integrate seamlessly with web projects.
-
DaFont and Font Squirrel: These sites host thousands of free fonts from various designers. While offering immense variety, it’s crucial to always check the license for each font, as usage rights can vary (e.g., free for personal use only, or free for commercial use with attribution). Font Squirrel, in particular, curates fonts that are explicitly free for commercial use.
-
Adobe Fonts: If you subscribe to Adobe Creative Cloud, you have access to a massive library of high-quality fonts included with your subscription, all licensed for commercial use. This is a significant perk for designers.
-
-
Premium Font Resources:
- MyFonts, Fontspring, Adobe Typekit (standalone options), Creative Market: These platforms offer a curated selection of professionally designed fonts, often with more extensive character sets, multiple weights and styles within a family, and robust kerning (spacing between characters). Premium fonts typically come with clear, commercial-use licenses and professional support. While they require an investment, the quality, versatility, and unique appeal often justify the cost for professional projects or branding.
Licensing Considerations
This is perhaps the most critical aspect of sourcing fonts. Failing to adhere to licensing agreements can lead to legal issues.
-
Personal Use License: Allows you to use the font for personal projects (e.g., school assignments, personal cards, desktop customization) but not for anything that generates income or promotes a business.
-
Commercial Use License: Grants permission to use the font for business-related projects (e.g., company logos, marketing materials, products for sale, client work). This is usually what you get with premium fonts and is explicitly stated for many free fonts.
-
Desktop License: Allows installation on your computer for use in desktop applications (Word, Photoshop, InDesign).
-
Webfont License: Specific for embedding fonts on websites using CSS.
-
Ebook/App License: Required for embedding fonts in digital publications or applications.
Always read the accompanying license file (often a .txt or PDF) when you download a font. If in doubt, assume it’s for personal use only or contact the font designer for clarification.
Choosing Fonts for Specific Projects
Selecting the right font involves more than just aesthetics; it’s about purpose.
-
Legibility First: For body text, prioritize fonts that are highly legible at various sizes. Sans-serif fonts like Open Sans, Lato, or Montserrat are excellent for digital displays, while classic serifs like Georgia or Times New Roman work well for print.
-
Match the Tone: As discussed, align the font’s personality with your project’s message. A children’s book requires a different feel than a corporate annual report.
-
Limit Your Choices: While tempting to use many beautiful fonts, sticking to 2-3 fonts per project (a primary heading font, a secondary heading/sub-heading font, and a body text font) creates visual harmony and avoids a cluttered look.
-
Test and Preview: Download a demo version if available, or use online font testers to see how the font looks with your specific text and in context before making a final decision or purchase.
Step-by-Step Font Installation Guides
The actual process of installing fonts is remarkably straightforward across different operating systems. While the exact steps might vary slightly, the core principle remains the same: copy the font file to a designated system folder.
Installing Fonts on Windows
Windows offers a couple of simple methods for installing new fonts.
-
Direct Installation (Easiest Method):
-
Download and Extract: Download your desired font, which typically comes in a
.zipfile. Right-click the.zipfile and select “Extract All…” to unzip its contents. You’ll then see the font files (e.g.,.ttfor.otf). -
Install: Locate the font file(s) you want to install. Right-click on a
.ttfor.otffile. From the context menu, select “Install” or “Install for all users.” “Install for all users” is generally recommended if multiple user accounts on the computer need access to the font. -
Confirmation: A small window might briefly appear indicating the font is being installed. Once complete, the font should be available in your applications.
-
-
Using the Fonts Folder:
-
Open Control Panel/Settings:
-
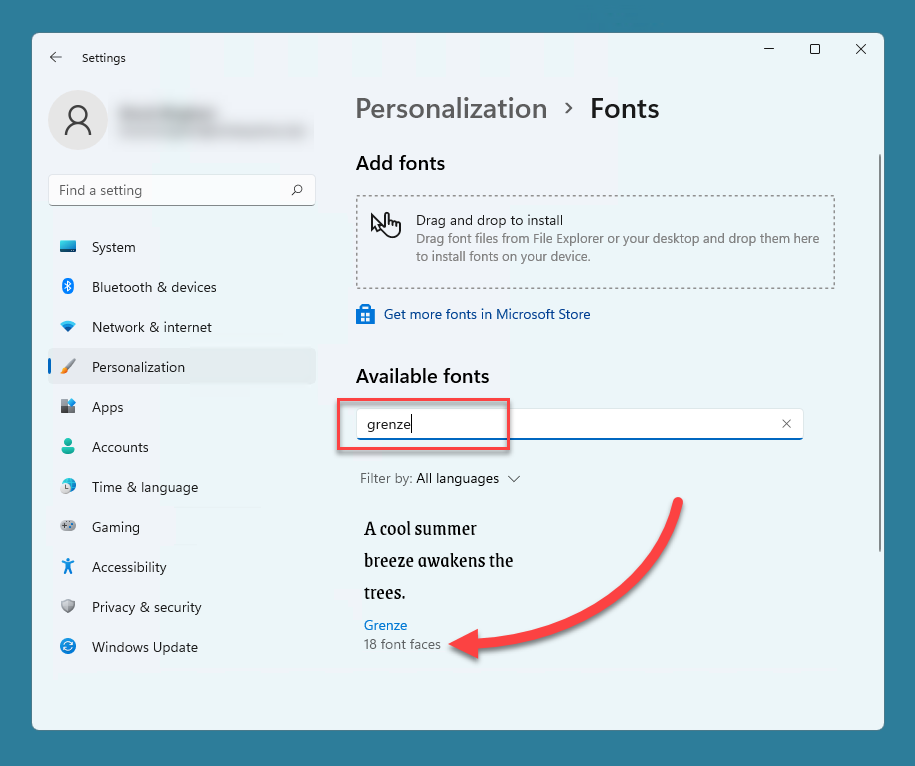
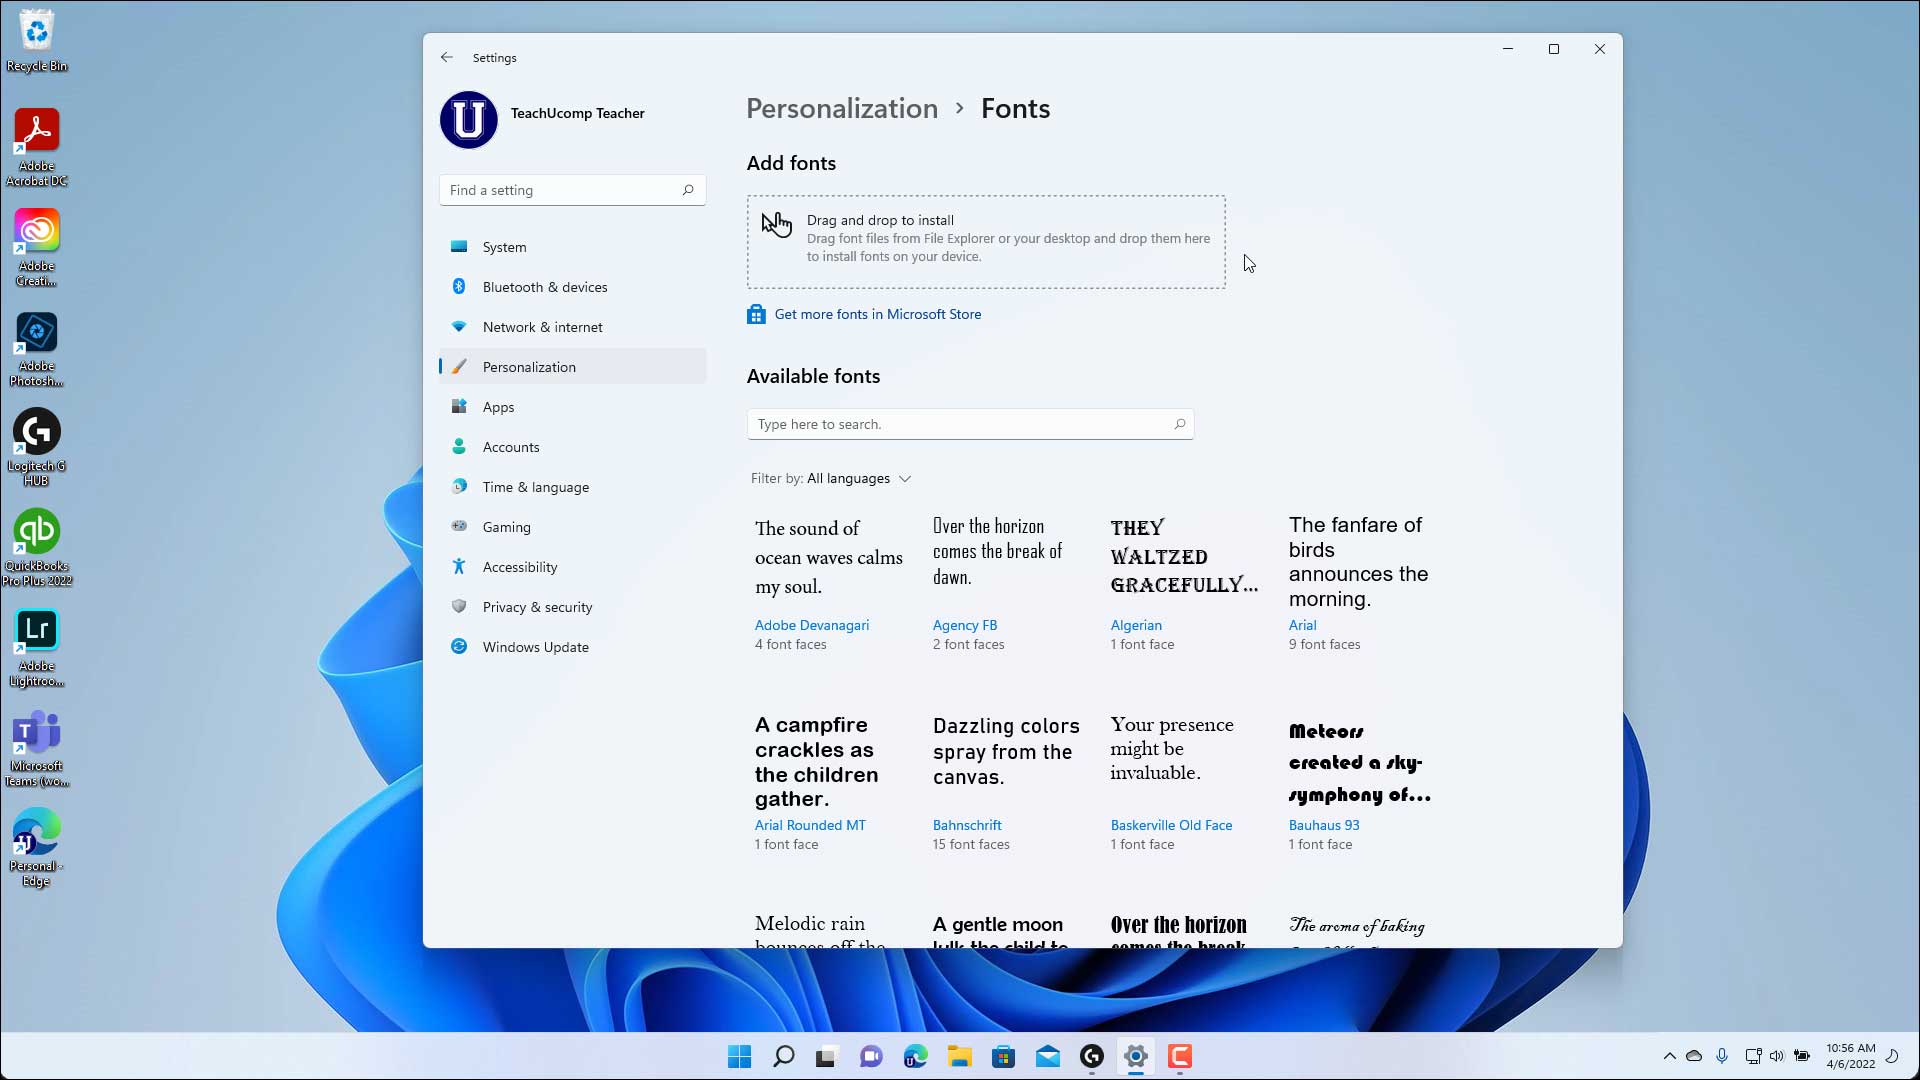
Windows 10/11: Go to
Settings > Personalization > Fonts. -
Older Windows versions: Go to
Control Panel > Appearance and Personalization > Fonts.
-
-
Drag and Drop: In the Fonts settings/folder, you’ll see a list of your installed fonts. Simply drag and drop your
.ttfor.otffont file(s) directly into this window. Windows will automatically install them. -
Copy and Paste: Alternatively, you can copy the font file(s) (
Ctrl+C), then open the Fonts folder (C:WindowsFonts) and paste them in (Ctrl+V).
-
After installation, restart any applications (like Word, Photoshop, etc.) that were open during the installation for the new fonts to appear in their font menus.
Installing Fonts on macOS
Installing fonts on a Mac is equally intuitive, primarily using the Font Book application.
-
Download and Extract: Download your font file, which will likely be a
.zipfile. Double-click the.zipto extract the.ttfor.otffont file(s). -
Double-Click to Preview/Install: Locate the extracted font file. Double-click on a
.ttfor.otffile. This will open the Font Book application and display a preview of the font. -
Install Font: In the Font Book window, click the “Install Font” button at the bottom right.
-
Validation: Font Book will quickly validate the font for errors. If issues are found, it will warn you. It’s generally best not to install corrupted fonts.
-
Confirmation: Once installed, the font will appear in your Font Book library and be available in all your macOS applications.
Alternative Method (Manual Copy):
You can also manually copy font files into one of these folders:
-
~/Library/Fonts(for current user only) -
/Library/Fonts(for all users)
This method is less common but works. If prompted for an administrator password, enter it.
Similar to Windows, always restart any applications that were running before installing the new fonts.
Installing Fonts on Linux (Brief Overview)
Linux distributions vary, but the general principle involves placing font files in specific system directories.
-
For the Current User:
-
Create a hidden folder named
.fontsin your home directory if it doesn’t exist:mkdir ~/.fonts -
Copy your
.ttfor.otffiles into this~/.fontsfolder. -
Run
fc-cache -fvin the terminal to rebuild the font cache.
-
-
For All Users (Requires Root Privileges):
-
Copy your font files to
/usr/local/share/fonts/(you might want to create a subfolder for organization, e.g.,/usr/local/share/fonts/myfonts). -
Run
sudo fc-cache -fvin the terminal.
-
Specific desktop environments (like GNOME, KDE Plasma) might also offer graphical font managers that simplify the process.
Managing Your Font Library
As your font collection grows, efficient management becomes crucial to maintain system performance, organize your creative assets, and avoid clutter.
Font Management Tools
While both Windows and macOS have built-in font viewers, dedicated font managers offer advanced features:
-
macOS Font Book: Beyond basic installation, Font Book allows you to enable/disable fonts, resolve duplicate fonts, and organize fonts into collections.
-
Windows Settings > Fonts: Provides basic browsing and uninstallation capabilities.
-
Third-Party Managers (e.g., FontBase, NexusFont, RightFont, Suitcase Fusion): These tools are invaluable for designers and power users. They allow you to:
-
Activate/Deactivate Fonts: Instead of permanently installing all fonts, managers let you activate them only when needed, reducing system load.
-
Organize into Collections: Group fonts by project, client, or style.
-
Preview Fonts: See fonts with custom text before using them.
-
Identify Duplicates: Help clean up redundant font files.
-
Sync Fonts: Some offer cloud syncing for teams.
-
Investing in a good font manager can significantly streamline your workflow if you work with a large number of typefaces.
Deactivating and Uninstalling Fonts
Sometimes you need to remove fonts to free up resources or declutter your system.
-
Windows:
-
Go to
Settings > Personalization > Fonts. -
Select the font you wish to remove.
-
Click the “Uninstall” button.
-
Alternatively, in the
C:WindowsFontsfolder, right-click the font and select “Delete.”
-
-
macOS:
-
Open Font Book.
-
Select the font or collection you wish to remove.
-
Go to
File > Remove "Font Name"orFile > Remove "Collection Name". -
You can also right-click the font in the list and select “Remove ‘Font Name’.”
-
Deactivating a font (if using a font manager) temporarily makes it unavailable without permanently deleting the file, allowing for easy re-activation later. Uninstalling removes the file from your system entirely.
Organizing Your Font Collection
A well-organized font library saves time and frustration.
-
Folder Structure: Create a logical folder structure for your downloaded (uninstalled) font files. You might categorize them by:
-
Source: (e.g., “Google Fonts,” “Creative Market Purchases”)
-
Type: (e.g., “Serif,” “Sans-Serif,” “Script,” “Display”)
-
Project: (e.g., “Client X Project,” “Personal Blog Fonts”)
-
-
Consistent Naming: Rename downloaded font files to be more descriptive if their original names are cryptic.
-
Metadata: Use font management software to add tags or notes to your fonts.
Regularly reviewing and curating your collection ensures that you only keep the fonts you genuinely use, preventing system bloat and making it easier to find the perfect typeface when inspiration strikes.
Troubleshooting Common Font Issues
Despite the straightforward installation process, you might occasionally encounter issues. Knowing how to troubleshoot these can save you a good deal of headache.
Font Not Appearing in Applications
This is the most common issue after installation.
-
Restart Applications: The most frequent culprit. Most applications load available fonts when they start. If an app was open during font installation, it won’t see the new font until it’s restarted.
-
Check Font File Integrity: Ensure the font file isn’t corrupted or incomplete. Try downloading it again from a different source if possible.
-
Verify Installation Location: Confirm the font was installed in the correct system-wide or user-specific font folder.
-
Font Conflicts: Occasionally, a new font might conflict with an existing one, especially if they share very similar internal names. Font managers can sometimes help identify and resolve these.
-
Application Compatibility: Very old or specialized applications might not support all modern font formats. Ensure your application is up-to-date.
Corrupted Font Files
A corrupted font file can cause display issues, application crashes, or simply fail to install.
-
Re-download: The first step is always to re-download the font from its original source. The initial download might have been incomplete or damaged.
-
Font Validator Tools: Some font managers include validation tools. Online services also exist that can check for common font file errors.
-
Avoid Unknown Sources: Stick to reputable font websites to minimize the risk of downloading corrupted or malicious font files.
Performance Considerations
While modern systems can handle a large number of fonts, an excessive, actively installed font library can sometimes impact performance.
-
System Startup: Having hundreds or thousands of fonts loaded at startup can slightly slow down your computer’s boot time.
-
Application Load Times: Applications that display extensive font menus (like design software) might take longer to load if they need to enumerate a massive font library.
-
Font Managers for Mitigation: This is where font managers shine. By only activating fonts when needed, you keep the system load light while retaining access to your full collection.
-
Regular Cleanup: Periodically uninstall fonts you no longer use.
By understanding these common issues and their solutions, you can maintain a robust and efficient font environment, ensuring your creative endeavors are never hampered by technical glitches.
In conclusion, installing fonts on your computer is an accessible skill that dramatically expands your creative toolkit. By understanding the types of fonts, where to ethically source them, and the straightforward installation steps across different operating systems, you gain the power to personalize your digital experience and enhance the impact of your communication. Effective font management, coupled with basic troubleshooting knowledge, will ensure your font library remains a valuable asset, ready to bring your typographic visions to life. Embrace the world of diverse typefaces, and watch as your digital projects transform with new character and flair.
aViewFromTheCave is a participant in the Amazon Services LLC Associates Program, an affiliate advertising program designed to provide a means for sites to earn advertising fees by advertising and linking to Amazon.com. Amazon, the Amazon logo, AmazonSupply, and the AmazonSupply logo are trademarks of Amazon.com, Inc. or its affiliates. As an Amazon Associate we earn affiliate commissions from qualifying purchases.