
Fluorescent lighting fixtures are a staple in many homes, offices, workshops, and commercial spaces due to their efficiency and bright illumination. However, like any electrical component, the heart of these fixtures – the ballast – can eventually fail. A malfunctioning ballast often manifests as flickering lights, delayed startup, dim illumination, or a persistent buzzing noise, not only disrupting your environment but also potentially wasting energy. Replacing a fluorescent ballast might seem like a daunting electrical task, but with the right knowledge, tools, and a strict adherence to safety protocols, it’s a manageable DIY project that can save you money and extend the life of your lighting fixture.
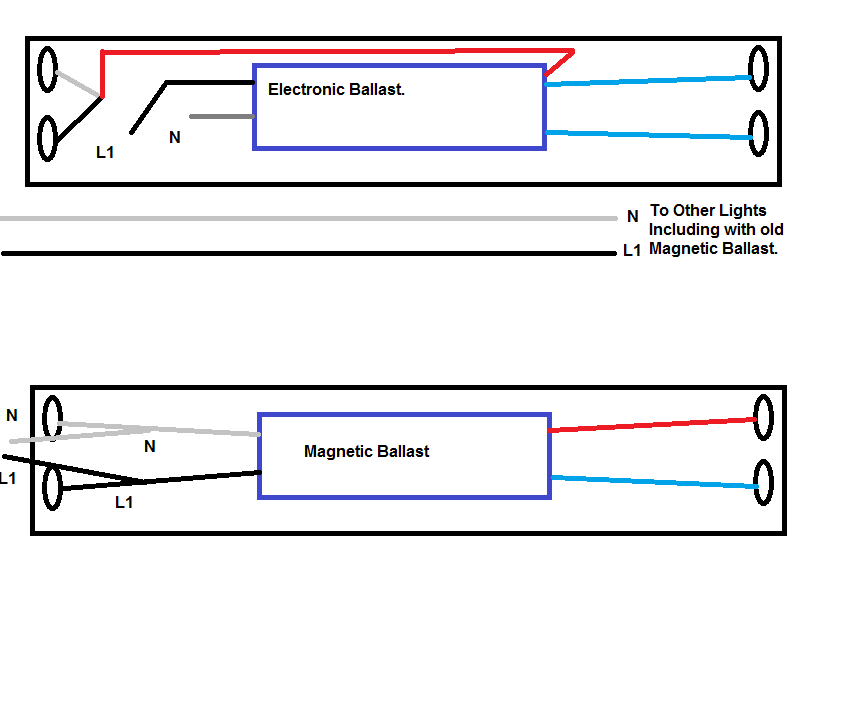
This comprehensive guide will walk you through the entire process, from understanding what a ballast does to selecting the right replacement and executing a flawless installation. We’ll delve into the technological nuances of these crucial components, explore how smart decisions can impact your finances, and ensure you maintain a professional, well-lit environment.
Understanding Your Fluorescent Lighting System: The Brain Behind the Brightness
Before you even think about picking up a screwdriver, it’s essential to understand what a fluorescent ballast is, why it’s there, and what options are available. This knowledge not only empowers you to make informed decisions but also forms the foundation of a successful and safe installation. It taps directly into the “Tech” aspect of our domain, demystifying the technology that illuminates your space.
The Role of the Ballast: Regulating the Current
At its core, a fluorescent ballast serves two primary functions:
- Provide initial voltage surge: Fluorescent lamps require a high initial voltage to ionize the gas inside the tube and start the arc that produces light.
- Regulate current: Once the arc is struck, the ballast limits and stabilizes the current flowing through the lamp. Without a ballast, the lamp would draw an ever-increasing current, quickly leading to self-destruction.
Historically, magnetic ballasts were the standard. These heavy, noisy components utilized electromagnetic coils to perform their function. While robust, they are less energy-efficient, often cause a noticeable hum, and can lead to flickering lights.
The advent of electronic ballasts revolutionized fluorescent lighting. These modern counterparts are much lighter, silent in operation, and significantly more energy-efficient. They operate at high frequencies (typically 20,000 Hz or more), which eliminates the visible flicker associated with magnetic ballasts, providing a more stable and comfortable light. Upgrading from a magnetic to an electronic ballast is often a wise decision, offering substantial energy savings (tying into “Money”) and improved light quality (enhancing the “Brand” image of your space).
Different types of fluorescent lamps (e.g., T12, T8, T5) require specific ballasts. T12 lamps and their magnetic ballasts are largely obsolete due to their inefficiency, with T8 and T5 lamps paired with electronic ballasts becoming the industry standard. Furthermore, ballasts come in different “start” types:
- Instant Start: Provides a high voltage to lamps quickly, causing rapid startup but potentially reducing lamp life due to direct filament bombardment. Highly energy efficient.
- Rapid Start: Preheats lamp filaments before striking an arc, leading to a slightly delayed but gentler start, extending lamp life. Moderately energy efficient.
- Programmed Start: The most advanced, preheating filaments optimally for maximum lamp life and frequently switching applications. Offers the best lamp life and excellent energy efficiency, ideal for occupancy sensor control.
Understanding these distinctions is crucial for selecting a compatible and efficient replacement.
Diagnosing a Failing Ballast: When to Replace
Knowing the symptoms of a failing ballast will save you from replacing components unnecessarily. Here’s what to look out for:
- Flickering lights: This is one of the most common signs. While a failing lamp can also flicker, persistent flickering even after replacing the tubes often points to the ballast.
- Buzzing or humming noise: Magnetic ballasts can hum, but if the noise becomes excessively loud or if an electronic ballast starts buzzing, it’s a clear indicator of trouble.
- Delayed startup or no startup: If your fluorescent tubes take a long time to illuminate or simply don’t light up at all, even after you’ve tried new lamps, the ballast is likely the culprit.
- Dim or uneven lighting: A weak ballast may not provide enough power for the lamps to reach full brightness or may illuminate some lamps unevenly.
- Burnt odor or visible scorching: In severe cases, a failing ballast can overheat, emitting a burning smell or showing visible signs of charring. Immediately disconnect power if you notice this.
Before concluding that the ballast is bad, always try replacing the fluorescent tubes. Lamps have a finite lifespan, and it’s a simpler, less expensive fix if they are the issue. If new tubes don’t resolve the problem, then it’s time to consider a ballast replacement.
Safety First: Essential Precautions Before You Begin
Working with electricity demands the utmost respect and caution. Ignoring safety protocols can lead to serious injury or even death. This section is non-negotiable and prioritizes your well-being above all else. Always remember, if you are uncomfortable or unsure at any point, it is best to consult a qualified electrician.
Power Disconnection is Non-Negotiable: The Golden Rule
This is the single most critical step. Never, under any circumstances, attempt to work on an electrical fixture without first completely disconnecting its power source.
- Locate the circuit breaker: Find the circuit breaker panel for your building.
- Identify the correct breaker: Turn off the breaker that controls the lighting fixture you’ll be working on. If uncertain, it’s always safer to turn off the main breaker for the entire area or building.
- Test for power: After turning off the breaker, use a non-contact voltage tester to confirm that no power is flowing to the fixture. Touch the tester to the wires leading into the fixture and the wires inside the fixture itself. The tester should remain silent and unlit, indicating a de-energized circuit.
- Lockout/Tagout (LOTO): For commercial or multi-person environments, implement a lockout/tagout procedure. This involves placing a lock on the circuit breaker and a tag indicating that work is in progress, preventing anyone from inadvertently re-energizing the circuit. Even for home DIY, informing others in the household is a good practice.
Personal Protective Equipment (PPE) and Workspace Preparation
Once the power is off, ensure you have the right gear and a safe workspace:
- Safety Glasses: Protect your eyes from falling debris, wire fragments, or accidental contact.
- Insulated Gloves: While the power is off, wearing electrical gloves provides an extra layer of protection against residual charge or accidental contact with an energized circuit if power is mistakenly restored.
- Insulated Tools: Use tools with insulated handles to further minimize electrical risk.
- Sturdy Ladder: If the fixture is overhead, use a stable ladder. Ensure it’s placed on a level surface and follow all ladder safety guidelines.
- Clear Workspace: Remove any obstacles from your work area to prevent trips and falls. Ensure adequate lighting (e.g., a battery-powered headlamp or flashlight) since the fixture’s power will be off.
Gathering Your Tools and Materials: Equipping for Success
Having the right tools and materials makes the job smoother, safer, and more efficient. A little preparation here can save a lot of frustration later.
Essential Tools for Ballast Replacement
You’ll need a basic set of electrical and hand tools:
- Screwdrivers: Both Phillips head and flathead screwdrivers are necessary for removing fixture covers and ballast mounting screws.
- Wire Strippers/Cutters: For cleanly cutting and stripping the insulation from electrical wires. A good quality stripper ensures precise cuts without damaging the wire strands.
- Pliers: Needle-nose pliers are particularly useful for bending and manipulating wires in tight spaces.
- Non-Contact Voltage Tester: As mentioned, this is crucial for confirming power is off.
- Multimeter (Optional but Recommended): For advanced troubleshooting, a multimeter can measure voltage, current, and continuity, helping you diagnose complex electrical issues if the new ballast doesn’t work.
- Marker/Labeler: Indispensable for labeling wires during disassembly, especially for fixtures with complex wiring.
- Electrical Tape: For insulating connections, though wire nuts are primarily used.
- Flashlight or Headlamp: To illuminate the work area when the fixture’s power is off.
- Drill (Optional): If the new ballast doesn’t align with the old mounting holes, a drill with an appropriate bit for metal or wood may be needed.
Selecting the Right Replacement Ballast: A Smart Investment
Choosing the correct replacement ballast is paramount. Mismatching can lead to poor performance, premature failure, or even safety hazards. This is where your understanding of the “Tech” comes into play, influencing your “Money” through efficiency.
- Match Specifications: Carefully check the specifications of the old ballast. Look for:
- Voltage: Usually 120V for residential, but commercial settings might use 277V.
- Lamp Type: T12, T8, T5 (e.g., F32T8 for a 32-watt T8 lamp).
- Number of Lamps: Ballasts are designed to operate a specific number of lamps (e.g., 2-lamp, 4-lamp).
- Wattage: The total wattage of the lamps it can power.
- Start Type: Instant Start, Rapid Start, or Programmed Start.
- Consider Upgrading: If you currently have a magnetic ballast, strongly consider upgrading to an electronic ballast. The initial cost might be slightly higher, but the energy savings, improved light quality, and silent operation will provide a significant return on investment over time (a clear “Money” benefit). Look for ballasts labeled “high-efficiency.”
- Reputable Brands: Invest in a ballast from a reputable manufacturer (e.g., Philips Advance, Sylvania, GE, Keystone). Quality components mean greater longevity and reliability, reflecting positively on the “Brand” aspect of your installed systems.
Step-by-Step Fluorescent Ballast Installation: From Disassembly to Reassembly
With safety assured and tools in hand, you’re ready to tackle the core task. Follow these steps meticulously, taking your time with each one.
Preparation and Disassembly: Documenting for Success
This stage focuses on carefully dismantling the fixture and preparing it for the new ballast.
- Remove the Diffuser/Cover: Carefully unclip or unscrew the plastic or metal cover that shields the lamps. Set it aside in a safe place where it won’t get damaged.
- Remove Fluorescent Tubes: Gently twist and pull the fluorescent tubes from their sockets. Handle them with care to avoid breakage, as they contain mercury. Store them safely away from your workspace.
- Locate the Old Ballast: The ballast is typically a rectangular metal box mounted inside the fixture’s metal channel.
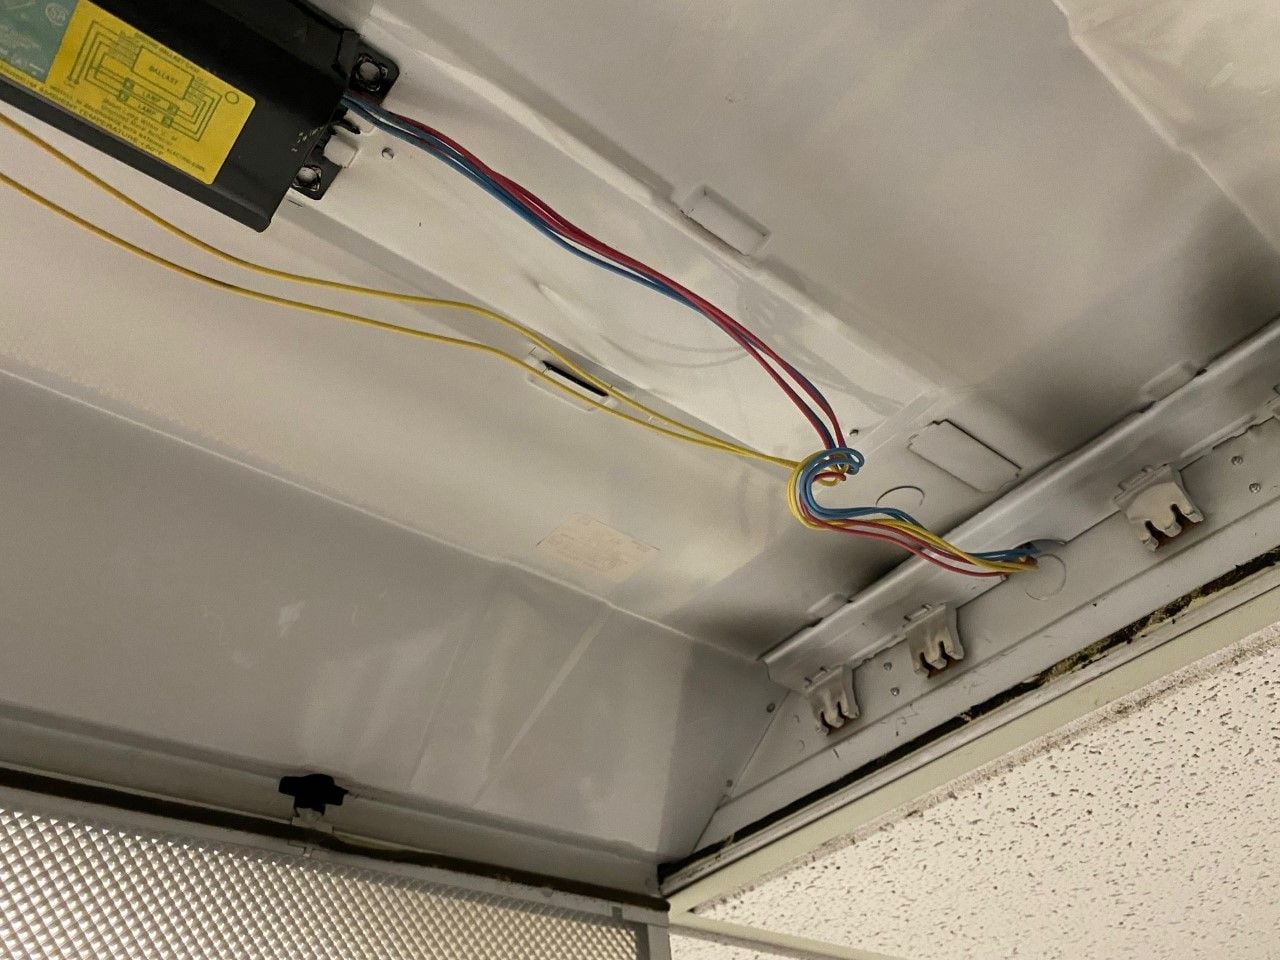
- Document Wiring: This is perhaps the most critical step for a smooth reinstallation.
- Take Photos: Use your smartphone to take multiple clear photos of the existing wiring configuration from different angles.
- Draw a Diagram: Sketch a simple diagram showing which wires from the fixture (line voltage, neutral, ground) connect to which wires on the old ballast, and how the ballast output wires connect to the lamp holders.
- Label Wires: Use a marker or masking tape to label each wire before disconnecting it. Pay close attention to colors (e.g., black for line, white for neutral, green for ground, and various colors for lamp leads). The new ballast will have a wiring diagram, but labeling existing wires simplifies connecting to the fixture’s power supply.
- Disconnect Old Ballast Wiring: Once documented, carefully cut the wires leading to the old ballast, leaving enough length on both the fixture wires and the lamp holder wires to work with. Alternatively, you might be able to untwist wire nuts or release quick-connect terminals.
- Remove the Old Ballast: Unscrew the mounting screws that hold the old ballast in place. Once freed, remove the old ballast from the fixture. It can be heavy, especially if it’s a magnetic type.
Wiring the New Ballast: Precision and Connection
This is where the new ballast takes its place, requiring careful adherence to the wiring diagram provided with the new component.
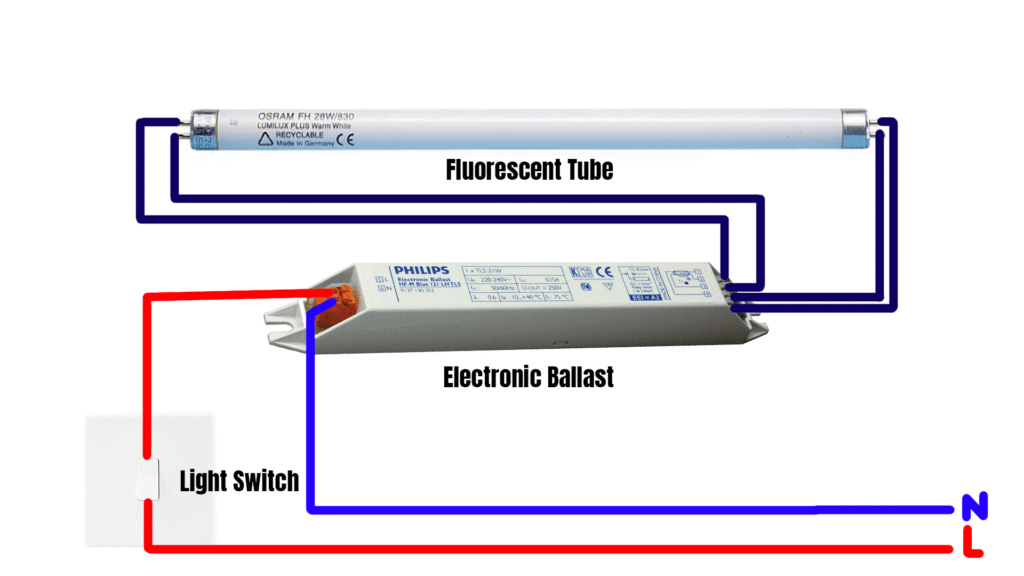
- Understand the New Ballast Wiring Diagram: Every new ballast comes with a wiring diagram. Study it carefully. It will show you which wires are for input power (line, neutral, ground) and which are for connecting to the lamp holders. Pay attention to specific color codes, as they can vary slightly between manufacturers.
- Connect Input (Line Voltage) Wires:
- Identify the line (hot/live) wire from the fixture (usually black). Connect it to the corresponding line wire on the new ballast.
- Identify the neutral wire from the fixture (usually white). Connect it to the corresponding neutral wire on the new ballast.
- Identify the ground wire (usually green or bare copper). Connect it to the ground screw on the fixture’s metal chassis, ensuring a secure bond.
- Use appropriately sized wire nuts for all connections, ensuring they are tightly twisted and secure. Give each connection a gentle tug to confirm it won’t pull apart.
- Connect Output (Lampholder) Wires:
- Refer to your new ballast’s diagram and your previously drawn diagram or photos.
- Connect the ballast’s output wires (these typically come in pairs for each lamp holder) to the correct wires leading to the lamp holders. The colors here are usually specific to the ballast design (e.g., blue, red, yellow).
- Ensure each connection is secure with wire nuts. For multiple lamps, you might have common wires that need to be spliced together before connecting to the ballast.
Mounting and Reassembly: The Finishing Touches
With all wires connected, it’s time to secure the new ballast and put everything back together.
- Mount the New Ballast: Position the new ballast inside the fixture channel. If the mounting holes align, secure it with the screws you removed earlier. If the holes don’t align, you may need to drill new pilot holes in the fixture’s metal base to ensure the ballast is firmly mounted. A loose ballast can vibrate and cause noise.
- Tuck Wires Neatly: Carefully tuck all the wires back into the fixture’s channel, ensuring they are not pinched or exposed. Wires should not interfere with the reinstallation of the lamps or cover.
- Replace Fluorescent Tubes: Reinstall the fluorescent tubes, ensuring they are seated correctly in their lamp holders.
- Replace Diffuser/Cover: Attach the fixture cover or diffuser, making sure it’s securely fastened.
Testing, Troubleshooting, and Maximizing Efficiency
The hard work is done! Now it’s time to see your efforts pay off. This final stage involves powering up, addressing any issues, and considering long-term benefits for your “Tech” and “Money.”
Initial Power-Up and Testing: The Moment of Truth
- Restore Power: Go back to your circuit breaker panel and switch the breaker for the fixture back to the “ON” position.
- Observe Operation:
- The lights should turn on immediately or with a very brief delay (depending on the ballast start type).
- Observe for any flickering, dimness, or unusual noises. Ideally, the new ballast should provide steady, bright, and silent operation.
Common Troubleshooting Scenarios: What If It Doesn’t Work?
If the lights don’t come on or exhibit problems, don’t panic. Revisit these common issues:
- No Light:
- Power Issue: Double-check the circuit breaker. Use your non-contact voltage tester to ensure power is reaching the fixture.
- Loose Connections: Power off the fixture, remove the cover, and meticulously check every wire nut connection. Tug gently on each wire to confirm it’s secure.
- Faulty Lamps: Even new lamps can be defective. Try a known working lamp if you have one.
- Incorrect Wiring: Review your wiring against the ballast diagram and your initial photos/diagrams. A single misconnected wire can prevent operation.
- Flickering or Dim Light:
- Bad Lamp/Tube: The lamps themselves might be nearing the end of their life or be incompatible with the new ballast.
- Wrong Ballast: The ballast might be incorrectly specified for the lamps being used.
- Poor Connections: Recheck all wire connections.
- Buzzing Noise:
- Loose Ballast: Ensure the new ballast is securely mounted to the fixture.
- Wrong Ballast Type: If you installed a magnetic ballast instead of an electronic one, some hum is normal, though it shouldn’t be excessive. If it’s an electronic ballast, excessive buzzing could indicate a defect or loose mounting.
Optimizing Your Lighting System: Smart Choices for the Future
Replacing a ballast isn’t just a repair; it’s an opportunity to improve your lighting system.
- Embrace Electronic Ballasts: If you haven’t already, the upgrade to electronic ballasts is highly recommended. They offer significant energy savings (up to 30% over magnetic ballasts), reduce heat output, extend lamp life, and eliminate flicker, creating a more productive and comfortable environment (boosting your “Brand” through better ambiance).
- Consider LED Retrofits: For maximum energy efficiency and longevity, consider converting your fluorescent fixture to LED. Many “plug-and-play” LED tubes can work with existing electronic ballasts, or you might choose to bypass the ballast entirely with “ballast-bypass” LED tubes. While a separate project, this step often delivers the best “Money” savings and aligns with modern “Tech” trends in lighting.
- Smart Lighting Integration: For certain fixtures, incorporating smart controls (e.g., occupancy sensors, dimmers, smart switches) can further enhance energy efficiency and convenience. This advanced “Tech” allows for greater customization and control over your lighting environment, perfectly fitting into a smart home or office ecosystem.
Conclusion
Successfully installing a fluorescent ballast is a rewarding project that combines practical skills with an understanding of electrical technology. By meticulously following safety precautions, carefully choosing the right replacement components, and paying close attention during the installation process, you can restore your lighting fixture to full, efficient operation.
This DIY endeavor not only saves you the cost of hiring a professional electrician, reinforcing the “Money” aspect, but also deepens your understanding of common household or commercial “Tech.” Furthermore, ensuring your spaces are well-lit, free from flickering, and energy-efficient contributes to a positive environment, subtly enhancing the “Brand” image of your home or business. Remember, while this guide provides detailed instructions, never hesitate to seek professional assistance if you encounter challenges or feel unsure about any step. A safely and correctly installed ballast means bright, reliable, and efficient lighting for years to come.
aViewFromTheCave is a participant in the Amazon Services LLC Associates Program, an affiliate advertising program designed to provide a means for sites to earn advertising fees by advertising and linking to Amazon.com. Amazon, the Amazon logo, AmazonSupply, and the AmazonSupply logo are trademarks of Amazon.com, Inc. or its affiliates. As an Amazon Associate we earn affiliate commissions from qualifying purchases.