
Is your once-snappy laptop starting to feel sluggish, struggling to keep up with your multitasking demands, or grinding to a halt when you open too many browser tabs? While a slow laptop can be frustrating, the good news is that often, the solution isn’t to buy an entirely new machine. One of the most impactful, yet relatively straightforward, upgrades you can perform is installing extra Random Access Memory (RAM). This simple modification can breathe new life into an aging system, significantly improving its performance, responsiveness, and overall user experience.
In a world where digital productivity, seamless online experiences, and efficient data handling are paramount, optimizing your existing technology is not just a smart tech move but also a savvy financial decision. This comprehensive guide will walk you through everything you need to know about upgrading your laptop’s RAM, from understanding its importance and identifying compatibility to a step-by-step installation process and post-upgrade verification. By the end of this article, you’ll be equipped with the knowledge and confidence to transform your laptop into a more capable and efficient powerhouse, aligning perfectly with the principles of effective tech management and wise financial investment in your digital assets.
Understanding RAM and Why Upgrade
Before we dive into the nitty-gritty of installation, it’s crucial to understand what RAM is, how it functions within your laptop, and why a sufficient amount is vital for a smooth computing experience. This section will demystify the core component and highlight the compelling reasons behind considering an upgrade.
What is RAM and How Does It Work?
RAM, or Random Access Memory, serves as your laptop’s short-term memory. Unlike your hard drive or Solid State Drive (SSD), which store data long-term, RAM is where your computer temporarily holds data that it needs to access quickly and frequently. Think of it as your laptop’s active workspace. When you open an application, load a web page, or edit a document, the data related to those tasks is loaded into RAM. The more RAM you have, the larger your laptop’s “workspace” becomes, allowing it to handle more tasks simultaneously and switch between them more rapidly without having to constantly fetch data from the slower long-term storage.
This dynamic interaction makes RAM a critical bottleneck for system performance. If your laptop runs out of available RAM, it resorts to using a portion of your much slower storage drive (known as virtual memory or a swap file) to temporarily store data. This process, called “swapping,” is significantly slower than accessing physical RAM, leading to noticeable slowdowns, stuttering, and an overall unresponsive feel.
Signs You Need More RAM
Recognizing the symptoms of insufficient RAM is the first step towards a potential upgrade. Here are some common indicators that your laptop might be craving more memory:
- Frequent Slowdowns and Freezes: Your laptop frequently lags or completely freezes, especially when you open multiple applications or browser tabs.
- Poor Multitasking Performance: Switching between different programs feels sluggish, or applications take a long time to load or respond.
- Browser Tabs Reloading: Web browsers often reload tabs when you switch back to them, indicating they were purged from memory to free up resources.
- Slow Gaming or Professional Software Performance: If you engage in gaming, video editing, graphic design, or other resource-intensive tasks, you might experience choppy frame rates, long rendering times, or application crashes.
- Disk Activity Spikes: You notice your hard drive activity light constantly blinking, even when you’re not actively saving files, suggesting heavy use of virtual memory.
The Benefits of a RAM Upgrade
Investing in a RAM upgrade offers a multitude of benefits that directly impact your productivity, enjoyment, and the longevity of your device:
- Improved Multitasking: Effortlessly run multiple applications, switch between browser tabs, and manage complex workflows without performance hitches. This is a game-changer for digital professionals and students alike.
- Faster Application Loading and Responsiveness: Programs launch quicker, and your operating system feels snappier and more fluid.
- Smoother Gaming and Creative Work: Experience better frame rates in games and more efficient rendering/processing times in demanding applications like Adobe Photoshop, Premiere Pro, or CAD software.
- Extended Laptop Lifespan: By boosting performance, you can postpone the need to purchase a new laptop, turning a relatively small investment into significant savings. This aligns with a smart money strategy by maximizing the return on your existing tech assets.
- Cost-Effective Performance Boost: Compared to upgrading a CPU or GPU, a RAM upgrade is often far more affordable and delivers a noticeable improvement in general system responsiveness for many users.
Preparing for Your RAM Upgrade
A successful RAM installation hinges on thorough preparation. This involves correctly identifying the right memory for your laptop and taking crucial safety measures to protect both yourself and your device. Skipping these steps can lead to compatibility issues or even damage your laptop.
Determining Your Laptop’s RAM Compatibility
This is arguably the most critical step. Not all RAM is created equal, and your laptop will only work with specific types. Here’s how to figure out what you need:
-
Identify Current RAM Specifications:
- Windows: Press
Ctrl+Shift+Escto open Task Manager. Go to the “Performance” tab, then click on “Memory.” You’ll see your current RAM capacity, speed (e.g., 2400 MHz), and form factor (SODIMM for laptops). You can also use the “System Information” app (search for it in the Start menu) under “System Summary” > “Memory.” - macOS: Click the Apple menu > “About This Mac.” The “Memory” tab will show you the total RAM, type, and speed. For more detailed slot information, click “Memory” in the System Report.
- Third-Party Tools: Software like CPU-Z (for Windows) provides extremely detailed information about your current RAM, including its type (DDR3, DDR4, DDR5), speed, and even timings.
- Manufacturer’s Website: Check your laptop’s specific model number on the manufacturer’s support website. This is often the most reliable source for maximum supported RAM capacity, the number of slots, and compatible memory types.
- Online Scanners: Websites like Crucial.com offer system scanners that automatically detect your laptop’s make and model and recommend compatible RAM modules.
- Windows: Press
-
Key Specifications to Note:
- RAM Type (DDR Generation): This is paramount. You cannot mix DDR3, DDR4, or DDR5 modules. They have different pin configurations and are not interchangeable. Most modern laptops use DDR4 or DDR5.
- Speed (MHz): RAM speed is measured in megahertz (MHz). It’s generally best to match the speed of your existing RAM or choose the highest speed supported by your laptop’s motherboard and CPU. If you mix speeds, all modules will typically run at the speed of the slowest module.
- Form Factor: For laptops, the standard form factor is SODIMM (Small Outline Dual In-line Memory Module), which is shorter than desktop DIMMs.
- Capacity: Determine how much RAM you want to add. If you have 4GB and want 16GB, you’ll likely need to replace your existing module(s) with higher capacity ones. Check your laptop’s maximum supported RAM.
- Number of Slots: Most laptops have two RAM slots, but some budget models may have only one, and ultra-thin models might have soldered RAM (meaning it cannot be upgraded).
Gathering Your Tools and Taking Precautions
Safety and organization are key to a smooth installation process.
-
Tools You’ll Need:
- Small Phillips Head Screwdriver: The most common tool required to open laptop panels. Ensure you have a small enough head to fit the screws.
- Plastic Prying Tool (Optional but Recommended): Also known as a “spudger,” this can help safely pry open plastic latches or panels without scratching the casing. Guitar picks can also work.
- Anti-static Wrist Strap or Mat: Crucial for preventing electrostatic discharge (ESD), which can permanently damage sensitive electronic components. If you don’t have one, frequently touch a grounded metal object (like a bare metal part of your computer’s casing after unplugging it) to discharge static electricity from your body.
- Clean, Well-Lit Workspace: A tidy area prevents losing tiny screws and provides good visibility.
-
Essential Precautions:
- Back Up Your Data: While a RAM upgrade is generally safe, it’s always wise to perform a full system backup before opening your laptop. This is a fundamental digital security and productivity best practice.
- Power Off and Unplug: Completely shut down your laptop, not just put it to sleep. Disconnect the power adapter and remove any peripherals (USB drives, external mouse, etc.).
- Remove the Battery (If Possible): For laptops with easily removable external batteries, take it out. For internal batteries, you will skip this step but ensure the laptop is fully powered down and unplugged.
- Ground Yourself: Wear an anti-static wrist strap connected to a grounded object, or regularly touch an unpainted metal object to discharge any static electricity from your body before touching internal components. Static electricity is an invisible enemy that can fry your laptop’s delicate electronics.
Step-by-Step RAM Installation Guide
With your preparation complete, it’s time to open your laptop and install the new RAM. Take your time, be gentle, and follow these steps carefully.

Accessing Your Laptop’s RAM Slots
This is often the trickiest part, as laptop designs vary significantly.
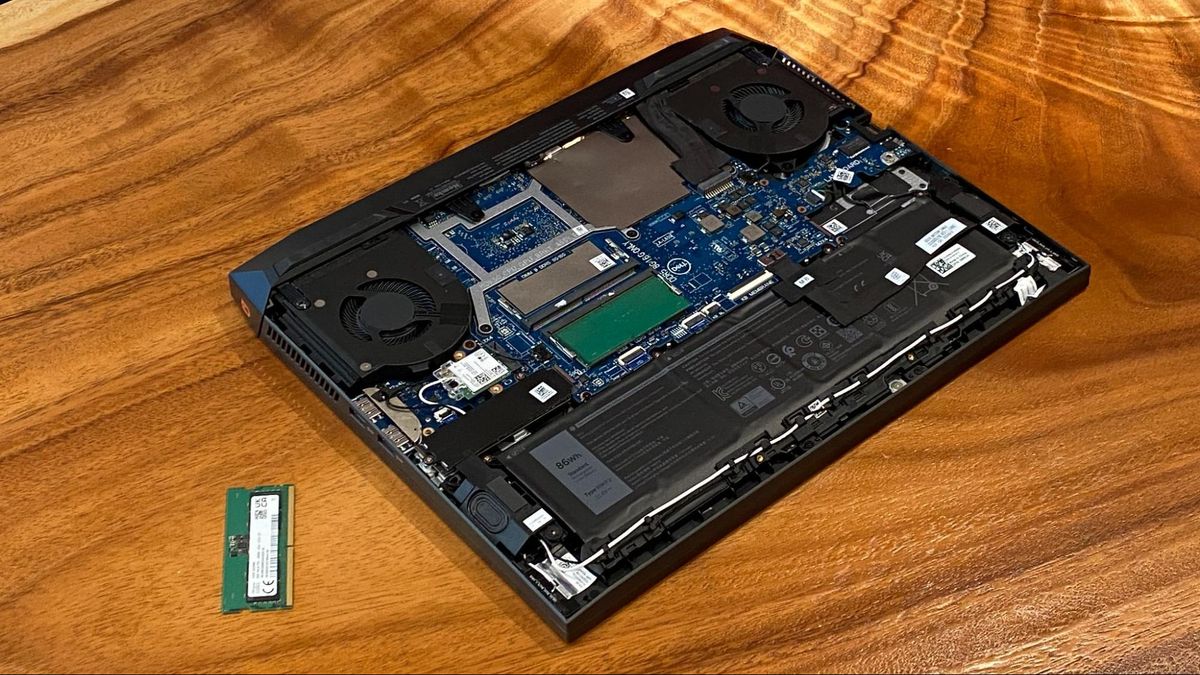
- Locate the Access Panel: Many laptops have a dedicated, smaller panel on the bottom secured by a few screws, specifically for accessing RAM or storage. Look for symbols resembling RAM sticks.
- Remove the Bottom Casing: For other laptops, especially ultrabooks or gaming models, you might need to remove the entire bottom panel of the laptop. This usually involves removing all visible screws on the bottom, and sometimes hidden screws under rubber feet or stickers.
- Carefully Open the Case: Once all screws are removed, use your plastic prying tool to gently separate the bottom panel from the rest of the chassis. Start at a corner or seam and work your way around, listening for gentle clicks as plastic clips release. Do not force it.
- Identify RAM Slots: Once the panel is off, locate the RAM slots. They are typically horizontal sockets with small metal clips on either side, often covered by a black protective film or heatsink sticker. Remove any film if present.
Removing Old RAM (If Applicable)
If you’re replacing existing RAM modules rather than just adding new ones, you’ll need to remove them first.
- Release the Clips: The RAM module is held in place by two small metal or plastic clips on either end of the slot. Gently push these clips outwards simultaneously.
- Module Pops Up: Once released, the RAM module will slightly pop up at about a 45-degree angle.
- Gently Pull Out: Hold the module by its edges (avoid touching the gold contacts) and gently pull it straight out from the slot.
- Store Safely: Place the old RAM in an anti-static bag or a safe, clean place if you plan to keep, sell, or reuse it.
Installing the New RAM Modules
This is where your new memory finds its home.
- Align the Notch: Take your new RAM module. You’ll notice an offset notch on the gold contacts. This notch must align perfectly with the raised key in the RAM slot. This ensures you insert it correctly and prevents installing an incompatible module.
- Insert at an Angle: Holding the module by its edges, insert it into the slot at a 45-degree angle, pushing gently but firmly until the gold contacts are almost fully seated and only the clips are preventing it from going further.
- Push Down to Secure: With the module properly inserted at an angle, gently push down on both sides of the module until the metal clips on either side of the slot snap into place, securing the module horizontally and flush with the motherboard. You should hear a soft click.
- Verify: Double-check that the clips are fully engaged and the module is firmly seated and horizontal. Give it a gentle wiggle to ensure it’s not loose.
- Repeat (If Adding More): If you have a second RAM module to install, repeat the process for the second slot.
Reassembling Your Laptop
Once the new RAM is securely in place, it’s time to close up your laptop.
- Replace Panels: Carefully align the bottom access panel or the entire bottom casing with the laptop’s chassis. Ensure all clips align.
- Press Gently: Gently press around the edges of the panel until you hear or feel the plastic clips snap back into place.
- Secure Screws: Reinsert all the screws you removed earlier. Do not overtighten them, as this can strip the screw threads or crack the plastic.
- Reinsert Battery and Peripherals: If you removed an external battery, put it back in. Reconnect your power adapter and any peripherals.
Post-Installation and Troubleshooting
You’ve done the hard work, but the process isn’t complete until you verify the new RAM is recognized and address any potential issues.
Verifying Your New RAM
After reassembly, the moment of truth arrives.
- Power On: Press the power button. If the laptop boots normally, that’s a great sign.
- Check BIOS/UEFI: As your laptop starts, repeatedly press the key to enter your BIOS/UEFI settings (commonly F2, F10, F12, DEL, or ESC, depending on the manufacturer). Look for a “System Information” or “Memory” section, which should display the total installed RAM.
- Verify in Operating System:
- Windows: Once logged in, press
Ctrl+Shift+Escto open Task Manager. Go to the “Performance” tab and click “Memory.” The total installed RAM should reflect your upgrade. You can also right-click “This PC” (or “My Computer”), select “Properties,” and check the “Installed RAM” value. - macOS: Click the Apple menu > “About This Mac.” The overview tab will show the total installed memory.
- Windows: Once logged in, press
- Run Memory Diagnostic Tools (Optional but Recommended): For absolute peace of mind, you can run a memory diagnostic. Windows has a built-in “Windows Memory Diagnostic” tool (search for it in the Start menu). This will check for any errors in your new RAM, which is crucial for long-term system stability and data integrity.
Common Issues and Solutions
Even with careful preparation, sometimes things don’t go perfectly. Here are some common problems and their fixes:
- Laptop Not Booting (Black Screen/No Display):
- Solution: This is usually a sign that RAM isn’t seated correctly. Power off, unplug, open the laptop, and carefully reseat each RAM module. Ensure the clips are fully engaged. Try booting with only one new RAM stick at a time to isolate a potentially faulty module.
- RAM Not Fully Recognized or Incorrect Amount Shown:
- Solution: First, re-verify physical installation. Then, check your BIOS/UEFI settings – some systems require enabling new memory or might have specific memory settings. Ensure the RAM is fully compatible (correct DDR generation, speed, and maximum capacity supported by your motherboard). If your laptop has two slots, ensure both are populated correctly if you expect dual-channel performance.
- System Instability or Blue Screens of Death (BSODs):
- Solution: This could indicate a faulty RAM module or an incompatibility. Run the Windows Memory Diagnostic tool or a third-party memory tester (like MemTest86). If errors are found, try replacing the problematic module. Ensure your new RAM’s speed and timings are compatible with your system.
When a RAM Upgrade Isn’t Enough
While a RAM upgrade is fantastic for multitasking and general responsiveness, it’s important to understand its limitations. If your laptop still feels slow after a RAM upgrade, other components might be the bottleneck:
- Slow Storage: If your laptop still uses a traditional Hard Disk Drive (HDD), upgrading to an SSD (Solid State Drive) is often the single most impactful upgrade for overall speed and responsiveness. This can be even more transformative than a RAM upgrade for many daily tasks, especially for boot times and application loading.
- Aging CPU: A very old or low-power CPU might struggle with modern software, regardless of how much RAM you have. The CPU is responsible for processing instructions; if it’s too slow, the system will still bottleneck.
- Integrated Graphics: For serious gaming, video editing, or 3D rendering, a dedicated graphics card (GPU) is essential. A RAM upgrade won’t significantly boost graphics performance if you’re relying solely on integrated graphics.
In such cases, you might need to consider other upgrades like an SSD or, eventually, invest in a new laptop. Understanding these limitations is part of making informed tech and financial decisions about your hardware investments.

Conclusion
Upgrading your laptop’s RAM is a powerful and accessible way to significantly enhance its performance, extend its lifespan, and improve your overall digital experience. From smoother multitasking and faster application loading to better handling of demanding software, the benefits are immediate and tangible. By carefully following the steps outlined in this guide – from meticulous preparation and compatibility checks to the physical installation and post-upgrade verification – you can confidently breathe new life into your machine.
This DIY upgrade is not just about technical skill; it’s a testament to smart tech management and a savvy financial choice. Instead of prematurely replacing a perfectly capable device, you leverage a cost-effective solution to boost productivity and enjoyment, maximizing your return on investment in your existing technology. So, if your laptop has been struggling, don’t despair. Equip yourself with the right knowledge, a few simple tools, and the confidence to perform a RAM upgrade. You’ll be amazed at the renewed vigor and efficiency your laptop will deliver, keeping you at the forefront of productivity and technological capability.
aViewFromTheCave is a participant in the Amazon Services LLC Associates Program, an affiliate advertising program designed to provide a means for sites to earn advertising fees by advertising and linking to Amazon.com. Amazon, the Amazon logo, AmazonSupply, and the AmazonSupply logo are trademarks of Amazon.com, Inc. or its affiliates. As an Amazon Associate we earn affiliate commissions from qualifying purchases.